


时隔一年,又要准备做Android的开发了,最近复习和整理一下Android的知识。 这次要说的是AlertDialog,这种对话框会经常遇到。AlertDialog跟WIN32开发中的Dialog不一样,AlertDialog是非阻塞的,而阻塞的对话框用的是PopupWindow。
main.xml的源码:
- <? xml version = "1.0" encoding = "utf-8" ?>
- < LinearLayout xmlns:android = "http://schemas.android.com/apk/res/android"
- android:orientation = "vertical"
- android:layout_width = "fill_parent"
- android:layout_height = "fill_parent"
- >
- < Button android:id = "@+id/Button01" android:layout_height = "wrap_content" android:text = "非Layout型对话框" android:layout_width = "fill_parent" > </ Button >
- < Button android:id = "@+id/Button02" android:layout_height = "wrap_content" android:text = "Layout型对话框" android:layout_width = "fill_parent" > </ Button > < View android:id = "@+id/View01" android:layout_width = "wrap_content" android:layout_height = "wrap_content" > </ View >
- </ LinearLayout >
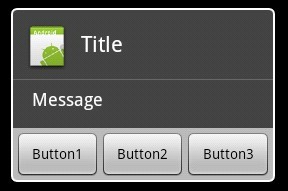
下图是非Layout型对话框,直接使用AlertDialog
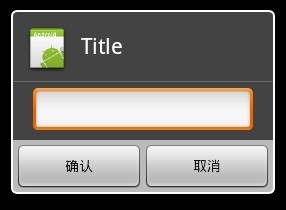
下图是使用了Layout的对话框,可以自定义控件,实现更复杂的对话框
dialoglayout.xml的源码:
- <? xml version = "1.0" encoding = "utf-8" ?>
- < LinearLayout xmlns:android = "http://schemas.android.com/apk/res/android"
- android:layout_width = "fill_parent" android:layout_height = "wrap_content"
- android:orientation = "vertical" >
- < EditText android:layout_height = "wrap_content"
- android:layout_width = "fill_parent" android:layout_marginLeft = "20dip"
- android:layout_marginRight = "20dip" android:textAppearance = "?android:attr/textAppearanceMedium" android:id = "@+id/edtInput" />
- </ LinearLayout >
程序源码:
- package com.testAlertDialog;
- import android.app.Activity;
- import android.app.AlertDialog;
- import android.content.Context;
- import android.content.DialogInterface;
- import android.os.Bundle;
- import android.view.Gravity;
- import android.view.LayoutInflater;
- import android.view.View;
- import android.view.View.OnClickListener;
- import android.widget.Button;
- import android.widget.EditText;
- import android.widget.PopupWindow;
- public class testAlertDialog extends Activity {
- Button btnShowDialog;
- Button btnShowDialog_Layout;
- /** Called when the activity is first created. */
- @Override
- public void onCreate(Bundle savedInstanceState) {
- super .onCreate(savedInstanceState);
- setContentView(R.layout.main);
- //定义按钮
- btnShowDialog=(Button)this .findViewById(R.id.Button01);
- btnShowDialog.setOnClickListener(new ClickEvent());
- btnShowDialog_Layout=(Button)this .findViewById(R.id.Button02);
- btnShowDialog_Layout.setOnClickListener(new ClickEvent());
- }
- //统一处理按键事件
- class ClickEvent implements OnClickListener{
- @Override
- public void onClick(View v) {
- // TODO Auto-generated method stub
- if (v==btnShowDialog)
- showDialog(testAlertDialog.this );
- else if (v==btnShowDialog_Layout)
- showDialog_Layout(testAlertDialog.this );
- }
- }
- //显示基本的AlertDialog
- private void showDialog(Context context) {
- AlertDialog.Builder builder = new AlertDialog.Builder(context);
- builder.setIcon(R.drawable.icon);
- builder.setTitle("Title" );
- builder.setMessage("Message" );
- builder.setPositiveButton("Button1" ,
- new DialogInterface.OnClickListener() {
- public void onClick(DialogInterface dialog, int whichButton) {
- setTitle("点击了对话框上的Button1" );
- }
- });
- builder.setNeutralButton("Button2" ,
- new DialogInterface.OnClickListener() {
- public void onClick(DialogInterface dialog, int whichButton) {
- setTitle("点击了对话框上的Button2" );
- }
- });
- builder.setNegativeButton("Button3" ,
- new DialogInterface.OnClickListener() {
- public void onClick(DialogInterface dialog, int whichButton) {
- setTitle("点击了对话框上的Button3" );
- }
- });
- builder.show();
- }
- //显示基于Layout的AlertDialog
- private void showDialog_Layout(Context context) {
- LayoutInflater inflater = LayoutInflater.from(this );
- final View textEntryView = inflater.inflate(
- R.layout.dialoglayout, null );
- final EditText edtInput=(EditText)textEntryView.findViewById(R.id.edtInput);
- final AlertDialog.Builder builder = new AlertDialog.Builder(context);
- builder.setCancelable(false );
- builder.setIcon(R.drawable.icon);
- builder.setTitle("Title" );
- builder.setView(textEntryView);
- builder.setPositiveButton("确认" ,
- new DialogInterface.OnClickListener() {
- public void onClick(DialogInterface dialog, int whichButton) {
- setTitle(edtInput.getText());
- }
- });
- builder.setNegativeButton("取消" ,
- new DialogInterface.OnClickListener() {
- public void onClick(DialogInterface dialog, int whichButton) {
- setTitle("" );
- }
- });
- builder.show();
- }
- }


 252
252

 被折叠的 条评论
为什么被折叠?
被折叠的 条评论
为什么被折叠?
 到【灌水乐园】发言


