


function StorePage(){d=document;t=d.selection?(d.selection.type!='None'?d.selection.createRange().text:''):(d.getSelection?d.getSelection():'');void(keyit=window.open('http://www.365key.com/storeit.aspx?t='+escape(d.title)+'&u='+escape(d.location.href)+'&c='+escape(t),'keyit','scrollbars=no,width=475,height=575,left=75,top=20,status=no,resizable=yes'));keyit.focus();}
本文来自:http://blog.csdn.net/hellogv/ ,转载必须注明出处!
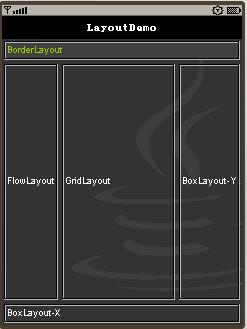 BorderLayout,就是把窗体布局分成东、南、西、北、中这5部分
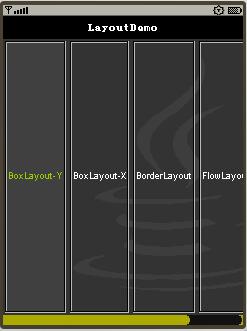 //BoxLayout-X,就是把控件从左往右排列
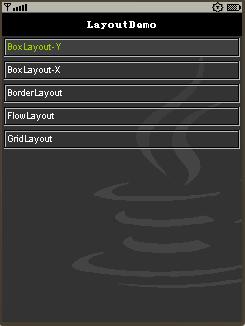 //BoxLayout-Y,就是把控件从上往下排列
 //FlowLayout,就是把控件按行排列,一行装不下则放到第二行......
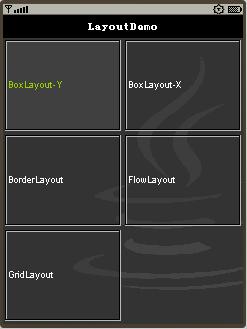 //GridLayout,这就是实现九宫图的排列方式!!!!!
LWUIT要求使用Form和任何控件,都要设置窗体布局。OK,现在回顾一下以前所实现的九宫图,其原理是这样:九宫图本质就是九个按钮按照 GridLayout排列,并且按钮附带图标,而且按钮获得焦点(按钮切换)时,会显示特效。
用过J2SE GUI的朋友,应该对这些不陌生,没接触过J2SE GUI的朋友也许需要一点时间消化一下。
OK,以下代码同样修改自Sample例子里面的,多余的话就不说了:
BorderLayout,就是把窗体布局分成东、南、西、北、中这5部分//BoxLayout-X,就是把控件从左往右排列//BoxLayout-Y,就是把控件从上往下排列//FlowLayout,就是把控件按行排列,一行装不下则放到第二行......//GridLayout,这就是实现九宫图的排列方式!!!!!LWUIT要求使用Form和任何控件,都要设置窗体布局。OK,现在回顾一下以前所实现的九宫图,其原理是这样:九宫图本质就是九个按钮按照 GridLayout排列,并且按钮附带图标,而且按钮获得焦点(按钮切换)时,会显示特效。
用过J2SE GUI的朋友,应该对这些不陌生,没接触过J2SE GUI的朋友也许需要一点时间消化一下。
OK,以下代码同样修改自Sample例子里面的,多余的话就不说了:
- /*
- *Copyright?2008SunMicrosystems,Inc.Allrightsreserved.
- *Useissubjecttolicenseterms.
- *
- */
- packagecom.sun.lwuit.uidemo;
- importcom.sun.lwuit.Button;
- importcom.sun.lwuit.Form;
- importcom.sun.lwuit.events.ActionEvent;
- importcom.sun.lwuit.events.ActionListener;
- importcom.sun.lwuit.layouts.BorderLayout;
- importcom.sun.lwuit.layouts.BoxLayout;
- importcom.sun.lwuit.layouts.FlowLayout;
- importcom.sun.lwuit.layouts.GridLayout;
- /**
- *本例演示如何布局窗体控件
- */
- publicclassLayoutDemoimplementsActionListener{
- publicFormform=newForm("LayoutDemo");
- privateButtonborder;
- privateButtonboxY;
- privateButtonboxX;
- privateButtonflow;
- privateButtongrid;
- LayoutDemo(){
- form.setLayout(newBoxLayout(BoxLayout.Y_AXIS));
- //BorderLayout,就是把窗体布局分成东、南、西、北、中这5部分
- border=newButton("BorderLayout");
- //顾名思义,设置按钮背景的透明度,范围0~255,可以用Util的资源编辑器来预先修改
- border.getStyle().setBgTransparency(100);
- //每个button都需要设计监听事件
- border.addActionListener(this);
- //BoxLayout-Y,就是把控件从上往下排列
- boxY=newButton("BoxLayout-Y");
- boxY.getStyle().setBgTransparency(100);
- boxY.addActionListener(this);
- //BoxLayout-X,就是把控件从左往右排列
- boxX=newButton("BoxLayout-X");
- boxX.getStyle().setBgTransparency(100);
- boxX.addActionListener(this);
- //FlowLayout,就是把控件按行排列,一行装不下则放到第二行......
- flow=newButton("FlowLayout");
- flow.getStyle().setBgTransparency(100);
- flow.addActionListener(this);
- //GridLayout,这就是实现九宫图的排列方式!!!!!
- grid=newButton("GridLayout");
- grid.getStyle().setBgTransparency(100);
- grid.addActionListener(this);
- addComponents(form);
- form.show();
- }
- privatevoidaddComponents(finalFormf){
- f.removeAll();
- f.addComponent(boxY);
- f.addComponent(boxX);
- f.addComponent(border);
- f.addComponent(flow);
- f.addComponent(grid);
- }
- publicvoidactionPerformed(ActionEventarg0){
- Stringbutton_name=((Button)(arg0.getSource())).getText();
- if(button_name.equals("BorderLayout"))
- {
- form.setLayout(newBorderLayout());
- form.removeAll();
- form.setScrollable(false);
- form.addComponent(BorderLayout.NORTH,border);
- form.addComponent(BorderLayout.EAST,boxY);
- form.addComponent(BorderLayout.CENTER,grid);
- form.addComponent(BorderLayout.WEST,flow);
- form.addComponent(BorderLayout.SOUTH,boxX);
- form.show();
- }
- elseif(button_name.equals("BoxLayout-Y"))
- {
- form.setLayout(newBoxLayout(BoxLayout.Y_AXIS));
- form.setScrollable(false);
- addComponents(form);
- form.show();
- }
- elseif(button_name.equals("FlowLayout"))
- {
- form.setLayout(newFlowLayout());
- form.setScrollable(false);
- addComponents(form);
- form.show();
- }
- elseif(button_name.equals("GridLayout"))
- {
- form.setLayout(newGridLayout(3,2));
- form.setScrollable(false);
- addComponents(form);
- form.show();
- }
- elseif(button_name.equals("BoxLayout-X"))
- {
- form.setLayout(newBoxLayout(BoxLayout.X_AXIS));
- form.setScrollable(true);
- addComponents(form);
- form.show();
- }
- }
- }


 6620
6620

 被折叠的 条评论
为什么被折叠?
被折叠的 条评论
为什么被折叠?
 到【灌水乐园】发言


