


前面我们分析了netty内存池、线程模型,比较难的两个点已经被一一消化,接下来我们开始进入大家最关心的环节,总体流程分析。 这里我选了io.netty.example.http.snoop来作为分析的入口,分别从server端、client端的维度来看看netty是如果设计的。这里你将了解比较详细的netty处理流程,让你在今后的应用中不再感到疑惑 。 如果还有不清楚的地方,可以直接交流,通过交流发现问题,并不断完善这系列文章。 本文假设你对netty已有大致了解,需要更深入的了解它的运作流程。如果是初学者,可能会发现头晕、眼花、脑抽经等症状。
配置篇
首先看看snoop包的server端启动代码。 在netty中,不管是server还是client,都是由引导类进行启动。在启动之前需要先做好各种参数的配置。可以配置的参数如下:
| 字段 | 类型 | 说明 | server模式 | client模式 |
| options | Map | channel的配置项 | 作用于ServerChannel | |
| childOptions | Map | channel的配置项 | 作用于Channel | |
| attrs | Map | 自定义的channel属性 | 作用于ServerChannel | 作用于Channel |
| childAttrs | Map | 自定义的channel属性 | 作用于Channel | |
| handler | ChannelHandler | 连接处理器 | 作用于ServerChannel | 作用于Channel |
| childHandler | ChannelHandler | 连接处理器 | 作用于Channel | |
| group | EventLoopGroup | 注册并处理连接 | 作用于ServerChannel | 作用于Channel |
| childGroup | EventLoopGroup | 注册并处理连接 | 作用于Channel | |
| channelFactory | ChannelFactory | 生成连接对象的工厂类 | 生成ServerChannel | 生成Channel |
除了channelFactory所有的字段都分成了xxx和childxxx两个相对应的字段,名称上能很容易的分出来字段的作用范围。 如我们希望设置SO_REUSEADDR参数,该参数作用于ServerSocket,则设置时调用option(ChannelOption.SO_REUSEADDR, true)。对于Server端来说,比较常见的几个设置:SO_KEEPALIVE、SO_REUSEADDR、TCP_NODELAY、SO_BACKLOG。
我们知道netty采用了reactor的设计模式,其中mainReactor主要负责连接的建立,连接建立后交由subReactor处理,而subReactor则主要负责处理读写等具体的事件。这里mainReactor的实际执行者是bossGroup,而subReactor的实际执行者则是workerGroup。 下面是HttpSnoopServer类中main方法的主要代码(去掉了一部分)
        EventLoopGroup bossGroup = new NioEventLoopGroup(1);
        EventLoopGroup workerGroup = new NioEventLoopGroup();
        try {
            ServerBootstrap b = new ServerBootstrap();
            b.group(bossGroup, workerGroup)
             .channel(NioServerSocketChannel.class)
             .handler(new LoggingHandler(LogLevel.INFO))
             .childHandler(new HttpSnoopServerInitializer(sslCtx));

            Channel ch = b.bind(PORT).sync().channel();
            ch.closeFuture().sync();
        } finally {
            bossGroup.shutdownGracefully();
            workerGroup.shutdownGracefully();
        }
这里bossGroup只启用了一个线程,因为一个端口只能创建一个ServerChannel,该ServerChannel的整个生命周期都在bossGroup中。如果你想用同一个ServerBootstrap启动多个端口,则bossGroup的大小需要根据启动的端口数调整。handler设置为LogginHandler,表示在ServerChannel的处理链中加入了日志记录(这个与客户端连接无关,即它只记录ServerChannel的注册、注销、关闭等,而不会记录客户端连接的相应事件。之前有同学加了LoggingHandler而没看到客户端的相应日志,就是这样了。需要的话要在childHandler的Initializer中加入LoggingHandler)。 childHandler设置为HttpSnoopServerInitializer,即用户连接使用HttpSnoopServerInitializer进行处理。
初始化完成开始调用bind(port)方法,bind首先会对各个参数进行验证,如channelFactory是否设置,group、childGroup是否设置,端口是否设置等,验证通过后,最终调用doBind方法(AbstractBootstrap中)。
    private ChannelFuture doBind(final SocketAddress localAddress) {
        // 初始化并注册Channel(此时是ServerChannel)
       final ChannelFuture regFuture = initAndRegister();
        final Channel channel = regFuture.channel();
        // 如果注册出错则直接返回
        if (regFuture.cause() != null) {
            return regFuture;
        }

        // 注册完成调用doBind0,否则添加一个注册事件的监听器,该监听器在监听到注册完成后也会触发doBind0操作
        if (regFuture.isDone()) {
            // At this point we know that the registration was complete and successful.
            ChannelPromise promise = channel.newPromise();
            doBind0(regFuture, channel, localAddress, promise);
            return promise;
        } else {
            // 一般来说都会是进入isDone,这里是以防万一
            final PendingRegistrationPromise promise = new PendingRegistrationPromise(channel);
            regFuture.addListener(new ChannelFutureListener() {
                @Override
                public void operationComplete(ChannelFuture future) throws Exception {
                    Throwable cause = future.cause();
                    if (cause != null) {
                        promise.setFailure(cause);
                    } else {
                        promise.executor = channel.eventLoop();
                    }
                    doBind0(regFuture, channel, localAddress, promise);
                }
            });
            return promise;
        }
    }
doBind首先会调用initAndRegister方法,来看看这个方法做了什么:
    final ChannelFuture initAndRegister() {
        final Channel channel = channelFactory().newChannel();
        try {
            init(channel);
        } catch (Throwable t) {
            channel.unsafe().closeForcibly();
            // 此时连接还未注册到EventLoopGroup,因此使用GlobalEventExecutor
            return new DefaultChannelPromise(channel, GlobalEventExecutor.INSTANCE).setFailure(t);
        }

        // 将连接注册到group中
        ChannelFuture regFuture = group().register(channel);
        if (regFuture.cause() != null) {
            if (channel.isRegistered()) {
                channel.close();
            } else {
                channel.unsafe().closeForcibly();
            }
        }

       return regFuture;
    }
channelFactory().newChannel()方法创建了一个NioServerSocketChannel实例,该实例初始化时由SelectorProvider.provider().openServerSocketChannel()来打开一个ServerSocketChannel,同时会调用configureBlocking(false)将其IO模式设置为非阻塞。
    private static final SelectorProvider DEFAULT_SELECTOR_PROVIDER = SelectorProvider.provider();
    private static ServerSocketChannel newSocket(SelectorProvider provider) {
        try {
            // 打开一个ServerSocketChannel
            return provider.openServerSocketChannel();
        } catch (IOException e) {
            throw new ChannelException(
                    "Failed to open a server socket.", e);
        }
    }

    public NioServerSocketChannel() {
 this(newSocket(DEFAULT_SELECTOR_PROVIDER));
 }

    public NioServerSocketChannel(ServerSocketChannel channel) {
        // 只对OP_ACCEPT事件感兴趣
 super(null, channel, SelectionKey.OP_ACCEPT);
        // 初始化连接对应的配置
 config = new NioServerSocketChannelConfig(this, javaChannel().socket());
 }

    protected AbstractNioChannel(Channel parent, SelectableChannel ch, int readInterestOp) {
 super(parent);
 this.ch = ch;
 this.readInterestOp = readInterestOp;
 try {
            // 将ServerSocketChannel设置为非阻塞模式
 ch.configureBlocking(false);
 } catch (IOException e) {
 try {
 ch.close();
 } catch (IOException e2) {
 if (logger.isWarnEnabled()) {
 logger.warn(
 "Failed to close a partially initialized socket.", e2);
 }
 }

 throw new ChannelException("Failed to enter non-blocking mode.", e);
 }
 }

    protected AbstractChannel(Channel parent) {
 this.parent = parent;
        // 非配id,该id全局唯一
 id = DefaultChannelId.newInstance();
        // 初始化Unsafe, Server生成的Unsafe类为NioMessageUnsafe,Unsafe属于较底层的操作,不对应用开放
        // 它处理的各种操作:register、bind、connect、disconnect、close、deregister,beginRead、write、flush
 unsafe = newUnsafe();
        // 创建pipeline
 pipeline = new DefaultChannelPipeline(this);
 }
完成后调用init进行对该ServerSocketChannel进行其他部分的初始化,init方法主要是:1、设置option;2、设置attr;3、如果设置了handler,将handler加入到处理链中(本例中加入LoggingHandler)。最后会加入一个ChannelInitializer,该ChannelInitializer主要功能是获取客户端连接后对连接进行初始化(具体如何初始化稍后再讲)。从下面代码可以看到,所有option/childOption之类的字段最终都会生成一份copy的数据,也就是该引导类可以继续使用(但是不能多个线程同时调用),用于引导其他端口的启动。
    void init(Channel channel) throws Exception {
        final Map<ChannelOption<?>, Object> options = options();
        synchronized (options) {
            channel.config().setOptions(options);
        }

        final Map<AttributeKey<?>, Object> attrs = attrs();
        synchronized (attrs) {
            for (Entry<AttributeKey<?>, Object> e: attrs.entrySet()) {
                @SuppressWarnings("unchecked")
                AttributeKey<Object> key = (AttributeKey<Object>) e.getKey();
                channel.attr(key).set(e.getValue());
            }
        }

        ChannelPipeline p = channel.pipeline();
        if (handler() != null) {
            p.addLast(handler());
        }

        final EventLoopGroup currentChildGroup = childGroup;
        final ChannelHandler currentChildHandler = childHandler;
        final Entry<ChannelOption<?>, Object>[] currentChildOptions;
        final Entry<AttributeKey<?>, Object>[] currentChildAttrs;
        synchronized (childOptions) {
            currentChildOptions = childOptions.entrySet().toArray(newOptionArray(childOptions.size()));
        }
        synchronized (childAttrs) {
            currentChildAttrs = childAttrs.entrySet().toArray(newAttrArray(childAttrs.size()));
        }

        p.addLast(new ChannelInitializer<Channel>() {
            @Override
            public void initChannel(Channel ch) throws Exception {
                // 这里的ServerBootstrapAcceptor比较重要先记住
               ch.pipeline().addLast(new ServerBootstrapAcceptor(
                        currentChildGroup, currentChildHandler, currentChildOptions, currentChildAttrs));
            }
        });
    }
初始化完成后立即将ServerChannel注册到bossGroup中,注册的时候会进行哪些操作呢?如果你还记得之前的EventLoop源码分析,就是这一句了:channel.unsafe().register(this, promise); 这行代码最终会调用AbstractChannel.AbstractUnsafe.register(EventLoop eventLoop, final ChannelPromise promise)
方法:
        public final void register(EventLoop eventLoop, final ChannelPromise promise) {
            ...去掉非主要代码...

            // channel的eventLoop被PausableChannelEventLoop包装,这样设置isAcceptingNewTasks=false时,新任务将被拒绝。这在关闭channel的时候非常有用
            if (AbstractChannel.this.eventLoop == null) {
                AbstractChannel.this.eventLoop = new PausableChannelEventLoop(eventLoop);
            } else {
                AbstractChannel.this.eventLoop.unwrapped = eventLoop;
            }

            if (eventLoop.inEventLoop()) {
                register0(promise);
            } else {
                try {
                    eventLoop.execute(new OneTimeTask() {
                        @Override
                        public void run() {
                            register0(promise);
                        }
                    });
                } catch (Throwable t) {
                    logger.warn(
                            "Force-closing a channel whose registration task was not accepted by an event loop: {}",
                            AbstractChannel.this, t);
                    closeForcibly();
                    closeFuture.setClosed();
                    safeSetFailure(promise, t);
                }
            }
        }
上面的代码最重要的部分就是PausableChannelEventLoop的封装,接下来调用register0。
        private void register0(ChannelPromise promise) {
            try {
                // check if the channel is still open as it could be closed in the mean time when the register
                // call was outside of the eventLoop
                if (!promise.setUncancellable() || !ensureOpen(promise)) {
                    return;
                }
                boolean firstRegistration = neverRegistered;
                // 真正的注册方法
                doRegister();
                neverRegistered = false;
                registered = true;
                // 注册完成以后开启接受任务的开关
                eventLoop.acceptNewTasks();
                safeSetSuccess(promise);
                // 触发channelRegistered事件
                pipeline.fireChannelRegistered();
                // 只有从未注册的channel才会触发channelActive,避免连接注销并重新注册时多次触发channelActive。
                // 注意后面还会出现fireChannelActive方法的调用,正常的第一次启动应该是触发后面那个fireChannelActive而不是这个
                if (firstRegistration && isActive()) {
                    pipeline.fireChannelActive();
                }
            } catch (Throwable t) {
                // Close the channel directly to avoid FD leak.
                closeForcibly();
                closeFuture.setClosed();
                safeSetFailure(promise, t);
            }
        }
doRegister方法将调用sun.nio.ch.ServerSocketChannelImpl.register方法,该方法将ServerSocketChannel注册到Selector上,因为传入的ops=0,此时并不会有连接进来(到目前为止都还没有与实际的端口进行绑定)。
    protected void doRegister() throws Exception {
        boolean selected = false;
        for (;;) {
            try {
                selectionKey = javaChannel().register(((NioEventLoop) eventLoop().unwrap()).selector, 0, this);
                return;
            } catch (CancelledKeyException e) {
                if (!selected) {
                    // 如果发送异常则强制执行Selector.selectNow()方法使 "canceled"的SelectionKey从Selector中移除
                    ((NioEventLoop) eventLoop().unwrap()).selectNow();
                    selected = true;
                } else {
                    //JDK bug ?
                    throw e;
                }
            }
        }
    }
注册完成后调用pipeline.fireChannelRegistered(); 该方法最终会是pipeline的处理链进行链式处理,在本例中他会触发两个操作:1、LogginHandler中的channelRegistered;2、在ServerBootstrap.init(Channel)方法中的代码:
     p.addLast(new ChannelInitializer<Channel>() {
            @Override
            public void initChannel(Channel ch) throws Exception {
                // 触发这里执行
               ch.pipeline().addLast(new ServerBootstrapAcceptor(
                        currentChildGroup, currentChildHandler, currentChildOptions, currentChildAttrs));
            }
        });
ServerBootstrapAcceptor类主要作用是接收到客户端连接后,使用childOptions和childAttrs对连接初始化,然后将连接注册到childGroup中。ServerBootstrapAcceptor的channelRead方法如下:
    public void channelRead(ChannelHandlerContext ctx, Object msg) {
            final Channel child = (Channel) msg;

            child.pipeline().addLast(childHandler);

            for (Entry<ChannelOption<?>, Object> e: childOptions) {
                try {
                    if (!child.config().setOption((ChannelOption<Object>) e.getKey(), e.getValue())) {
                        logger.warn("Unknown channel option: " + e);
                    }
                } catch (Throwable t) {
                    logger.warn("Failed to set a channel option: " + child, t);
                }
            }

            for (Entry<AttributeKey<?>, Object> e: childAttrs) {
                child.attr((AttributeKey<Object>) e.getKey()).set(e.getValue());
            }

            try {
                childGroup.register(child).addListener(new ChannelFutureListener() {
                    @Override
                    public void operationComplete(ChannelFuture future) throws Exception {
                        if (!future.isSuccess()) {
                            forceClose(child, future.cause());
                        }
                    }
                });
            } catch (Throwable t) {
                forceClose(child, t);
            }
        }
回到主流程,如果是第一次启动触发channelActive方法,本例中主要触发LoggerHandler.channelActive。调用完成后回到AbstractBootstrap.doBind0()方法:
    private static void doBind0(
            final ChannelFuture regFuture, final Channel channel,
            final SocketAddress localAddress, final ChannelPromise promise) {
        channel.eventLoop().execute(new Runnable() {
            @Override
            public void run() {
                if (regFuture.isSuccess()) {
                    channel.bind(localAddress, promise).addListener(ChannelFutureListener.CLOSE_ON_FAILURE);
                } else {
                    promise.setFailure(regFuture.cause());
                }
            }
        });
    }
doBind0最终调用channel.bind方法对执行端口进行监听。需要注意的是,为了保证线程安全,channel的所有方法都需要到EventLoop中执行。channel.bind最终调用AbstractChannel.AbstractUnsafe.bind(final SocketAddress localAddress, final ChannelPromise promise):
        public final void bind(final SocketAddress localAddress, final ChannelPromise promise) {
            // ---这里去掉了部分代码---

            boolean wasActive = isActive();
            try {
                doBind(localAddress);
            } catch (Throwable t) {
                safeSetFailure(promise, t);
                closeIfClosed();
                return;
            }

            if (!wasActive && isActive()) {
                // 增加一个任务,该任务触发pipeline.fireChannelActive方法, 该方法将最终触发channel.read()
               invokeLater(new OneTimeTask() {
                    @Override
                    public void run() {
                        pipeline.fireChannelActive();
                    }
                });
            }

            safeSetSuccess(promise);
        }

        // 最终调用socket的bind方式进行绑定,注意backlog在windows下默认为200,其他系统默认128
        protected void doBind(SocketAddress localAddress) throws Exception {
     javaChannel().socket().bind(localAddress, config.getBacklog());
     }

        // 上面的channel.read()最终会触发AbstractNioChannel.doBeginRead()方法
        protected void doBeginRead() throws Exception {
     // Channel.read() or ChannelHandlerContext.read() was called
            if (inputShutdown) {
                return;
     }

     final SelectionKey selectionKey = this.selectionKey;

     if (!selectionKey.isValid()) {
     return;
     }

     readPending = true;

            // 注册readInterestOp,ServerSocket关注的op为OP_ACCEPT
     final int interestOps = selectionKey.interestOps();
     if ((interestOps & readInterestOp) == 0) {
     selectionKey.interestOps(interestOps | readInterestOp);
     }

     }
到这里启动的步骤已经完成,我们再来回顾一下整个启动过程:
1、应用设置启动所需的各个参数
2、应用调用bind(port)启动监听,bind过程如下
3、验证启动参数设置是否正确,调用doBind
4、doBind创建NioServerSocketChannel,并对其进行初始化,包括创建一个实际的ServerSocket,设置其为非阻塞模式,创建底层处理实例NioMessageUnsafe,创建pipeline
5、pipeline中加入一个ChannelInitializer,该ChannelInitializer往pipleline中加入ServerBootstrapAcceptor用于接收客户连接后设置其初始化参数,然后注册到childGroup处理
6、将NioServerSocketChannel注册到bossGroup,此时bossGroup被激活开始接收任务及IO事件。
7、往EventLoop中添加一个任务,该任务的内容为将之前创建的ServerSocket绑定到指定端口。
8、绑定端口后增加一个任务,该任务内容为注册NioServerSocketChannel关注的事件OP_ACCEPT到SelectKey中。到此,服务端可以接收到来自客户端的请求。
到此,ServerBootstrap的启动过程结束,服务端可以接收到客户端的连接请求。这里还有很多概念比较模糊,pipeline.addLast进行了什么操作,pipeline.channelXXX(如channelActive)是如何最终调用到channel的对应方法的。解开了这个问题,才能往下分析NioServerSocketChannel的请求接收、分发流程。ok, 下一篇文章就是对ChannelPipeline进行分析!
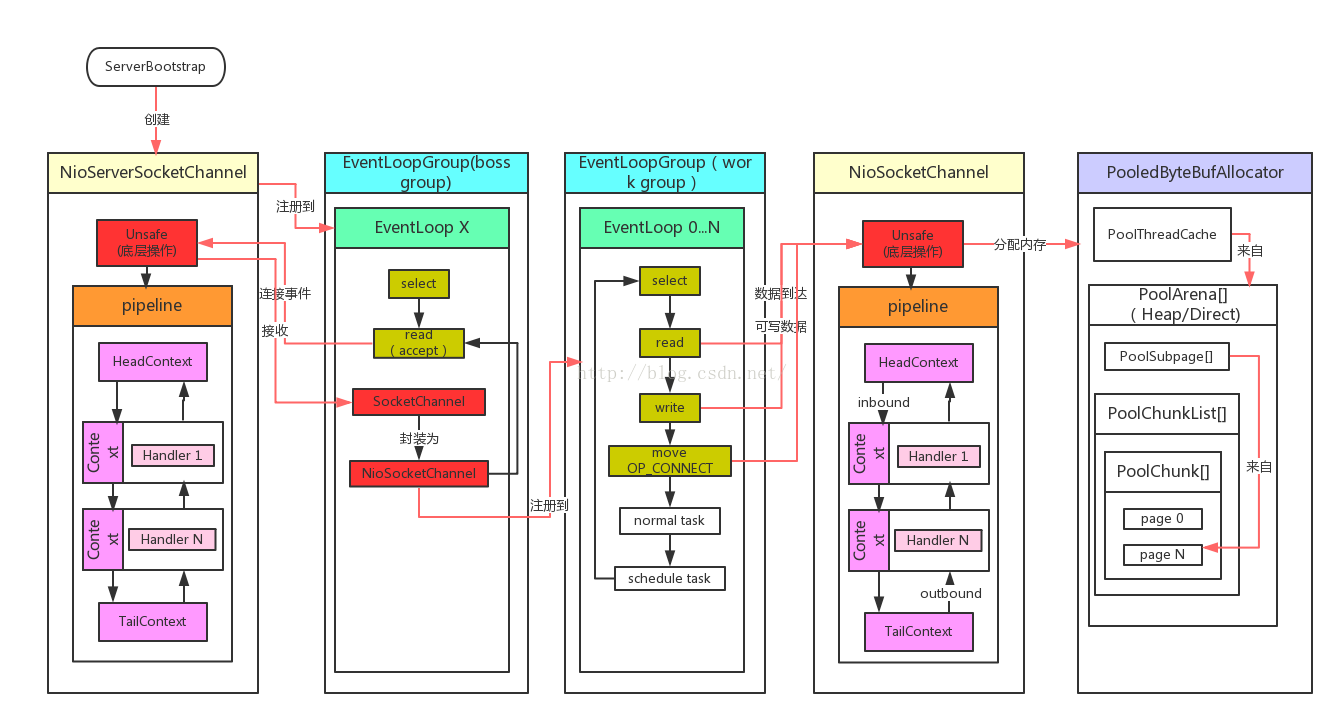
来一张图解解馋,netty本身还是很复杂的,该图进行了简化。


 1136
1136

 被折叠的 条评论
为什么被折叠?
被折叠的 条评论
为什么被折叠?
 到【灌水乐园】发言


