


背景:有时候我们需要对方法进行封装,通过对这些封装的方法进行调用,我们可以很好的处理一些事情。比如,记录日志,或者重复使用这些封装实现撤销功能。
意图:将一个请求封装为一个对象,从而使你可用不同的请求对客户进行参数化;对请求排队或记录请求日志,以及支持可撤消的操作。
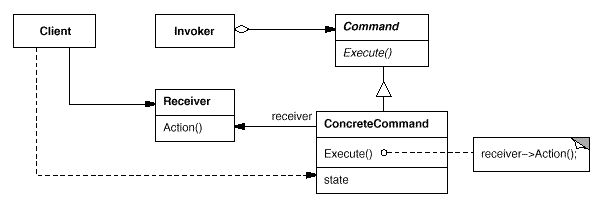
结构:
例子:这次我们将设计一个家电自动化遥控器的API
需求分析:
遥控器的图: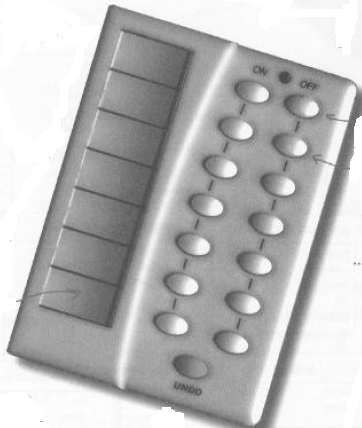
1)、遥控器上具有七个可编程的插槽、七个开关按钮和一个整体撤销按钮。
2)、通过创建一组API,使插槽可以控制一个或一组家电装置,这些装置指电灯、电风扇、热水器等。
3)、插槽还可以控制未来可能出现的家电装置。
4)、整体撤销按钮具有撤销上一个命令的功能。
初步思考:
1)、我们将设计一系列类,这些类都具有ON()和Off()方法。
2)、当遥控器上的on或off开关被按下时,某些类的on或off方法被调用,进而控制家电装置,但这些被调用的类是可以被改变的(因为插槽上的东西可以改变)。
3)、当on或off开关被按下时,如果我们通过if--else语句加以选择判断,那么第三点需求我们将难以满足。
4)撤销功能如何实现,上一个按钮是什么?针对的是哪一个装置?
进一步思考:
这次设计中不变的是遥控器(或者说是遥控器的按钮),变化的是家电装置,例如第一排开关可以控制电灯,也可以控制电风扇,或者未来可能出现的家电。所以我们需要对遥控器和家电装置进行解耦。此时我们想到了命令模式:遥控器(或者说遥控器上的按钮)就是命令的请求者,家电装置就是命令的执行者,我们所要做的就是将命令的请求者和命令的执行者解耦。
具体的过程:
1)、客户创建命令。
2)、客户将命令的执行者封装进命令对象里。
3)、命令的请求者调用命令。
4)、命令的执行者执行命令。
下面我们实现只有一组开关按钮的遥控器,类图如下:

首先实现的是命令接口:
public interface Command {
	public void execute();
	public void undo();
}
其次我们来实现关电风扇CeilingFanOffCommand的命令实现:
public class CeilingFanOffCommand implements Command {
	CeilingFan ceilingFan;
	int prevSpeed;

	public CeilingFanOffCommand(CeilingFan ceilingFan) {
		this.ceilingFan = ceilingFan;
	}

	public void execute() {
		prevSpeed = ceilingFan.getSpeed();
		ceilingFan.off();
	}

	public void undo() {
		if (prevSpeed == CeilingFan.HIGH) {
			ceilingFan.high();
		} else if (prevSpeed == CeilingFan.MEDIUM) {
			ceilingFan.medium();
		} else if (prevSpeed == CeilingFan.LOW) {
			ceilingFan.low();
		} else if (prevSpeed == CeilingFan.OFF) {
			ceilingFan.off();
		}
	}
}
这边需要注意的它的构造函数,我们将命令的执行者通过构造函数弄进来,我们可以将命令的实际执行将命令请求解耦,这样我们就不用去判断这个是if-else判断是什么命令去执行什么样的函数,非常方便的解耦。
我们再实现一个高速风扇的命令:
package headfirst.command.undo;

public class CeilingFanHighCommand implements Command {
	CeilingFan ceilingFan;
	int prevSpeed;

	public CeilingFanHighCommand(CeilingFan ceilingFan) {
		this.ceilingFan = ceilingFan;
	}

	public void execute() {
		prevSpeed = ceilingFan.getSpeed();
		ceilingFan.high();
	}

	public void undo() {
		if (prevSpeed == CeilingFan.HIGH) {
			ceilingFan.high();
		} else if (prevSpeed == CeilingFan.MEDIUM) {
			ceilingFan.medium();
		} else if (prevSpeed == CeilingFan.LOW) {
			ceilingFan.low();
		} else if (prevSpeed == CeilingFan.OFF) {
			ceilingFan.off();
		}
	}
}
接着我们来看命令的请求者如何将执行命令:
public class RemoteControlWithUndo {
	Command[] onCommands;
	Command[] offCommands;
	Command undoCommand;

	public RemoteControlWithUndo() {
		onCommands = new Command[7];
		offCommands = new Command[7];

		Command noCommand = new NoCommand();
		for(int i=0;i<7;i++) {
			onCommands[i] = noCommand;
			offCommands[i] = noCommand;
		}
		undoCommand = noCommand;
	}

	public void setCommand(int slot, Command onCommand, Command offCommand) {
		onCommands[slot] = onCommand;
		offCommands[slot] = offCommand;
	}

	public void onButtonWasPushed(int slot) {
		onCommands[slot].execute();
		undoCommand = onCommands[slot];
	}

	public void offButtonWasPushed(int slot) {
		offCommands[slot].execute();
		undoCommand = offCommands[slot];
	}

	public void undoButtonWasPushed() {
		undoCommand.undo();
	}

	public String toString() {
		StringBuffer stringBuff = new StringBuffer();
		stringBuff.append("\n------ Remote Control -------\n");
		for (int i = 0; i < onCommands.length; i++) {
			stringBuff.append("[slot " + i + "] " + onCommands[i].getClass().getName()
				+ "    " + offCommands[i].getClass().getName() + "\n");
		}
		stringBuff.append("[undo] " + undoCommand.getClass().getName() + "\n");
		return stringBuff.toString();
	}
}
最后我们来看一下客户的代码:
package headfirst.command.undo;

public class RemoteLoader {

	public static void main(String[] args) {
		RemoteControlWithUndo remoteControl = new RemoteControlWithUndo();

		Light livingRoomLight = new Light("Living Room");

		LightOnCommand livingRoomLightOn =
				new LightOnCommand(livingRoomLight);
		LightOffCommand livingRoomLightOff =
				new LightOffCommand(livingRoomLight);

		remoteControl.setCommand(0, livingRoomLightOn, livingRoomLightOff);

		remoteControl.onButtonWasPushed(0);
		remoteControl.offButtonWasPushed(0);
		System.out.println(remoteControl);
		remoteControl.undoButtonWasPushed();
		remoteControl.offButtonWasPushed(0);
		remoteControl.onButtonWasPushed(0);
		System.out.println(remoteControl);
		remoteControl.undoButtonWasPushed();

		CeilingFan ceilingFan = new CeilingFan("Living Room");

		CeilingFanMediumCommand ceilingFanMedium =
				new CeilingFanMediumCommand(ceilingFan);
		CeilingFanHighCommand ceilingFanHigh =
				new CeilingFanHighCommand(ceilingFan);
		CeilingFanOffCommand ceilingFanOff =
				new CeilingFanOffCommand(ceilingFan);

		remoteControl.setCommand(0, ceilingFanMedium, ceilingFanOff);
		remoteControl.setCommand(1, ceilingFanHigh, ceilingFanOff);

		remoteControl.onButtonWasPushed(0);
		remoteControl.offButtonWasPushed(0);
		System.out.println(remoteControl);
		remoteControl.undoButtonWasPushed();

		remoteControl.onButtonWasPushed(1);
		System.out.println(remoteControl);
		remoteControl.undoButtonWasPushed();
	}
}
补充:
1)NoCommand模式
代码:
package headfirst.command.party;

public class NoCommand implements Command {
	public void execute() { }
	public void undo() { }
}
用途:当你不想返回一个有意义的对象时,就可以用空对象。客户也可以将处理null的责任转移给空对象。举例来说,遥控器出厂时可以用NoCommand对象对他进行初始化。
2)、宏命令
代码:
package headfirst.command.party;

public class MacroCommand implements Command {
	Command[] commands;

	public MacroCommand(Command[] commands) {
		this.commands = commands;
	}

	public void execute() {
		for (int i = 0; i < commands.length; i++) {
			commands[i].execute();
		}
	}

	public void undo() {
		for (int i = 0; i < commands.length; i++) {
			commands[i].undo();
		}
	}
}
应用:
1)、队列请求
想象有一个工作队列;你在某一端添加命令,然后另一端则是线程。线程进行下面的动作:从队列中取出一个命令,调用他的execute()方法,等待这个命令完成,然后将此命令丢弃,再取出下一个命令...此时,工作队列类和进行计算的对象之间完全解耦。当时线程可能进行财务运算,下一刻可能读取网络数据。
2)、日志请求
这需要我们将所有的动作(命令)记录在日志中,并能在系统死机后,对这些命令对象重新加载,成批的依次调用这些对象的execute()方法,恢复到之前的状态。比方说,对于电子表格的应用,我们可能想要实现的错误恢复方式是将电子表格的操作记录在日志中,而不是每次电子表格一有变化就记录整个电子表格。


 被折叠的 条评论
为什么被折叠?
被折叠的 条评论
为什么被折叠?
 到【灌水乐园】发言


