


<span style="color: rgb(49, 49, 49); font-family: Arial, Helvetica, simsun, u5b8bu4f53; line-height: 25px; text-indent: 28px; white-space: pre; background-color: rgb(204, 206, 208); font-weight: normal;"><span style="font-size:12px;">内核的输入子系统是对分散的,多种不同类别的输入设备(如键盘,鼠标,跟踪球,操纵杆,触摸屏,加速计和手写板)等字符设备进行统一处理的一层抽象,就是在字符设备驱动上抽象出的一层。</span></span>
<span style="color: rgb(49, 49, 49); font-family: Arial, Helvetica, simsun, u5b8bu4f53; line-height: 25px; text-indent: 28px; white-space: pre; background-color: rgb(204, 206, 208); font-weight: normal;"><span style="font-size:12px;">输入子系统包括两类驱动程序:事件驱动程序和设备驱动程序。事件驱动程序负责和应用程序的接口,而设备驱动程序负责和底层输入设备的通信。鼠标事件生成文件mousedev属于事件驱动程序,而PS/2鼠标驱动程序是设备驱动程序。事件驱动程序是标准的,对所有的输入类都是可用的,所以要实现的是设备驱动程序而不是事件驱动程序。设备驱动程序可以利用一个已经存在的,合适的事件驱动程序通过输入核心和用户应用程序接口。</span></span>
<span style="color: rgb(49, 49, 49); font-family: Arial, Helvetica, simsun, u5b8bu4f53; line-height: 25px; text-indent: 28px; white-space: pre; background-color: rgb(204, 206, 208); font-weight: normal;"><span style="font-size:12px;">输入子系统带来了如下好处:</span></span>
<span style="color: rgb(49, 49, 49); font-family: Arial, Helvetica, simsun, u5b8bu4f53; line-height: 25px; text-indent: 28px; white-space: pre; background-color: rgb(204, 206, 208); font-weight: normal;"><span style="font-size:12px;">1.统一了物理形态各异的相似的输入设备的处理功能</span></span>
<span style="color: rgb(49, 49, 49); font-family: Arial, Helvetica, simsun, u5b8bu4f53; line-height: 25px; text-indent: 28px; white-space: pre; background-color: rgb(204, 206, 208); font-weight: normal;"><span style="font-size:12px;">2.提供了用于分发输入报告给用户应用程序的简单的事件接口</span></span>
<span style="color: rgb(49, 49, 49); font-family: Arial, Helvetica, simsun, u5b8bu4f53; line-height: 25px; text-indent: 28px; white-space: pre; background-color: rgb(204, 206, 208); font-weight: normal;"><span style="font-size:12px;">3.抽取出了输入驱动程序的通用部分,简化了驱动,并引入了一致性如下图,input子系统分三层,最上一层是event handler,中间是intput core,底层是input driver。input driver把event report到input core层。input core对event进行分发,传到event handler,相应的event handler层把event放到event buffer中,等待用户进程来取。</span></span><span style="font-size:14px;">
</span>
<span style="color: rgb(49, 49, 49); font-family: Arial, Helvetica, simsun, u5b8bu4f53; font-size: 14px; line-height: 25px; text-indent: 28px; white-space: pre; background-color: rgb(204, 206, 208); font-weight: normal;"><img src="file:///c:/users/administrator/appdata/roaming/360se6/User Data/temp/0_1305946214L3v6.gif" alt="" /></span>

<span style="color: rgb(49, 49, 49); font-family: Arial, Helvetica, simsun, u5b8bu4f53; line-height: 25px; text-indent: 28px; white-space: pre; background-color: rgb(204, 206, 208); font-weight: normal;"><span style="font-size:12px;">内核的输入子系统是对分散的,多种不同类别的输入设备(如键盘,鼠标,跟踪球,操纵杆,触摸屏,加速计和手写板)等字符设备进行统一处理的一层抽象,就是在字符设备驱动上抽象出的一层。</span></span><span style="color: rgb(49, 49, 49); font-family: Arial, Helvetica, simsun, u5b8bu4f53; line-height: 25px; text-indent: 28px; white-space: pre; background-color: rgb(204, 206, 208); font-weight: normal;"><span style="font-size:12px;">输入子系统包括两类驱动程序:事件驱动程序和设备驱动程序。事件驱动程序负责和应用程序的接口,而设备驱动程序负责和底层输入设备的通信。鼠标事件生成文件mousedev属于事件驱动程序,而PS/2鼠标驱动程序是设备驱动程序。事件驱动程序是标准的,对所有的输入类都是可用的,所以要实现的是设备驱动程序而不是事件驱动程序。设备驱动程序可以利用一个已经存在的,合适的事件驱动程序通过输入核心和用户应用程序接口。</span></span><span style="color: rgb(49, 49, 49); font-family: Arial, Helvetica, simsun, u5b8bu4f53; line-height: 25px; text-indent: 28px; white-space: pre; background-color: rgb(204, 206, 208); font-weight: normal;"><span style="font-size:12px;">输入子系统带来了如下好处:</span></span><span style="color: rgb(49, 49, 49); font-family: Arial, Helvetica, simsun, u5b8bu4f53; line-height: 25px; text-indent: 28px; white-space: pre; background-color: rgb(204, 206, 208); font-weight: normal;"><span style="font-size:12px;">1.统一了物理形态各异的相似的输入设备的处理功能</span></span><span style="color: rgb(49, 49, 49); font-family: Arial, Helvetica, simsun, u5b8bu4f53; line-height: 25px; text-indent: 28px; white-space: pre; background-color: rgb(204, 206, 208); font-weight: normal;"><span style="font-size:12px;">2.提供了用于分发输入报告给用户应用程序的简单的事件接口</span></span><span style="color: rgb(49, 49, 49); font-family: Arial, Helvetica, simsun, u5b8bu4f53; line-height: 25px; text-indent: 28px; white-space: pre; background-color: rgb(204, 206, 208); font-weight: normal;"><span style="font-size:12px;">3.抽取出了输入驱动程序的通用部分,简化了驱动,并引入了一致性如下图,input子系统分三层,最上一层是event handler,中间是intput core,底层是input driver。input driver把event report到input core层。input core对event进行分发,传到event handler,相应的event handler层把event放到event buffer中,等待用户进程来取。</span></span><span style="font-size:14px;">
</span><span style="color: rgb(49, 49, 49); font-family: Arial, Helvetica, simsun, u5b8bu4f53; font-size: 14px; line-height: 25px; text-indent: 28px; white-space: pre; background-color: rgb(204, 206, 208); font-weight: normal;"><img src="file:///c:/users/administrator/appdata/roaming/360se6/User Data/temp/0_1305946214L3v6.gif" alt="" /></span>struct input_dev {
const char *name;
const char *phys;
const char *uniq;
struct input_id id; //与input_handler匹配的时会用到
unsigned long evbit[BITS_TO_LONGS(EV_CNT)]; //支持的所有事件类型
unsigned long keybit[BITS_TO_LONGS(KEY_CNT)]; //按键事件支持的子事件
unsigned long relbit[BITS_TO_LONGS(REL_CNT)]; //相对坐标事件支持的子事件
unsigned long absbit[BITS_TO_LONGS(ABS_CNT)]; //绝对坐标事件支持的子事件
unsigned long mscbit[BITS_TO_LONGS(MSC_CNT)]; //其他事件支持的子事件
unsigned long ledbit[BITS_TO_LONGS(LED_CNT)]; //LED灯事件支持的子事件
unsigned long sndbit[BITS_TO_LONGS(SND_CNT)]; //声音事件支持的子事件
unsigned long ffbit[BITS_TO_LONGS(FF_CNT)]; //受力事件支持的子事件
unsigned long swbit[BITS_TO_LONGS(SW_CNT)]; //开关事件支持的子事件
unsigned int keycodemax;
unsigned int keycodesize;
void *keycode;
int (*setkeycode)(struct input_dev *dev, int scancode, int keycode);
int (*getkeycode)(struct input_dev *dev, int scancode, int *keycode);
struct ff_device *ff;
unsigned int repeat_key;
struct timer_list timer;
int sync;
int abs[ABS_MAX + 1]; //绝对坐标上报的当前值
int rep[REP_MAX + 1]; //这个参数主要是处理重复按键,后面遇到再讲
unsigned long key[BITS_TO_LONGS(KEY_CNT)]; //按键有两种状态,按下和抬起,这个字段就是记录这两个状态。
unsigned long led[BITS_TO_LONGS(LED_CNT)];
unsigned long snd[BITS_TO_LONGS(SND_CNT)];
unsigned long sw[BITS_TO_LONGS(SW_CNT)];
int absmax[ABS_MAX + 1]; //绝对坐标的最大值
int absmin[ABS_MAX + 1]; //绝对坐标的最小值
int absfuzz[ABS_MAX + 1];
int absflat[ABS_MAX + 1];
int (*open)(struct input_dev *dev);
void (*close)(struct input_dev *dev);
int (*flush)(struct input_dev *dev, struct file *file);
int (*event)(struct input_dev *dev, unsigned int type, unsigned int code, int value);
struct input_handle *grab; //当前使用的handle
spinlock_t event_lock;
struct mutex mutex;
unsigned int users;
int going_away;
struct device dev;
struct list_head h_list; //h_list是一个链表头,用来把handle挂载在这个上
struct list_head node; //这个node是用来连到input_dev_list上的
};
struct input_handler {
void *private;
void (*event)(struct input_handle *handle, unsigned int type, unsigned int code, int value);
int (*connect)(struct input_handler *handler, struct input_dev *dev, const struct input_device_id *id);
void (*disconnect)(struct input_handle *handle);
void (*start)(struct input_handle *handle);
const struct file_operations *fops;
int minor; //次设备号
const char *name;
const struct input_device_id *id_table;
const struct input_device_id *blacklist;
struct list_head h_list; //h_list是一个链表头,用来把handle挂载在这个上
struct list_head node; //这个node是用来连到input_handler_list上的
};
struct input_handle {
void *private;
int open;
const char *name;
struct input_dev *dev; //指向input_dev
struct input_handler *handler; //指向input_handler
struct list_head d_node; //连到input_dev的h_list上
struct list_head h_node; //连到input_handler的h_list上
}; 
下面来看看input子系统的初始化函数:
static int __init input_init(void)
{
    int err;

    input_init_abs_bypass();
    /*创建一个类input_class*/
    err = class_register(&input_class);
    if (err) {
        printk(KERN_ERR "input: unable to register input_dev class/n");
        return err;
    }
    /*在/proc下创建入口项*/
    err = input_proc_init();
    if (err)
        goto fail1;
    /*注册设备号INPUT_MAJOR的设备,记住input子系统的设备的主设备号都是13,即INPUT_MAJOR为13,并与input_fops相关联*/
    err = register_chrdev(INPUT_MAJOR, "input", &input_fops);
    if (err) {
        printk(KERN_ERR "input: unable to register char major %d", INPUT_MAJOR);
        goto fail2;
    }

    return 0;

 fail2: input_proc_exit();
 fail1: class_unregister(&input_class);
    return err;
}
subsys_initcall(input_init);
下面来看input子系统的file_operations,这里只有一个打开函数input_open_file,这个在事件传递部分讲解。
static const struct file_operations input_fops = {
    .owner = THIS_MODULE,
    .open = input_open_file,
};
int input_register_device(struct input_dev *dev)
{
static atomic_t input_no = ATOMIC_INIT(0);
struct input_handler *handler;
const char *path;
int error;
__set_bit(EV_SYN, dev->evbit);
/*
* If delay and period are pre-set by the driver, then autorepeating
* is handled by the driver itself and we don't do it in input.c.
*/
init_timer(&dev->timer);
/*
*rep主要是处理重复按键,如果没有定义dev->rep[REP_DELAY]和dev->rep[REP_PERIOD],
*则将其赋值为默认值。dev->rep[REP_DELAY]是指第一次按下多久算一次,这里是250ms,
*dev->rep[REP_PERIOD]指如果按键没有被抬起,每33ms算一次。
*/
if (!dev->rep[REP_DELAY] && !dev->rep[REP_PERIOD]) {
dev->timer.data = (long) dev;
dev->timer.function = input_repeat_key;
dev->rep[REP_DELAY] = 250;
dev->rep[REP_PERIOD] = 33;
}
/*如果dev没有定义getkeycode和setkeycode,则赋默认值。他们的作用一个是获得键的扫描码,一个是设置键的扫描码*/
if (!dev->getkeycode)
dev->getkeycode = input_default_getkeycode;
if (!dev->setkeycode)
dev->setkeycode = input_default_setkeycode;
dev_set_name(&dev->dev, "input%ld",
(unsigned long) atomic_inc_return(&input_no) - 1);
/*将input_dev封装的dev注册到sysfs*/
error = device_add(&dev->dev);
if (error)
return error;
path = kobject_get_path(&dev->dev.kobj, GFP_KERNEL);
printk(KERN_INFO "input: %s as %s/n",
dev->name ? dev->name : "Unspecified device", path ? path : "N/A");
kfree(path);
error = mutex_lock_interruptible(&input_mutex);
if (error) {
device_del(&dev->dev);
return error;
}
/*将input_dev挂在input_dev_list上*/
list_add_tail(&dev->node, &input_dev_list);
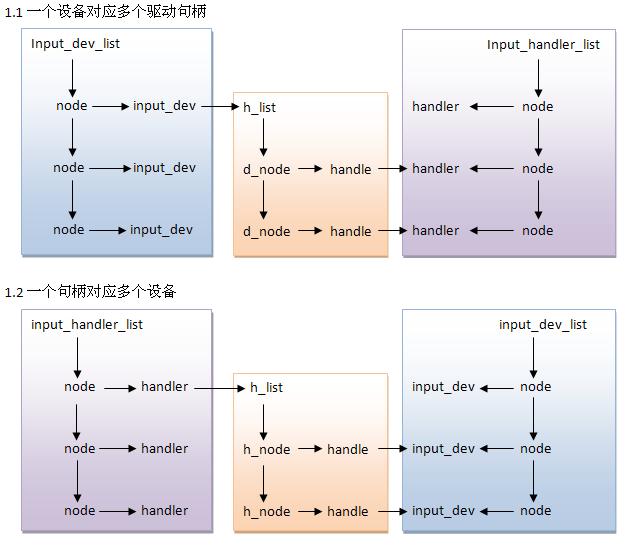
/*匹配所有的input_handler,这个就是刚才那幅图里的一个设备对应多个handler的由来*/
list_for_each_entry(handler, &input_handler_list, node)
input_attach_handler(dev, handler);
input_wakeup_procfs_readers();
mutex_unlock(&input_mutex);
return 0;
} 跟踪程序,来看看input_attach_handler的实现:
<span style="padding: 0px; margin: 0px; color: rgb(49, 49, 49); font-family: Arial, Helvetica, simsun, u5b8bu4f53; font-size: 14px; line-height: 25px; text-indent: 28px; background-color: rgb(204, 206, 208);">static int input_attach_handler(struct input_dev *dev, struct input_handler *handler)</span>
{
    const struct input_device_id *id;
    int error;
    /*handler有一个黑名单,如果存在黑名单,并且这个id匹配就退出*/
    if (handler->blacklist && input_match_device(handler->blacklist, dev))
        return -ENODEV;
    /*匹配id,实现在下边可以看到*/
    id = input_match_device(handler->id_table, dev);
    if (!id)
        return -ENODEV;
    /*如果匹配,则调用具体的handler的connect函数*/
    error = handler->connect(handler, dev, id);
    if (error && error != -ENODEV)
        printk(KERN_ERR
            "input: failed to attach handler %s to device %s, "
            "error: %d/n",
            handler->name, kobject_name(&dev->dev.kobj), error);

    return error;
} static const struct input_device_id *input_match_device(const struct input_device_id *id,
struct input_dev *dev)
{
int i;
for (; id->flags || id->driver_info; id++) {
if (id->flags & INPUT_DEVICE_ID_MATCH_BUS)
if (id->bustype != dev->id.bustype)
continue;
if (id->flags & INPUT_DEVICE_ID_MATCH_VENDOR)
if (id->vendor != dev->id.vendor)
continue;
if (id->flags & INPUT_DEVICE_ID_MATCH_PRODUCT)
if (id->product != dev->id.product)
continue;
if (id->flags & INPUT_DEVICE_ID_MATCH_VERSION)
if (id->version != dev->id.version)
continue;
MATCH_BIT(evbit, EV_MAX);
MATCH_BIT(keybit, KEY_MAX);
MATCH_BIT(relbit, REL_MAX);
MATCH_BIT(absbit, ABS_MAX);
MATCH_BIT(mscbit, MSC_MAX);
MATCH_BIT(ledbit, LED_MAX);
MATCH_BIT(sndbit, SND_MAX);
MATCH_BIT(ffbit, FF_MAX);
MATCH_BIT(swbit, SW_MAX);
return id;
}
return NULL;
}
#define MATCH_BIT(bit, max) /
for (i = 0; i < BITS_TO_LONGS(max); i++) /
if ((id->bit[i] & dev->bit[i]) != id->bit[i]) /
break; /
if (i != BITS_TO_LONGS(max)) /
continue;
#define MATCH_BIT(bit, max) / for (i = 0; i < BITS_TO_LONGS(max); i++) / if ((id->bit[i] & dev->bit[i]) != id->bit[i]) / break; / if (i != BITS_TO_LONGS(max)) / continue;
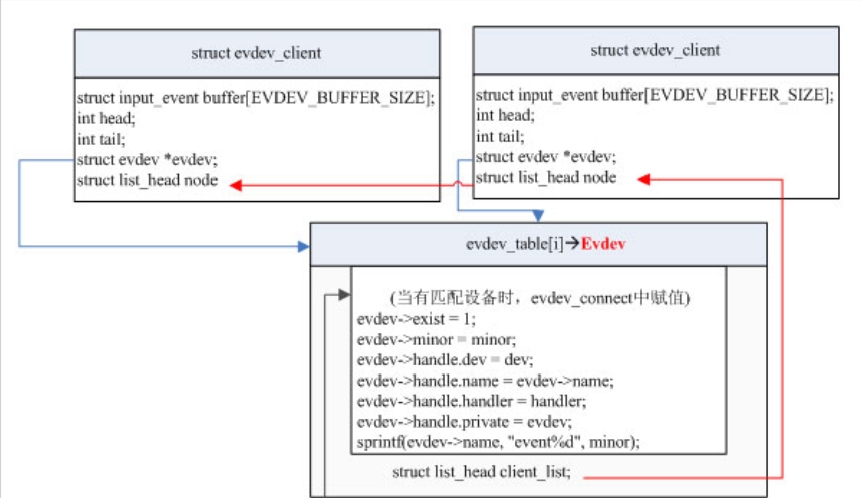
下边是刚刚看到的connect,这里假设这个handler是evdev_handler。如果匹配上了就会创建一个evdev,它里边封装了一个handle,会把input_dev和input_handler关联到一起。
/*
 * Create new evdev device. Note that input core serializes calls
 * to connect and disconnect so we don't need to lock evdev_table here.
 */
static int evdev_connect(struct input_handler *handler, struct input_dev *dev,
             const struct input_device_id *id)
{
    struct evdev *evdev;
    int minor;
    int error;
    /*
     *首先补充几个知识点:
     *static struct input_handler *input_table[8];
     *#define INPUT_DEVICES 256
     *一共有8个input_handler,对应256个设备,所以一个handler对应32个设备。
     *这个问题在我参加的一次linux驱动的面试中被问到,当时真是汗啊!!!
     *static struct evdev *evdev_table[EVDEV_MINORS];
     *#define EVDEV_MINORS  32
     *evdev理论上可对应32个设备,其对应的设备节点一般位于/dev/input/event0~/dev/input/event4
     *下边的for循环,在evdev_table数组中找一个未使用的地方
     */
    for (minor = 0; minor < EVDEV_MINORS; minor++)
        if (!evdev_table[minor])
            break;

    if (minor == EVDEV_MINORS) {
        printk(KERN_ERR "evdev: no more free evdev devices/n");
        return -ENFILE;
    }
    /*下边的代码是分配一个evdev结构体,并对成员进行初始化*/
    evdev = kzalloc(sizeof(struct evdev), GFP_KERNEL);
    if (!evdev)
        return -ENOMEM;

    INIT_LIST_HEAD(&evdev->client_list);
    spin_lock_init(&evdev->client_lock);
    mutex_init(&evdev->mutex);
    init_waitqueue_head(&evdev->wait);

    snprintf(evdev->name, sizeof(evdev->name), "event%d", minor);
    evdev->exist = 1;
    evdev->minor = minor;

    evdev->handle.dev = input_get_device(dev);
    evdev->handle.name = evdev->name;
    evdev->handle.handler = handler;
    evdev->handle.private = evdev;

    dev_set_name(&evdev->dev, evdev->name);
    evdev->dev.devt = MKDEV(INPUT_MAJOR, EVDEV_MINOR_BASE + minor);
    evdev->dev.class = &input_class;
    evdev->dev.parent = &dev->dev;
    evdev->dev.release = evdev_free;
    /**/
    device_initialize(&evdev->dev);
    /*
         *input_register_handle完成的主要功能是:
         *list_add_tail_rcu(&handle->d_node, &dev->h_list);
     *list_add_tail(&handle->h_node, &handler->h_list);
     */
    error = input_register_handle(&evdev->handle);
    if (error)
        goto err_free_evdev;
    /*evdev_install_chrdev完成的功能是evdev_table[evdev->minor]=evdev;*/
    error = evdev_install_chrdev(evdev);
    if (error)
        goto err_unregister_handle;

    error = device_add(&evdev->dev);
    if (error)
        goto err_cleanup_evdev;

    return 0;
    。。。。。。。。。。
}
看一下这张图会对上边的结构有清楚的认知了:
<span style="color: rgb(49, 49, 49); font-family: Arial, Helvetica, simsun, u5b8bu4f53; font-size: 14px; line-height: 25px; text-indent: 28px; white-space: pre; background-color: rgb(204, 206, 208); font-weight: normal;">
</span>
<span style="color: rgb(49, 49, 49); font-family: Arial, Helvetica, simsun, u5b8bu4f53; font-size: 14px; line-height: 25px; text-indent: 28px; white-space: pre; background-color: rgb(204, 206, 208); font-weight: normal;">
</span>


 1153
1153

 被折叠的 条评论
为什么被折叠?
被折叠的 条评论
为什么被折叠?
 到【灌水乐园】发言


