


UIButton详解
UIButton和UILabel的区别和联系
为什么要讨论这个看似没有营养的问题,因为大家都知道UIButton是按钮而UILabel是标签,这明显是两个不同的东西。事实上,UIButton和UILabel都是UIView的子类型,UIView及其子类型都代表一个矩形区域,UILabel直接继承了UIView,而UIButton的父类UIControl继承了UIView,这有什么区别吗?答案是肯定的,UIView有一个叫做userInteractionEnabled的属性,UIView将其默认值设置为YES,但UILabel的这个属性默认是NO。换句话说,只有UIControl的子类将这个属性设置为YES,因此这些控件在默认的情况下是交互型控件,能够跟用户进行交互,比如UIButton可以接受用户点击的操作,而且UIControl的子类可以通过addTarget方法设置要处理的事件及其处理代码。
创建和使用UIButton对象
- +buttonWithType:类方法,在创建按钮时指定按钮的类型。(iOS 7开始取消了圆角矩形按钮类型,但是仍然可以通过其他方式做出圆角矩形的按钮,因为很多时候按钮都是以图片的形态呈现,有了这个圆角矩形反而不方便定制)
UIButton常用属性和方法
配置按钮标题的属性和方法:
- titleLabel属性:按钮标题的标签
- -titleForState:方法:指定状态下的按钮标题
- -setTitle:forState:方法:设置指定状态下按钮的标题
- -titleColorForState:方法:指定状态下的按钮标题颜色
- -setTitleColor:forState:方法:设置指定状态下按钮标题的颜色
- -setTitleShadowColor:forState:方法:设置指定状态下按钮标题阴影的颜色
配置按钮显示的方法:
- -backgroundImageForState:方法:获得指定状态下的背景图
- -setBackgroundImage:forState:方法:设置指定状态下的背景图
- -imageForState:方法:获得指定状态下的按钮图片
- -setImage:forState:方法:设置指定状态下的按钮图片
配置边距的属性:
- contentEdgeInsets属性:内容的边距
- titleEdgeInsets属性:标题的边距
- imageEdgeInsets属性:图片的边距
获取按钮当前状态的属性:
- buttonType属性:可能的取值包括UIButtonTypeCustom、UIButtonTypeSystem、UIButtonTypeDetailDisclosure、UIButtonTypeInfoLight、UIButtonTypeInfoDark、UIButtonTypeContactAdd、UIButtonTypeRounedRect(过时)。
- currentTitle属性:按钮上当前显示的标题
- currentTitleColor属性:当前标题颜色
- currentImage属性:按钮上当前显示的图片
- currentBackgroundImage属性:按钮上当前显示的背景图片
- imageView属性:按钮上的图片视图
继承自UIControl的属性和方法:
- -addTarget:action:forControlEvents:方法:将为事件添加的消息接受者和对应的动作加入事件派发表,简而言之就是为控件绑定事件处理的回调方法
- -removeTarget:action:forControlEvents:方法:与上面方法的作用相反
- -enabled属性:控件是启动还是禁用
- -state属性:控件所处的状态
UIButton的常用事件和状态
我们先说一下UIControl的所有可能的事件。
| 事件类型 | 说明 |
|---|---|
| UIControlEventTouchDown | 单点触摸按下事件,用户点触屏幕,或者又有新手指落下的时候 |
| UIControlEventTouchDownRepeat | 多点触摸按下事件,点触计数大于1:用户按下第二、三、或第四根手指的时候 |
| UIControlEventTouchDragInside | 当一次触摸在控件窗口内拖动时 |
| UIControlEventTouchDragOutside | 当一次触摸在控件窗口之外拖动时 |
| UIControlEventTouchDragEnter | 当一次触摸从控件窗口之外拖动到内部时 |
| UIControlEventTouchDragExit | 当一次触摸从控件窗口内部拖动到外部时 |
| UIControlEventTouchUpInside | 所有在控件之内触摸抬起事件 |
| UIControlEventTouchUpOutside | 所有在控件之外触摸抬起事件(点触必须开始与控件内部才会发送通知) |
| UIControlEventTouchCancel | 所有触摸取消事件,即一次触摸因为放上了太多手指而被取消,或者被上锁或者电话呼叫打断 |
| UIControlEventValueChanged | 当控件的值发生改变时,发送通知。用于滑块、分段控件、以及其他取值的控件。你可以配置滑块控件何时发送通知,在滑块被放下时发送,或者在被拖动时发送 |
| UIControlEventEditingDidBegin | 当文本控件中开始编辑时发送通知 |
| UIControlEventEditingChanged | 当文本控件中的文本被改变时发送通知 |
| UIControlEventEditingDidEnd | 当文本控件中编辑结束时发送通知 |
| UIControlEventEditingDidOnExit | 当文本控件内通过按下回车键(或等价行为)结束编辑时,发送通知 |
| UIControlEventAlltouchEvents | 通知所有触摸事件 |
| UIControlEventAllEditingEvents | 通知所有关于文本编辑的事件 |
| UIControlEventAllEvents | 通知所有事件 |
对于UIButton来说,可能绝大多数处理的都是UIControlEventTouchUpInside事件,简单的说就是按钮点击的事件。
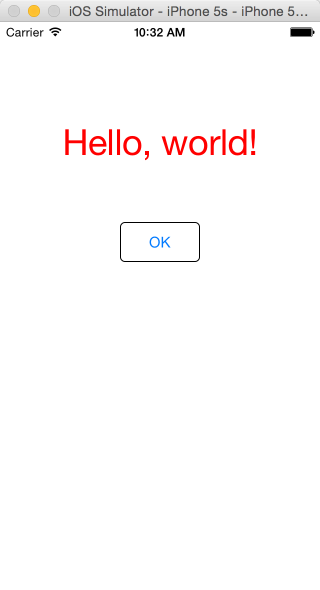
下面的例子中我们在窗口上放置一个标签和一个按钮,通过点击按钮修改标签上的文字,效果如下图所示。
AppDelegate类的实现代码
#import "AppDelegate.h"

@interface AppDelegate () {
    NSArray *infos;
}

@end

@implementation AppDelegate


- (instancetype)init {
    if(self = [super init]) {
        infos = @[@"Hello, world!", @"How are you?", @"Nice to meet you!", @"See you!", @"Good night!"];
    }
    return self;
}


- (BOOL)application:(UIApplication *)application didFinishLaunchingWithOptions:(NSDictionary *)launchOptions {

    self.window = [[UIWindow alloc]initWithFrame:[UIScreen mainScreen].bounds];
    self.window.backgroundColor = [UIColor whiteColor];

    CGRect screenRect = [[UIScreen mainScreen] bounds];
    CGPoint centerPoint = CGPointMake(screenRect.size.width / 2.0, screenRect.size.height / 2.0);

    UILabel *infoLabel = [[UILabel alloc] initWithFrame:CGRectMake(0, 0, 200, 40)];
    centerPoint.y -= 50;
    infoLabel.center = centerPoint;
    infoLabel.textAlignment = NSTextAlignmentCenter;
    infoLabel.font = [UIFont systemFontOfSize:36];
    infoLabel.text = infos[0];
    infoLabel.textColor = [UIColor redColor];
    infoLabel.tag = 101;
    infoLabel.adjustsFontSizeToFitWidth = YES;

    UIButton *okButton = [UIButton buttonWithType:UIButtonTypeSystem];
    okButton.frame = CGRectMake(0, 0, 80, 40);
    centerPoint.y += 100;
    okButton.center = centerPoint;
    [okButton setTitle:@"OK" forState:UIControlStateNormal];
    okButton.layer.borderColor = [UIColor blackColor].CGColor;
    okButton.layer.borderWidth = 1;
    okButton.layer.cornerRadius = 5;

    [okButton addTarget:self action:@selector(okButtonClicked) forControlEvents:UIControlEventTouchUpInside];

    [self.window addSubview:infoLabel];
    [self.window addSubview:okButton];

    [self.window makeKeyAndVisible];

    return YES;
}

- (void) okButtonClicked {
    UILabel *infoLabel = (id)[self.window viewWithTag:101];
    int randomIndex = arc4random() % [infos count];
    infoLabel.text = infos[randomIndex];
}

@end
自定义UIButton
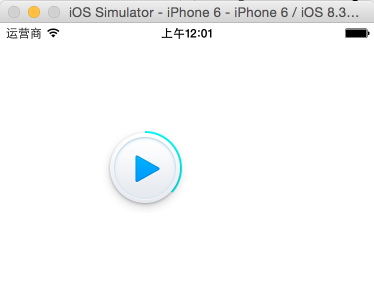
为什么需要定制按钮呢,如果大家用过酷狗音乐就知道,它的播放按键是带进度提示功能的,这样的按钮肯定需要我们自行定制,看看下面的例子。
#import <UIKit/UIKit.h>

/**带进度的按钮*/
@interface CDMyPlayButton : UIButton

/**完成进度(0.0-1.0)*/
@property (nonatomic, assign) double value;

@end
#import "CDMyPlayButton.h"
@implementation CDMyPlayButton
// Only override drawRect: if you perform custom drawing.
// An empty implementation adversely affects performance during animation.
- (void)drawRect:(CGRect)rect {
// Drawing code
UIBezierPath *bezierPath = [[UIBezierPath alloc] init];
CGFloat centerX = rect.size.width / 2.0;
CGFloat centerY = rect.size.height / 2.0;
CGFloat radius = centerX;
[bezierPath addArcWithCenter:CGPointMake(centerX, centerY) radius:radius * 0.8 startAngle:-M_PI_2 endAngle:M_PI * 2 * self.value - M_PI_2 clockwise:YES];
[[UIColor cyanColor] setStroke];
bezierPath.lineWidth = 2;
[bezierPath stroke];
}
@endUIImage简介
UIImage是用来显示图像的对象。我们可以通过文件、接收到原始的数据或者Quartz图像对象来创建UIImage对象。
创建UIImage对象的方式
- +imageNamed:类方法:根据指定的文件名返回UIImage对象
- +imageWithData:类方法:根据指定的NSData对象创建UIImage对象
- -imageWithContentOfFile:方法:通过文件加载指定路径下的内容获得UIImage对象
- -imageWithCGImage:方法:通过Quartz 2D对象创建UIImage对象
- -imageWithCIImage:方法:通过Core Image对象创建UIImage对象
    // 此种方式会对加载的图片进行单例处理,不适合动态加载大量图片,因为单例对象会一直存在于内存中
    UIImage *image1 = [UIImage imageNamed:@"abc"];

    NSString * strPath = [[NSBundle mainBundle]  pathForResource:@"abc" ofType:@"png"];
    // 此方式适合本地动态加载大量图片,而且即使加载很大的图片也不会使程序崩溃,前一种方式加载大图片可能会出现问题
    UIImage *image2 = [UIImage imageWithContentsOfFile:strPath];

    // 通过制定URL得到的数据创建图片对象
    UIImage *image3 =[UIImage imageWithData:[NSData dataWithContentsOfURL:[NSURL URLWithString:@"https://www.baidu.com/img/bdlogo.png"]]];
此外,还可以通过一组图片和一个持续时间来创建一个动态UIImage对象。
UIImage对象的属性
- size属性:图像的大小,得到一个CGSize结构体,其中包括了宽度(width)和高度(height)。
绘制图像
- -drawAtPoint:方法:从指定的左上角坐标处绘制图像。
- -drawInRect:方法:在指定的矩形区域内绘制整个图像。
UIViewController入门
概念和作用
UIViewController可以管理一屏的内容,如果说UIWindow是一副画的画框,那么UIViewController就是画框中植入的一张画布。我们并不建议将所有的视图对象或子视图都直接置于UIWindow对象中,因为UIWindow对象是唯一的,如果要想改变用户界面就会非常的麻烦。如果使用UIViewController来管理用户界面的话,在切换用户界面时只需要更换一个视图控制器就可以了。
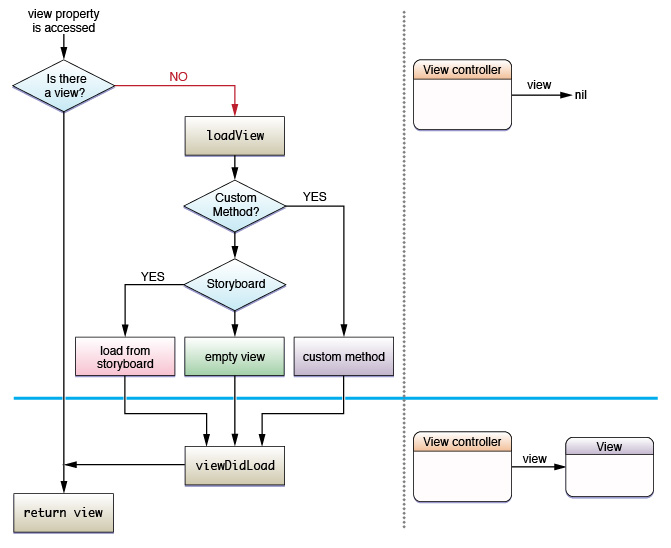
它定义了一系列和生命周期相关的方法。下面的图展示了UIViewController的生命周期,详细的内容我们在后续的课程中跟大家分享。
视图控制器加载:
视图控制器收到内存警告:

如何将UIViewController和UIWindow关联
我们可以创建一个视图控制器并将第一个例子中在UIWindow上放置的按钮和标签放到视图控制器中,再通过UIWindow对象的rootViewController属性将视图控制器设置为窗体对象的根视图控制器,代码如下所示:
自定义视图控制器的代码如下所示。
#import "CDRootViewController.h"

@interface CDRootViewController () {
    NSArray *infos;
}

@end

@implementation CDRootViewController

- (instancetype)init {
    if(self = [super init]) {
        infos = @[@"Hello, world!", @"How are you?", @"Nice to meet you!", @"See you!", @"Good night!"];
    }
    return self;
}

- (void)viewDidLoad {
    [super viewDidLoad];

    // 将直接放在AppDelegate中的代码转移到视图控制器中
    // 将原来直接放到UIWindow上的视图添加到视图控制器的视图中
    CGRect screenRect = [[UIScreen mainScreen] bounds];
    CGPoint centerPoint = CGPointMake(screenRect.size.width / 2.0, screenRect.size.height / 2.0);

    UILabel *infoLabel = [[UILabel alloc] initWithFrame:CGRectMake(0, 0, 200, 40)];
    centerPoint.y -= 50;
    infoLabel.center = centerPoint;
    infoLabel.textAlignment = NSTextAlignmentCenter;
    infoLabel.font = [UIFont systemFontOfSize:36];
    infoLabel.text = infos[0];
    infoLabel.textColor = [UIColor redColor];
    infoLabel.tag = 101;
    infoLabel.adjustsFontSizeToFitWidth = YES;

    UIButton *okButton = [UIButton buttonWithType:UIButtonTypeSystem];
    okButton.frame = CGRectMake(0, 0, 80, 40);
    centerPoint.y += 100;
    okButton.center = centerPoint;
    [okButton setTitle:@"OK" forState:UIControlStateNormal];
    okButton.layer.borderColor = [UIColor blackColor].CGColor;
    okButton.layer.borderWidth = 1;
    okButton.layer.cornerRadius = 5;
    okButton.layer.shadowColor = [UIColor yellowColor].CGColor;
    okButton.layer.shadowRadius = 10;

    [okButton addTarget:self action:@selector(okButtonClicked) forControlEvents:UIControlEventTouchUpInside];

    [self.view addSubview:infoLabel];
    [self.view addSubview:okButton];
}

- (void) okButtonClicked {
    UILabel *infoLabel = (id)[self.view viewWithTag:101];
    int randomIndex = arc4random() % [infos count];
    infoLabel.text = infos[randomIndex];

    [UIView beginAnimations:nil context:nil];
    [UIView setAnimationDuration:0.5];
    [UIView setAnimationTransition:UIViewAnimationTransitionCurlDown forView:self.view cache:YES];
    [UIView commitAnimations];
}

@end
AppDelegate的代码如下所示。
#import "AppDelegate.h"
#import "CDRootViewController.h"

@interface AppDelegate ()

@end

@implementation AppDelegate


- (BOOL)application:(UIApplication *)application didFinishLaunchingWithOptions:(NSDictionary *)launchOptions {

    self.window = [[UIWindow alloc]initWithFrame:[UIScreen mainScreen].bounds];
    self.window.backgroundColor = [UIColor whiteColor];

    // 创建视图控制器对象
    CDRootViewController *rvc = [[CDRootViewController alloc] init];
    // 将视图控制器设置为窗口的根视图控制器
    self.window.rootViewController = rvc;

    [self.window makeKeyAndVisible];


    return YES;
}
@end


 1万+
1万+


 被折叠的 条评论
为什么被折叠?
被折叠的 条评论
为什么被折叠?
 到【灌水乐园】发言


