


目录
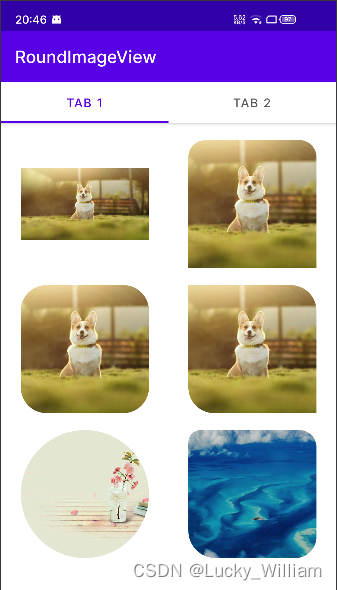
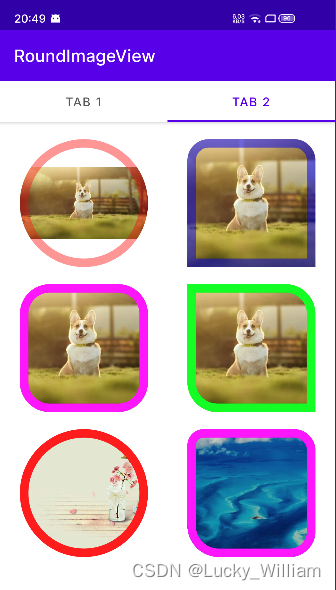
ImageView 设置圆角及外边框样式
我们通常可以通过以下几种方式来实现:
- 通过图片加载库,比如 Glide 或 Fresco 设置图片转换规则来剪裁 bitmap 实现圆角,通过绘制圆角矩形边框来实现外边框样式;
- 通过自定义的父布局包裹 ImageView,在父布局中设置指定的路径裁剪画布,实现圆角;
- 在 ImageView 中设置指定路径及画笔裁剪画布,绘制边框,实现圆角及外边框样式;
本篇主要介绍的是第 3 种方式,先来看效果图:
一、设置圆角逻辑:裁剪画布
// 以下是伪代码

// 指定浮点数组,包含 4 组 [x,y] 半径值,顺序:左上,右上,右下,左下
val radii = floatArrayOf(
    topLeftRadius, topLeftRadius, topRightRadius, topRightRadius,
    bottomRightRadius, bottomRightRadius, bottomLeftRadius, bottomLeftRadius
)

// 设置圆角矩形坐标
val rectF = RectF()
rectF.set(left, top, right, bottom)

// 设置上下左右 4 个圆角路径
val path = Path()
path.addRoundRect(rectF, radii, Path.Direction.CW)

// 或者 设置圆形
path.addCircle(radius, radius, radius, Path.Direction.CW)

// 裁剪画布
canvas.clipPath(path)

super.onDraw(canvas)
二、设置外边框逻辑:在绘制 Drawable 后再绘制外边框
// 以下是伪代码

// 指定浮点数组,包含 4 组 [x,y] 半径值,顺序:左上,右上,右下,左下
val radii = floatArrayOf(
    topLeftRadius, topLeftRadius, topRightRadius, topRightRadius,
    bottomRightRadius, bottomRightRadius, bottomLeftRadius, bottomLeftRadius
)

// 设置外边框矩形坐标
val borderRectF = RectF()
borderRectF.set(left, top, right, bottom)

// 设置外边框矩形路径
val borderPath = Path()
borderPath.addRoundRect(borderRectF, radii, Path.Direction.CW)

// 设置外边框画笔
val borderPaint = Paint(Paint.ANTI_ALIAS_FLAG).apply {
    color = borderColor
    strokeWidth = borderWidth
    style = Paint.Style.STROKE
}

// 先让系统完成 Drawable 绘制
super.onDraw(canvas)

// 再绘制圆角矩形边框
canvas.drawPath(borderPath, borderPaint)

// 或者 绘制圆形边框
canvas.drawCircle(radius, radius, radius, borderPaint)
示例中效果都已实现,代码已发布到 mavenCentral 仓库,可直接在项目中集成使用
三、在项目中集成
1. 添加依赖
repositories {
    mavenCentral()
}
implementation 'io.github.weilianyang:RoundImageView:1.0.2'
2. 控件样式
<declare-styleable name="RoundImageView">

    <!-- 圆角大小,如果只设置了此值,则默认会使用其作为所有圆角的值 -->
    <attr name="riv_radius" format="dimension" />

    <!-- 顶部左侧圆角大小 -->
    <attr name="riv_topLeft_radius" format="dimension" />

    <!-- 顶部右侧圆角大小 -->
    <attr name="riv_topRight_radius" format="dimension" />

    <!-- 底部左侧圆角大小 -->
    <attr name="riv_bottomLeft_radius" format="dimension" />

    <!-- 底部右侧圆角大小 -->
    <attr name="riv_bottomRight_radius" format="dimension" />

    <!-- 作为圆形图片,和 riv_radius 一起使用。
         如果未设置 riv_radius,半径将取宽高最小值的一半 -->
    <attr name="riv_roundAsCircle" format="boolean" />

    <!-- 外边框颜色 -->
    <attr name="riv_borderColor" format="color" />

    <!-- 外边框宽度 -->
    <attr name="riv_borderWidth" format="dimension" />

</declare-styleable>
3. 在 xml 中使用
(1)分别指定4个圆角的大小
<com.william.widget.RoundImageView
    android:layout_width="150dp"
    android:layout_height="150dp"
    android:scaleType="centerCrop"
    app:riv_bottomLeft_radius="32dp"
    app:riv_bottomRight_radius="25dp"
    app:riv_topLeft_radius="14dp"
    app:riv_topRight_radius="20dp" />
(2)作为圆形图片使用
<com.william.widget.RoundImageView
    android:layout_width="150dp"
    android:layout_height="150dp"
    android:scaleType="centerCrop"
    app:riv_roundAsCircle="true" />
(3)设置外边框宽度和颜色
<com.william.widget.RoundImageView
    android:layout_width="150dp"
    android:layout_height="150dp"
    android:scaleType="centerCrop"
    app:riv_borderColor="#ff00ff"
    app:riv_borderWidth="5dp"
    app:riv_radius="1dp" />
4. 在 代码 中使用
(1)指定圆角大小及边框样式
/**
 * @param radius 圆角大小,当 asCircle 为 true 时,值作为圆形图片的半径,如果为0,则将取宽高最小值的一半
 * @param borderWidth 外边框宽度
 * @param borderColor 外边框颜色
 * @param asCircle 作为圆形图片使用,默认 false
 */
fun setRadiusAndBorder(
    radius: Float,
    borderWidth: Float = 0f,
    @ColorInt borderColor: Int = 0,
    asCircle: Boolean = false,
) {
    this.radius = radius
    this.borderWidth = borderWidth
    this.borderColor = borderColor
    this.roundAsCircle = asCircle

    updateBorderPaint()
}
(2)分别指定4个圆角的大小及边框样式
/**
 * @param topLeftRadius 顶部左侧圆角大小
 * @param topRightRadius 顶部右侧圆角大小
 * @param bottomLeftRadius 底部左侧圆角大小
 * @param bottomRightRadius 底部右侧圆角大小
 * @param borderWidth 外边框宽度
 * @param borderColor 外边框颜色
 */
fun setRadiusAndBorder(
    topLeftRadius: Float = 0f,
    topRightRadius: Float = 0f,
    bottomLeftRadius: Float = 0f,
    bottomRightRadius: Float = 0f,
    borderWidth: Float = 0f,
    @ColorInt borderColor: Int = 0
) {
    this.topLeftRadius = topLeftRadius
    this.topRightRadius = topRightRadius
    this.bottomLeftRadius = bottomLeftRadius
    this.bottomRightRadius = bottomRightRadius
    this.borderWidth = borderWidth
    this.borderColor = borderColor

    updateBorderPaint()
}


 885
885


 被折叠的 条评论
为什么被折叠?
被折叠的 条评论
为什么被折叠?
 到【灌水乐园】发言


