


前言
使用Maven可以对项目的各种依赖进行统一管理,在pom文件中定以好依赖,就可以从Maven中央库或者第三方库中下载到本地。但在企业内部使用也会遇到一些问题,每个使用者都需要去下载相应的依赖包或者插件,效率低下,浪费带宽,所以搭建企业内部的私服就很有必要。
搭建私服后,所有的依赖就可以从私服下载,私服会自动判定,如果私服库里没有这个资源,则私服会自动去网上下载,如果私服已经包含所需资源,则可以通过内网提供给使用者,大大提高工作效率。
Nexus是Maven常用的私服,安装使用都还算方便,用于搭建企业内部的maven私服。
准备工作
下载JDK:http://download.oracle.com/otn-pub/java/jdk/8u74-b02/jdk-8u74-linux-x64.tar.gz?AuthParam=1457320414_0a8f6e90d7f0837453418473460f3742
下载Maven:http://apache.fayea.com/maven/maven-3/3.3.9/binaries/apache-maven-3.3.9-bin.tar.gz
下载Nexus:http://www.sonatype.org/nexus/go,Nexus所有版本下载地址:
http://www.sonatype.org/nexus/archived/
安装步骤
1、安装JDK
解压缩
> tar xzf jdk-8u74-linux-x64.gz配置环境变量
> vi /etc/profile在文件最后一行追加:
export JAVA_HOME=/home/jdk/jdk1.8.0_74
export PATH=$PATH:$JAVA_HOME/bin
让系统重新加载/etc/profile,命令:
> source /etc/profile验证是否安装成功
> java -versionJava version “1.8.0_74”
Java(TM) SE Runtime Environment (build 1.8.0_74-b02)
Java HotSpot(TM) 64-Bit Server VM (build 25.74-b02, mixed mode)2、安装Maven
解压文件
> tar -zvxf apache-maven-3.3.9-bin.tar.gz配置环境变量
> vi /etc/profile最近文件最后追加如下两行:
export MAVEN_HOME=/home/maven/apache-maven-3.3.9
export PATH=$PATH:$MAVEN_HOME/bin
让系统重新加载/etc/profile,命令:
> source /etc/profile验证是否安装成功
mvn -versionApache Maven 3.3.9 (bb52d8502b132ec0a5a3f4c09453c07478323dc5; 2015-11-11T00:41:47+08:00)
Maven home: /usr/local/maven3/apache-maven-3.3.9
Java version: 1.8.0_74, vendor: Oracle Corporation
Java home: /usr/local/java/jdk1.8.0_74/jre
Default locale: zh_CN, platform encoding: UTF-8
OS name: "linux", version: "2.6.32-642.el6.x86_64", arch: "amd64", family: "unix"
3、安装Nexus
解压文件
tar xzf nexus-2.12.0-01-bundle.tar.gz 解压后的目录结构如下图所示:

上图中的 nexus-2.12.0-01和sonatype-work目录就是解压tar包后的两个目录,nexus-2.12.0-01中是nexus的核心文件,sonatype-work,会将下载来的开发包放置在其中。
启动Nexus
[root@w157-bigdata-Maven nexus-2.12.0-01]# ./bin/nexus[root@w157-bigdata-Maven nexus-2.12.0-01]# ./bin/nexus
Usage: ./bin/nexus { console | start | stop | restart | status | dump }
[root@w157-bigdata-Maven nexus-2.12.0-01]# ./bin/nexus start
****************************************
WARNING - NOT RECOMMENDED TO RUN AS ROOT
****************************************
If you insist running as root, then set the environment variable RUN_AS_USER=root before running this script.默认情况下,root没有权限启动nexus,需要在启动文件nexus中增加nexus的启动用户授权:
vi bin/nexus加上RUN_AS_USER=root,如图所示:
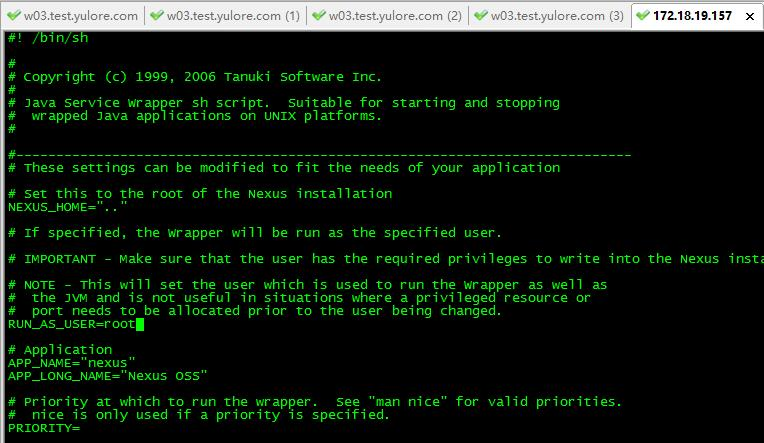
修改完成后保存退出即可。
[root@w157-bigdata-Maven nexus-2.12.0-01]# ./bin/nexus start
****************************************
WARNING - NOT RECOMMENDED TO RUN AS ROOT
****************************************
Starting Nexus OSS...
Started Nexus OSS.
[root@w157-bigdata-Maven nexus-2.12.0-01]#
另外,默认端口为8081,如需修改请查看配置文件 conf/nexus.properties。
查看启动日志:
> tail -f logs/wrapper.log配置Nexus
访问网址:http://172.18.19.157:8081/nexus

点击右上角的 Log In 按钮即可登陆了。默认登录账号/密码为: admin/admin123 ,登陆成功后的界面

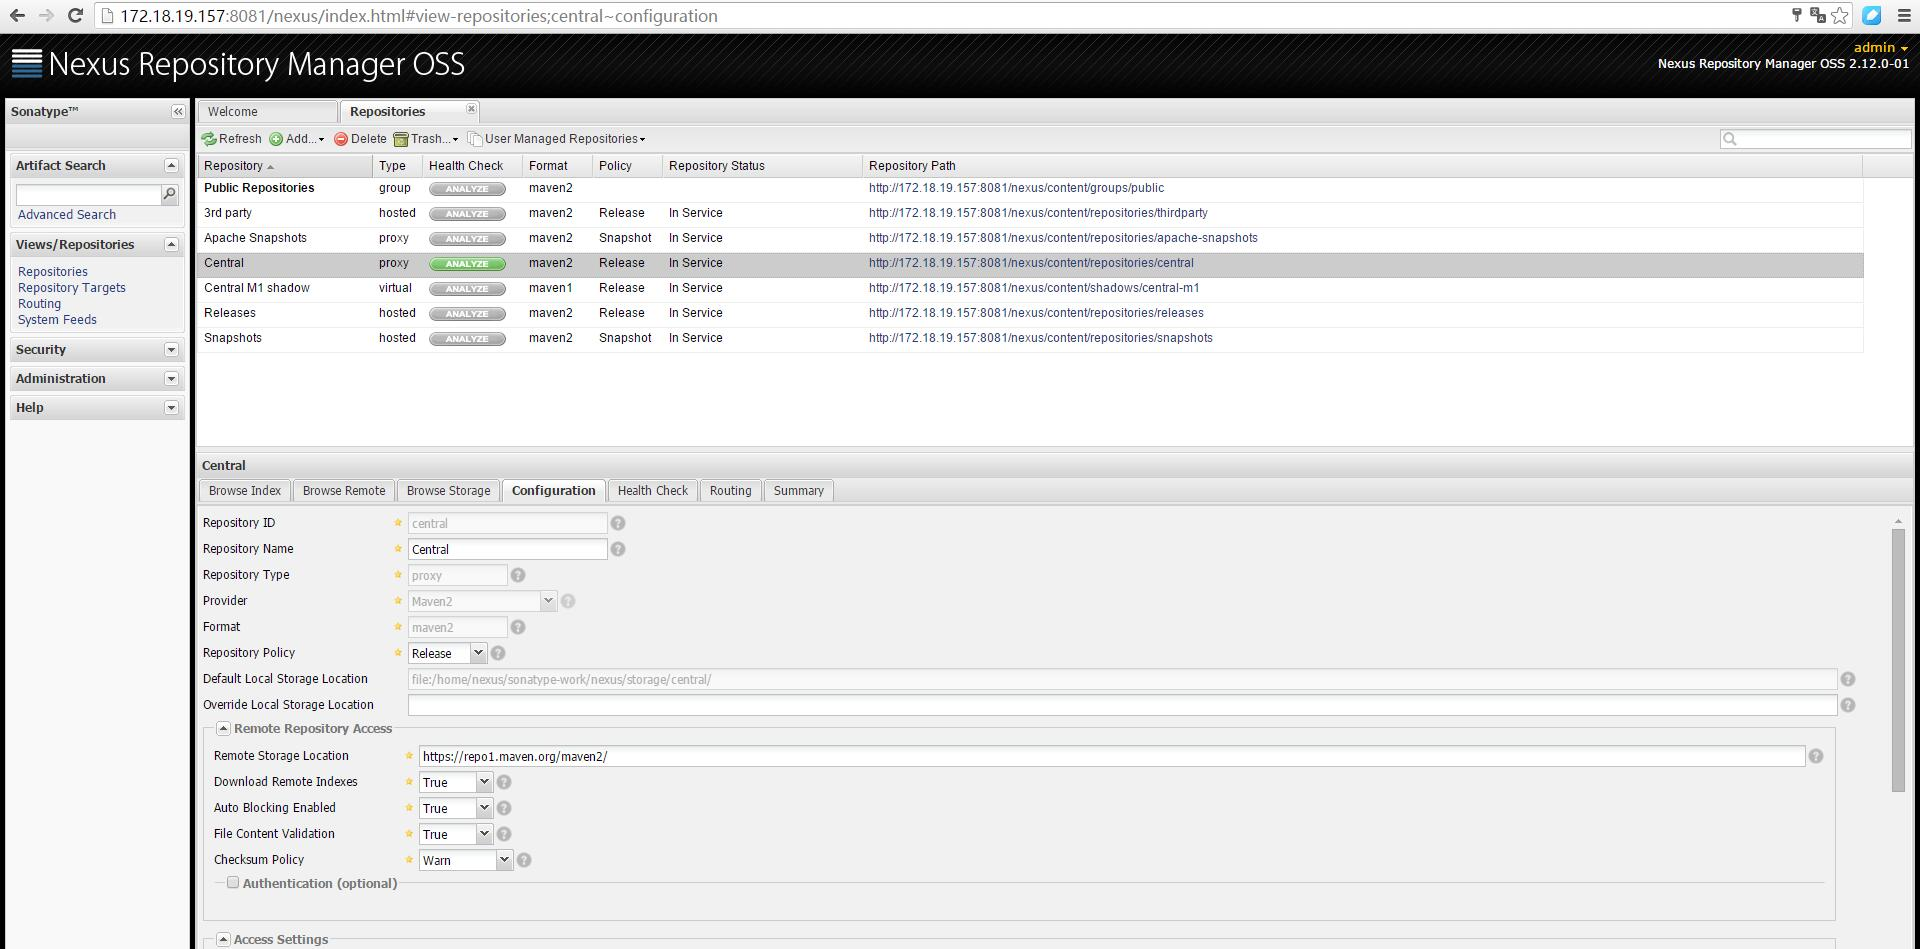
将列表中所有Type为proxy 的项目的 Configuration 中的 Download Remote Indexes 设置为True,以便自动更新远程仓库索引。
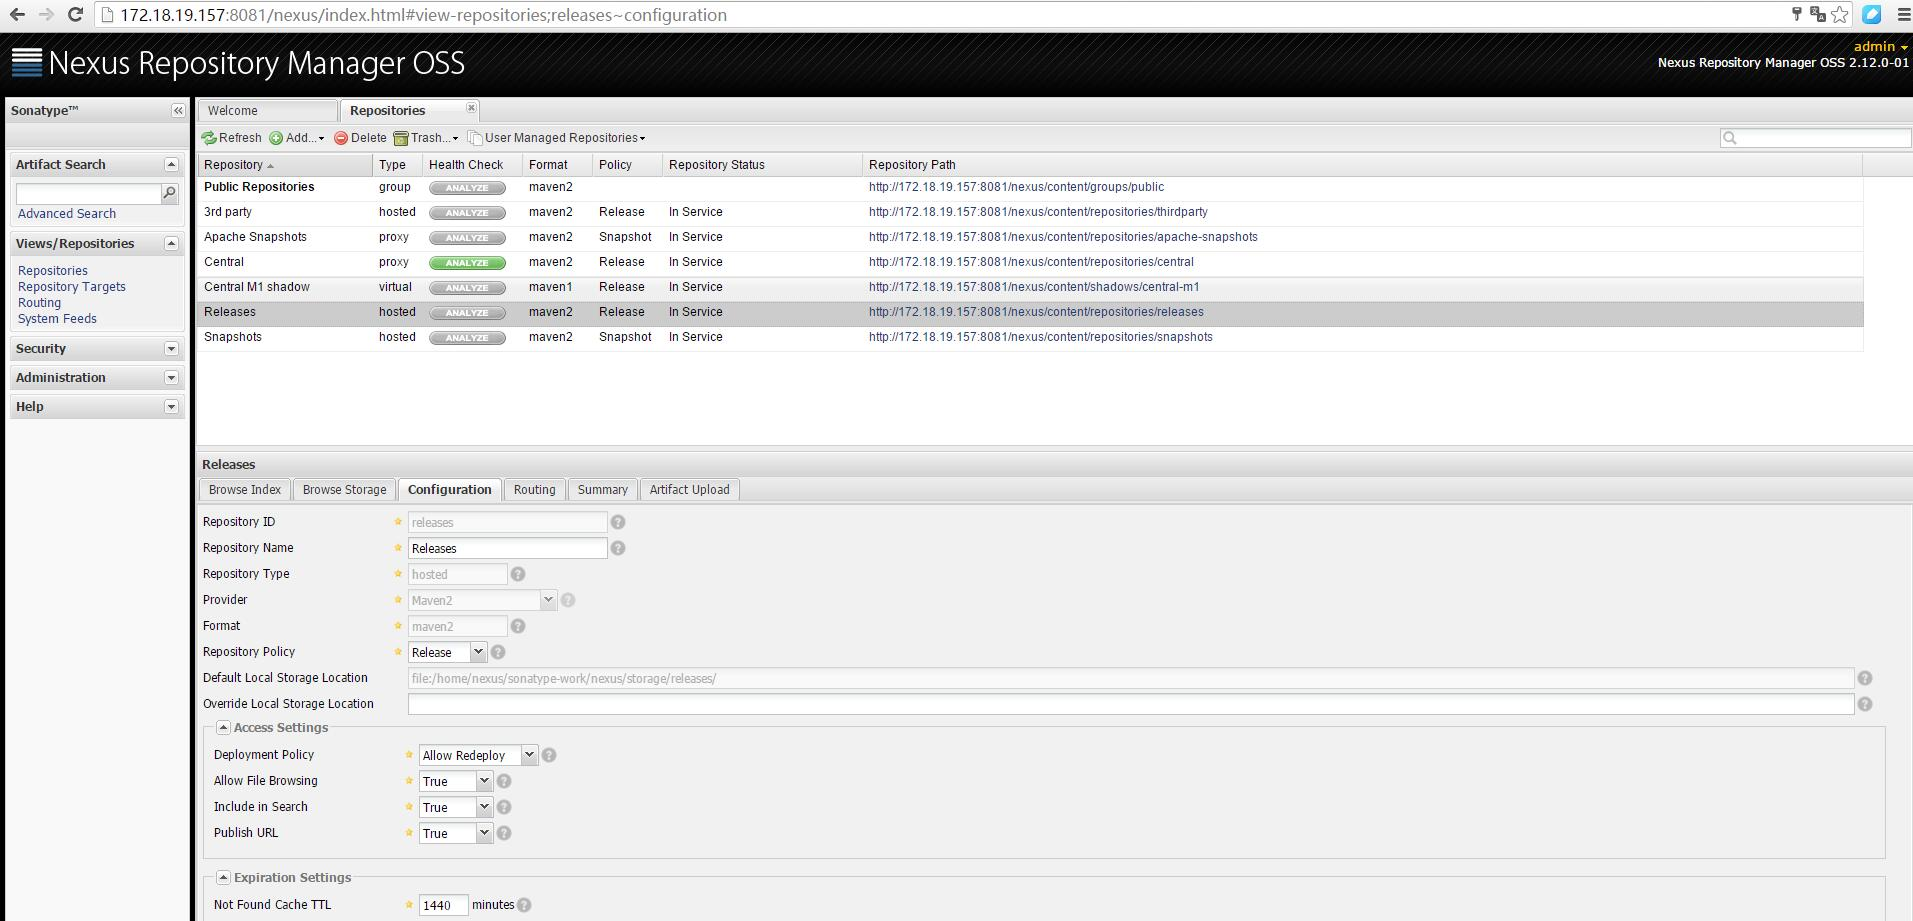
将Releases、Snapshots仓库的Deployment Policy设置为 Allow ReDeploy,以便可以将本地依赖自动发布到私服上。
添加第三方jar
我们避免不了会使用到一些第三方的 jar ,而这些jar包也不存在于互联网上的maven中央仓库中,这时我们可以手工添加jar 到我们的私服中。
添加第三方 jar 如下,可以选择GAV参数模式或者pom模式:
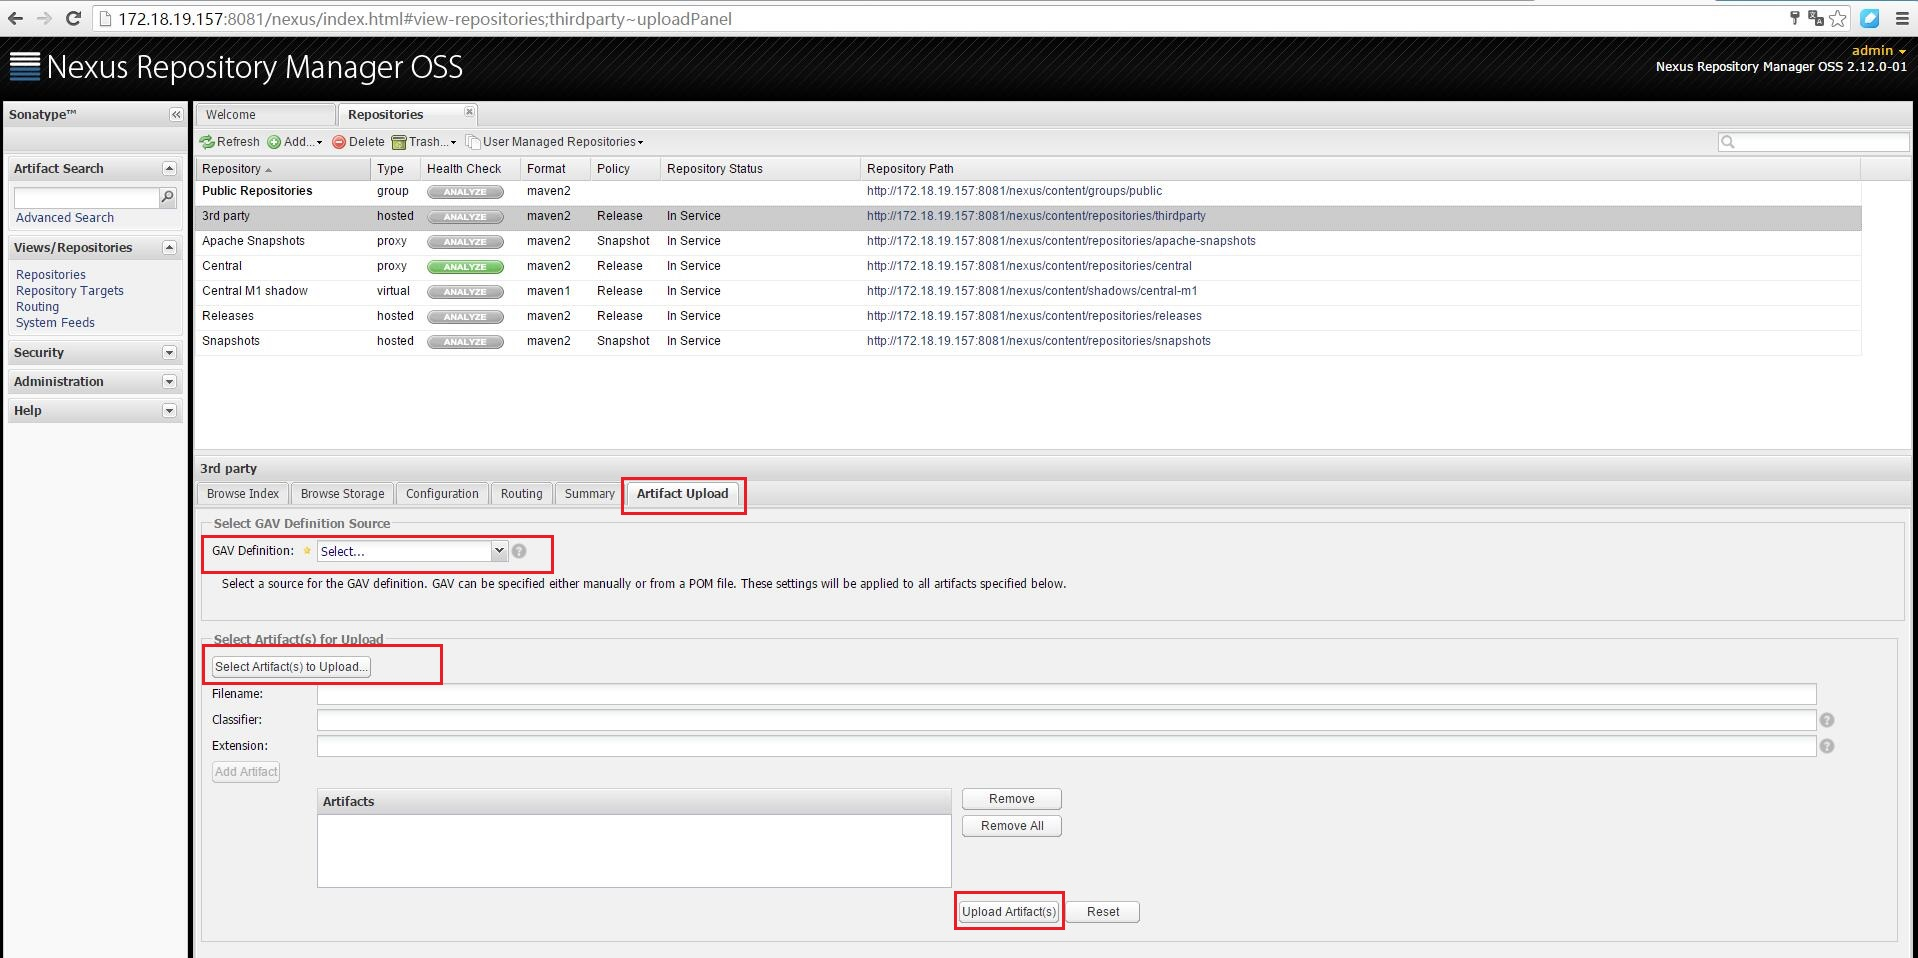
填写完必选字段,点击Upload Artifact(s)按钮即可。
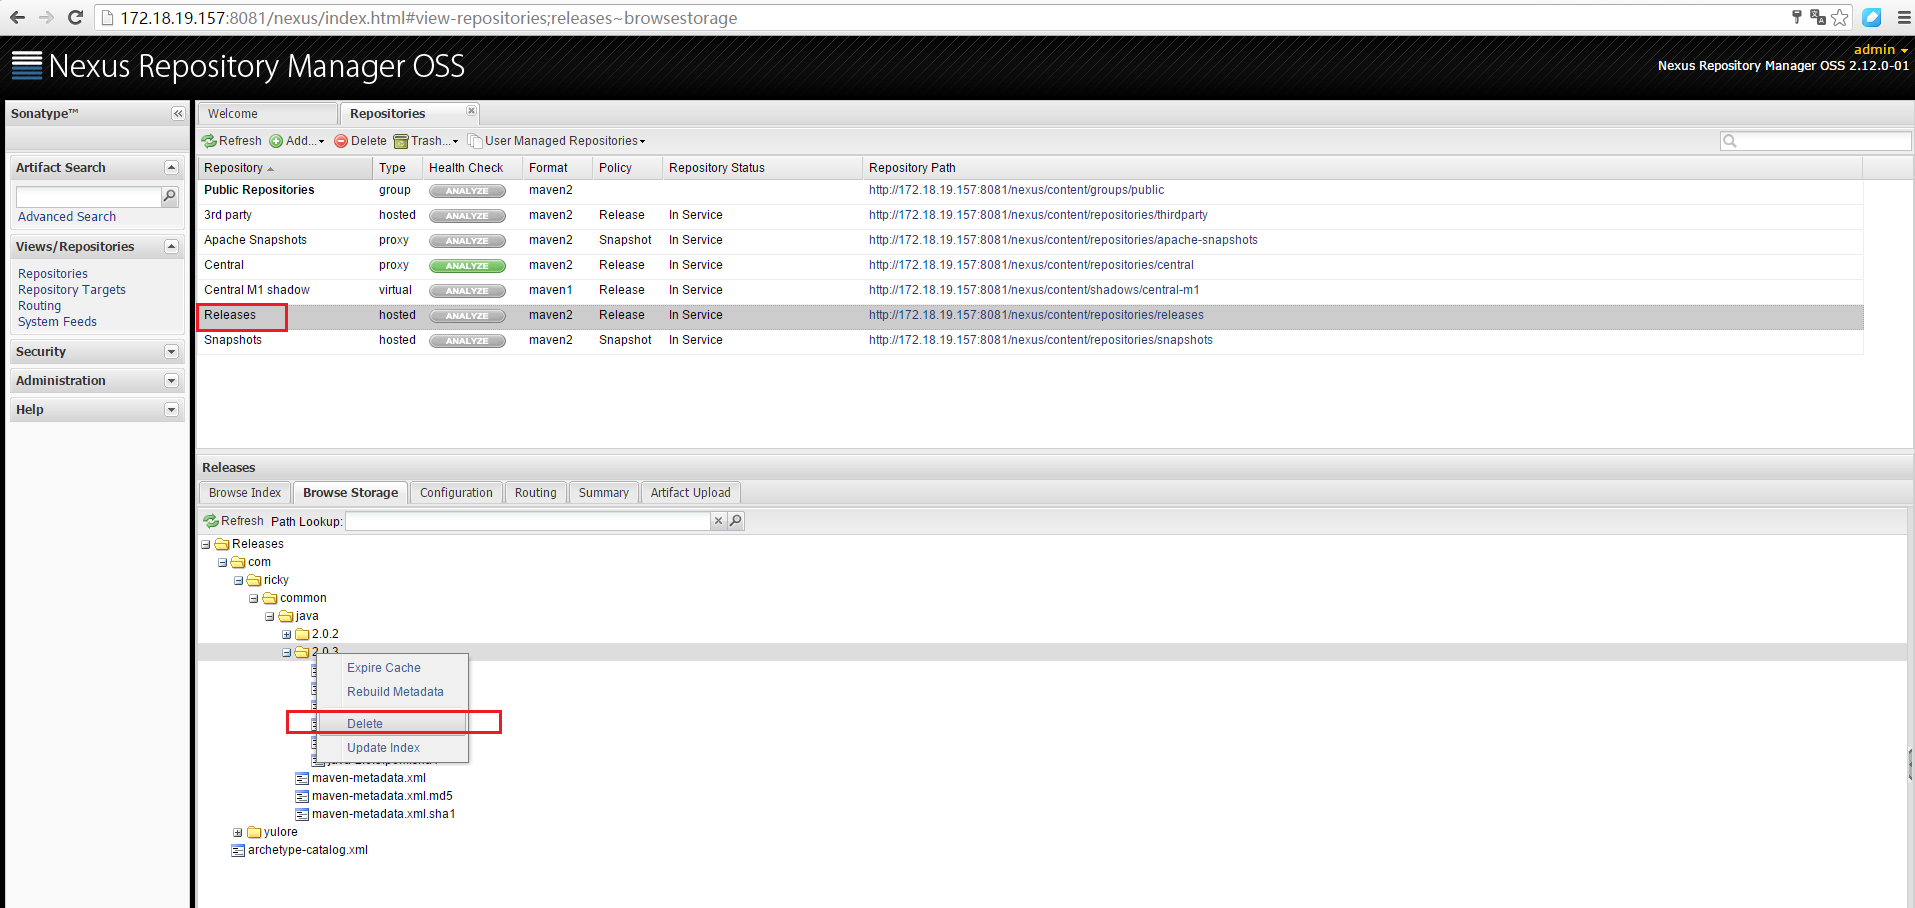
如果需要删除的话,如下:
本地项目配置引用私服
一. 自动发布构件到远程仓库
1. 在工程的pom.xml中添加上传依赖jar包配置:
<distributionManagement>

    <repository>
           <id>releases</id><!--这个ID需要与你的release仓库的Repository ID一致-->
           <url>http://172.18.19.157:8081/nexus/content/repositories/releases</url>
    </repository>
    <snapshotRepository>
        <id>snapshots</id><!--这个ID需要与你的snapshots仓库的Repository ID一致-->
        <url>http://172.18.19.157:8081/nexus/content/repositories/snapshots</url>
    </snapshotRepository>

</distributionManagement>
2.Nexus的访问权限控制,修改$MAVEN_HOME\conf目录下的settings.xml配置文件,添加如下配置:
<servers>
     <server>
         <!-- id对应第一步里面的id -->
        <id>releases</id>
        <!-- nexus私服里面配置的用户和密码 -->
        <username>admin</username>
        <password>admin123</password>
    </server>
    <server>
        <id>snapshots</id>
        <username>admin</username>
        <password>admin123</password>
    </server>
  </servers>
对第2步补充说明:
第2步涉及的仓库id、用户的配置,都是nexus私服里面已经创建好了的,我们完全可以自己创建仓库、用户,来上传项目依赖。
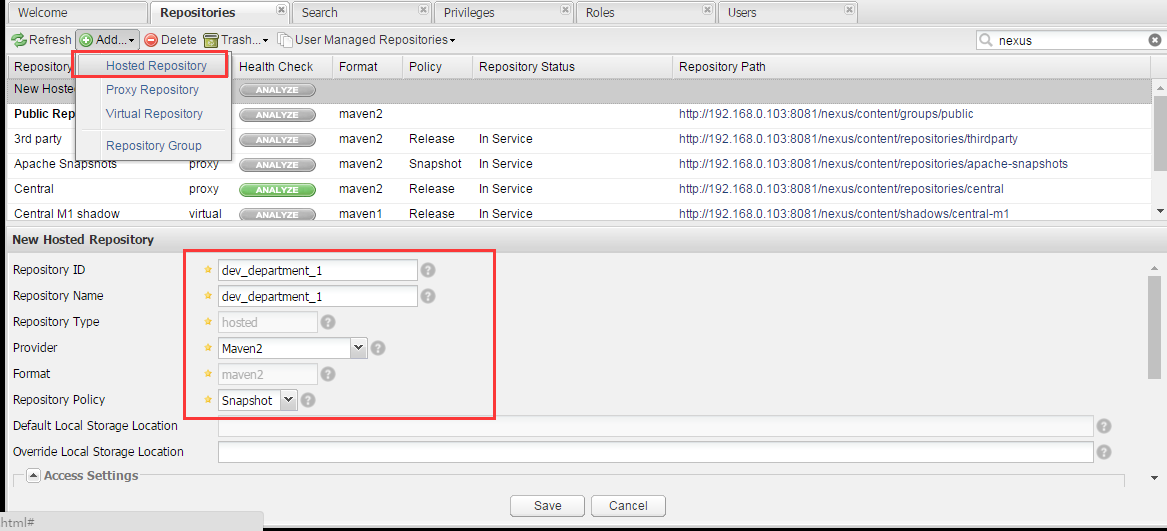
自定义创建仓库,记得设置Deployment Policy为Allow Redeploy:
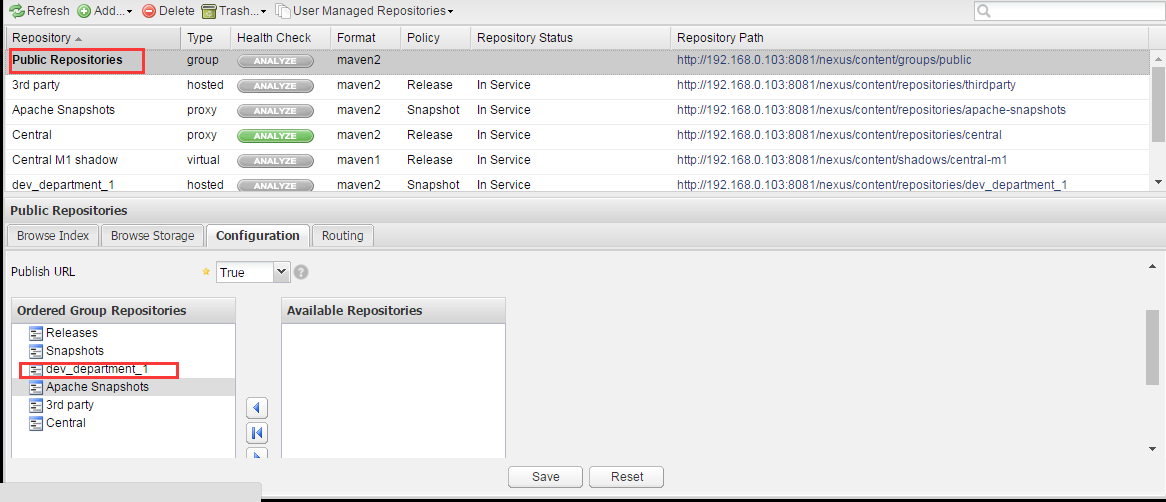
将新创建的仓库添加到仓库组中:
添加一个权限,指向新创建的仓库:

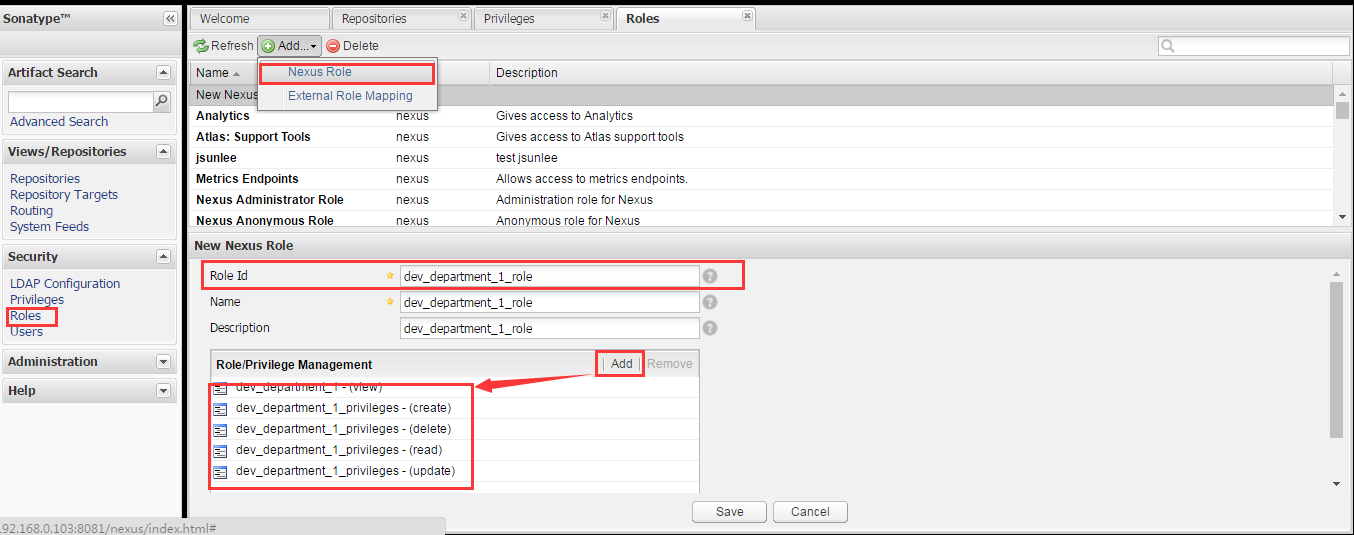
添加一个角色,指向新创建的权限:
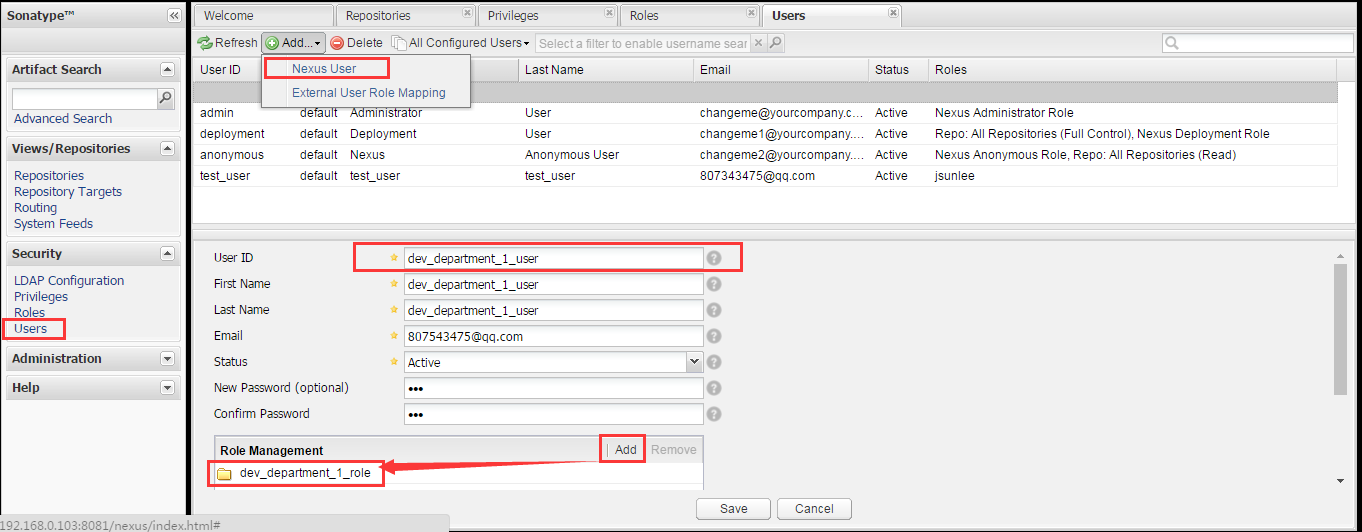
添加一个用户,指向新创建的角色:
这样之后,我们就可以更改第2步配置如下:
<servers>
     <server>
         <!-- id对应第一步里面的id -->
        <id>dev_department_1</id>
        <!-- nexus私服里面配置的用户和密码 -->
        <username>dev_department_1_user</username>
        <password>123</password>
    </server>
    <server>
        <id>dev_department_1</id>
        <username>dev_department_1_user</username>
        <password>123</password>
    </server>
  </servers>
3.打开windows命令行,在工程所在目录下执行
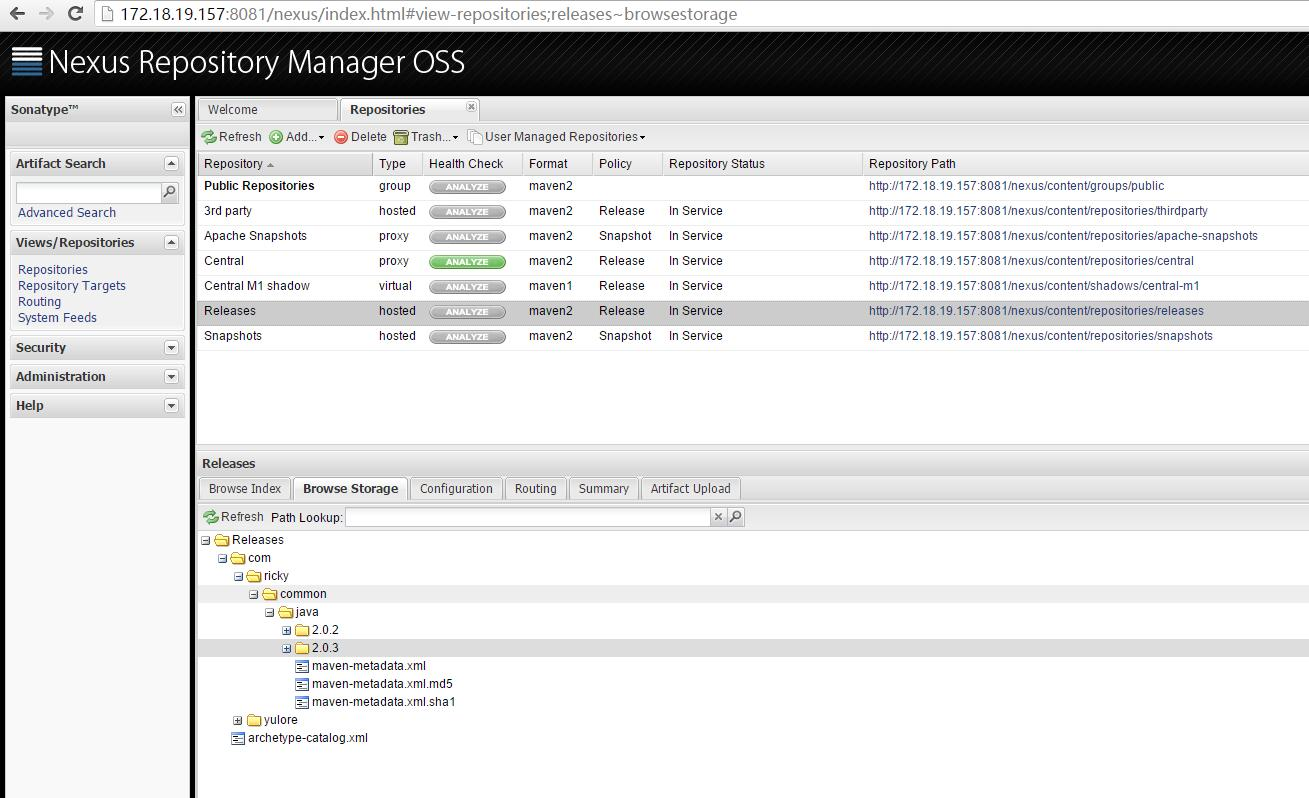
mvn deploy所部署的包就自动上传到了nexus安装目录下的
二.配置Maven从Nexus下载构件
1.在POM中配置Nexus私服,这样的配置只对当前的Maven项目有效。
<repositories>
      <repository>
          <id>public</id>
          <name>Team Maven Repository</name>
          <url>http://172.18.19.157:8081/nexus/content/groups/public/</url>
          <releases>
              <enabled>true</enabled>
          </releases>
          <snapshots>
              <enabled>true</enabled>
          </snapshots>
      </repository>
  </repositories>
2.在settings.xml中配置profile元素,这样就能让本机所有的Maven项目都使用自己的Maven私服。
<profile>
    <id>nexus-public</id>
    <repositories>
      <repository>
        <id>Public</id>
        <name>Public Repositories</name>
        <url>http://192.168.10.50:8081/nexus/content/groups/public</url>
        <snapshots>
          <enabled>true</enabled>
        </snapshots>
        <releases>
          <enabled>true</enabled>
        </releases>
      </repository>
    </repositories>
</profile>并在</profiles>之后中加入:
    <activeProfiles>
        <!-- 激活上面的私服 -->
        <activeProfile>nexus-public</activeProfile>
    </activeProfiles>
对第2步的补充说明,使用镜像的方式:
settings配置镜像:
    <!-- 配置私服镜像 -->
<mirrors>
    <mirror>
        <!-- 唯一的标志,自定义,用于区别镜像 -->
        <id>nexus</id>
        <!-- 此镜像指向的服务id,比如central,*代表拦截所有 -->
        <mirrorOf>*</mirrorOf>
        <name>Public Repositories</name>
        <url>http://192.168.0.103:8081/nexus/content/groups/public/</url>
    </mirror>
</mirrors>
使用profile覆盖远程仓库,将请求拦截到镜像:
  <profiles>
    <profile>
        <!-- 此处引用上面自定义的镜像 -->
         <id>nexus</id>
         <!-- 所有请求均通过镜像 -->
         <repositories>
             <repository>
                 <!-- 把中央仓库的访问配置一个假地址 -->
                 <id>central</id>
                 <url>http://central</url>
                 <releases><enabled>true</enabled></releases>
                 <snapshots><enabled>true</enabled></snapshots>
             </repository>
         </repositories>
         <pluginRepositories>
             <pluginRepository>
                 <id>central</id>
                 <url>http://central</url>
                 <releases><enabled>true</enabled></releases>
                 <snapshots><enabled>true</enabled></snapshots>
             </pluginRepository>
         </pluginRepositories>
     </profile>
  </profiles>
激活镜像:
    <activeProfiles>
        <!-- 激活镜像 -->
        <activeProfile>nexus</activeProfile>
    </activeProfiles>


 5480
5480


 被折叠的 条评论
为什么被折叠?
被折叠的 条评论
为什么被折叠?
 到【灌水乐园】发言


