


 超级会员免费看
 本文详细介绍了如何在RuoYi-Vue-Plus项目中配置并使用阿里云OSS进行文件上传,包括AWS客户端配置、OssClient的使用、systemApplicationRunner初始化、上传接口、前端组件定义以及阿里云OSS的配置和测试。同时,还提及了腾讯云和七牛云的文件上传配置。
一、AWS
欢迎使用 Amazon Web Services 文档 (amazonaws.cn)![]() https://docs.amazonaws.cn/zh_cn/?nc2=h_l2_su找到 Amazon S3
https://docs.amazonaws.cn/zh_cn/?nc2=h_l2_su找到 Amazon S3

Amazon S3 是云存储标杆,可以支持所有接入 S3的云存储写一
客户端配置
从Amazon S3迁移到OSS后,您仍然可以使用S3 API访问OSS,仅需要对S3的客户端应用进行如下改动:
获取阿里云账号或RAM用户的AccessKey ID和AccessKey Secret,并在您使用的客户端和SDK中配置您申请的AccessKey ID与AccessKey Secret。
二、配置
ruoyi-oss 模块引入依赖
<dependency>
    <groupId>com.amazonaws</groupId>
    <artifactId>aws-java-sdk-s3</artifactId>
</dependency>
模块解析:
- com.ruoyi.oss.constant.OssConstant :对象存储常量配置(引入云服务商如下: 阿里 腾讯 七牛云 华为)
- com.ruoyi.oss.core.OssClient:S3 存储协议 所有兼容S3协议的云厂商均支持,()
- com.ruoyi.oss.enumd.AccessPolicyType 桶的访问策略配置
- com.ruoyi.oss.enumd.PolicyType : 文件读写策略
- com.ruoyi.oss.factory.OssFactory: 文件上传工厂,用于获取OssClient 实例
- com.ruoyi.oss.entity.UploadResult 返回结果类
- com.ruoyi.oss.properties.OssProperties OSS对象存储 配置属性
二、、OssClient AWS 客户端
类位置: com.ruoyi.oss.core.OssClient
作用; 创建 AmazonS3 上传文件客户端(代码已经上传附件)
sys_oss_config 配置表对应的字段
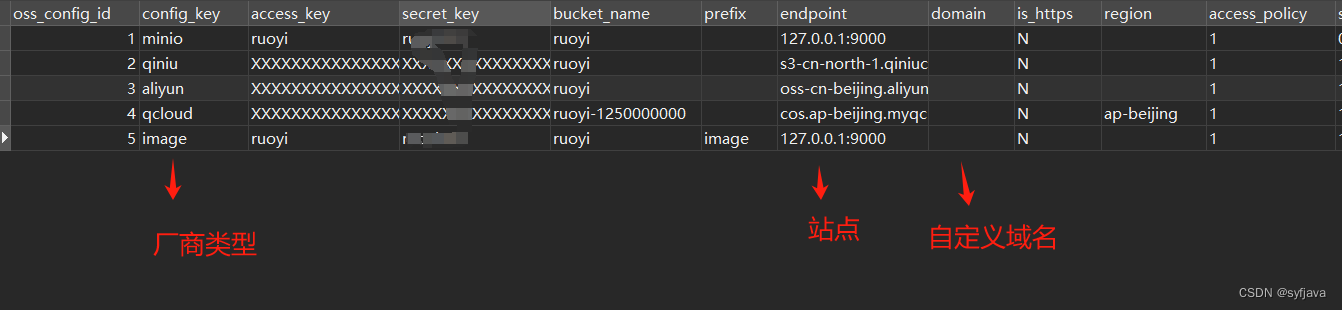
1-使用:
上传:只需要调用 OssClient 的 上传方法(如下, 提供字节 路径等参数)/** * <简述>上传方法 * <详细描述> * @author syf * @date 2024/5/24 22:58 * @param data 提供字节流 * @param path 路径 * @param contentType 内容类型 * @return com.ruoyi.oss.entity.UploadResult */ public UploadResult upload(byte[] data, String path, String contentType) { return upload(new ByteArrayInputStream(data), path, contentType); }
删除:提供全路径
/**
     * <简述>删除方法
     * <详细描述>
     * @author syf
     * @date 2024/5/24 23:14
     * @param path
     */
    public void delete(String path) {
        path = path.replace(getUrl() + "/", "");
        try {
            client.deleteObject(properties.getBucketName(), path);
        } catch (Exception e) {
            throw new OssException("删除文件失败,请检查配置信息:[" + e.getMessage() + "]");
        }
    }
uploadSuffix :提供字节(或者输入流) 上传文件getObjectMetadata : 根据完整文件路径,获取文件元数据
2- OssFactory 客户端工厂
OssClient 实例工厂。提供 有参 和 无参构造2种方式获取客户端类位置 : com.ruoyi.oss.factory.OssFactory
三、systemApplicationRunner 初始化
实现了 ApplicationRunner 方法,项目启动后 回去执行初始化配置
package com.ruoyi.system.runner;

import com.ruoyi.common.config.RuoYiConfig;
import com.ruoyi.system.service.ISysConfigService;
import com.ruoyi.system.service.ISysDictTypeService;
import com.ruoyi.system.service.ISysOssConfigService;
import lombok.RequiredArgsConstructor;
import lombok.extern.slf4j.Slf4j;
import org.springframework.boot.ApplicationArguments;
import org.springframework.boot.ApplicationRunner;
import org.springframework.stereotype.Component;

/**
 * 初始化 system 模块对应业务数据
 *
 * @author Lion Li
 */
@Slf4j
@RequiredArgsConstructor
@Component
public class SystemApplicationRunner implements ApplicationRunner {

    private final RuoYiConfig ruoyiConfig;
    private final ISysConfigService configService;
    private final ISysDictTypeService dictTypeService;
    private final ISysOssConfigService ossConfigService;

    @Override
    public void run(ApplicationArguments args) throws Exception {
        ossConfigService.init();
        log.info("初始化OSS配置成功");
        if (ruoyiConfig.isCacheLazy()) {
            return;
        }
        configService.loadingConfigCache();
        log.info("加载参数缓存数据成功");
        dictTypeService.loadingDictCache();
        log.info("加载字典缓存数据成功");
    }

}
类位置:com.ruoyi.system.service.impl.SysOssConfigServiceImpl
上传初始化操作:
加载配置到缓存中,并设置默认值
   @Override
    public void init() {
        List<SysOssConfig> list = baseMapper.selectList();
        // 加载OSS初始化配置
        for (SysOssConfig config : list) {
            String configKey = config.getConfigKey();
            if ("0".equals(config.getStatus())) {
                RedisUtils.setCacheObject(OssConstant.DEFAULT_CONFIG_KEY, configKey);
            }
            CacheUtils.put(CacheNames.SYS_OSS_CONFIG, config.getConfigKey(), JsonUtils.toJsonString(config));
        }
    }
四、上传文件接口
类位置: com.ruoyi.web.controller.system.SysOssController
 /**
     * 上传OSS对象存储
     *
     * @param file 文件
     */
    @SaCheckPermission("system:oss:upload")
    @Log(title = "OSS对象存储", businessType = BusinessType.INSERT)
    @PostMapping(value = "/upload", consumes = MediaType.MULTIPART_FORM_DATA_VALUE)
    public R<Map<String, String>> upload(@RequestPart("file") MultipartFile file) {
        if (ObjectUtil.isNull(file)) {
            return R.fail("上传文件不能为空");
        }
        SysOssVo oss = iSysOssService.upload(file);
        Map<String, String> map = new HashMap<>(2);
        map.put("url", oss.getUrl());
        map.put("fileName", oss.getOriginalName());
        map.put("ossId", oss.getOssId().toString());
        return R.ok(map);
    }
五、前端页面上传文件组件定义
1-上传按钮:
路径:src\views\system\oss\index.vue
<el-col :span="1.5">
        <el-button
          type="primary"
          plain
          icon="el-icon-plus"
          size="mini"
          @click="handleFile"
          v-hasPermi="['system:oss:upload']"
        >上传文件</el-button>
      </el-col>
2-上传对话框:
<!-- 添加或修改OSS对象存储对话框 -->
    <el-dialog :title="title" :visible.sync="open" width="500px" append-to-body>
      <el-form ref="form" :model="form" :rules="rules" label-width="80px">
        <el-form-item label="文件名">
          <fileUpload v-model="form.file" v-if="type === 0"/>
          <imageUpload v-model="form.file" v-if="type === 1"/>
        </el-form-item>
      </el-form>
      <div slot="footer" class="dialog-footer">
        <el-button :loading="buttonLoading" type="primary" @click="submitForm">确 定</el-button>
        <el-button @click="cancel">取 消</el-button>
      </div>
    </el-dialog>
3-定义上传文件组件 fileUpload :
路径: src\components\FileUpload\index.vue
实现技术:
el-upload 实现该上传属性,具体api查看element官网
<template>
  <div class="upload-file">
    <el-upload
      multiple
      :action="uploadFileUrl"
      :before-upload="handleBeforeUpload"
      :file-list="fileList"
      :limit="limit"
      :on-error="handleUploadError"
      :on-exceed="handleExceed"
      :on-success="handleUploadSuccess"
      :show-file-list="false"
      :headers="headers"
      class="upload-file-uploader"
      ref="fileUpload"
    >
      <!-- 上传按钮 -->
      <el-button size="mini" type="primary">选取文件</el-button>
      <!-- 上传提示 -->
      <div class="el-upload__tip" slot="tip" v-if="showTip">
        请上传
        <template v-if="fileSize"> 大小不超过 <b style="color: #f56c6c">{{ fileSize }}MB</b> </template>
        <template v-if="fileType"> 格式为 <b style="color: #f56c6c">{{ fileType.join("/") }}</b> </template>
        的文件
      </div>
    </el-upload>

    <!-- 文件列表 -->
    <transition-group class="upload-file-list el-upload-list el-upload-list--text" name="el-fade-in-linear" tag="ul">
      <li :key="file.url" class="el-upload-list__item ele-upload-list__item-content" v-for="(file, index) in fileList">
        <el-link :href="`${file.url}`" :underline="false" target="_blank">
          <span class="el-icon-document"> {{ getFileName(file.name) }} </span>
        </el-link>
        <div class="ele-upload-list__item-content-action">
          <el-link :underline="false" @click="handleDelete(index)" type="danger">删除</el-link>
        </div>
      </li>
    </transition-group>
  </div>
</template>

<script>
import { getToken } from "@/utils/auth";
import { listByIds, delOss } from "@/api/system/oss";

export default {
  name: "FileUpload",
  props: {
    // 值
    value: [String, Object, Array],
    // 数量限制
    limit: {
      type: Number,
      default: 5,
    },
    // 大小限制(MB)
    fileSize: {
      type: Number,
      default: 5,
    },
    // 文件类型, 例如['png', 'jpg', 'jpeg']
    fileType: {
      type: Array,
      default: () => ["doc", "xls", "ppt", "txt", "pdf"],
    },
    // 是否显示提示
    isShowTip: {
      type: Boolean,
      default: true
    }
  },
  data() {
    return {
      number: 0,
      uploadList: [],
      baseUrl: process.env.VUE_APP_BASE_API,
      uploadFileUrl: process.env.VUE_APP_BASE_API + "/system/oss/upload", // 上传文件服务器地址
      headers: {
        Authorization: "Bearer " + getToken(),
      },
      fileList: [],
    };
  },
  watch: {
    value: {
      //监听    <fileUpload v-model="form.file" v-if="type === 0"/> 中  form.file 值
      async handler(val) {
        if (val) {
          let temp = 1;
          // 首先将值转为数组
          let list;
          if (Array.isArray(val)) {
            list = val;
          } else {
            await listByIds(val).then(res => {
              list = res.data.map(oss => {
                oss = { name: oss.originalName, url: oss.url, ossId: oss.ossId };
                return oss;
              });
            })
          }
          // 然后将数组转为对象数组
          this.fileList = list.map(item => {
            item = { name: item.name, url: item.url, ossId: item.ossId };
            item.uid = item.uid || new Date().getTime() + temp++;
            return item;
          });
        } else {
          this.fileList = [];
          return [];
        }
      },
      deep: true,//深入监听
      immediate: true//组件初刷立即调用一次
    }
  },
  computed: {
    // 是否显示提示
    showTip() {
      return this.isShowTip && (this.fileType || this.fileSize);
    },
  },
  methods: {
    // 上传前校检格式和大小
    handleBeforeUpload(file) {
      // 校检文件类型
      if (this.fileType) {
        const fileName = file.name.split('.');
        const fileExt = fileName[fileName.length - 1];
        const isTypeOk = this.fileType.indexOf(fileExt) >= 0;
        if (!isTypeOk) {
          this.$modal.msgError(`文件格式不正确, 请上传${this.fileType.join("/")}格式文件!`);
          return false;
        }
      }
      // 校检文件大小
      if (this.fileSize) {
        const isLt = file.size / 1024 / 1024 < this.fileSize;
        if (!isLt) {
          this.$modal.msgError(`上传文件大小不能超过 ${this.fileSize} MB!`);
          return false;
        }
      }
      this.$modal.loading("正在上传文件,请稍候...");
      this.number++;
      return true;
    },
    // 文件个数超出
    handleExceed() {
      this.$modal.msgError(`上传文件数量不能超过 ${this.limit} 个!`);
    },
    // 上传失败
    handleUploadError(err) {
      this.$modal.msgError("上传文件失败,请重试");
      this.$modal.closeLoading();
    },
    // 上传成功回调
    handleUploadSuccess(res, file) {
      if (res.code === 200) {
        this.uploadList.push({ name: res.data.fileName, url: res.data.url, ossId: res.data.ossId });
        this.uploadedSuccessfully();
      } else {
        this.number--;
        this.$modal.closeLoading();
        this.$modal.msgError(res.msg);
        this.$refs.fileUpload.handleRemove(file);
        this.uploadedSuccessfully();
      }
    },
    // 删除文件
    handleDelete(index) {
      let ossId = this.fileList[index].ossId;
      delOss(ossId);
      this.fileList.splice(index, 1);
      this.$emit("input", this.listToString(this.fileList));
    },
    // 上传结束处理
    uploadedSuccessfully() {
      if (this.number > 0 && this.uploadList.length === this.number) {
        this.fileList = this.fileList.concat(this.uploadList);
        this.uploadList = [];
        this.number = 0;
        this.$emit("input", this.listToString(this.fileList));
        this.$modal.closeLoading();
      }
    },
    // 获取文件名称
    getFileName(name) {
      // 如果是url那么取最后的名字 如果不是直接返回
      if (name.lastIndexOf("/") > -1) {
        return name.slice(name.lastIndexOf("/") + 1);
      } else {
        return name;
      }
    },
    // 对象转成指定字符串分隔
    listToString(list, separator) {
      let strs = "";
      separator = separator || ",";
      for (let i in list) {
        strs += list[i].ossId + separator;
      }
      return strs != "" ? strs.substr(0, strs.length - 1) : "";
    },
  },
};
</script>

<style scoped lang="scss">
.upload-file-uploader {
  margin-bottom: 5px;
}
.upload-file-list .el-upload-list__item {
  border: 1px solid #e4e7ed;
  line-height: 2;
  margin-bottom: 10px;
  position: relative;
}
.upload-file-list .ele-upload-list__item-content {
  display: flex;
  justify-content: space-between;
  align-items: center;
  color: inherit;
}
.ele-upload-list__item-content-action .el-link {
  margin-right: 10px;
}
</style>
路径: ruoyi-admin/src/main/resources/application.yml
后端上传文件配置:
  # 文件上传
  servlet:
    multipart:
      # 单个文件大小
      max-file-size: 10MB
      # 设置总上传的文件大小
      max-request-size: 20MB
4-组件设置为全局组件:
路径:src\main.js
Vue.component('FileUpload', FileUpload)
六、图片上传组件
路径 : src\components\ImageUpload\index.vue
功能 :对比上面上传文件,只是多了回显功能,其他一样
七、阿里云上传文件配置
1-先开启 阿里云配置

2- 阿里云空控制台搜索oss 服务

3- 右上角进入 accesskey管理
创建用户,并验证。最后配置到系统
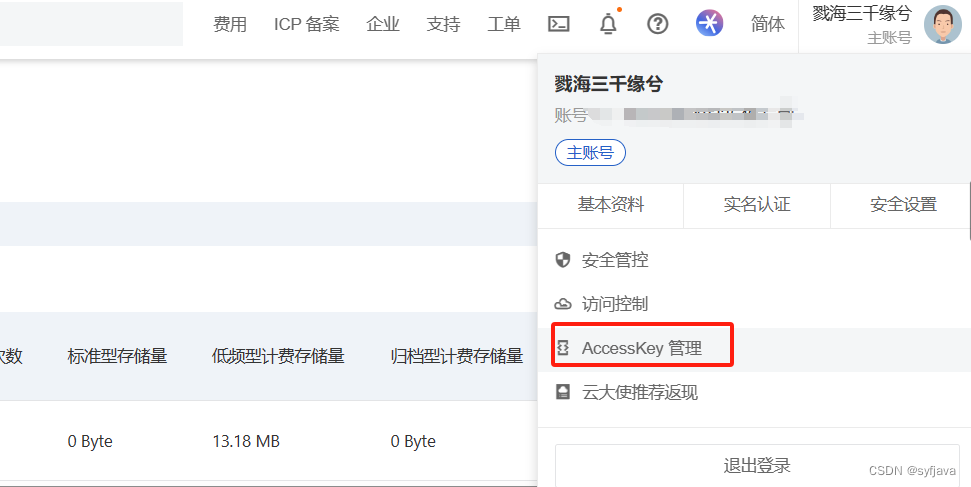
使用子账户 key(主账户key泄露比较危险,子账户随时可以关闭)

创建用户,开启api调用。之后手机短信验证

这里复制 key,
 保存上面key

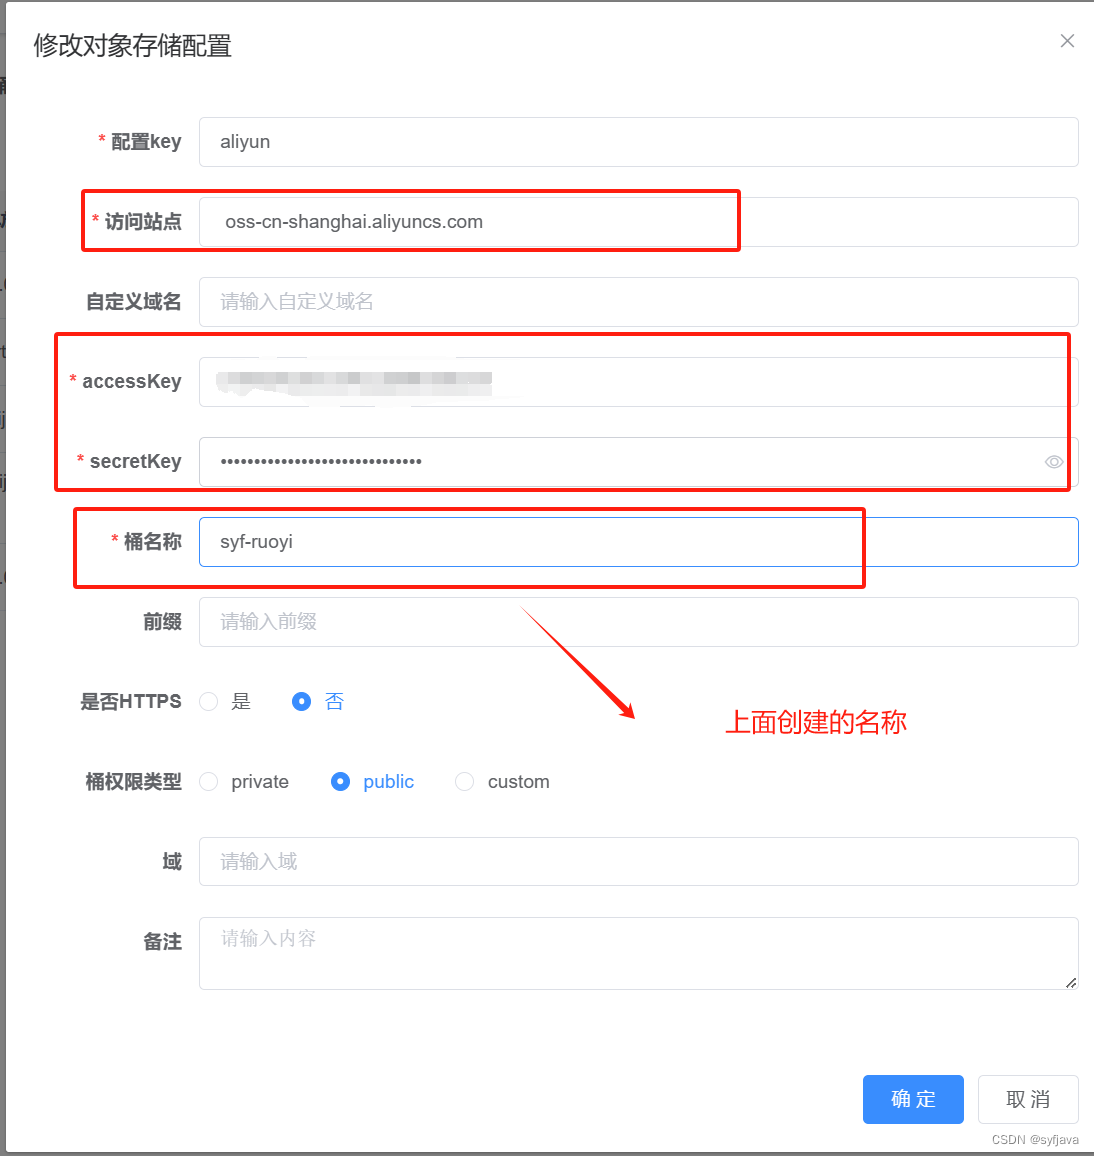
4-创建桶

5-配置上面桶的信息
八、测试阿里云
上传文件报错; 提示没有权限 you have not right access

accesskey管理 中设置权限

再次测试上传:成功

九、自定义域名访问文件
绑定域名后就可以用自己的域名来访问图片。
注意:
要在自己域名网站配置CNAME
如果配置https,可以去宝塔或者腾讯登申请免费证书陪配置(否则访问不到文件)

绑定域名配置在 自定义域名

十、腾讯云配置 OSS文件上传
步骤同上面 七 :阿里云配置一样。腾讯云点击左上角搜索 对象存储
唯一不同的注意点:
上传提示错误 :Access Denied. (Service Amazon s3: Status 403 ;Error code :Access Denied。。。
是域一定要配置 ,阿里云则默认可以为空

十一、七牛云配置文件上传
1-开启七牛云配置
 2-找到对象存储

3-新建桶 :(七牛有效期30天)

4-基础配置中查看s3域名 ,复制里面的 Endpoint,到若依文件配置的 访问站点。空间授权(只读 和 读写看下)


5- 测试域名设置为我们的 自定义域名(七牛云免费自带)

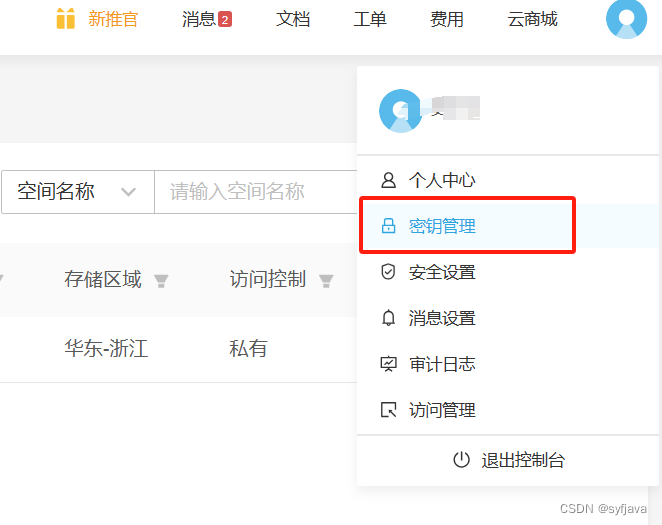
6-右上角秘钥管理设置我们的 AccessKey/SecretKey
测试上传成功


 383
383

 被折叠的 条评论
为什么被折叠?
被折叠的 条评论
为什么被折叠?
 到【灌水乐园】发言


