前期回顾:
上一期我们介绍了threejs中的材质,本期主要介绍纹理。
1) 基本概念
在three.js中, 使用图片来模拟纹理效果, 将一张二维的图片包裹到三维的物体上
比如
- 将
世界地图的图片包裹到球体上就可以模拟出地球的效果 - 将
篮球的图片包裹到球体上就可以模拟出篮球的效果
2) 纹理加载器
在three.js中通过纹理加载器加载图片
示例:
// 加载纹理贴图
const texture = new THREE.TextureLoader().load('/src/assets/texture/world.jpeg')
// 在设置材质时指定纹理贴图
const sphereMaterial = new THREE.MeshStandardMaterial({
  map: texture,
})
纹理贴图又可以细分为:
- 普通纹理贴图
- 凹凸纹理贴图
- 法向纹理贴图
- 环境纹理贴图
3) 普通纹理贴图
完整示例:
import * as THREE from 'three'
import { OrbitControls } from 'three/addons/controls/OrbitControls.js'

// 导入封装的MeshGui
import { MeshGui } from '../gui'

// 一. 创建场景
const scene = new THREE.Scene()

// 二. 创建相机
const camera = new THREE.PerspectiveCamera(
  45,
  window.innerWidth / window.innerHeight
)
camera.position.set(0, 0, 5)

// 三. 创建物体
const sphereGeometry = new THREE.SphereGeometry(1, 32, 32)
// 加载纹理贴图
const texture = new THREE.TextureLoader().load('/src/assets/texture/world.jpeg')
// 在设置材质时指定纹理贴图
const sphereMaterial = new THREE.MeshStandardMaterial({
  map: texture,
})
const sphere = new THREE.Mesh(sphereGeometry, sphereMaterial)
scene.add(sphere)

new MeshGui({
  target: sphere,
})

// 创建灯光
const ambientLight = new THREE.AmbientLight(0xffffff, 1)
scene.add(ambientLight)

// 四. 创建渲染器
const renderer = new THREE.WebGLRenderer({ antialias: true })
renderer.setPixelRatio(window.devicePixelRatio)
renderer.setSize(window.innerWidth, window.innerHeight)
renderer.setAnimationLoop(animation)
// 将渲染的canvas添加到body元素中
document.body.appendChild(renderer.domElement)

// 五. 辅助工具
const control = new OrbitControls(camera, renderer.domElement)

const axesHelper = new THREE.AxesHelper(10)
scene.add(axesHelper)

const gridHelper = new THREE.GridHelper(20, 20, 0xffffff, 0xffffff)
gridHelper.material.transparent = true
gridHelper.material.opacity = 0.5
scene.add(gridHelper)

function animation() {
  renderer.render(scene, camera)
}

window.addEventListener('resize', () => {
  camera.aspect = window.innerWidth / window.innerHeight
  camera.updateProjectionMatrix()

  renderer.setSize(window.innerWidth, window.innerHeight)
})
效果:

4) 凹凸纹理贴图
为了模拟表面的粗糙凹凸效果, 可以多加一组贴图来模拟高度上的凹凸效果
注意
只有在可以产生阴影的光线环境下, 才可以观察到凹凸效果
完整示例:
import * as THREE from 'three'
import { OrbitControls } from 'three/addons/controls/OrbitControls.js'

// 导入封装的MeshGui
import { MeshGui } from '../gui'

// 一. 创建场景
const scene = new THREE.Scene()

// 二. 创建相机
const camera = new THREE.PerspectiveCamera(
  45,
  window.innerWidth / window.innerHeight
)
camera.position.set(0, 0, 5)

// 三. 创建物体
const sphereGeometry = new THREE.SphereGeometry(1, 32, 32)

// 加载纹理贴图
const texture = new THREE.TextureLoader().load('/src/assets/texture/world.jpeg')

// 加载法向贴图
const map = new THREE.TextureLoader().load(
  '/src/assets/texture/world_normal.jpg'
)
// 在设置材质时指定纹理贴图
const sphereMaterial = new THREE.MeshStandardMaterial({
  map: texture,
  bumpMap: map,
})
const sphere = new THREE.Mesh(sphereGeometry, sphereMaterial)
scene.add(sphere)

new MeshGui({
  target: sphere,
})

// 添加环境灯光源
// const ambientLight = new THREE.AmbientLight(0xffffff, 1)
// scene.add(ambientLight)

// 添加点光源
const pointLight = new THREE.PointLight(0xffffff, 1)
pointLight.position.set(10, 10, 10)
scene.add(pointLight)

// 四. 创建渲染器
const renderer = new THREE.WebGLRenderer({ antialias: true })
renderer.setPixelRatio(window.devicePixelRatio)
renderer.setSize(window.innerWidth, window.innerHeight)
renderer.setAnimationLoop(animation)
// 将渲染的canvas添加到body元素中
document.body.appendChild(renderer.domElement)

// 五. 辅助工具
const control = new OrbitControls(camera, renderer.domElement)

const axesHelper = new THREE.AxesHelper(10)
scene.add(axesHelper)

const gridHelper = new THREE.GridHelper(20, 20, 0xffffff, 0xffffff)
gridHelper.material.transparent = true
gridHelper.material.opacity = 0.5
scene.add(gridHelper)

function animation() {
  renderer.render(scene, camera)
}

window.addEventListener('resize', () => {
  camera.aspect = window.innerWidth / window.innerHeight
  camera.updateProjectionMatrix()

  renderer.setSize(window.innerWidth, window.innerHeight)
})
效果:

5) 法向纹理贴图
使用法向贴图可以展示更多的细节, 更精细的控制
注意
如果设置了法向贴图, 凹凸贴图就会失效
完整示例:
import * as THREE from 'three'
import { OrbitControls } from 'three/addons/controls/OrbitControls.js'

// 导入封装的MeshGui
import { MeshGui } from '../gui'

// 一. 创建场景
const scene = new THREE.Scene()

// 二. 创建相机
const camera = new THREE.PerspectiveCamera(
  45,
  window.innerWidth / window.innerHeight
)
camera.position.set(0, 0, 5)

// 三. 创建物体
// 定义几何球体
const sphereGeometry = new THREE.SphereGeometry(1, 32, 32)

// 加载纹理贴图
const texture = new THREE.TextureLoader().load('/src/assets/texture/world.jpeg')

// 加载法向贴图
const map = new THREE.TextureLoader().load(
  '/src/assets/texture/world_normal.jpg'
)
// 在设置材质时指定纹理贴图
const sphereMaterial = new THREE.MeshStandardMaterial({
  map: texture,
  bumpMap: map,
  normalMap: map,
})
const sphere = new THREE.Mesh(sphereGeometry, sphereMaterial)
scene.add(sphere)

new MeshGui({
  target: sphere,
})

// 添加环境灯光源
// const ambientLight = new THREE.AmbientLight(0xffffff, 1)
// scene.add(ambientLight)

// 添加点光源
const pointLight = new THREE.PointLight(0xffffff, 1)
pointLight.position.set(10, 10, 10)
scene.add(pointLight)

// 四. 创建渲染器
const renderer = new THREE.WebGLRenderer({ antialias: true })
renderer.setPixelRatio(window.devicePixelRatio)
renderer.setSize(window.innerWidth, window.innerHeight)
renderer.setAnimationLoop(animation)
// 将渲染的canvas添加到body元素中
document.body.appendChild(renderer.domElement)

// 五. 辅助工具
const control = new OrbitControls(camera, renderer.domElement)

const axesHelper = new THREE.AxesHelper(10)
scene.add(axesHelper)

const gridHelper = new THREE.GridHelper(20, 20, 0xffffff, 0xffffff)
gridHelper.material.transparent = true
gridHelper.material.opacity = 0.5
scene.add(gridHelper)

function animation() {
  renderer.render(scene, camera)
}

window.addEventListener('resize', () => {
  camera.aspect = window.innerWidth / window.innerHeight
  camera.updateProjectionMatrix()

  renderer.setSize(window.innerWidth, window.innerHeight)
})
效果:

6) 环境纹理贴图
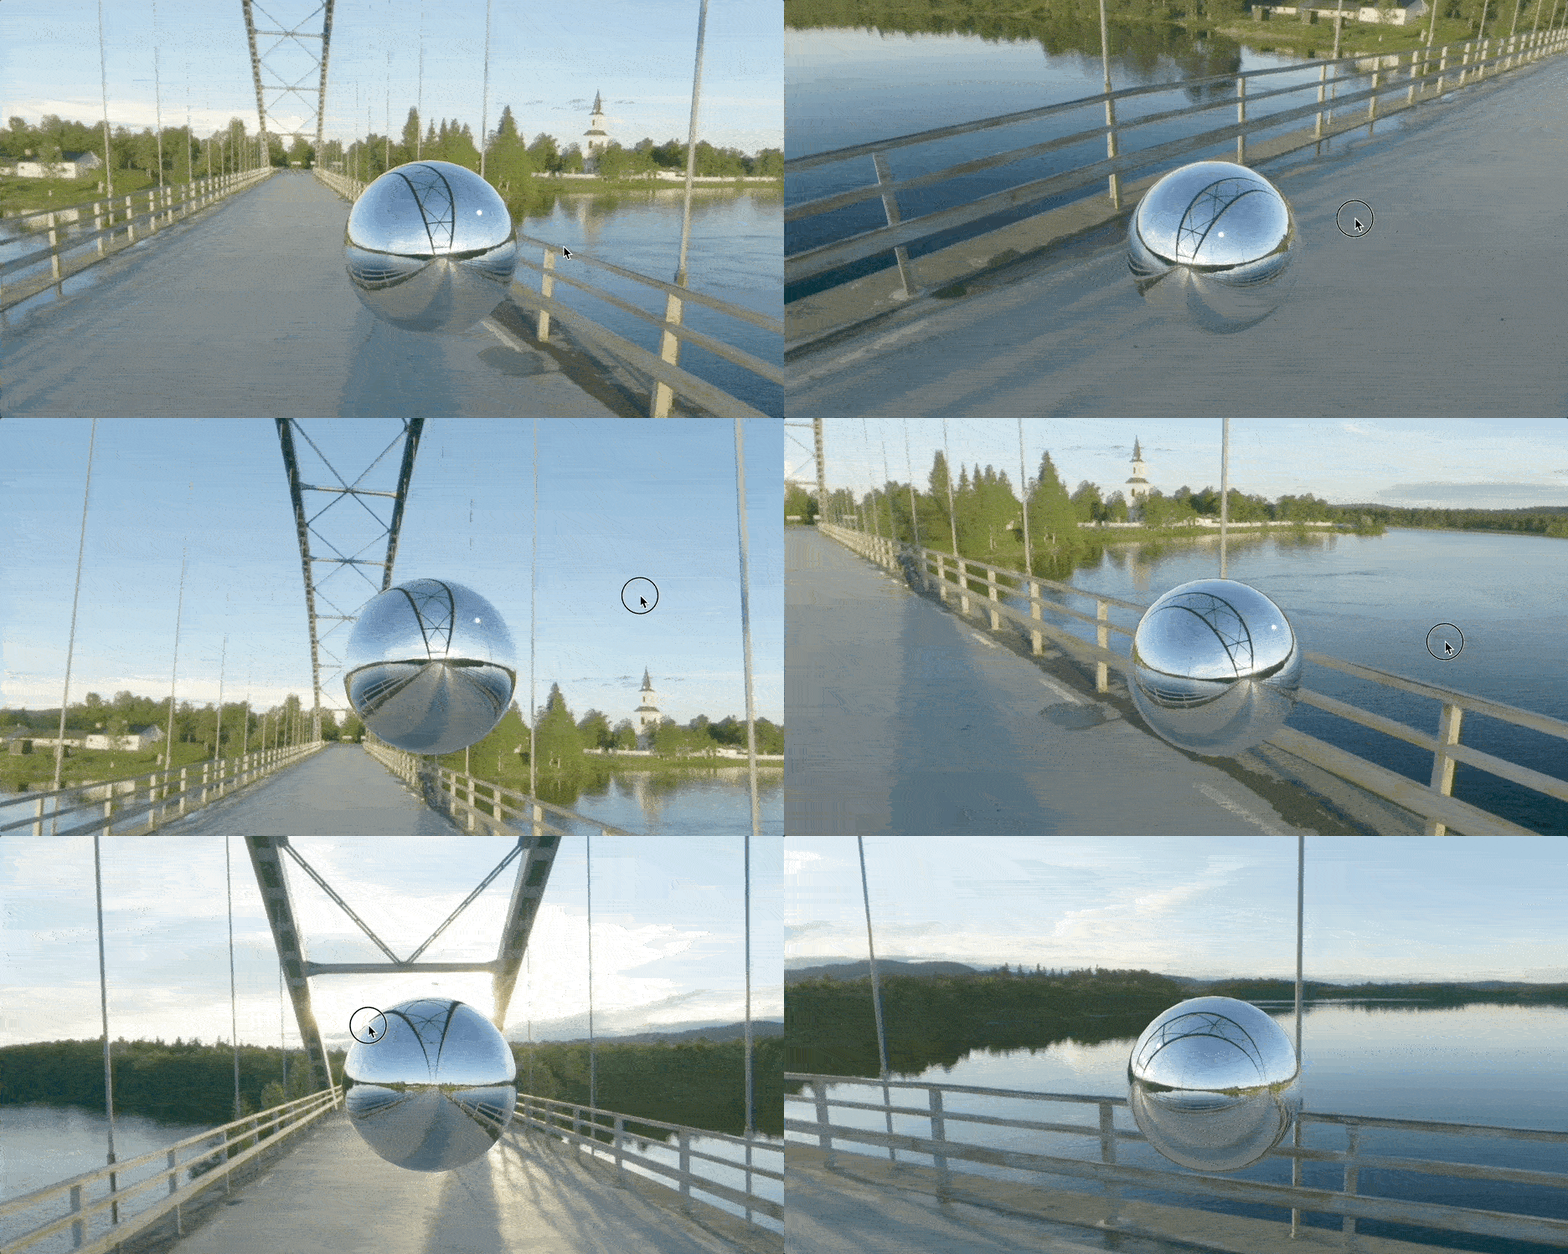
对于表面光滑的物体, 是可以反射出周围环境的效果, 环境贴图主要就是用于实现这个效果
效果:

示例:
import * as THREE from 'three'
import { OrbitControls } from 'three/addons/controls/OrbitControls.js'

// 导入封装的MeshGui
import { MeshGui } from '../gui'

// 一. 创建场景
const scene = new THREE.Scene()

// 二. 创建相机
const camera = new THREE.PerspectiveCamera(
  45,
  window.innerWidth / window.innerHeight
)
camera.position.set(0, 0, 5)

// 三. 创建物体
// 创建一个盒子, 模拟周围环境
const envGeometry = new THREE.BoxGeometry(1000, 1000, 1000)

const loader = new THREE.TextureLoader().setPath('/src/assets/texture/bridge/')

// 分别加载6个面的图片, 构成全景图
const imgs = ['px.jpg', 'nx.jpg', 'py.jpg', 'ny.jpg', 'pz.jpg', 'nz.jpg']

const mats = []
for (const item of imgs) {
  mats.push(
    new THREE.MeshBasicMaterial({
      map: loader.load(item),
      side: THREE.DoubleSide,
    })
  )
}
const env = new THREE.Mesh(envGeometry, mats)

// 创建一个球体, 能更好的显示效果
const sphereGeometry = new THREE.SphereGeometry(1, 32, 32)
const texture = new THREE.CubeTextureLoader()
  .setPath('/src/assets/texture/bridge/')
  .load(imgs)

const sphereMaterial = new THREE.MeshStandardMaterial({
  envMap: texture,
  roughness: 0.0, // 粗糙程度, 0表示镜面, 非常光滑
  metalness: 1, // 金属度
})
const sphere = new THREE.Mesh(sphereGeometry, sphereMaterial)

scene.add(env)
scene.add(sphere)

new MeshGui({
  target: sphere,
})

// 添加环境灯光源
// const ambientLight = new THREE.AmbientLight(0xffffff, 1)
// scene.add(ambientLight)

// 添加点光源
const pointLight = new THREE.PointLight(0xffffff, 1)
pointLight.position.set(10, 10, 10)
scene.add(pointLight)

// 四. 创建渲染器
const renderer = new THREE.WebGLRenderer({ antialias: true })
renderer.setPixelRatio(window.devicePixelRatio)
renderer.setSize(window.innerWidth, window.innerHeight)
renderer.setAnimationLoop(animation)
// 将渲染的canvas添加到body元素中
document.body.appendChild(renderer.domElement)

// 五. 辅助工具
const control = new OrbitControls(camera, renderer.domElement)

const axesHelper = new THREE.AxesHelper(10)
// scene.add(axesHelper)

const gridHelper = new THREE.GridHelper(20, 20, 0xffffff, 0xffffff)
gridHelper.material.transparent = true
gridHelper.material.opacity = 0.5
// scene.add(gridHelper)

function animation() {
  renderer.render(scene, camera)
}

window.addEventListener('resize', () => {
  camera.aspect = window.innerWidth / window.innerHeight
  camera.updateProjectionMatrix()

  renderer.setSize(window.innerWidth, window.innerHeight)
})
我们不仅提供优质课程,助你学习更进一步!新中地学生threejs作品:


三维GIS开发特训营即将开班,免fei领视频版教程戳↓↓↓


 被折叠的 条评论
为什么被折叠?


