


 本文详细介绍了如何在Android中使用WindowManager创建和管理窗口,包括获取WindowManager实例、设置LayoutParams属性以及添加View的过程。还探讨了WindowManager.LayoutParams的flag属性对touch和key事件的影响,以及View与Window的关联机制。
Window/WindowManager 创建与使用
先看看一个简单的添加View到Window的过程
    private void showView() {
        //获取WindowManager实例,这里的App是继承自Application
        WindowManager wm = (WindowManager) App.getApplication().getSystemService(Context.WINDOW_SERVICE);

        //设置LayoutParams属性
        WindowManager.LayoutParams layoutParams = new WindowManager.LayoutParams();
        layoutParams.height = 400;
        layoutParams.width = 400;
        layoutParams.format = PixelFormat.RGBA_8888;

        //窗口标记属性
        layoutParams.flags = WindowManager.LayoutParams.FLAG_NOT_TOUCH_MODAL
                | WindowManager.LayoutParams.FLAG_NOT_FOCUSABLE;

        //Window类型
        if (Build.VERSION.SDK_INT >= Build.VERSION_CODES.O) {
            layoutParams.type = WindowManager.LayoutParams.TYPE_APPLICATION_OVERLAY;
        } else {
            layoutParams.type = WindowManager.LayoutParams.TYPE_PHONE;
        }

        //构造TextView
        TextView textView = new TextView(this);
        textView.setBackground(new ColorDrawable(Color.WHITE));
        textView.setText("hello windowManager");

        //将textView添加到WindowManager
        wm.addView(textView, layoutParams);
    }
效果如下:

以上代码分三个部分看:
1、获取WindowManager对象
2、设置LayoutParams属性
3、将View添加到Window里
I 获取WindowManager对象
App是继承自Application,App.getApplication()获取当前应用的application实例,其本身也是Context。关于Context请移步:Android各种Context的前世今生
public interface WindowManager extends ViewManager
WindowManager是个接口,继承了ViewManager,ViewManager也是个接口,来看看它的内容:
    public interface ViewManager
    {
        //添加View, view 表示内容本身,params表示对此view位置、大小等属性的限制
        public void addView(View view, ViewGroup.LayoutParams params);
        //更新view
        public void updateViewLayout(View view, ViewGroup.LayoutParams params);
        //移除View
        public void removeView(View view);
    }
既然WindowManager是个接口,那么必然有实现它的类,答案就在:getSystemService(Context.WINDOW_SERVICE)里。
ContextImpl.java
    @Override
    public Object getSystemService(String name) {
        return SystemServiceRegistry.getSystemService(this, name);
    }
SystemServiceRegistry.java
    public static Object getSystemService(ContextImpl ctx, String name) {
        ServiceFetcher<?> fetcher = SYSTEM_SERVICE_FETCHERS.get(name);
        return fetcher != null ? fetcher.getService(ctx) : null;
    }

    registerService(Context.WINDOW_SERVICE, WindowManager .class,
                new CachedServiceFetcher<WindowManager>() {
        @Override
        public WindowManager createService (ContextImpl ctx){
            return new WindowManagerImpl(ctx);
        }
    });
WindowManager实现类是WindowManagerImpl
WindowManagerImpl 内容并不多
    public final class WindowManagerImpl implements WindowManager {
        //WindowManagerImpl 代理类 WindowManagerGlobal单例
        private final WindowManagerGlobal mGlobal = WindowManagerGlobal.getInstance();
        //getSystemService传进来的Context
        private final Context mContext;
        //记录构造WindowManager父Window
        private final Window mParentWindow;
        //关联Activity时会赋值
        private IBinder mDefaultToken;

        public WindowManagerImpl(Context context) {
            this(context, null);
        }

        private WindowManagerImpl(Context context, Window parentWindow) {
            mContext = context;
            mParentWindow = parentWindow;
        }

        public WindowManagerImpl createLocalWindowManager(Window parentWindow) {
            return new WindowManagerImpl(mContext, parentWindow);
        }
        //省略
    }
其实现的add/update/remove方法最终交由WindowManagerGlobal实现。
WindowManagerGlobal记录着该App内所有展示的Window一些相关信息
II 设置LayoutParams属性
WindowManager.LayoutParams 继承自ViewGroup.LayoutParams,来看看一些我们关注的属性:
width : 指定Window的宽度
height : 指定Window的高度
x : Window在屏幕X轴的偏移(偏移的起点是gravity设置的位置)
y : Window在屏幕Y轴的偏移(偏移的起点是gravity设置的位置)
flags :控制Window一些行为,比如能否让下层的Window获得点击事件,Window能否超出屏幕展示等
type :Window类型,分为三种:
FIRST_APPLICATION_WINDOW ~ LAST_APPLICATION_WINDOW(1~99)应用窗口
FIRST_SUB_WINDOW ~ LAST_SUB_WINDOW (1000 ~ 1999)子窗口
FIRST_SYSTEM_WINDOW ~ LAST_SYSTEM_WINDOW (2000 ~ 2999)系统窗口
数值越大,层级越高,也就是层级越高的就能显示在层级低的上边。
gravity : Window的位置,取值自Gravity
windowAnimations : Window动画
该例我们设置的type属于系统窗口,系统窗口需要用户开启权限,对应的是设置里的:“显示在其他应用的上层”
在Activity里检查并获取应用的方法如下:
    public void onClick(View view) {
        if (checkPermission(this)) {
            showView();
        } else {
            Intent intent = getPermissionIntent(this);
            if (intent != null) {
                try {
                    startActivityForResult(intent, 100);
                } catch (Exception e) {
                    Log.d("hello", "error");
                }
            } else {
            }
        }
    }

    public static boolean checkPermission(@NonNull Context context) {

        if (Build.VERSION.SDK_INT >= Build.VERSION_CODES.M) {
            return Settings.canDrawOverlays(context);
        } else if (Build.VERSION.SDK_INT >= Build.VERSION_CODES.KITKAT) {
            int op = 24;
            AppOpsManager manager = (AppOpsManager) context.getSystemService(Context.APP_OPS_SERVICE);
            try {
                Class clazz = AppOpsManager.class;
                Method method = clazz.getDeclaredMethod("checkOp", int.class, int.class, String.class);
                return AppOpsManager.MODE_ALLOWED == (int) method.invoke(manager, op, Binder.getCallingUid(), context.getPackageName());
            } catch (Exception e) {
                return false;
            }
        } else {
            return true;
        }
    }

    public static Intent getPermissionIntent(@NonNull Context context) {

        if (Build.VERSION.SDK_INT >= Build.VERSION_CODES.M) {
            return new Intent(Settings.ACTION_MANAGE_OVERLAY_PERMISSION, Uri.parse("package:" + context.getPackageName()));
        } else if (Build.VERSION.SDK_INT >= Build.VERSION_CODES.KITKAT) {
            String brand = Build.BRAND;
            if (TextUtils.isEmpty(brand)) {
                return null;
            }
            return null;
        } else {
            return null;
        }
    }

    @Override
    protected void onActivityResult(int requestCode, int resultCode, @Nullable Intent data) {
        super.onActivityResult(requestCode, resultCode, data);
        if (requestCode == 100) {
            if (checkPermission(this)) {
                showView();
            }
        }
    }
当然还需要在AndroidManifest.xml里声明使用的权限
<uses-permission android:name="android.permission.SYSTEM_ALERT_WINDOW" />
III 将View添加到Window里
wm.addView(textView, layoutParams)
WindowManagerGlobal.java
    public void addView(View view, ViewGroup.LayoutParams params,
                        Display display, Window parentWindow) {

        final WindowManager.LayoutParams wparams = (WindowManager.LayoutParams) params;
        if (parentWindow != null) {
            //调整LayoutParams
            parentWindow.adjustLayoutParamsForSubWindow(wparams);
        } else {
            //省略
        }

        ViewRootImpl root;
        View panelParentView = null;
        synchronized (mLock) {
            //构造ViewRootImpl
            root = new ViewRootImpl(view.getContext(), display);
            view.setLayoutParams(wparams);
            //用数组记录
            //mViews 存放添加到Window的view
            //mRoots 存放ViewRootImpl
            //mParams 存放Window参数
            mViews.add(view);
            mRoots.add(root);
            mParams.add(wparams);
            try {
                //调用ViewRootImpl setView
                root.setView(view, wparams, panelParentView);
            } catch (RuntimeException e) {
            }
        }
        //省略
    }
真正实现窗口的添加是通过ViewRootImpl setView(xx)方法
ViewRootImpl.java
    public void setView(View view, WindowManager.LayoutParams attrs, View panelParentView) {
        synchronized (this) {
            if (mView == null) {
                mView = view;
                //省略
                int res;
                //提交View展示请求(测量、布局、绘制),只是提交到队列里
                //当屏幕刷新信号到来之时从队列取出执行
                requestLayout();
                try {
                    //添加到窗口
                    //进程间通信,告诉WindowManagerService为我们开辟一个Window空间
                    res = mWindowSession.addToDisplay(mWindow, mSeq, mWindowAttributes,
                            getHostVisibility(), mDisplay.getDisplayId(), mTmpFrame,
                            mAttachInfo.mContentInsets, mAttachInfo.mStableInsets,
                            mAttachInfo.mOutsets, mAttachInfo.mDisplayCutout, mInputChannel,
                            mTempInsets);
                } catch (RemoteException e) {
                } finally {
                }
                if (res < WindowManagerGlobal.ADD_OKAY) {
                    //窗口添加失败抛出各种异常
                }
                //Window根View的mParent是ViewRootImpl 而其他View的mParent是其父控件
                //这参数是向上遍历View Tree的关键
                view.assignParent(this);
                //输入事件相关 touch、key事件接收
                CharSequence counterSuffix = attrs.getTitle();
                mSyntheticInputStage = new SyntheticInputStage();
                InputStage viewPostImeStage = new ViewPostImeInputStage(mSyntheticInputStage);
                InputStage nativePostImeStage = new NativePostImeInputStage(viewPostImeStage,
                        "aq:native-post-ime:" + counterSuffix);
                InputStage earlyPostImeStage = new EarlyPostImeInputStage(nativePostImeStage);
                InputStage imeStage = new ImeInputStage(earlyPostImeStage,
                        "aq:ime:" + counterSuffix);
                InputStage viewPreImeStage = new ViewPreImeInputStage(imeStage);
                InputStage nativePreImeStage = new NativePreImeInputStage(viewPreImeStage,
                        "aq:native-pre-ime:" + counterSuffix);
            }
        }
    }
关于requestLayout()请移步:Android Activity创建到View的显示过程
使用Binder方式,ViewRootImpl与WindowManagerService建立Session进行通信
mWindowSession.addToDisplay 简单来看看后续调用(有兴趣的可以深入源码看看)。
Session.java
    public int addToDisplay(IWindow window, int seq, WindowManager.LayoutParams attrs,
            int viewVisibility, int displayId, Rect outFrame, Rect outContentInsets,
            Rect outStableInsets, Rect outOutsets,
            DisplayCutout.ParcelableWrapper outDisplayCutout, InputChannel outInputChannel,
            InsetsState outInsetsState) {
        return mService.addWindow(this, window, seq, attrs, viewVisibility, displayId, outFrame,
                outContentInsets, outStableInsets, outOutsets, outDisplayCutout, outInputChannel,
                outInsetsState);
    }

WindowManagerService.java
    public int addWindow(Session session, IWindow client, int seq,
            LayoutParams attrs, int viewVisibility, int displayId, Rect outFrame,
            Rect outContentInsets, Rect outStableInsets, Rect outOutsets,
            DisplayCutout.ParcelableWrapper outDisplayCutout, InputChannel outInputChannel,
            InsetsState outInsetsState) {
            //省略
}
WindowManager.LayoutParams flag属性之key/touch事件
我们知道Activity实际上也是通过Window展示的,现在Activity之上添加了另一个Window,那么key/touch事件是如何决定分发给哪个Window呢?
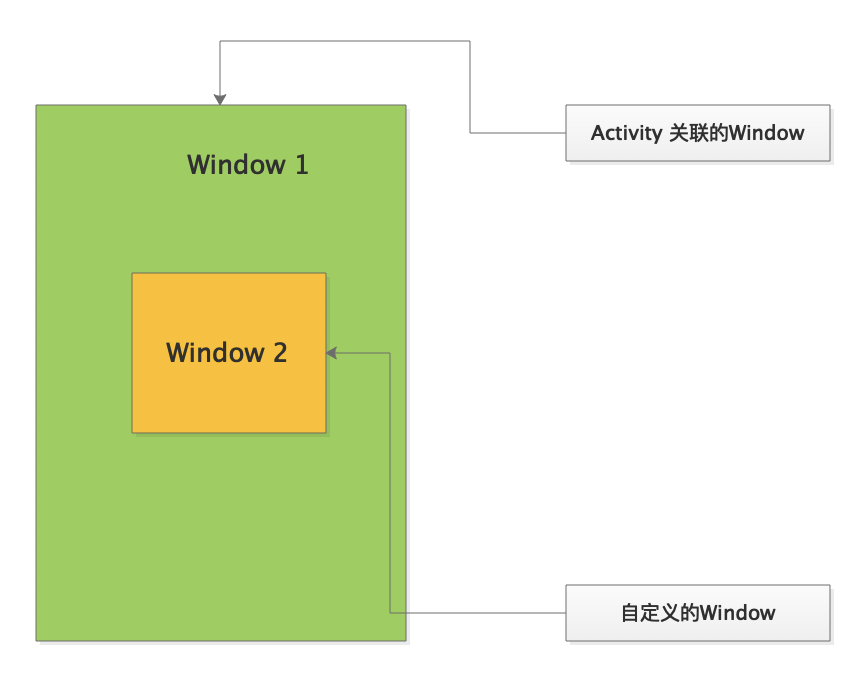
如上图所示,Window2 是在Window1之上,层级比Window1高,决定Window2 key/touch事件是否分发给Window1取决于WindowManager.LayoutParams flag 参数,flag默认为0。结合上图来看看一些常用的值及其作用,当Window2使用如下参数时:
public static final int FLAG_NOT_TOUCHABLE = 0x00000010;
public static final int FLAG_NOT_FOCUSABLE = 0x00000008;
public static final int FLAG_NOT_TOUCH_MODAL = 0x00000020;
public static final int FLAG_WATCH_OUTSIDE_TOUCH = 0x00040000;
public static final int FLAG_ALT_FOCUSABLE_IM = 0x00020000;
flag默认为0,不对flag设置时,Window2默认接受所有的touch/key 事件,即使点击区域不在Window2的范围内。
FLAG_NOT_TOUCHABLE
表示Window 不接收所有的touch事件。此时无论点击Window2 区域还是Window2之外的区域,touch事件都分发给了下一层Window1。而key事件则不受影响。
FLAG_NOT_FOCUSABLE
表示Window不接收输入焦点,不和键盘交互。比如当Window里使用editText时,是无法弹出键盘的。另外一个作用就是:当点击Window2之外的区域时,touch事件分发给了Window1,而点击Window2区域是分发给了其自身,key事件也不会分发给Window2,而是给了Window1(该作用相当于设置了FLAG_NOT_TOUCH_MODAL)。
FLAG_NOT_TOUCH_MODAL
表示当点击Window2之外的区域时,touch事件分发给了Window1,而key事件不受影响。当然此时Window2是能获取焦点的,能和键盘交互。
FLAG_WATCH_OUTSIDE_TOUCH
该值配合FLAG_NOT_TOUCH_MODAL才会生效。意思就是当设置了FLAG_NOT_TOUCH_MODAL时,点击Window2外部区域其收不到touch事件,但是这个时候Window2想要收到外部点击的事件,同时又不影响事件分发给Window1,此时FLAG_WATCH_OUTSIDE_TOUCH标记就发挥其作用了。此Window2接收到ACTION_OUTSIDE类型的事件,而touch事件(down/move/up)则分发给了Window1。key事件不受影响。
FLAG_ALT_FOCUSABLE_IM
与键盘相关。当FLAG_NOT_FOCUSABLE没有设置且FLAG_ALT_FOCUSABLE_IM设置时,表示无需与键盘交互。当FLAG_NOT_FOCUSABLE/FLAG_ALT_FOCUSABLE_IM同时设置时,表示需要与输入法交互。FLAG_ALT_FOCUSABLE_IM单独设置时不影响touch/key 事件。
View如何与Window关联
通过前面的分析,并没有发现View和Window的直接关联,那么View的内容怎么显示在Window上的呢?
Surface与Canvas
平时我们都是重写View onDraw(Canvas canvas),通过Canvas绘制我们想要的效果,来看看Canvas是怎么来的:
对于软件绘制:
ViewRootImpl.java
public final Surface mSurface = new Surface();
final Canvas canvas = mSurface.lockCanvas(dirty);
可以看出,Canvas是从Surface获取的,那自然想到Surface和Window是否有关系呢,是怎么关联呢?
ViewRootImpl.java
    private int relayoutWindow(WindowManager.LayoutParams params, int viewVisibility,
                               boolean insetsPending) throws RemoteException {
        //省略
        //传入SurfaceControl,在WindowManagerService里处理
        int relayoutResult = mWindowSession.relayout(mWindow, mSeq, params,
                (int) (mView.getMeasuredWidth() * appScale + 0.5f),
                (int) (mView.getMeasuredHeight() * appScale + 0.5f), viewVisibility,
                insetsPending ? WindowManagerGlobal.RELAYOUT_INSETS_PENDING : 0, frameNumber,
                mTmpFrame, mPendingOverscanInsets, mPendingContentInsets, mPendingVisibleInsets,
                mPendingStableInsets, mPendingOutsets, mPendingBackDropFrame, mPendingDisplayCutout,
                mPendingMergedConfiguration, mSurfaceControl, mTempInsets);
        if (mSurfaceControl.isValid()) {
            //返回App层的Surface
            mSurface.copyFrom(mSurfaceControl);
        } else {
            destroySurface();
        }
        //省略
        return relayoutResult;
    }
在View开启ViewTree三大流程时,performTraversals->relayoutWindow,将Window与SurfaceControl关联,进而关联Surface。这样,Window->Surface->Canvas就关联起来了,通过Canvas将View绘制到Surface上,最终显示出来。
而对于硬件加速来说:
每个View都有RenderNode
RenderNode.java
    public @NonNull RecordingCanvas beginRecording(int width, int height) {
        if (mCurrentRecordingCanvas != null) {
            throw new IllegalStateException(
                    "Recording currently in progress - missing #endRecording() call?");
        }
        mCurrentRecordingCanvas = RecordingCanvas.obtain(this, width, height);
        return mCurrentRecordingCanvas;
    }
绘制该View的Canvas通过beginRecording获取,Canvas绘制的操作封装在DisplayList。
在ViewRootImpl->performTraversals
hwInitialized = mAttachInfo.mThreadedRenderer.initialize(
mSurface);
建立ThreadedRenderer和Surface关联,而ThreadedRenderer里持有:
protected RenderNode mRootNode;
该mRootNode是整个ViewTree的根node。这样Surface和Canvas建立了关联。
用图表示View、Window、Surface关系:
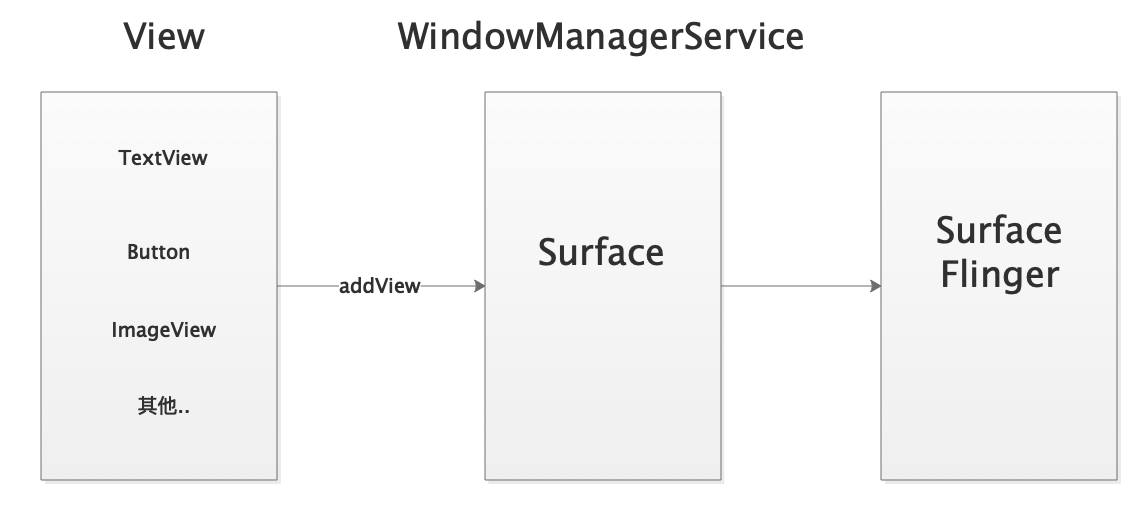
Window内容是通过Surface展示,而SurfaceFlinger将多个Surface合成显示在屏幕上。
ViewManager 其他方法
上面说了添加View到Window的addView(xx)方法,接下来看看updateViewLayout(xx)和removeView(xx)方法
updateViewLayout(xx)
WindowManagerGlobal.java
    public void updateViewLayout(View view, ViewGroup.LayoutParams params) {
        final WindowManager.LayoutParams wparams = (WindowManager.LayoutParams)params;
        //设置View的params
        view.setLayoutParams(wparams);
        synchronized (mLock) {
            //找到目标View在数组中的位置
            int index = findViewLocked(view, true);
            ViewRootImpl root = mRoots.get(index);
            //移除旧的params
            mParams.remove(index);
            //添加新的params
            mParams.add(index, wparams);
            //ViewRootImpl重新设置params
            //最终按需开启View的三大流程
            root.setLayoutParams(wparams, false);
        }
    }
removeView(xx)
public void removeView(View view, boolean immediate)
immediate 表示是否立即移除View,如果是false,那么通过Handler发送Message,等待下次Looper轮询后执行。
具体工作是在ViewRootImpl里的doDie()。
    void doDie() {
        synchronized (this) {
            //通知View已经移除
            if (mAdded) {
                dispatchDetachedFromWindow();
            }
            if (mAdded && !mFirst) {
                destroyHardwareRenderer();
                if (mView != null) {
                        try {
                            //通知WindowManagerService重新布局
                            if ((relayoutWindow(mWindowAttributes, viewVisibility, false)
                                    & WindowManagerGlobal.RELAYOUT_RES_FIRST_TIME) != 0) {
                                mWindowSession.finishDrawing(mWindow);
                            }
                        } catch (RemoteException e) {
                        }
                    }
                    //移除surface
                    destroySurface();
                }
            }
            mAdded = false;
        }
        //移除WindowManagerGlobal记录的信息,比如ViewRootImpl、View数组等
        WindowManagerGlobal.getInstance().doRemoveView(this);
    }
WindowManager常用场景
Android里的界面展示都是通过WindowManager.addView(xx),也就是说我们看到的界面都是有个Window的。只是Window比较抽象,我们更多接触的是View。
Activity
Activity实际上也是通过Window展示界面的,只是系统封装好了addView的过程。我们只需要setContentView(resId),将我们的布局传入即可。
关于setContentView(resId),请移步:Android DecorView 一窥全貌(上)
Dialog
Dialog内部也是通过addView(xx)展示
PopupWindow
与Dialog类似,只是没有PhoneWindow
Toast
Toast与其他的系统弹框等…只要界面展示都会用到addView(xx)
Dialog/PopupWindow/Toast 更详细的差异请移步:
Dialog PopupWindow Toast 你还有疑惑吗


 2086
2086


 被折叠的 条评论
为什么被折叠?
被折叠的 条评论
为什么被折叠?
 到【灌水乐园】发言


