


PopupWindow is used to show floating view on display at specified position. It’s a floating container that appears on top of current activity. PopupWindow can have their own layout and can be set after inflating with setContentView(View).
Using PopupWindow we will implement Tooltip view. Tooltip view is getting quite popular these days with Android developers. It is used for engaging experience of application user. Like for first installation with series of Tooltip view around different anchor view, you can give a tour of your application.
Sample PopupWindow Application
Update your res/layout/activity_main.xml as below. It will have a button which will act as anchor view for popup window.
<RelativeLayout xmlns:android="http://schemas.android.com/apk/res/android"
xmlns:tools="http://schemas.android.com/tools"
android:layout_width="match_parent"
android:layout_height="match_parent"
android:paddingBottom="@dimen/activity_vertical_margin"
android:paddingLeft="@dimen/activity_horizontal_margin"
android:paddingRight="@dimen/activity_horizontal_margin"
android:paddingTop="@dimen/activity_vertical_margin"
tools:context="com.androidsrc.popupwindow.MainActivity" >
<Button
android:id="@+id/anchor_view"
android:layout_width="wrap_content"
android:layout_height="wrap_content"
android:layout_centerHorizontal="true"
android:layout_centerVertical="true"
android:onClick="onClick"
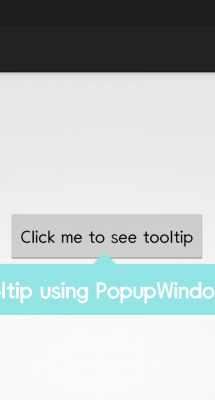
android:text="Click me to see tooltip" />
</RelativeLayout>PopupWindow will have it’s own custom view. Create new layout file res/layout/tooltip_layout.xml. It will have ImageView to show arrow and TextView to show tip text.
<?xml version="1.0" encoding="utf-8"?>
<LinearLayout xmlns:android="http://schemas.android.com/apk/res/android"
 android:layout_width="wrap_content"
 android:layout_height="wrap_content"
 android:orientation="vertical" >

 <ImageView
 android:id="@+id/tooltip_nav_up"
 android:layout_width="25dp"
 android:layout_height="25dp"
 android:layout_gravity="center"
 android:background="@drawable/nav_up" />

 <TextView
 android:id="@+id/tooltip_text"
 android:layout_width="wrap_content"
 android:layout_height="wrap_content"
 android:background="@drawable/tooltip_bg"
 android:gravity="center"
 android:padding="10dp"
 android:text="Tooltip using PopupWindow :)"
 android:textColor="@android:color/white"
 android:textSize="20dp"
 android:textStyle="bold" />

</LinearLayout>
I dont have any png file for arrow in tip layout. We will create our own shape using layer-list. Create file res/drawable/nav_up.xml
<?xml version="1.0" encoding="utf-8"?>
<layer-list xmlns:android="http://schemas.android.com/apk/res/android" >

 <item>
 <rotate
 android:fromDegrees="45"
 android:pivotX="-50%"
 android:pivotY="80%"
 android:toDegrees="45" >
 <shape android:shape="rectangle" >
 <solid android:color="#92e4e5" >
 </solid>

 <stroke
 android:width="2dp"
 android:color="#92e4e5" />
 </shape>
 </rotate>
 </item>

</layer-list>
For background of TextView as well we will create a shape drawable. Create res/drawable/tooltip_bg.xml
<?xml version="1.0" encoding="utf-8"?>
<shape xmlns:android="http://schemas.android.com/apk/res/android"
 android:shape="rectangle" >

 <solid android:color="#92e4e5" />

 <stroke
 android:width="2dp"
 android:color="#92e4e5" />

 <corners android:radius="2dp" />

</shape>
Now we will create a class named TooltipWindow.java which will tailor our need to show tool tip on anchor view. We will show ToolTip on clicking button from main Activity of our application. This button will act as anchor view for it. We will inflate layout file for Tooltip and set this view to PopupWindow. Whenever showing of Tooltip is required, we will call showToolTip(View). With some calculations based upon screen dimensions and anchor view size, we will calculate x and y position for PopupWindow. Final code will be as below.
package com.androidsrc.popupwindow;

import android.app.ActionBar.LayoutParams;
import android.content.Context;
import android.graphics.Rect;
import android.graphics.drawable.BitmapDrawable;
import android.os.Handler;
import android.view.Gravity;
import android.view.LayoutInflater;
import android.view.View;
import android.widget.PopupWindow;

public class TooltipWindow {

private static final int MSG_DISMISS_TOOLTIP = 100;
private Context ctx;
private PopupWindow tipWindow;
private View contentView;
private LayoutInflater inflater;

public TooltipWindow(Context ctx) {
this.ctx = ctx;
tipWindow = new PopupWindow(ctx);

inflater = (LayoutInflater) ctx
.getSystemService(Context.LAYOUT_INFLATER_SERVICE);
contentView = inflater.inflate(R.layout.tooltip_layout, null);
}

void showToolTip(View anchor) {

tipWindow.setHeight(LayoutParams.WRAP_CONTENT);
tipWindow.setWidth(LayoutParams.WRAP_CONTENT);

tipWindow.setOutsideTouchable(true);
tipWindow.setTouchable(true);
tipWindow.setFocusable(true);
tipWindow.setBackgroundDrawable(new BitmapDrawable());

tipWindow.setContentView(contentView);

int screen_pos[] = new int[2];
// Get location of anchor view on screen
anchor.getLocationOnScreen(screen_pos);

// Get rect for anchor view
Rect anchor_rect = new Rect(screen_pos[0], screen_pos[1], screen_pos[0]
+ anchor.getWidth(), screen_pos[1] + anchor.getHeight());

// Call view measure to calculate how big your view should be.
contentView.measure(LayoutParams.WRAP_CONTENT,
LayoutParams.WRAP_CONTENT);

int contentViewHeight = contentView.getMeasuredHeight();
int contentViewWidth = contentView.getMeasuredWidth();
// In this case , i dont need much calculation for x and y position of
// tooltip
// For cases if anchor is near screen border, you need to take care of
// direction as well
// to show left, right, above or below of anchor view
int position_x = anchor_rect.centerX() - (contentViewWidth / 2);
int position_y = anchor_rect.bottom - (anchor_rect.height() / 2);

tipWindow.showAtLocation(anchor, Gravity.NO_GRAVITY, position_x,
position_y);

// send message to handler to dismiss tipWindow after X milliseconds
handler.sendEmptyMessageDelayed(MSG_DISMISS_TOOLTIP, 4000);
}

boolean isTooltipShown() {
if (tipWindow != null && tipWindow.isShowing())
return true;
return false;
}

void dismissTooltip() {
if (tipWindow != null && tipWindow.isShowing())
tipWindow.dismiss();
}

Handler handler = new Handler() {
public void handleMessage(android.os.Message msg) {
switch (msg.what) {
case MSG_DISMISS_TOOLTIP:
if (tipWindow != null && tipWindow.isShowing())
tipWindow.dismiss();
break;
}
};
};

}
Finally, let’s move to our MainActivity.java. It will implement View.OnClickListener for button click events. In onClick(), we will show tooltip window.
package com.androidsrc.popupwindow;

import android.app.Activity;
import android.os.Bundle;
import android.view.Menu;
import android.view.MenuItem;
import android.view.View;
import android.view.View.OnClickListener;

public class MainActivity extends Activity implements OnClickListener{

TooltipWindow tipWindow;

@Override
protected void onCreate(Bundle savedInstanceState) {
super.onCreate(savedInstanceState);
setContentView(R.layout.activity_main);
tipWindow = new TooltipWindow(MainActivity.this);
}

@Override
public void onClick(View anchor) {
// TODO Auto-generated method stub
if(!tipWindow.isTooltipShown())
tipWindow.showToolTip(anchor);
}

@Override
protected void onDestroy() {
// TODO Auto-generated method stub
if(tipWindow != null && tipWindow.isTooltipShown())
tipWindow.dismissTooltip();
super.onDestroy();
}

}
效果如下:
还是不够方便?
国外牛人封装好的框架:


 1043
1043


 被折叠的 条评论
为什么被折叠?
被折叠的 条评论
为什么被折叠?
 到【灌水乐园】发言


