


(一)概念
首先介绍一下静态库(静态链接库)、动态库(动态链接库)的概念,首先两者都是代码共享的方式。
静态库:在链接步骤中,连接器将从库文件取得所需的代码,复制到生成的可执行文件中,这种库称为静态库,其特点是可执行文件中包含了库代码的一份完整拷贝;缺点就是被多次使用就会有多份冗余拷贝。即静态库中的指令都全部被直接包含在最终生成的 EXE 文件中了。在vs中新建生成静态库的工程,编译生成成功后,只产生一个.lib文件。
动态库:动态链接库是一个包含可由多个程序同时使用的代码和数据的库,DLL不是可执行文件。动态链接提供了一种方法,使进程可以调用不属于其可执行代码的函数。函数的可执行代码位于一个 DLL 中,该 DLL 包含一个或多个已被编译、链接并与使用它们的进程分开存储的函数。在vs中新建生成动态库的工程,编译成功后,产生一个.lib文件和一个.dll文件。
那么上述静态库和动态库中的lib有什么区别呢?
静态库中的lib:该LIB包含函数代码本身(即包括函数的索引,也包括实现),在编译时直接将代码加入程序当中
动态库中的lib:该LIB包含了函数所在的DLL文件和文件中函数位置的信息(索引),函数实现代码由运行时加载在进程空间中的DLL提供
总之,lib是编译时用到的,dll是运行时用到的。如果要完成源代码的编译,只需要lib;如果要使动态链接的程序运行起来,只需要dll。
(二)生成和使用lib
1.VS2015生成lib文件
在VS2015中新建项目->Win32项目->勾选静态链接库,然后添加所需要的类,包括.h文件和.cpp文件。下面的例子中,我添加了两个类,分别是twomain类和student类,相应的代码如下:
towmain.h:
#pragma once
#include"stdafx.h"
#include"student.h"
#include<iostream>
#include<string>
using namespace std;

class twomain
{
public:
    twomain();
    ~twomain();

    void setStn(string name, int age);
    student getStn();
    void setCity(string city);
    string getCity();

    void toString();

private:
    student stn;
    string city;
};
towmain.cpp:
#include "stdafx.h"
#include "twomain.h"

twomain::twomain()
{
}
twomain::~twomain()
{
}

void twomain::setCity(string city) {
    this->city = city;
}
string twomain::getCity() {
    return this->city;
}

void twomain::setStn(string name, int age) {
    this->stn.setName(name);
    this->stn.setAge(age);
}
student twomain::getStn() {
    return this->stn;
}

void twomain::toString() {
    cout<<"name is "<<this->stn.getName()<<",age is "<<this->stn.getAge()<<",city is "<<this->city<<endl;
}
student.h:
#pragma once
#include<iostream>
#include<string>
using namespace std;
class student
{
public:
    student();
    ~student();
    void setName(string name);
    string getName();
    void setAge(int age);
    int getAge();

    void toString();

private:
    string name;
    int age;
};
student.cpp:
#include "stdafx.h"
#include "student.h"
student::student()
{
}
student::~student()
{
}

void student::setName(string name) {
    this->name = name;
}
string student::getName() {
    return this->name;
}

void student::setAge(int age) {
    this->age = age;
}
int student::getAge() {
    return this->age;
}

void student::toString() {
    cout << "name is " << this->name << ",age is " << this->age << endl;
}然后点击工具栏菜单中的生成->生成解决方案,就可以在项目文件目录的debug目录下看到生成的lib文件。主要要考虑清楚自己的lib应用的场景,是debug模式还是release模式,是x86还是x64平台使用,这些要严格按照需要选择,不然后面使用时很容易出一些错误。
2.使用lib文件
生成好了lib文件之后,我们新建一个空项目,来测试生成的lib是否好用。在新建的空项目中添加main.cpp文件,并在该文件中添加如下代码:
#include"twomain.h"
int main() {
    twomain t;
    t.setCity("江西");
    t.setStn("刘伟",23);

    t.toString();
    system("pause");

    return 0;
}
这时还没有引入.h文件和.lib文件,所以会有错误,引入.h文件和.lib文件的操作如下:
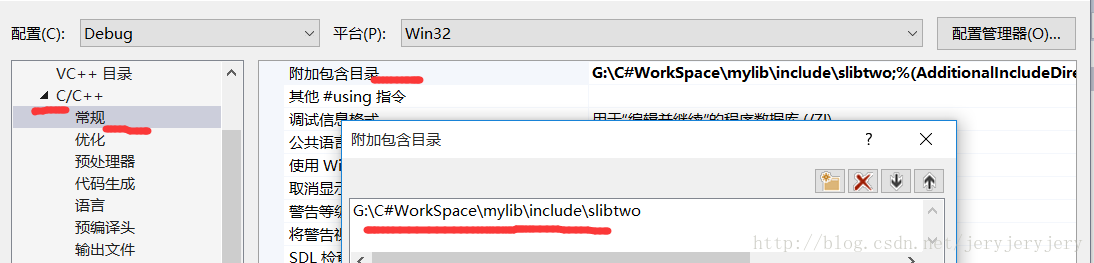
1.引入.h文件。引入点.h文件,使得在#include .h文件时不会报错,也就引入了类的声明,类的具体实现在.lib文件中。右键项目->属性->配置属性->C/C++->常规->附加包含目录,在附加包含目录中添加包含该lib中使用到所有的.h的文件夹的路径。项目首先根据会自己项目中搜索是否存在.h文件,如果发现没有就会去附加包含目录中搜索.h文件。如下图所示:
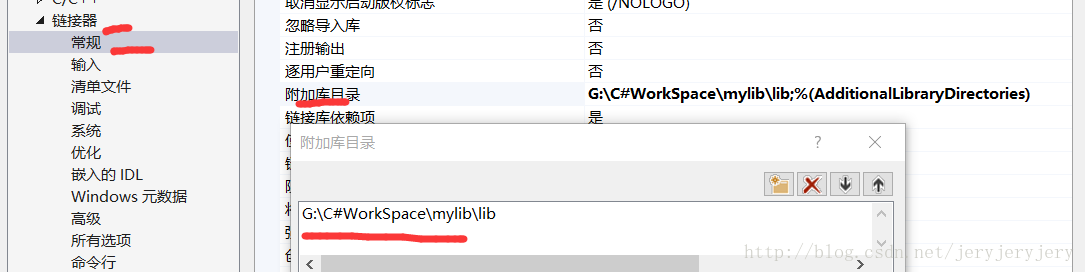
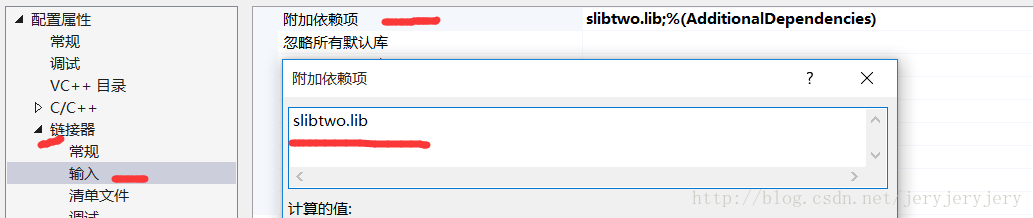
2.引入.lib文件。.h文件仅仅包含了类或方法的定义,没有具体的实现,具体的实现在.lib文件中。右键项目->属性->配置属性->链接器->常规->附加库目录,在附加库目录中添加包含该lib文件的文件夹路径。然后再在链接器->输入->附加依赖项中,加入该lib的名字,包括文件格式.lib。如下图所示:
然后程序就可以运行了,参考main.cpp代码,运行结果截图如下:

(三)生成和使用dll
1.VS2015生成dll
在VS2015中新建项目->Win32项目->勾选dll,然后添加所需要的类,包括.h文件和.cpp文件。我在项目中添加了dll和student两个类,代码如下:
dll.h:
#pragma once
//_declspec(dllimport),用来导入
/*
*默认情况下是自动生成导出DLL_EXPORT,如果DLL_EXPORT已经存在,则定义DLL_API为_declspec(dllexport),
*如果DLL_EXPORT不存在,则定义DLL_API为_declspec(dllimport)
*/
#ifdef DLL_EXPORTS
#define DLL_API _declspec(dllexport)
#else
#define DLL_API _declspec(dllimport)
#endif
#include<iostream>
#include<string>
#include"student.h"
using namespace std;

class DLL_API dll {
public:
    dll();
    ~dll();

    void setStn(string name, int age);
    student getStn();
    void setCity(string city);
    string getCity();

    void toString();

private:
    student stn;
    string city;
};

extern "C" DLL_API void cal(int x);
在dll.h文件中,我首先定义了dll接口,DLL_API。当我们引用dll时,只能引用dll中用dll接口声明的类,函数,变量等,所以一定要定义dll接口。然后我们用该接口声明了一个dll类和一个函数cal(int x),函数前面加上extern “C”是防止dll文件中改变这个函数的函数名,因为C++编译dll函数时,会根据需要更改命名,添加extern “C”就会阻止名字的更改,保持原始的命名。以上.h文件的代码也可以这样子,代码如下:
dll.h(版本2):
#pragma once
//_declspec(dllimport),用来导入
/*
*默认情况下是自动生成导出DLL_EXPORT,如果DLL_EXPORT已经存在,则定义DLL_API为_declspec(dllexport),
*如果DLL_EXPORT不存在,则定义DLL_API为_declspec(dllimport)
*/
#ifdef DLL_EXPORTS
#define DLL_API _declspec(dllexport)
#else
#define DLL_API _declspec(dllimport)
#endif
#include<iostream>
#include<string>
#include"student.h"
using namespace std;

class dll {
public:
    DLL_API dll();
    DLL_API ~dll();

    DLL_API void setStn(string name, int age);
    DLL_API student getStn();
    DLL_API void setCity(string city);
    DLL_API string getCity();

    DLL_API void toString();

private:
    student stn;
    string city;
};

extern "C" DLL_API void cal(int x);
dll.cpp:
// dll.cpp : 定义 DLL 应用程序的导出函数。
//

#include "stdafx.h"
#include"dll.h"

dll::dll() {

}
dll::~dll() {

}

void dll::setStn(string name, int age) {
    this->stn.setName(name);
    this->stn.setAge(age);
}
student dll::getStn() {
    return this->stn;
}

void dll::setCity(string city) {
    this->city = city;
}
string dll::getCity() {
    return this->city;
}

void dll::toString() {
    cout << "name is " << this->stn.getName() << ",age is " << this->stn.getAge() << ",city is " << this->getCity() << endl;
}

DLL_API void cal(int x) {
    cout <<x<< "的平方是:" << x*x << endl;
}
student.h:
#pragma once

#include<string>
#include<iostream>
using namespace std;

class student
{
public:
    student();
    ~student();

    void setName(string name);
    string getName();
    void setAge(int age);
    int getAge();

    void toString();

private:
    string name;
    int age;
};
student.cpp:
#include "stdafx.h"
#include "student.h"

student::student()
{
}
student::~student()
{
}

void student::setName(string name) {
    this->name = name;
}
string student::getName() {
    return this->name;
}

void student::setAge(int age) {
    this->age = age;
}
int student::getAge() {
    return this->age;
}

void student::toString() {
    cout << "name is " << this->name << ",age is " << this->age << endl;
}然后点击工具栏中的生成->生成解决方案,就会在项目文件路径中的debug目录下生成相应的.dll和.lib文件。在上面的概念中已经说明了,dll链接库中,.h文件给出了类或函数的声明,.lib文件给出了这些类和函数的实现在dll文件中的位置,dll文件中实现了相应的类和函数的声明。注意,要考虑后面使用dll的场景,是debug模式还是release模式,是x86还是x64环境,根据需要来调整环境,VS2015调整环境很简单,然后生成相应的dll文件。
2.使用dll文件
使用dll文件包括隐式调用和显式调用。隐式调用需要.h文件,.lib文件和.dll文件,而显式调用只需要.dll文件。
2.1.隐式调用dll
隐式调用dll方法和上面调用lib基本上是一模一样,只要一点点差别。以下面例子为例:
首先新建一个空项目,添加相应的main.cpp,代码如下:
#include"dll.h"
int main() {
dll d;
d.setCity("江西");
d.setStn("刘伟",23);
d.toString();
system("pause");
return 0;
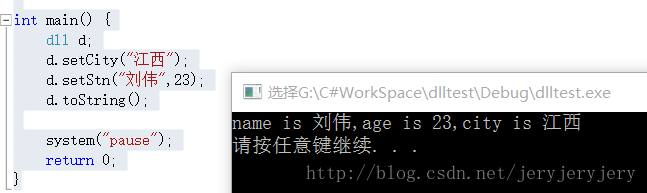
}然后也是先引入lib中包含的.h文件所在文件夹的路径,然后再引入相应的.lib文件所在文件夹路径和引入.lib文件,具体操作和上面使用lib是一样的。最后需要在这个新建的项目所在的文件中找到debug文件夹,将上面生成的.dll文件添加到这个debug目录中(如果是release模式,则是release文件夹下)。然后就可以执行程序,执行结果截图如下:
2.2隐式调用dll文件
隐式调用dll文件只需要将该dll文件放到需要使用该dll文件的项目下的debug文件夹中,不需要引入.h文件和.lib文件,因为隐式调用dll是用win api来找到函数的定义。隐式调用dll文件一般只能调用dll中的方法,不能调用dll中的类和变量(其实也可以调用,只是很麻烦)。下面给出了隐式调用dll文件的例子,仍以上面生成的dll文件为例子,调用该dll文件中的cal(int x)方法,代码如下:
#include<Windows.h> //使用win api需要的头文件
#include<iostream>
using namespace std;
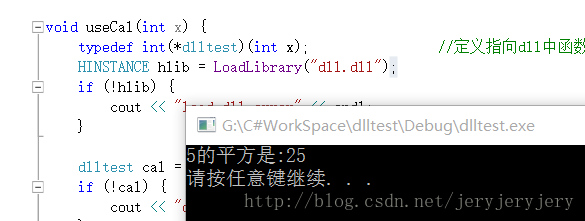
void useCal(int x) {
typedef int(*dlltest)(int x); //定义指向dll中函数的函数指针,保证参数类型一致,(int x)表示有一个int型参数
HINSTANCE hlib = LoadLibrary("dll.dll"); //加载dll,使用相对路径,从项目文件路径开始
if (!hlib) {
cout << "load dll error" << endl;
}
dlltest cal = (dlltest)GetProcAddress(hlib,"cal");//得到函数的定义
if (!cal) {
cout << "didn't find the method!" << endl;
}
cal(x); //执行函数
}
int main() {
useCal(5);
system("pause");
return 0;
}先用指向函数的指针去dll文件中找到函数的定义,然后执行函数。执行结果截图如下:
参考链接:
http://www.cnblogs.com/TenosDoIt/p/3203137.html
http://www.cnblogs.com/enterBeijingThreetimes/archive/2010/08/04/1792099.html


 3489
3489

 被折叠的 条评论
为什么被折叠?
被折叠的 条评论
为什么被折叠?
 到【灌水乐园】发言


