


mongodb数据库服务器运行了一段时间之后发现磁盘空间慢慢的都被耗尽了额。就参照网上的步骤一步一步的开始扩容工作。在这将自己的操作步骤做一个记录以便未来不时之需。
前沿:
在安装系统的时候我选择的是自动分区,系统就会自动以LVM的方式分区。为了保证系统后期的可用性,建议所有新系统安装都采用LVM。
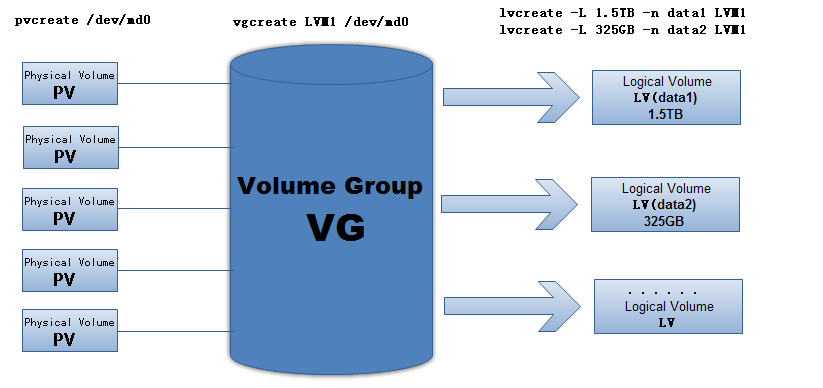
LVM结构图
扩容步骤
1. 查看磁盘设备
命令:# fdisk -l
结果:
Disk /dev/sda: 697.9 GB, 697932185600 bytes
255 heads, 63 sectors/track, 84852 cylinders
Units = cylinders of 16065 * 512 = 8225280 bytes
Sector size (logical/physical): 512 bytes / 512 bytes
I/O size (minimum/optimal): 512 bytes / 512 bytes
Disk identifier: 0x00054716

Device Boot      Start         End      Blocks   Id  System
/dev/sda1   *           1          64      512000   83  Linux
Partition 1 does not end on cylinder boundary.
/dev/sda2              64       39163   314059776   8e  Linux LVM
找到需要扩展的磁盘设备
2.使用fdisk /dev/sda 对磁盘进行分区
命令:# fdisk /dev/sda
结果:
WARNING: DOS-compatible mode is deprecated. It's strongly recommended to
         switch off the mode (command 'c') and change display units to
         sectors (command 'u').

Command (m for help): n
Command action
   e   extended
   p   primary partit

   p
Partition number (1-4): 3
First cylinder (39163-84852, default 39163):
Using default value 39163
Last cylinder, +cylinders or +size{K,M,G} (39163-84852, default 84852):
Using default value 84852

Command (m for help): w
The partition table has been altered!

Calling ioctl() to re-read partition table.

WARNING: Re-reading the partition table failed with error 16: Device or resource busy.
The kernel still uses the old table. The new table will be used at
the next reboot or after you run partprobe(8) or kpartx(8)
Syncing disks.
依次输入n,p, 3(分区号,根据实际情况配置),enter,enter ,最后按w保存

之前最大的分区号是2,所以将本分区号设置为3,本人理解。
3.使用fdisk -l查看分区是否创建成功
命令: fdisk -l
结果:
本结果应该是有3个分区才正确,这里不给出结果内容
4.重启机器
命令:# reboot
因为只有重启后,才能正式生效。
5.使用pvcreate创建物理卷
命令:# pvcreate /dev/sda3
结果: Physical volume "/dev/sda3" successfully created
6.查看原VG的情况
命令: vgdisplay
结果:
--- Volume group ---
VG Name               VolGroup //注意记录此名字,扩容时将新的pv加入指定的名字
System ID
Format                lvm2
Metadata Areas        1
Metadata Sequence No  3
VG Access             read/write
VG Status             resizable
MAX LV                0
Cur LV                2
Open LV               2
Max PV                0
Cur PV                1
Act PV                1
VG Size               7.51 GiB
PE Size               4.00 MiB
Total PE              1922
AllocPE / Size       1922 / 7.51 GiB
Free  PE / Size       0 / 0
VG UUID               FnUsmX-s284-GeRK-hJNJ-BbIG-Vpe7-OuFZE1
7.扩展卷组,将/dev/sdb物理卷添加到VolGroup卷组中
命令:# vgextend VolGroup /dev/sda3
结果:
Volume group "VolGroup" successfully extended其中,VolGroup就是步骤6中查看得到的VG Name。
再查看VG情况,可以看到VG大小变化,空余空间。
8.查看更改后VG的情况
命令:# vgdisplay
结果:
--- Volume group ---
VG Name               VolGroup
System ID
Format                lvm2
Metadata Areas        2
Metadata Sequence No  4
VG Access             read/write
VG Status             resizable
MAX LV                0
Cur LV                2
Open LV               2
Max PV                0
Cur PV                2
Act PV                2
VG Size               22.50 GiB
PE Size               4.00 MiB
Total PE              5761
AllocPE / Size       1922 / 7.51 GiB
Free  PE / Size       3839 / 15.00 GiB
VG UUID               FnUsmX-s284-GeRK-hJNJ-BbIG-Vpe7-OuFZE1
9.将新的VG空间划入LV(扩容lv_root)
命令:# lvextend -L +340G /dev/mapper/vgGW-lvRoot
结果: 暂无内容
10.检查/root逻辑卷
命令:# e2fsck -f /dev/mapper/vgGW-lvRoot
结果: 暂无内容
11.重新定义分区大小
命令:# resize2fs /dev/mapper/vgGW-lvRoot
结果: 暂无内容
12.查看扩充后的磁盘状态
命令:# df -h
到此为止,我们的扩盘工作已经完成了。
如何将磁盘从实体机中扩展到虚拟机中,VMware vSphere Client下增加虚拟机磁盘空间的方法


 678
678

 被折叠的 条评论
为什么被折叠?
被折叠的 条评论
为什么被折叠?
 到【灌水乐园】发言


