


Android 代码动态修改RelativeLayout布局
前言
有时我们会遇到在xml布局文件中设置好界面后,但是又需要从代码中进行动态布局修改。
之前从网上寻找了好多资料,看到的都是新建一个布局文件
但是我的需求又是从当前布局文件的基础上进行修改。
下面用一个示例大家介绍一个比较简单的办法。
演示
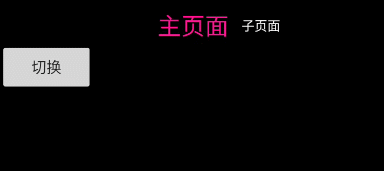
该例子主要是使用RelativeLayout布局,放置两个TextView,点击切换按钮进行切换,永远有一个TextView保持屏幕中间。
activity_main.xml
<?xml version="1.0" encoding="utf-8"?>
<LinearLayout xmlns:android="http://schemas.android.com/apk/res/android"
    xmlns:tools="http://schemas.android.com/tools"
    android:layout_width="match_parent"
    android:layout_height="match_parent"
    android:background="@android:color/background_dark"
    android:orientation="vertical"
    tools:context=".MainActivity">
    <RelativeLayout
        android:id="@+id/relativeLayout"
        android:layout_width="match_parent"
        android:layout_height="wrap_content">
        <TextView
            android:id="@+id/text_small"
            android:layout_width="wrap_content"
            android:layout_height="wrap_content"
            android:layout_centerHorizontal="true"
            android:layout_centerVertical="true"
            android:layout_marginEnd="6dp"
            android:text="主页面"
            android:textColor="@color/deeppink"
            android:textSize="22sp" />
        <TextView
            android:id="@+id/text_big"
            android:layout_width="wrap_content"
            android:layout_height="wrap_content"
            android:layout_centerVertical="true"
            android:layout_marginStart="6dp"
            android:layout_toEndOf="@id/text_small"
            android:text="子页面"
            android:textColor="@color/white"
            android:textSize="12sp" />
    </RelativeLayout>
    <Button
        android:id="@+id/btn"
        android:layout_width="wrap_content"
        android:layout_height="wrap_content"
        android:text="切换" />
</LinearLayout>
MainActivity.java
public class MainActivity extends AppCompatActivity {
    //    TextView
    private TextView text_small;
    private TextView text_big;
    //    布局参数
    private RelativeLayout.LayoutParams params_small;
    private RelativeLayout.LayoutParams params_big;
    //    切换按钮
    private Button btn;
    //    切换标识
    private boolean check = false;

    @Override
    protected void onCreate(Bundle savedInstanceState) {
        super.onCreate(savedInstanceState);
        setContentView(R.layout.activity_main);
        text_small = findViewById(R.id.text_small);
        text_big = findViewById(R.id.text_big);
        btn = findViewById(R.id.btn);
//        获取TextView的布局参数
        params_small = (RelativeLayout.LayoutParams) text_small.getLayoutParams();
        params_big = (RelativeLayout.LayoutParams) text_big.getLayoutParams();
//          按钮切换
        btn.setOnClickListener(new View.OnClickListener() {
            @Override
            public void onClick(View v) {
                if (check) {
//                    切换子页面
                    smallModeSwitch();
                    check = false;
                } else {
//                    切换主页面
                    bigModeSwitch();
                    check = true;
                }
            }
        });
    }

    /**
     * 修改布局
     *
     * @date: 2021/1/28 16:07
     * @author: SiYuan Jiao
     */
    private void bigModeSwitch() {
//        设置字体及颜色
        text_big.setTextSize(22);
        text_big.setTextColor(Color.parseColor("#ff1493"));
        text_small.setTextSize(12);
        text_small.setTextColor(Color.WHITE);
//        删除主页面居中效果
        params_small.removeRule(RelativeLayout.CENTER_HORIZONTAL);
//        添加主页面对于子页面的相对位置
        params_small.addRule(RelativeLayout.START_OF, R.id.text_big);
//        设置主页面应用此效果
        text_small.setLayoutParams(params_small);
//        添加子页面居中效果
        params_big.addRule(RelativeLayout.CENTER_HORIZONTAL);
//        删除原有相对主页面的位置
        params_big.removeRule(RelativeLayout.END_OF);
//        子页面应用此效果
        text_big.setLayoutParams(params_big);
    }

    private void smallModeSwitch() {
        text_small.setTextSize(22);
        text_small.setTextColor(Color.parseColor("#ff1493"));
        text_big.setTextSize(12);
        text_big.setTextColor(Color.WHITE);


        params_big.removeRule(RelativeLayout.CENTER_HORIZONTAL);
        params_big.addRule(RelativeLayout.END_OF, R.id.text_small);
        text_big.setLayoutParams(params_big);
        params_small.addRule(RelativeLayout.CENTER_HORIZONTAL);
        params_small.removeRule(RelativeLayout.START_OF);
        text_small.setLayoutParams(params_small);
    }

}
结束
其中主要是通过getLayoutParams()方法获取当前布局信息,使用removeRule()删除不要的属性,使用addRule()添加需要的属性值,最后使用setLayoutParams进行应用配置。
通过以上的例子,应该能解决动态代码修改RelativeLayout布局的问题。
感谢
如果对你有用,请点个爱心给个赞吧~~


 6659
6659


 被折叠的 条评论
为什么被折叠?
被折叠的 条评论
为什么被折叠?
 到【灌水乐园】发言


