


上一篇文章中写到,自定义的接口继承了CrudRepository、JpaSpecificationExecutor接口后有默认的实现类感觉很方便。
上一篇文章地址:http://blog.csdn.net/jieyanqulaopo123/article/details/79461107
今天想到如果既要有默认的实现功能、又要在接口中添加方法然后自己实现接口中添加的方法,怎么办???
于是有了下面这篇文章。
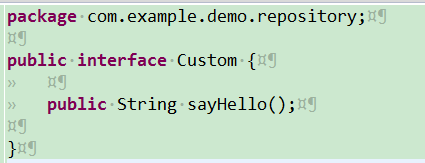
1、自定义一个接口
public interface Custom {
public String sayHello();
}
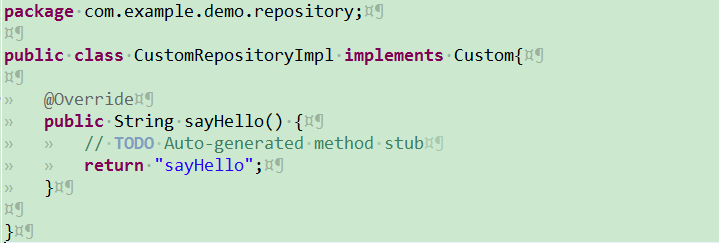
2、编写Custom接口的实现类
public class CustomRepositoryImpl implements Custom{
@Override
public String sayHello() {
// TODO Auto-generated method stub
return "sayHello";
}
}
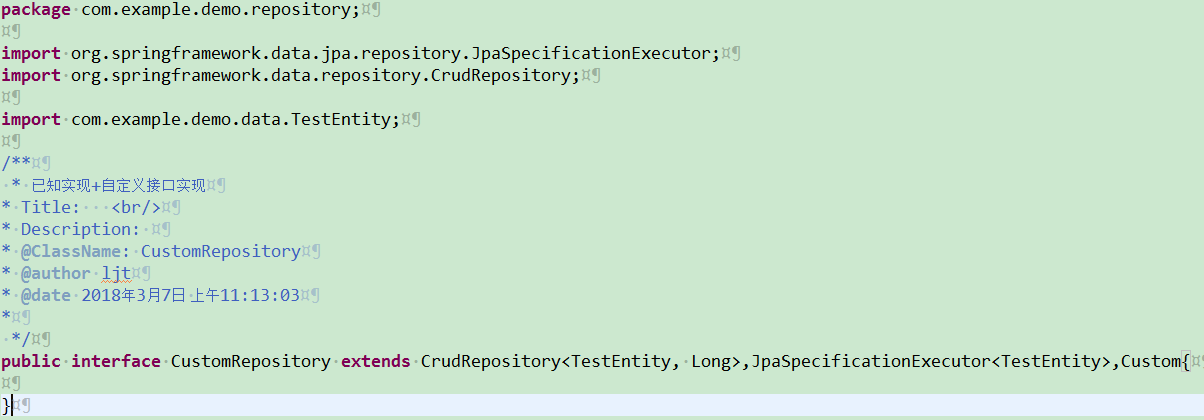
3、让自定义的接口继承CrudRepository、JpaSpecificationExecutor、Custom接口
public interface CustomRepository extends
CrudRepository<TestEntity, Long>,JpaSpecificationExecutor<TestEntity>,Custom{
}4、编写测试类
@Autowired
CustomRepository customRepository;
@RequestMapping("/testAdd")
public String testCustomAdd(){
TestEntity entity = new TestEntity("WangWu","123456");
customRepository.save(entity);
return entity.toString();
}
@RequestMapping("/testCustom")
public String testCustomCount(){
return customRepository.sayHello();
}
5、运行结果
/testAdd:
TestEntity [id=3, userName=WangWu, passWord=123456, email=null, mobile=null, nickName=null]
/testCustom
sayHello
6、需要注意的地方
自定义接口实现类的名称一定是你继承了CrudRepository、JpaSpecificationExecutor、和你自定义接口的接口的名称+Impl。如本文中的:CustomRepositoryImpl=CustomRepository+Impl。
Custom.java内容
CustomRepository.java内容
CustomRepositoryImpl.java内容
如果名称不对则会报:实体里找不到sayHello方法。
完。


 1096
1096

 被折叠的 条评论
为什么被折叠?
被折叠的 条评论
为什么被折叠?
 到【灌水乐园】发言


