


Spring AOP实现原理实例
1. AOP相关概念
切面(Aspect) :官方的抽象定义为“一个关注点的模块化,这个关注点可能会横切多个对象”。
连接点(Joinpoint) :程序执行过程中的某一行为。
通知(Advice) :“切面”对于某个“连接点”所产生的动作。
切入点(Pointcut) :匹配连接点的断言,在AOP中通知和一个切入点表达式关联。
目标对象(Target Object) :被一个或者多个切面所通知的对象。
AOP代理(AOP Proxy) :在Spring AOP中有两种代理方式,JDK动态代理和CGLIB代理。
总结:在目标对象(target object)的某些方法(jointpoint)添加不同种类的操作(通知、增强操处理),最后通过某些方法(weaving、织入操作)实现一个新的代理目标对象。
1.1 Spring AOP通知(advice)分成五类:
前置通知[Before advice]:在连接点前面执行,前置通知不会影响连接点的执行,除非此处抛出异常。
正常返回通知[After returning advice]:在连接点正常执行完成后执行,如果连接点抛出异常,则不会执行。
异常返回通知[After throwing advice]:在连接点抛出异常后执行。
返回通知[After (finally) advice]:在连接点执行完成后执行,不管是正常执行完成,还是抛出异常,都会执行返回通知中的内容。
环绕通知[Around advice]:环绕通知围绕在连接点前后,比如一个方法调用的前后。这是最强大的通知类型,能在方法调用前后自定义一些操作。环绕通知还需要负责决定是继续处理join point(调用ProceedingJoinPoint的proceed方法)还是中断执行。
在AOP中切面就是与业务逻辑独立,但又垂直存在于业务逻辑的代码结构中的通用功能组合;切面与业务逻辑相交的点就是切点;连接点就是把业务逻辑离散化后的关键节点;切点属于连接点,是连接点的子集;Advice(增强)就是切面在切点上要执行的功能增加的具体操作;在切点上可以把要完成增强操作的目标对象(Target)连接到切面里,这个连接的方式就叫织入。
1.2AOP的全部通知顺序,SpringBoot或SpringBoot2对AOP的执行顺序
pom.xml
<?xml version="1.0" encoding="UTF-8"?>
<project xmlns="http://maven.apache.org/POM/4.0.0" xmlns:xsi="http://www.w3.org/2001/XMLSchema-instance"
	xsi:schemaLocation="http://maven.apache.org/POM/4.0.0 https://maven.apache.org/xsd/maven-4.0.0.xsd">
	<modelVersion>4.0.0</modelVersion>
	<parent>
		<groupId>org.springframework.boot</groupId>
		<artifactId>spring-boot-starter-parent</artifactId>
		<version>2.3.3.RELEASE</version>
		<!--<version>1.5.9.RELEASE</version> -->
		<relativePath/>
	</parent>
	<groupId>com.example</groupId>
	<artifactId>demo</artifactId>
	<version>0.0.1-SNAPSHOT</version>
	<name>SpringBootRedis</name>
	<description>Demo project for Spring Boot</description>
	<properties>
		<java.version>1.8</java.version>
	</properties>
	<dependencies>
		<dependency>
			<groupId>org.springframework.boot</groupId>
			<artifactId>spring-boot-starter</artifactId>
		</dependency>
		<dependency>
			<groupId>org.springframework.boot</groupId>
			<artifactId>spring-boot-starter-web</artifactId>
		</dependency>
		<dependency>
			<groupId>org.springframework.boot</groupId>
			<artifactId>spring-boot-starter-actuator</artifactId>
		</dependency>

		<dependency>
			<groupId>org.springframework.boot</groupId>
			<artifactId>spring-boot-starter-test</artifactId>
			<scope>test</scope>
			<exclusions>
				<exclusion>
					<groupId>org.junit.vintage</groupId>
					<artifactId>junit-vintage-engine</artifactId>
				</exclusion>
			</exclusions>
		</dependency>

		<dependency>
			<groupId>org.apache.commons</groupId>
			<artifactId>commons-pool2</artifactId>
		</dependency>
		<!-- Spring Boot AOP技术-->
		<dependency>
			<groupId>org.springframework.boot</groupId>
			<artifactId>spring-boot-starter-aop</artifactId>
		</dependency>
		<!-- 一般通用基础配置 -->
		<dependency>
			<groupId>org.springframework.boot</groupId>
			<artifactId>spring-boot-devtools</artifactId>
			<scope>runtime</scope>
			<optional>true</optional>
		</dependency>
		<dependency>
			<groupId>org.projectlombok</groupId>
			<artifactId>lombok</artifactId>
			<optional>true</optional>
		</dependency>
		<dependency>
			<groupId>junit</groupId>
			<artifactId>junit</artifactId>
			<scope>test</scope>
		</dependency>
	</dependencies>
	<build>
		<plugins>
			<plugin>
				<groupId>org.springframework.boot</groupId>
				<artifactId>spring-boot-maven-plugin</artifactId>
			</plugin>
		</plugins>
	</build>
</project>
MyAspect切面类
package com.example.demo.config;

import org.aspectj.lang.ProceedingJoinPoint;
import org.aspectj.lang.annotation.*;
import org.springframework.stereotype.Component;

@Aspect
@Component
public class MyAspect {
    @Before("execution(* com.example.demo.service.CalcServiceImpl.*(..))")
    public void beforeNotify() {
        System.out.println("********@Before我是前置通知");
    }
    @After("execution(* com.example.demo.service.CalcServiceImpl.*(..))")
    public void afterNotify() {
        System.out.println("********@After我是后置通知");
    }

    @AfterReturning("execution(* com.example.demo.service.CalcServiceImpl.*(..))")
    public void afterReturningNotify() {
        System.out.println("********@AfterReturning我是返回后通知");
    }

    @AfterThrowing("execution(* com.example.demo.service.CalcServiceImpl.*(..))")
    public void afterThrowingNotify() {
        System.out.println("********@AfterThrowing我是异常通知");
    }

    @Around("execution(* com.example.demo.service.CalcServiceImpl.*(..))")
    public Object around(ProceedingJoinPoint proceedingJoinPoint) throws Throwable {
        Object retvalue = null;
        System.out.println("我是环绕通知之前AAA");
        retvalue = proceedingJoinPoint.proceed();
        System.out.println("我是环绕通知之后BBB");
        return retvalue ;
    }
}
CalcService
package com.example.demo.service;

public interface CalcService {
    public int div(int x, int y);
}
CalcServiceImpl
package com.example.demo.service;

import org.springframework.stereotype.Service;

@Service
public class CalcServiceImpl implements CalcService{
    @Override
    public int div(int x, int y) {
        int result = x / y;
        System.out.println("===>CalcServiceImpl被调用,计算结果为:" + result);
        return result;
    }
}
单元测试类SpringBootRedisApplicationTests
package com.example.demo;

import com.example.demo.service.CalcService;
import org.junit.Test;
import org.junit.runner.RunWith;
import org.springframework.boot.test.context.SpringBootTest;
import org.springframework.test.context.junit4.SpringRunner;
import javax.annotation.Resource;

@SpringBootTest
@RunWith(SpringRunner.class)
public class SpringBootRedisApplicationTests {

	@Resource
	private CalcService calcService;

    //<version>1.5.9.RELEASE</version>就是Spring4版本
	@Test
	public void testAop4() {
		//calcService.div(10, 2);正常通知,
		calcService.div(10,0);//异常通知
	}

    //<version>2.3.3.RELEASE</version>就是Spring5版本
	@Test
	public void testAop5() {
		//calcService.div(10, 2);//正常通知
		calcService.div(10,0);//异常通知
	}
}
测试结果
Spring4和Spring5AOP通知顺序


2. 实例Demo
核心代码是红色框内容,其它请忽略。
pom.xml引入aop
<dependency>
		  <groupId>org.springframework.boot</groupId>
		  <artifactId>spring-boot-starter-aop</artifactId>
</dependency>
spring-bean.xml
<?xml version="1.0" encoding="UTF-8"?>
<beans xmlns="http://www.springframework.org/schema/beans"
    xmlns:xsi="http://www.w3.org/2001/XMLSchema-instance"
    xmlns:aop="http://www.springframework.org/schema/aop"
    xmlns:tx="http://www.springframework.org/schema/tx"
    xsi:schemaLocation="
    http://www.springframework.org/schema/beans
        http://www.springframework.org/schema/beans/spring-beans.xsd
        http://www.springframework.org/schema/aop
        http://www.springframework.org/schema/aop/spring-aop.xsd
        http://www.springframework.org/schema/tx
        http://www.springframework.org/schema/context/spring-tx.xsd
        ">

     <!-- 把UserServiceImpl交给spring管理 -->
     <bean id="userService" class="com.aop.UserServiceImpl"></bean>

     <!-- 配置通知对象 -->
     <bean id="myAdvice" class="com.aop.MyAdvice"></bean>

     <!-- 配置aop -->
      <aop:config>
      <!-- 配置切面,用于各种通知 -->
        <aop:aspect ref="myAdvice">
			<!-- 配置aop -->
			<!-- expression :配置加入的具体位置 -->
            <aop:pointcut  expression="execution(public * *(..))" id="myPointcut"/>
			<!-- 配置通知类型 -->
            <aop:before pointcut-ref="myPointcut" method="before"/>
            <aop:after pointcut-ref="myPointcut" method="after"/>
            <aop:after-returning pointcut-ref="myPointcut" method="afterReturning"/>
            <aop:around pointcut-ref="myPointcut" method="around"/>
            <aop:after-throwing pointcut-ref="myPointcut" method="afterThrowing"/>

        </aop:aspect>
    </aop:config>
</beans>

BeanUtil.java
package com.aop;

import org.springframework.context.support.ClassPathXmlApplicationContext;

public class BeanUtil {
	public static Object getBean(String beanName) {
		return new ClassPathXmlApplicationContext("spring-bean.xml").getBean(beanName);
	}
}
MyAdvice.java
package com.aop;
import org.aopalliance.intercept.Joinpoint;
import org.aspectj.lang.ProceedingJoinPoint;
public class MyAdvice {
	/**
	 * 前置通知
	 * @param joinpoint
	 */
	public void before() {
		System.out.println("前置通知-----------before");
	}
	/**
	 * 后置通知
	 */
	public void after() {
		System.out.println("后置通知-----------after");
	}
	/**
	 * 引入通知
	 */
	public void afterReturning() {
		System.out.println("引入通知-----------afterReturning");
	}
	/**
	 * 环绕通知
	 */
	public void around(ProceedingJoinPoint joinpoint) {
		System.out.println("环绕通知-----------around开始");
		try {
			joinpoint.proceed();
		} catch (Throwable e) {
			// TODO Auto-generated catch block
			e.printStackTrace();
		}
		System.out.println("环绕通知-----------around结束");
	}
	/**
	 * 异常通知
	 */
	public void afterThrowing() {
		System.out.println("异常通知-----------afterThrowing");
	}

}
UserService.java
package com.aop;
public interface UserService {
		public void print();
}
UserServiceImpl.java
package com.aop;
public class UserServiceImpl implements UserService{
	@Override
	public void print() {
		System.out.println("执行打印。。。。。。。。。。。。。");
	}
}
单元测试类UserAction.java
package com.test;
import static org.junit.Assert.*;
import org.junit.Test;
import com.aop.BeanUtil;
import com.aop.UserService;
public class UserAction {

	private UserService userService;
	@Test
	public void test() {

		userService = (UserService) BeanUtil.getBean("userService");
		userService.print();
	}
}
执行结果如下:

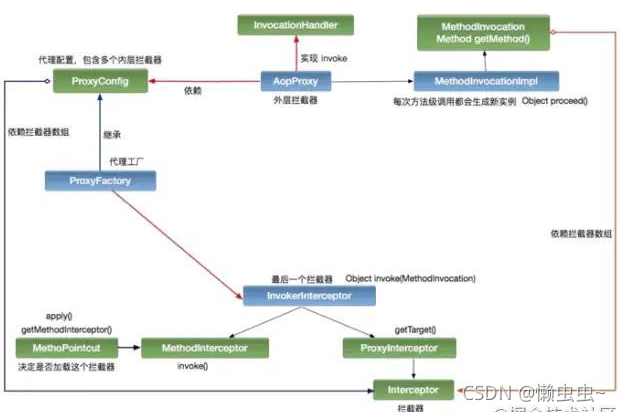
3. Spring AOP 原理
简单说说 AOP 的设计:
每个 Bean 都会被 JDK 或者 Cglib 代理。取决于是否有接口。
每个 Bean 会有多个“方法拦截器”。注意:拦截器分为两层,外层由 Spring 内核控制流程,内层拦截器是用户设置,也就是 AOP。
当代理方法被调用时,先经过外层拦截器,外层拦截器根据方法的各种信息判断该方法应该执行哪些“内层拦截器”。内层拦截器的设计就是职责连的设计。
可以将 AOP 分成 2 个部分来分析:代理的创建;代理的调用。
开始分析(扯):
3.1代理的创建(按步骤):
1>首先,需要创建代理工厂,代理工厂需要 3 个重要的信息:拦截器数组,目标对象接口数组,目标对象。
2>创建代理工厂时,默认会在拦截器数组尾部再增加一个默认拦截器 —— 用于最终的调用目标方法。
3>当调用 getProxy 方法的时候,会根据接口数量大余 0 条件返回一个代理对象(JDK or Cglib)。
注意:创建代理对象时,同时会创建一个外层拦截器,这个拦截器就是 Spring 内核的拦截器。用于控制整个 AOP 的流程。
3.2代理的调用
1>当对代理对象进行调用时,就会触发外层拦截器。
2>外层拦截器根据代理配置信息,创建内层拦截器链。创建的过程中,会根据表达式判断当前拦截是否匹配这个拦截器。而这个拦截器链设计模式就是职责链模式。
3>当整个链条执行到最后时,就会触发创建代理时那个尾部的默认拦截器,从而调用目标方法。最后返回。
来张不是很标准的 UML 图:
关于调用过程,来张流程图:

参考文章
https://www.jianshu.com/p/22cf46235d75
https://blog.csdn.net/javazejian/article/details/56267036
https://blog.csdn.net/u011863024/article/details/115270840
https://www.cnblogs.com/bainannan/p/14369979.html


 3943
3943


 被折叠的 条评论
为什么被折叠?
被折叠的 条评论
为什么被折叠?
 到【灌水乐园】发言


