


一、业务应用场景
1:需要在容器启动的时候执行一些内容。比如读取配置文件,数据库连接之类的。SpringBoot给我们提供了两个接口来帮助我们实现这种需求。
2:应用服务启动时,加载一些数据和执行一些应用的初始化动作。如:删除临时文件,清除缓存信息,读取配置文件信息,数据库连接等。
对于小型项目进行定时任务的启动。
二、解决方案
方案1:ApplicationRunner
方案2:CommandLineRunner
SpringBoot给我们提供了两个接口来帮助我们实现这种需求。他们的执行时机为容器启动完成的时候。
ApplicationRunner中run方法的参数为ApplicationArguments,
而CommandLineRunner接口中run方法的参数为String数组。
当接口有多个实现类时,提供了@order注解实现自定义执行顺序,也可以实现Ordered接口来自定义顺序。
方案3:利用@Scheduled注解解决
注意:数字越小,优先级越高,也就是@Order(1)注解的类会在@Order(2)注解的类之前执行。
方案4:实现InitializingBean接口,重写afterPropertiesSet方法。
- 被spring管理
- 实现InitializingBean接口
- 重写afterPropertiesSet方法
InitializingBean接口为bean提供了初始化方法的方式,它只包括afterPropertiesSet方法,凡是继承该接口的类,在初始化bean的时候都会执行该方法。 测试每次调用这个方法都会重新初始化,但是只初始化一次。
三、CommandLineRunner和ApplicationRunner接口代码验证
方案1:ApplicationRunner接口
package org.spring.springboot.service;

import org.slf4j.Logger;
import org.slf4j.LoggerFactory;
import org.springframework.boot.ApplicationArguments;
import org.springframework.boot.ApplicationRunner;
import org.springframework.core.annotation.Order;
import org.springframework.stereotype.Component;

@Component  //被 spring 容器管理
@Order(1)   //如果多个自定义的 ApplicationRunner  ,用来标明执行的顺序
public class ApplicationRunnerStartService implements ApplicationRunner {

	private static Logger logger =  LoggerFactory.getLogger(ApplicationRunnerStartService.class);

	@Override
	public void run(ApplicationArguments args) throws Exception {
		logger.info("===SpringBoot项目启动后,执行ApplicationRunnerStartService方法,进行初始化操作 =============");
	}

}
方案2:CommandLineRunnerStartService
package org.spring.springboot.service;

import org.slf4j.Logger;
import org.slf4j.LoggerFactory;
import org.springframework.beans.factory.annotation.Autowired;
import org.springframework.boot.CommandLineRunner;
import org.springframework.core.annotation.Order;
import org.springframework.stereotype.Component;

@Component  //被 spring 容器管理
@Order(10)  //如果多个自定义的 CommandLineRunner,用来标明执行的顺序,数字越小,顺序越靠前
public class CommandLineRunnerStartService  implements CommandLineRunner{

	private static Logger logger =  LoggerFactory.getLogger(CommandLineRunnerStartService.class);

	@Autowired
	private UserService userService;

	@Override
	public void run(String... args) throws Exception {
		logger.info("===SpringBoot项目启动后,执行CommandLineRunnerStartService方法,进行初始化操作 =============");
		//执行自己的业务逻辑
		System.out.println(userService.Sel(1).toString());
	}

}
package org.spring.springboot;

import org.mybatis.spring.annotation.MapperScan;
import org.springframework.boot.SpringApplication;
import org.springframework.boot.autoconfigure.SpringBootApplication;

/**
 * Spring Boot 应用启动类
*/
@SpringBootApplication
public class ApplicationApp {

    public static void main(String[] args) {
        // 程序启动入口
        // 启动嵌入式的 Tomcat 并初始化 Spring 环境及其各 Spring 组件
        SpringApplication.run(ApplicationApp.class,args);
    }
}
ApplicationApp主启动类启动之后,控制台输出如下信息

四、利用@Scheduled注解解决
方案3:@Scheduled注解
@Component
public class OACheckScheduleTask {

    private static final Logger LOG = LoggerFactory.getLogger(OACheckScheduleTask.class);

    @Autowired
    private OARoleConfigService oaRoleConfigService;

    //@Scheduled(cron = "0 0 2 1/1 * ? ")//每天02:00执行
    @Scheduled(fixedDelay = 1 * 60 * 1000)//每1分钟一次
    public void configureTasks() {

        LOG.info("**********************************************************************************************");
        LOG.info("***************************检查人员数据异常信息开始************************************************");
        LOG.info("**********************************************************************************************");

        /**
         * 获取角色配置离职人员配置信息
         */
        oaRoleConfigService.getRoleConfig();

        LOG.info("**********************************************************************************************");
        LOG.info("***************************检查人员数据异常信息结束************************************************");
        LOG.info("**********************************************************************************************");

    }
}
注意:主启动类要加上@EnableScheduling
@SpringBootApplication
@EnableScheduling
@MapperScan("com.aac.oacheck.dao")
public class OACheckApplication {
    public static void main(String[] args) {
        SpringApplication.run(OACheckApplication.class, args);
    }
}
五、实现InitializingBean接口,重写afterPropertiesSet方法。
@Service
public class UserService implements InitializingBean {
@Resource
private UserMapper userMapper;
public List<User> getByName() {
List<User> userList = userMapper.selectList(null);
return userList;
}
@Override
public void afterPropertiesSet() {
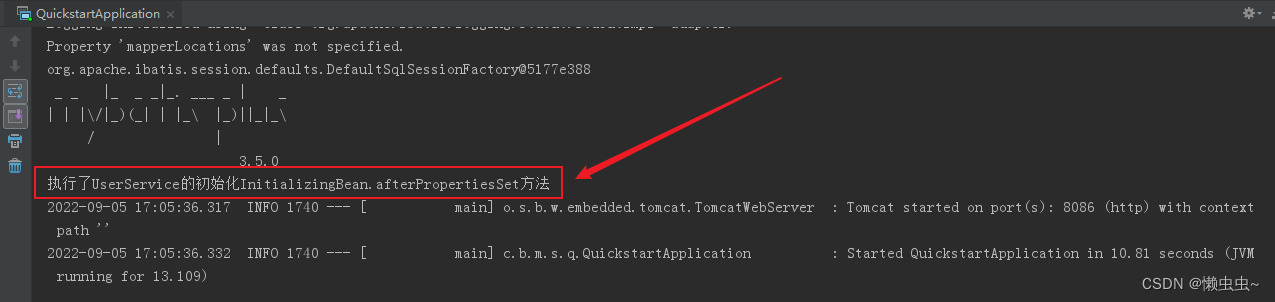
System.out.println("执行了UserService的初始化InitializingBean.afterPropertiesSet方法");
}
}
测试代码,项目启动时候就会执行此方法。
1、Spring为bean提供了两种初始化bean的方式,实现InitializingBean接口,实现afterPropertiesSet方法,或者在配置文件中通过init-method指定,两种方式可以同时使用。
2、实现InitializingBean接口是直接调用afterPropertiesSet方法,比通过反射调用init-method指定的方法效率要高一点,但是init-method方式消除了对spring的依赖。
3、如果调用afterPropertiesSet方法时出错,则不调用init-method指定的方法。
参考文章
springboot启动后自动执行方法的两种方法_happytaohaha的博客-CSDN博客_springboot项目启动后执行方法


 1526
1526


 被折叠的 条评论
为什么被折叠?
被折叠的 条评论
为什么被折叠?
 到【灌水乐园】发言


