


代码仓库地址:G:\code_read\my-multi-module-project
以下是创建一个基于 Spring Boot 的多模块、多环境项目,并在 IntelliJ IDEA 中配置 JDK 和 Maven 的详细步骤。同时,展示了如何引入 MySQL 和 MyBatis,并开发一个小 demo。
1. 创建多模块 Maven 项目
1.1 创建父项目
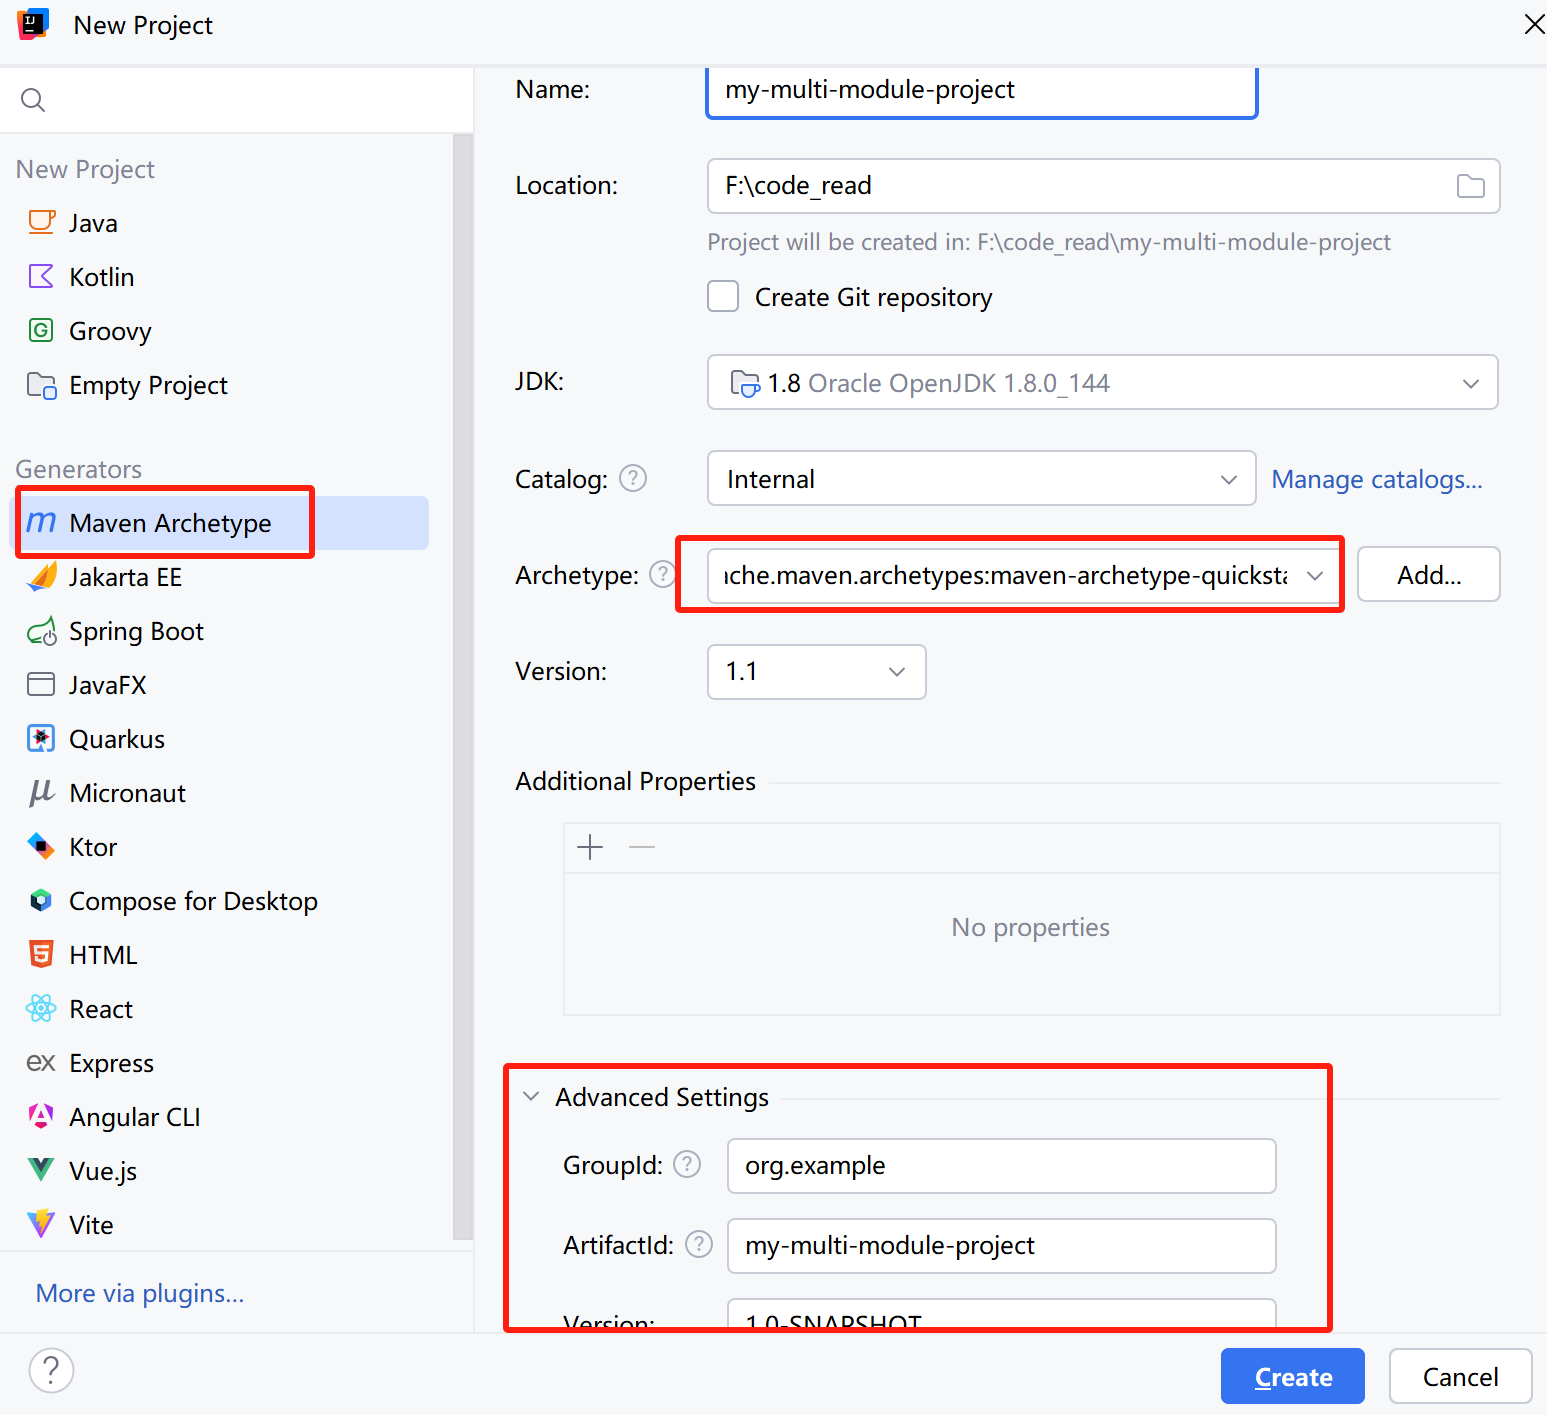
- 打开 IntelliJ IDEA,选择 Create New Project。
- 选择 Maven,点击 Next。
- 填写项目信息:
-
- Group ID:
com.example - Artifact ID:
my-multi-module-project - Version:
1.0-SNAPSHOT
- Group ID:
- 点击 Finish,创建父项目。
1.2 创建子模块
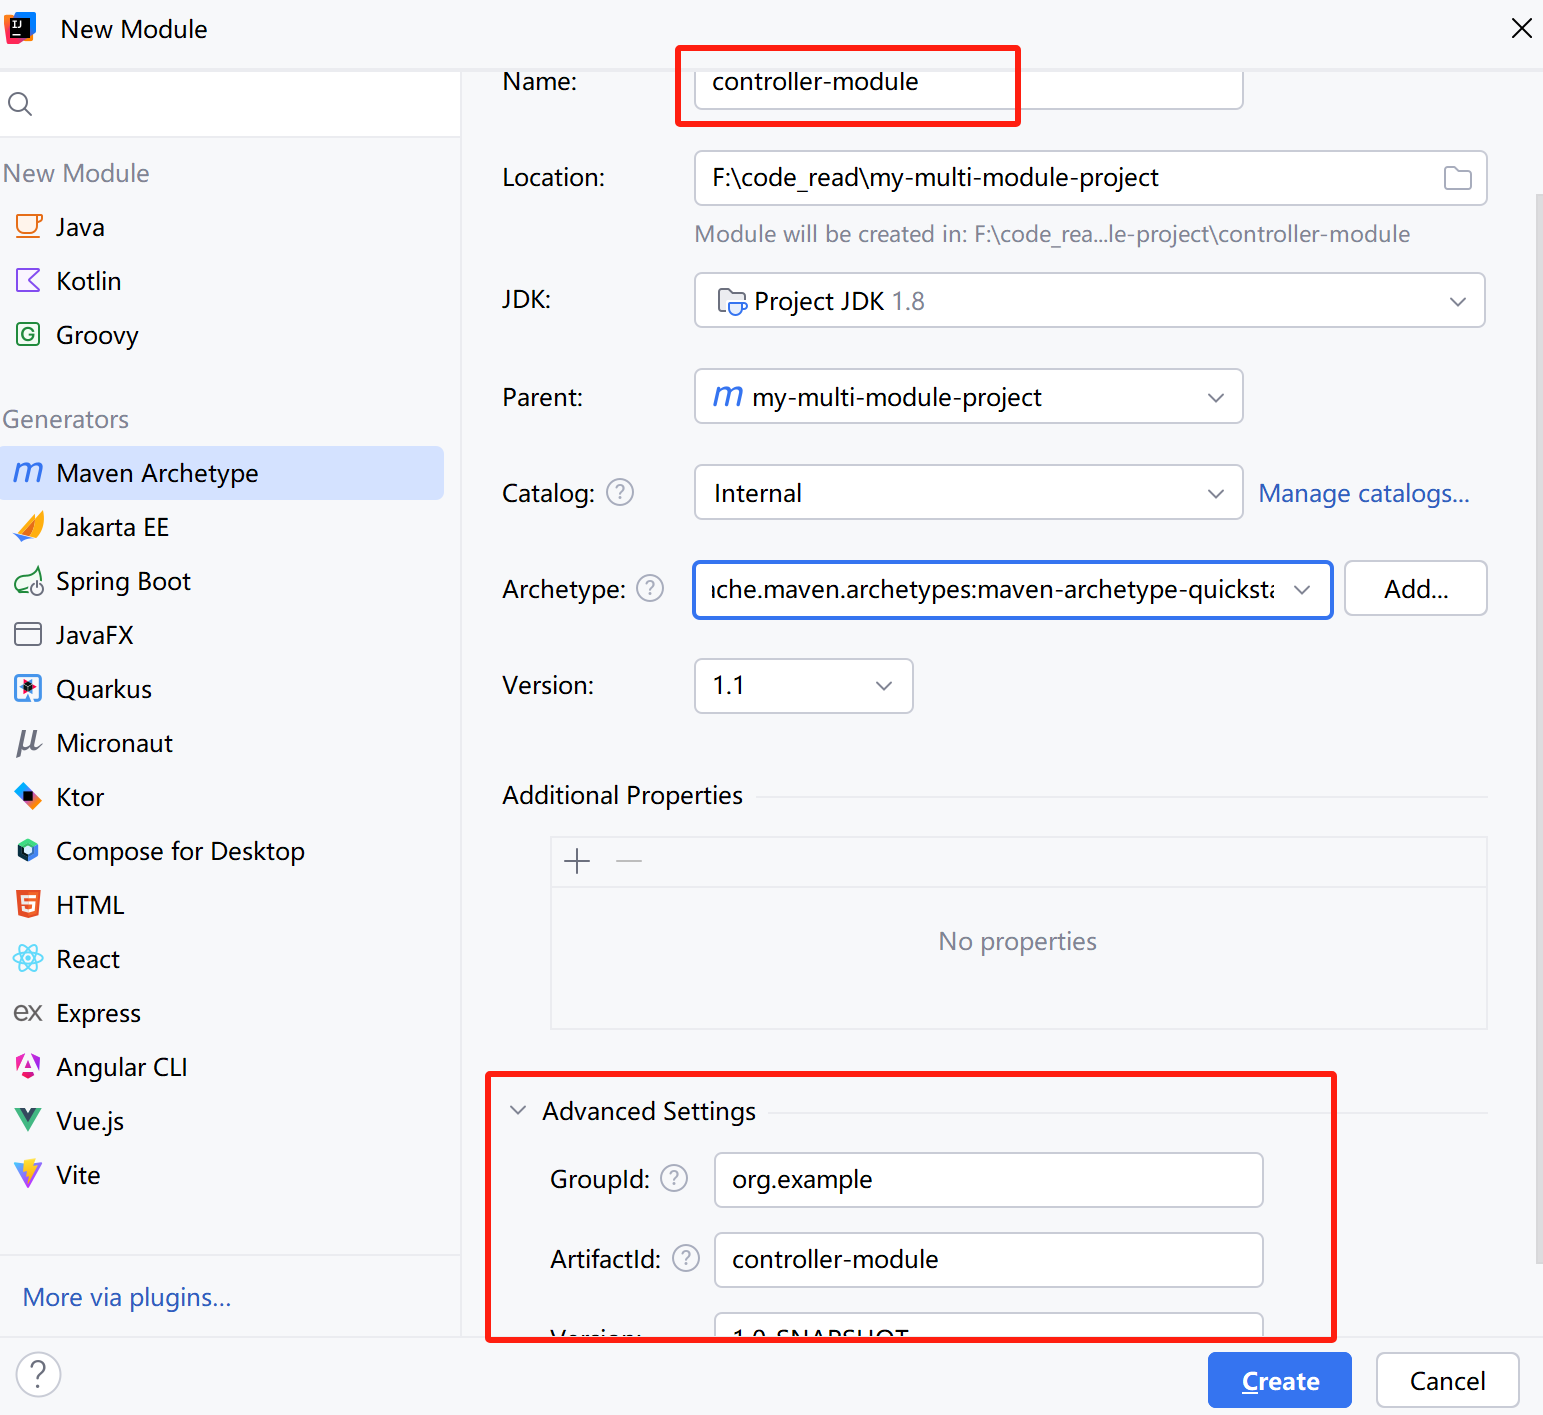
在父项目中创建子模块:
- 右键点击
my-multi-module-project,选择 New > Module。 - 选择 Maven,点击 Next。
- 填写模块信息:
-
- Artifact ID:
controller-module - Version:
1.0-SNAPSHOT
- Artifact ID:
- 点击 Finish,创建
controller-module。 - 重复上述步骤,创建
service-module和dao-module。
1.3 修改父项目的 pom.xml
在父项目的 pom.xml 中添加子模块:
<modules>
    <module>controller-module</module>
    <module>service-module</module>
    <module>dao-module</module>
</modules>
2. 配置多环境
2.1 创建多环境配置文件
在controller-module的 src/main/resources 文件夹中创建多环境配置文件:
application-dev.properties:开发环境配置application-prod.properties:生产环境配置
例如:
# application-dev.properties
#port
server.port=8888
2.2 在 application.properties 中指定默认环境
在 application.properties 中指定默认环境:
#profile
spring.profiles.active=dev
3. 在 IntelliJ IDEA 中配置 JDK 与 Maven
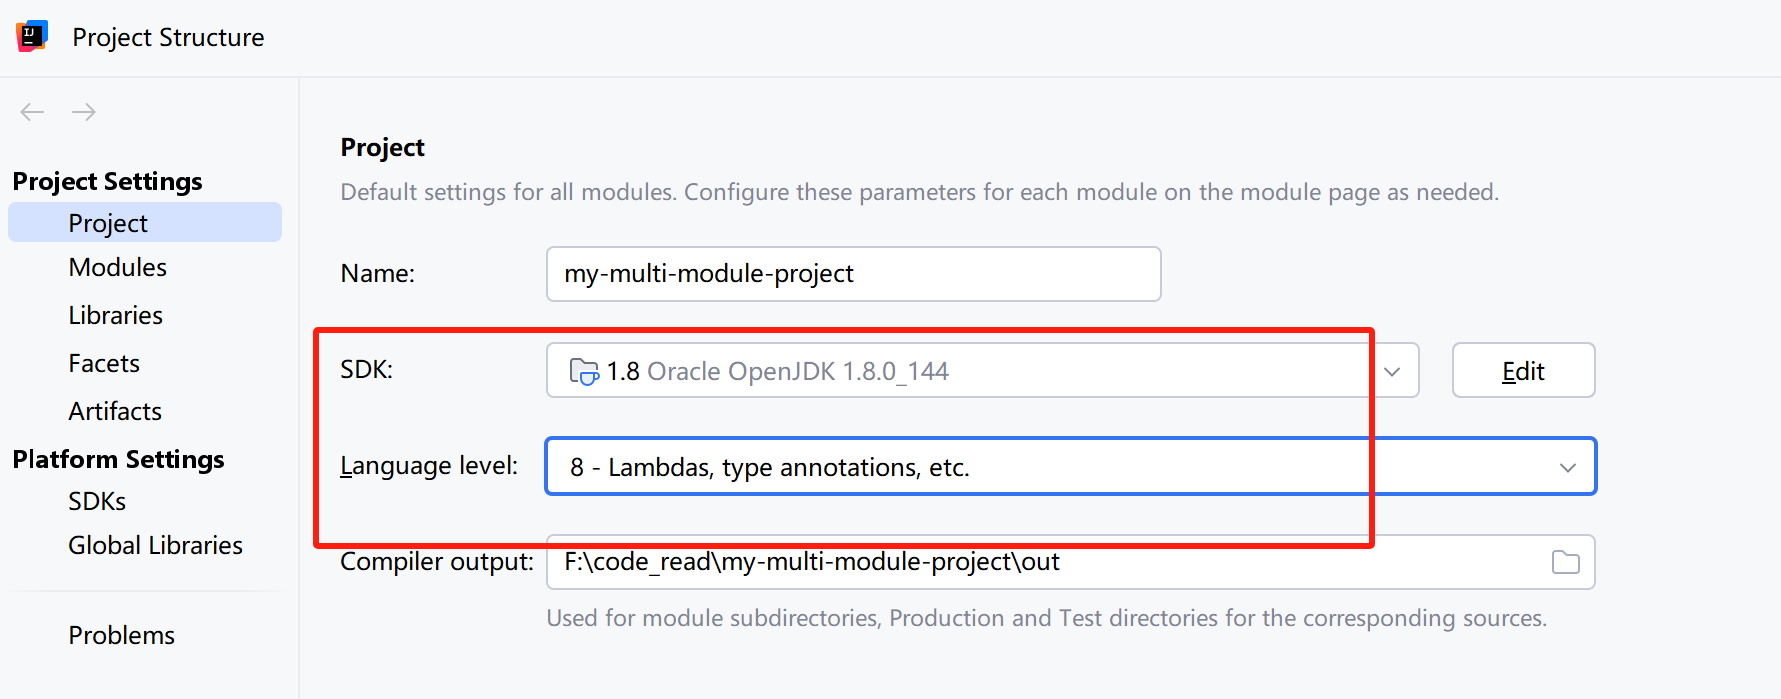
3.1 配置 JDK 1.8
- 打开 IntelliJ IDEA,选择 File > Project Structure。
- 在 Project Settings > Project 中,选择 Project SDK:
-
- 点击 New...,选择 JDK,并指定 JDK 1.8 的路径。
- 确保 Project language level 设置为 8 - Lambdas, type annotations etc.。
- 点击 Apply 和 OK。
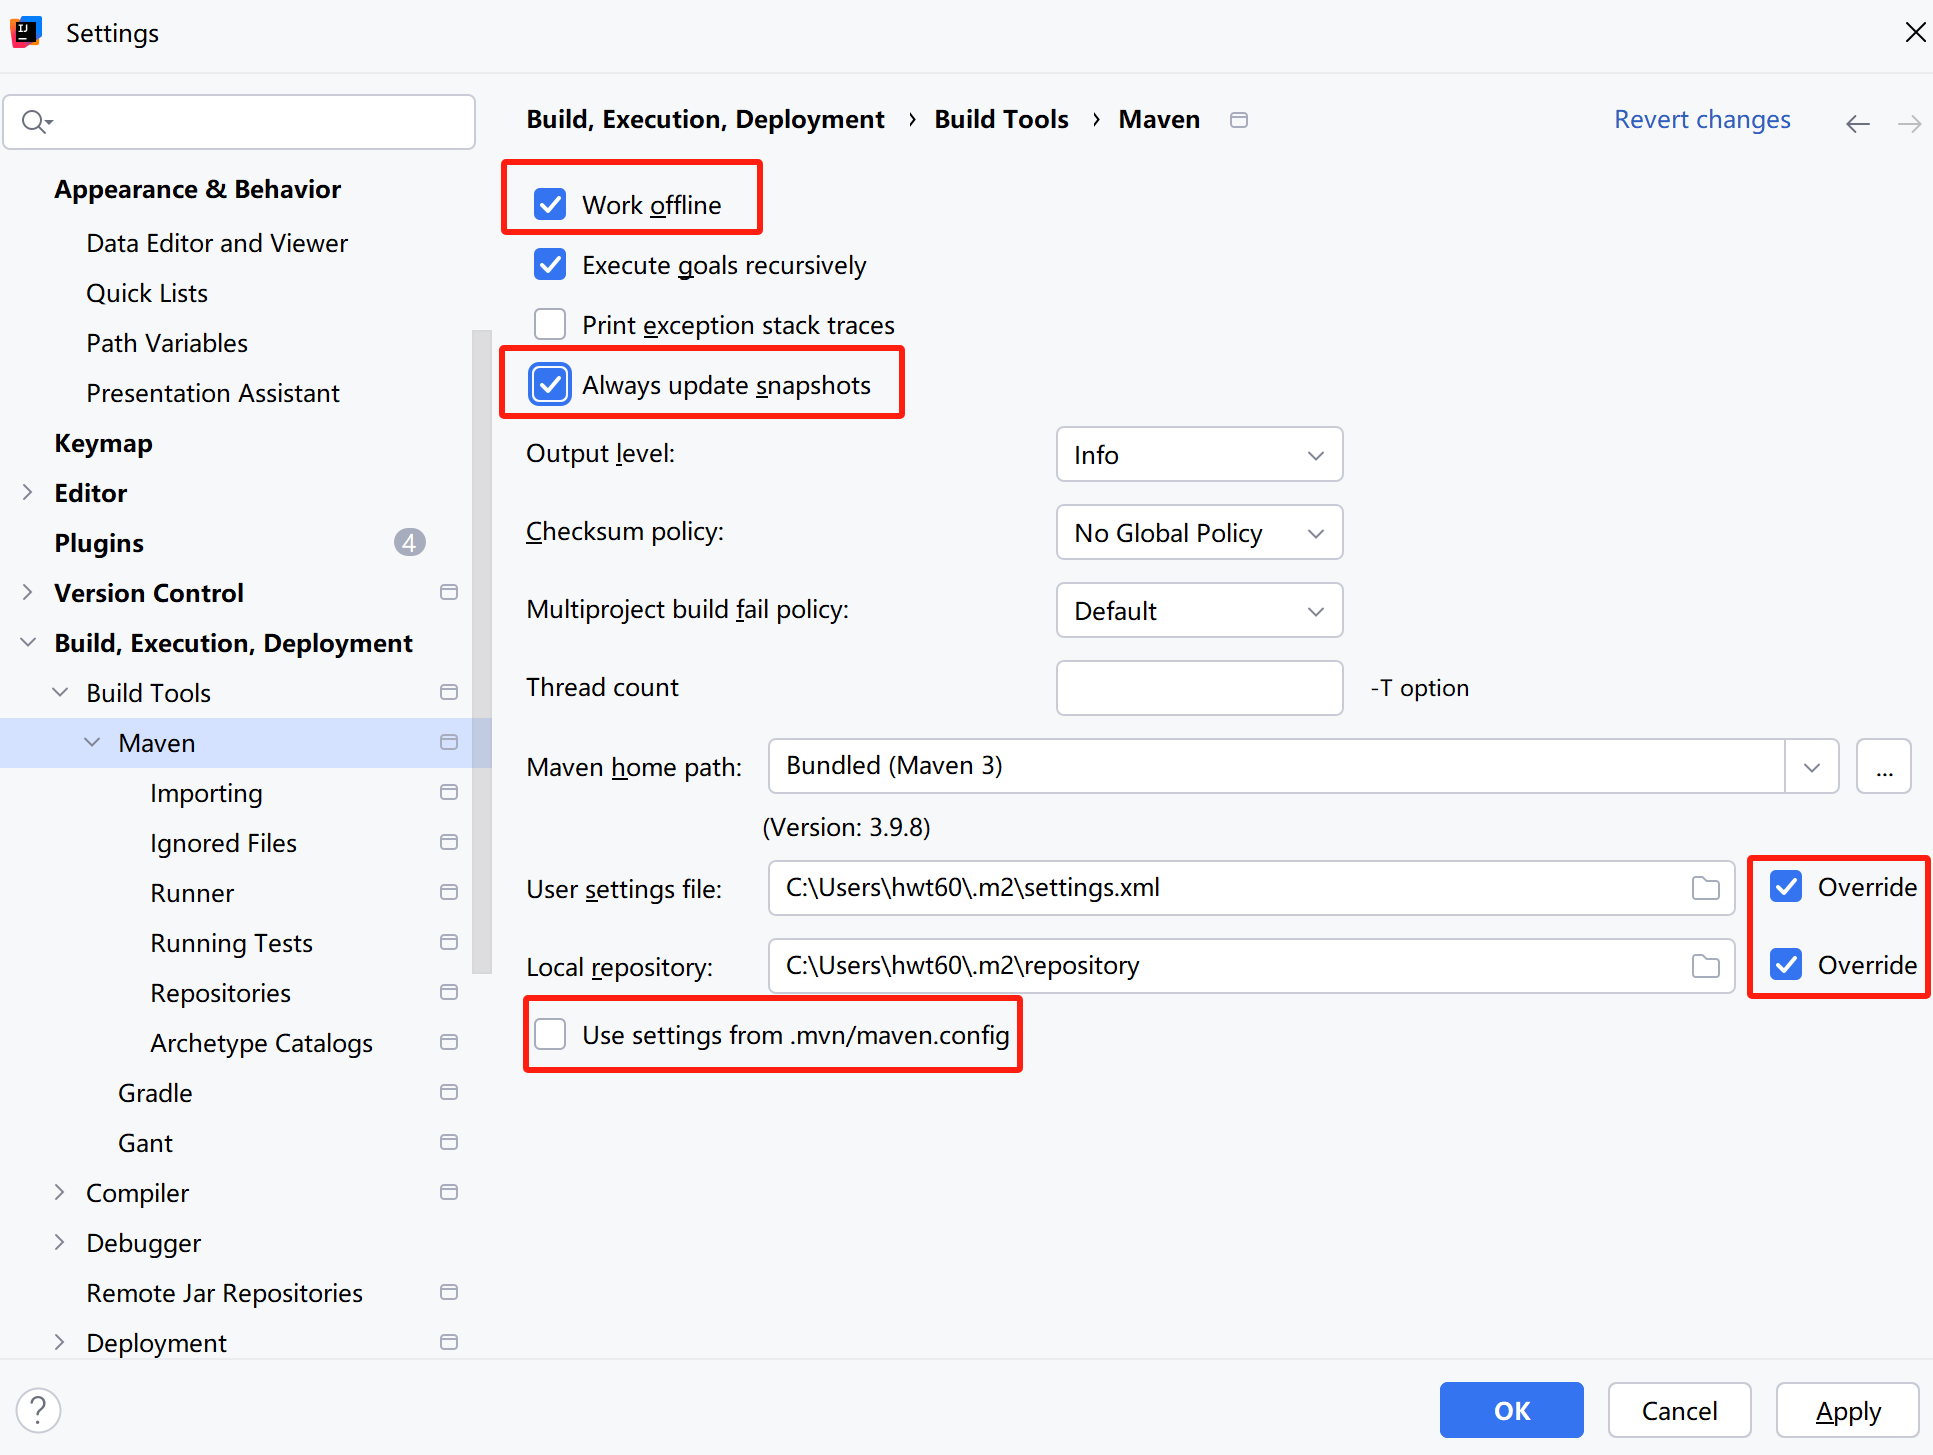
3.2 配置本地 Maven 的 settings.xml
- 打开 IntelliJ IDEA,选择 File > Settings(或 Ctrl + Alt + S)。
- 在 Build, Execution, Deployment > Build Tools > Maven 中:
-
- 勾选 Work offline(如果需要离线模式,如果要添加新依赖,必须手动打开它,否则不会下载)。
-
-
- 避免网络请求:在离线模式下,Maven 不会尝试从远程仓库下载依赖,只会从本地缓存(
~/.m2/repository)中查找依赖。 - 提高构建速度:减少网络延迟,尤其在没有网络连接的环境中非常有用。
- 减少依赖冲突:避免因远程仓库中的依赖版本更新而导致的构建问题。
- 如果需要下载新的依赖,可以暂时取消勾选 Work offline,让 Maven 从远程仓库下载依赖。
- 避免网络请求:在离线模式下,Maven 不会尝试从远程仓库下载依赖,只会从本地缓存(
-
-
- 确保 Always update snapshots 被选中。
- 在 Maven home path 中:
-
- 选择 内置 maven 或指定本地 Maven 的路径。
- 在 User settings file 中:
-
- 指定本地 Maven 的
settings.xml文件路径(通常位于~/.m2/settings.xml)。
- 指定本地 Maven 的
<?xml version="1.0" encoding="UTF-8"?>
<settings xmlns="http://maven.apache.org/SETTINGS/1.0.0"
  xmlns:xsi="http://www.w3.org/2001/XMLSchema-instance"
  xsi:schemaLocation="http://maven.apache.org/SETTINGS/1.0.0 http://maven.apache.org/xsd/settings-1.0.0.xsd">

  <localRepository>${user.home}/.m2/repository</localRepository>

  <mirrors>
    <mirror>
      <id>alimaven</id>
      <name>aliyun maven</name>
      <url>http://maven.aliyun.com/nexus/content/groups/public/</url>
      <mirrorOf>central</mirrorOf>
    </mirror>
  </mirrors>

  <profiles>
    <profile>
      <id>default</id>
      <repositories>
        <repository>
          <id>alimaven</id>
          <name>aliyun maven</name>
          <url>http://maven.aliyun.com/nexus/content/groups/public/</url>
          <releases>
            <enabled>true</enabled>
          </releases>
          <snapshots>
            <enabled>true</enabled>
          </snapshots>
        </repository>
      </repositories>
      <pluginRepositories>
        <pluginRepository>
          <id>alimaven</id>
          <name>aliyun maven</name>
          <url>http://maven.aliyun.com/nexus/content/groups/public/</url>
          <releases>
            <enabled>true</enabled>
          </releases>
          <snapshots>
            <enabled>true</enabled>
          </snapshots>
        </pluginRepository>
      </pluginRepositories>
    </profile>
  </profiles>

  <activeProfiles>
    <activeProfile>default</activeProfile>
  </activeProfiles>

</settings>- 在 Local repository 中:
-
- 通常位于
~/.m2/repository
- 通常位于
- 点击 Apply 和 OK。
3.3 重写 Maven 默认配置
在父项目的 pom.xml 中,可以覆盖 Maven 的默认配置:
<build>
    <plugins>
        <plugin>
            <groupId>org.apache.maven.plugins</groupId>
            <artifactId>maven-compiler-plugin</artifactId>
            <version>3.8.1</version>
            <configuration>
                <source>1.8</source>
                <target>1.8</target>
            </configuration>
        </plugin>
    </plugins>
</build>
在父项目的 pom.xml 中,通过 <build> 配置覆盖 Maven 的默认配置是一种常见的做法,用于统一管理项目中的构建工具配置。配置 Maven 编译器插件(maven-compiler-plugin),以确保所有子模块使用相同的 Java 版本进行编译,还提高了项目的可维护性。
4. 集成 SpringBoot
4.1 在父项目中引入 Spring Boot 依赖
在父项目的 pom.xml 中添加 Spring Boot 父依赖:
<parent>
    <groupId>org.springframework.boot</groupId>
    <artifactId>spring-boot-starter-parent</artifactId>
    <version>2.7.0</version>
</parent>
添加 web 依赖:
<!-- Spring Boot Starter Web -->
<dependency>
  <groupId>org.springframework.boot</groupId>
  <artifactId>spring-boot-starter-web</artifactId>
</dependency>
4.2 在子模块中添加模块间依赖关系
在 service-module 的 pom.xml 中添加对 dao-module 的依赖:
<dependencies>
    <dependency>
        <groupId>org.example</groupId>
        <artifactId>dao-module</artifactId>
        <version>1.0-SNAPSHOT</version>
    </dependency>
</dependencies>
在 controller-module 的 pom.xml 中添加对 service-module 的依赖:
<dependencies>
    <dependency>
        <groupId>org.example</groupId>
        <artifactId>service-module</artifactId>
        <version>1.0-SNAPSHOT</version>
    </dependency>
</dependencies>
4.3 添加启动入口
在父项目中创建一个启动类:
package org.example;

import org.springframework.boot.SpringApplication;
import org.springframework.boot.autoconfigure.SpringBootApplication;

@SpringBootApplication
public class Application {
    public static void main(String[] args) {
        SpringApplication.run(Application.class, args);
    }
}
5. 搭建数据库与持久层框架
5.1 安装 MySQL
详见 MySQL 安装教程:https://www.yuque.com/gamewinner/saowhv/bcnr8341oxtdo47z
确保 MySQL 服务已启动:
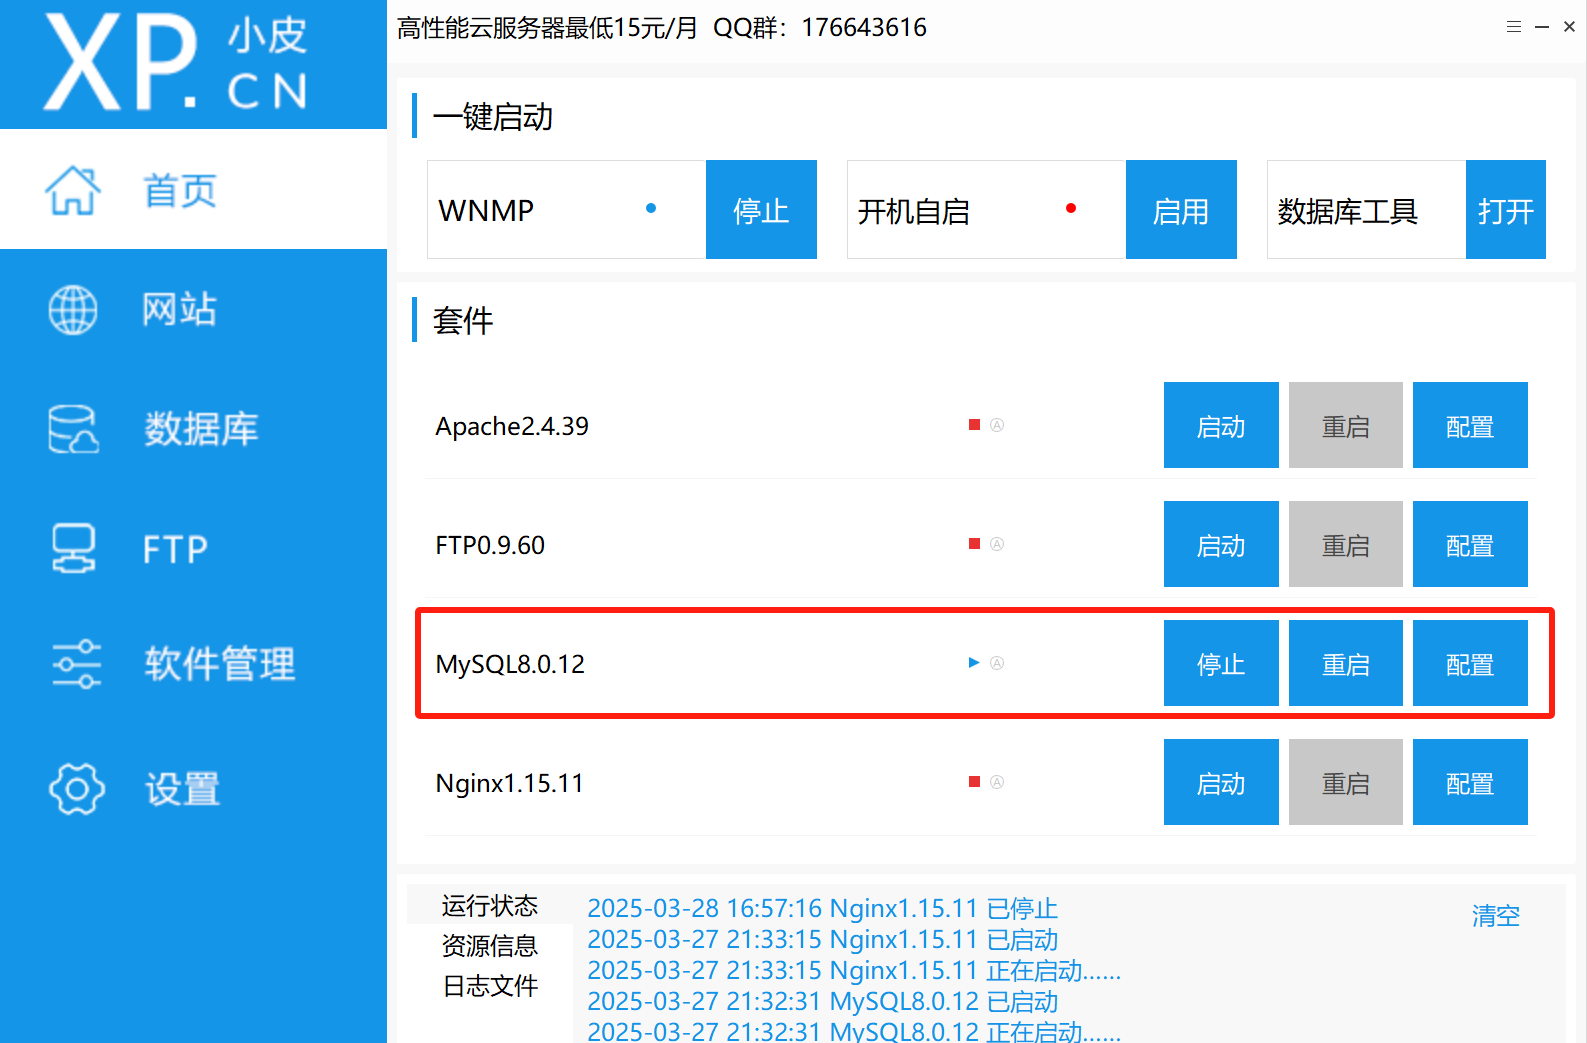
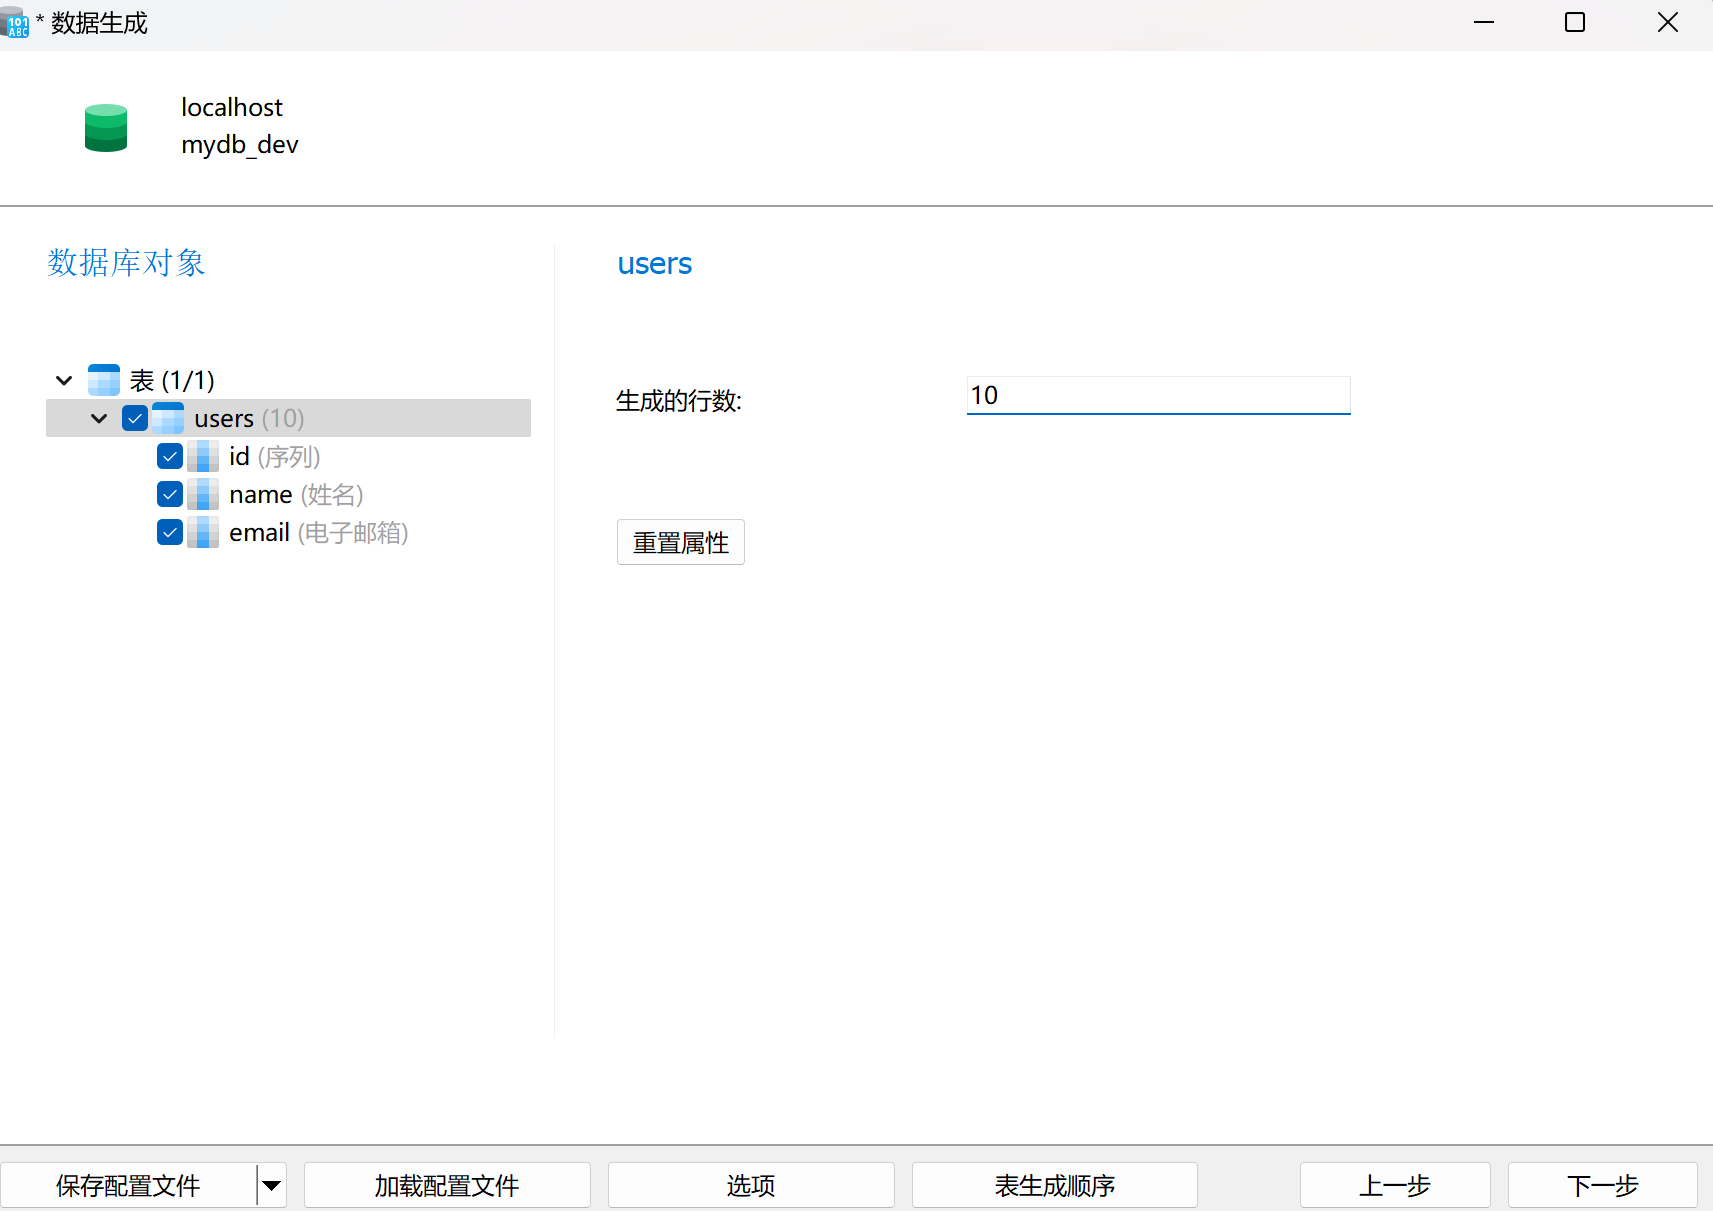
创建一个数据库(如:mydb_dev)。创建一个测试表:users
CREATE TABLE `users` (
`id` int(11) NOT NULL,
`name` varchar(60) DEFAULT NULL,
`email` varchar(60) DEFAULT NULL,
PRIMARY KEY (`id`)
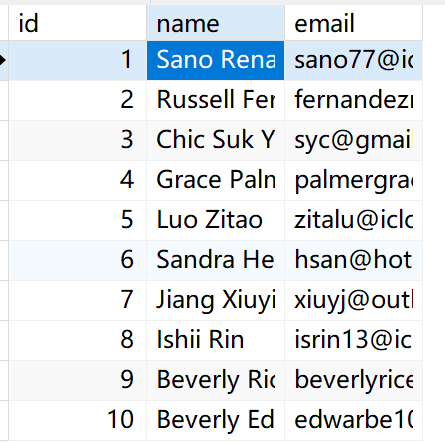
) ENGINE=MyISAM;创建测试数据:在表上右键——>数据生成(可实现快速造数据)
5.2 添加 MyBatis 框架依赖
在父项目的 pom.xml 中添加 MyBatis 依赖:
<dependency>
    <groupId>org.mybatis.spring.boot</groupId>
    <artifactId>mybatis-spring-boot-starter</artifactId>
    <version>2.2.0</version>
</dependency>

<dependency>
    <groupId>mysql</groupId>
    <artifactId>mysql-connector-java</artifactId>
    <version>8.0.26</version>
</dependency>
5.3 在项目中配置数据库
在父项目的 application-dev.properties 和 application-prod.properties 中配置数据库连接信息。
#datasource
spring.datasource.url=jdbc:mysql://localhost:3306/mydb_dev
spring.datasource.username=root
spring.datasource.password=root
spring.datasource.driver-class-name=com.mysql.cj.jdbc.Driver
5.4 配置 MyBatis
在父项目的 application.properties 中配置 MyBatis:
#profile
spring.profiles.active=dev
#mybatis
mybatis.mapper-locations=classpath:mapper/*.xml
mybatis.type-aliases-package=org.example.model
在 dao-module 中创建一个 Mapper 接口和对应的 XML 文件:
package org.example.dao;

import org.example.model.User;
import org.apache.ibatis.annotations.Mapper;

@Mapper
public interface UserMapper {
    User selectById(Long id);
}
对应的 XML 文件:写 SQL 语句的地方
<?xml version="1.0" encoding="UTF-8" ?>
<!DOCTYPE mapper
        PUBLIC "-//mybatis.org//DTD MAPPER 3.0//EN"
        "http://mybatis.org/dtd/mybatis-3-mapper.dtd">
<mapper namespace="org.example.dao.UserMapper">
    <select id="selectById" parameterType="long" resultType="org.example.model.User">
        SELECT * FROM users WHERE id = #{id}
    </select>
</mapper>
5.5 安装 MyBatis 小插件:MyBatisX
- 功能:免费的MyBatis插件,支持从数据库表生成实体类、Mapper接口和Mapper XML文件。还支持通过Mapper方法名生成对应的SQL标签,方便从Mapper方法跳转到XML中的具体SQL。
- 亮点:
-
- 支持Mapper接口与XML文件之间的快速跳转。
- 提供类似JPA的自动补全提示,提升编码效率。
- 适用场景:使用MyBatis框架的Java开发者,特别是需要快速生成代码和提高开发效率的场景。
5.6 开发 service 层
在 service-module 中创建一个 Service 类:
package org.example.Service;

import org.example.dao.UserMapper;
import org.example.model.User;
import org.springframework.beans.factory.annotation.Autowired;
import org.springframework.stereotype.Service;

@Service
public class UserService {

    @Autowired
    private UserMapper userMapper;

    public User getUserById(Long id) {
        return userMapper.selectById(id);
    }
}
5.7 开发 controller 层
在 controller-module 中创建一个 Controller 类:
package org.example.controller;

import org.example.Service.UserService;
import org.example.model.User;
import org.springframework.beans.factory.annotation.Autowired;
import org.springframework.web.bind.annotation.GetMapping;
import org.springframework.web.bind.annotation.PathVariable;
import org.springframework.web.bind.annotation.RequestMapping;
import org.springframework.web.bind.annotation.RestController;

@RestController
@RequestMapping("/users")
public class UserController {

    @Autowired
    private UserService userService;

    @GetMapping("/{id}")
    public User getUser(@PathVariable Long id) {
        return userService.getUserById(id);
    }
}
6. 启动
- 在 IntelliJ IDEA 中,右键点击
Application类,选择 Run。 - 访问
http://localhost:8888/users/1,测试接口是否正常工作。


 被折叠的 条评论
为什么被折叠?
被折叠的 条评论
为什么被折叠?
 到【灌水乐园】发言


