


前言
本文,演示Spring Boot Weflux集成SpringSecurity安全验证框架做项目的身份验证与权限管理;通过@EnableWebFluxSecurity注解加载与配置Security权限与用户登录信息,通过@EnableReactiveMethodSecurity注解在标准方法上用表达式模型做安全控制设置,如:使用@PreAuthorize注解在方法上控制用户访问RestAPI做权限验证;采用jwt做登录会话数字签名,通过jwt验证后,从jwt中获取用户唯一标识,在做相应业务验权和调用;
到此,本示例核心为完成一个基础springSecurity安全框架登录功能演示;
SpringWebFlux
SpringWebFlux是一套全新的springMVC框架体系下的新技术,随着SpingBoot的版本更新与微服务架构迭代,融入了更多的新技术,慢慢的让大众认识和学习了解到WebFlux的特点与设计,并接受在项目中实践,在springframework 5.0版本刚添加发布后,也存在一些学习与使用难点、甚至组件版本的兼容性等问题;随着版本的升级与迭代优化,现已有完全替代SpringWeb成为Web微服务开发框架主力军的潜力;
官方说明
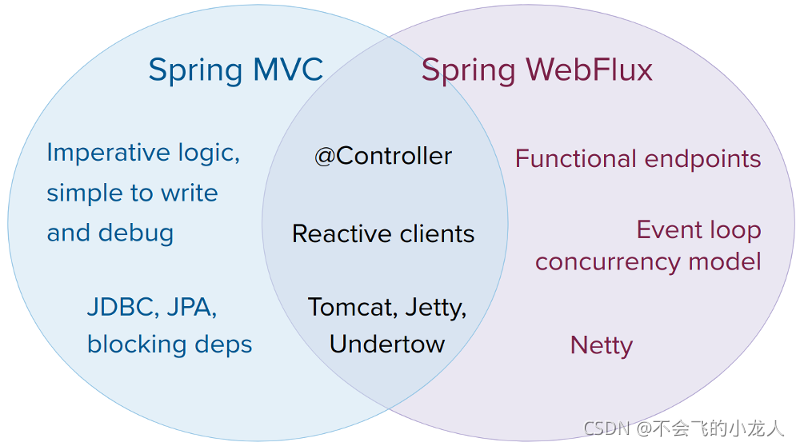
SpringWebFlux是从spring framework 5.0版本开始在spring MVC整个生态框架中加入的,它是一套全新的ReactiveWeb技术,通够与现有的SpringMVC其它组件共存,是一个反应式堆栈Web框架,是全完全非阻塞,支持 Reactive Streams背压,并在 Netty、Undertow 和 Servlet 3.1+ 容器等服务器上运行。
在微服务架构中,您可以混合使用 Spring MVC 或 Spring WebFlux 控制器或 Spring WebFlux 功能端点的应用程序。在两个框架中都支持相同的基于注释的编程模型,可以更轻松地重用知识,同时还可以为正确的工作选择正确的工具。
并且从 Spring Web MVC 迁移到 Spring WebFlux 可以是无缝的,我们不需要重写原有的任何逻辑代码!
详细情况参见官方文档:
https://docs.spring.io/spring-framework/docs/current/reference/html/web-reactive.html
SpringSecurity
Spring Security在spingMVC框架体系中用于做身份验证与权限管理的框架,增加系统的安全防护,防止非法登录与跨权限访问,目前很多项目中有应用;
官方说明
Spring Security 是一个功能强大且高度可定制的身份验证和访问控制框架。它是保护基于 Spring 的应用程序的事实上的标准。
Spring Security 是一个专注于为 Java 应用程序提供身份验证和授权的框架。与所有 Spring 项目一样,Spring Security 的真正强大之处在于它可以轻松扩展以满足自定义要求
特征
- 对身份验证和授权的全面且可扩展的支持
- 防止会话固定、点击劫持、跨站点请求伪造等攻击
- Servlet API 集成
- 与 Spring Web MVC 的可选集成
应用程序安全归结为两个或多或少独立的问题:身份验证(你是谁?)和授权(你被允许做什么?)。有时人们会说“访问控制”而不是“授权”,这可能会让人感到困惑,但这样想是有帮助的,因为“授权”在其他地方超载。Spring Security 的架构旨在将身份验证与授权分开,并为两者提供策略和扩展点。
详细情况参见官方文档:
https://spring.io/guides/topicals/spring-security-architecture
项目示例
创建一个叫webflux-demo的工程,用于本演示项目编写代码;
创建项目pom文件
pom.xml
<parent>
    <groupId>org.springframework.boot</groupId>
    <artifactId>spring-boot-starter-parent</artifactId>
    <version>2.4.5</version>
    <relativePath/>
</parent>

<dependencies>
    <dependency>
        <groupId>org.springframework.boot</groupId>
        <artifactId>spring-boot-starter-webflux</artifactId>
        <exclusions>
            <exclusion>
                <groupId>org.springframework.boot</groupId>
                <artifactId>spring-boot-starter-logging</artifactId>
            </exclusion>
        </exclusions>
    </dependency>

    <dependency>
        <groupId>org.springframework.security</groupId>
        <artifactId>spring-security-test</artifactId>
        <scope>test</scope>
    </dependency>
    <dependency>
        <groupId>org.springframework.boot</groupId>
        <artifactId>spring-boot-starter-security</artifactId>
    </dependency>
    <dependency>
        <groupId>org.projectlombok</groupId>
        <artifactId>lombok</artifactId>
        <optional>true</optional>
    </dependency>
    <dependency>
        <groupId>org.springframework.boot</groupId>
        <artifactId>spring-boot-starter-test</artifactId>
        <scope>test</scope>
    </dependency>
    <!--添加对日志系统的支持,采用最新的log4j2框架-->
    <dependency>
        <groupId>org.springframework.boot</groupId>
        <artifactId>spring-boot-starter-log4j2</artifactId>
    </dependency>
    <!-- json解析包 -->
    <dependency>
        <groupId>com.alibaba</groupId>
        <artifactId>fastjson</artifactId>
        <version>1.2.75</version>
    </dependency>
    <dependency>
        <groupId>org.apache.commons</groupId>
        <artifactId>commons-lang3</artifactId>
        <version>3.10</version>
    </dependency>
    <!-- JWT Token验证机制 -->
    <dependency>
        <groupId>com.auth0</groupId>
        <artifactId>java-jwt</artifactId>
        <version>3.8.1</version>
    </dependency>
    <dependency>
        <groupId>io.jsonwebtoken</groupId>
        <artifactId>jjwt</artifactId>
        <version>0.9.0</version>
    </dependency>
</dependencies>
创建项目YML配置
application.yml
# 本地服务访问
server:
  # 服务端口
  port: 8080
  # 服务IP
  address: 0.0.0.0

spring:
  application:
    # 应用服务名
    name: security

# 配置日志
logging:
  level:
    com.netflix: info
    reactor.util: info
    org.springframework.boot: info
#    # log 级别
#    org.springframework.cloud.gateway: debug
  config: classpath:log4j2.xml

# 是否启用springboot的debug调试模式,会打印详细日志信息
debug: true
创建Log4j2日志配置
log4j2.xml
<?xml version="1.0" encoding="UTF-8"?>
<!--
    status : 这个用于设置log4j2自身内部的信息输出,可以不设置,当设置成trace时,会看到log4j2内部各种详细输出
    monitorInterval : Log4j能够自动检测修改配置文件和重新配置本身, 设置间隔秒数。
-->
<Configuration status="WARN" monitorInterval="600">
    <!-- 日志级别
            trace:追踪,就是程序推进一下,可以写个trace输出
            debug:调试,一般作为最低级别,trace基本不用。
            info:输出重要的信息,使用较多
            warn:警告,有些信息不是错误信息,但也要给一些提示。
            error:错误信息。用的也很多。
            fatal:致命错误。级别较高.
     -->
    <Appenders>
        <!--这个输出控制台的配置-->
        <Console name="Console" target="SYSTEM_OUT">
            <!-- 控制台只输出level及以上级别的信息(onMatch),其他的直接拒绝(onMismatch),[DENY|ACCEPT] -->
            <ThresholdFilter level="debug" onMatch="ACCEPT" onMismatch="DENY"/>
            <!-- 输出日志的格式 -->
            <PatternLayout>
                <charset>UTF-8</charset>
                <pattern>[%d{yyyy-MM-dd HH:mm:ss.SSS}] [%level] [%thread] [%class{36}] [%L] - %msg%xEx%n</pattern>
            </PatternLayout>
        </Console>
    </Appenders>
    <Loggers>
        <!-- 配置日志的根节点 -->
        <root level="trace">
            <appender-ref ref="Console"/>
        </root>
        <!-- 第三方日志配置 -->
        <logger name="org.springframework.core" level="info"/>
        <logger name="org.springframework.beans" level="info"/>
        <logger name="org.springframework.context" level="info"/>
        <logger name="io.netty" level="warn"/>
        <logger name="org.apache.http" level="warn"/>
    </Loggers>
</Configuration>
创建启动类
JwtAppStart.java
package com.webflux.demo;

import org.springframework.boot.SpringApplication;
import org.springframework.boot.autoconfigure.SpringBootApplication;
import org.springframework.http.HttpStatus;
import org.springframework.http.server.reactive.ServerHttpResponse;
import org.springframework.security.access.prepost.PreAuthorize;
import org.springframework.security.core.Authentication;
import org.springframework.web.bind.annotation.RequestMapping;
import org.springframework.web.bind.annotation.RequestMethod;
import org.springframework.web.bind.annotation.ResponseBody;
import org.springframework.web.bind.annotation.RestController;
import org.springframework.web.reactive.config.EnableWebFlux;
import reactor.core.publisher.Mono;

import java.security.Principal;
import java.util.HashMap;
import java.util.Map;

//注意:@EnableWebFlux用来配置freemarker,它适用于模板文件,但是对静态资源访问有问题,访问纯静态资源请注释
@EnableWebFlux
@RestController
@SpringBootApplication
//@EnableGlobalMethodSecurity(prePostEnabled = true, securedEnabled = true)
public class JwtAppStart{

    /**
     此示例,只提供api级别的security接口较验
     测试流程:
     1.通过postamn 以get访问:http://127.0.0.1:8080/getUser 未登录,被拦截,跳转到/login(get模式),返回未登录提示
     2.通过postamn 以post模式访问: http://127.0.0.1:8080/login,参数通过body (x-wwww-from-urlencoded)表单提交
     2.1. 登录成功,进入ServerAuthenticationSuccessHandler类中加工返回数据
     2.2. 登录失败,进入ServerAuthenticationFailureHandler类中加工返回数据
     2.3. 登录成功后,继续通过postamn 以get访问:http://127.0.0.1:8080/getUser,响应正常
     */

    public static void main(String[] args) {
        SpringApplication.run(JwtAppStart.class, args);
    }

    /**
     * 不限制用户访问(需登录)
     * @return
     */
    @RequestMapping("/getUser")
    @ResponseBody
    public Mono<String> getUser(){
        return Mono.just("getUser");
    }

    /**
     * 普通用户访问
     * post
     * @return
     */
    @PreAuthorize("hasRole('USER')")
    @RequestMapping(value = "/user", method = {RequestMethod.GET,RequestMethod.POST})
    @ResponseBody
    public Mono<String> user(Principal principal){
        System.out.println(principal.getName());
        return Mono.just("hello "+principal.getName());
    }

    /**
     * 超管用户访问
     * @return
     */
//    @PreAuthorize("hasPermission('ROLE_ADMIN')")
//    @Secured("ROLE_ADMIN")
    @PreAuthorize("hasRole('ADMIN')")
    @RequestMapping(value = "/admin", method = {RequestMethod.GET,RequestMethod.POST})
    @ResponseBody
    public Mono<String> admin(Principal principal,Authentication authentication){
        System.out.println(authentication.getAuthorities());
        System.out.println(principal.getName());
        return Mono.just("admin "+principal.getName());
    }

    @RequestMapping(value = "/login", method = {RequestMethod.GET,RequestMethod.POST})
    @ResponseBody
    public Mono<Object> login(ServerHttpResponse response){
        Map<String, String> responseMap = new HashMap<>();
        responseMap.put("code", "failure");
        responseMap.put("msg", "您还未登录");
        response.setStatusCode(HttpStatus.UNAUTHORIZED);
        return Mono.just(responseMap);
    }

}
创建权限配置类
WebFluxSecurityConfigurer.java
package com.webflux.demo.config;

import com.alibaba.fastjson.JSONObject;
import com.webflux.demo.handler.JwtSecurityContextRepository;
import com.webflux.demo.service.UserService;
import com.webflux.demo.util.JwtTokenUtils;
import lombok.extern.slf4j.Slf4j;
import org.springframework.context.annotation.Bean;
import org.springframework.core.io.buffer.DataBuffer;
import org.springframework.http.HttpMethod;
import org.springframework.http.HttpStatus;
import org.springframework.http.server.reactive.ServerHttpResponse;
import org.springframework.security.authentication.*;
import org.springframework.security.config.annotation.method.configuration.EnableReactiveMethodSecurity;
import org.springframework.security.config.annotation.web.reactive.EnableWebFluxSecurity;
import org.springframework.security.config.web.server.ServerHttpSecurity;
import org.springframework.security.core.userdetails.User;
import org.springframework.security.core.userdetails.UsernameNotFoundException;
import org.springframework.security.web.server.SecurityWebFilterChain;
import org.springframework.security.web.server.WebFilterExchange;
import org.springframework.web.server.ServerWebExchange;
import reactor.core.publisher.Mono;

import java.io.UnsupportedEncodingException;
import java.util.HashMap;
import java.util.Map;

/**
 * @Description EnableWebFluxSecurity权限验证配置
 * @Author JL
 * @Version V1.0
 */
@Slf4j
@EnableWebFluxSecurity
@EnableReactiveMethodSecurity
public class WebFluxSecurityConfigurer {

    /**
     * 提供用于获取UserDetails的Service
     * @param userService
     * @return
     */
    @Bean
    public ReactiveAuthenticationManager authenticationManager(UserService userService) {
        log.info("加载security 用户配置....");
        return new UserDetailsRepositoryReactiveAuthenticationManager(userService);
    }

    /**
     * http请求路径权限与过滤链配置
     * @param http
     * @param userService
     * @return
     */
    @Bean
    public SecurityWebFilterChain springWebFilterChain(ServerHttpSecurity http, UserService userService) {
        log.info("加载security 权限配置....");
        http
                .csrf().disable()
                .cors().disable()
                .httpBasic().disable()
                .securityContextRepository(new JwtSecurityContextRepository(userService))
                .formLogin()
                .authenticationFailureHandler((webFilterExchange, exception) -> { //验证失败处理器(可以单独创建类处理)
                    webFilterExchange.getExchange().getResponse().setStatusCode(HttpStatus.UNAUTHORIZED);
                    Map<String, String> responseMap = new HashMap<>();
                    responseMap.put("code", "failure");
                    if (exception instanceof UsernameNotFoundException) {
                        responseMap.put("msg", "用户不存在 " + exception.getMessage());
                    } else if (exception instanceof BadCredentialsException) {
                        responseMap.put("msg", "密码错误 " + exception.getMessage());
                    } else if (exception instanceof LockedException) {
                        responseMap.put("msg", "用户锁定 " + exception.getMessage());
                    } else if (exception instanceof AccountExpiredException) {
                        responseMap.put("msg", "账户过期 " + exception.getMessage());
                    } else if (exception instanceof DisabledException) {
                        responseMap.put("msg", "账户不可用 " + exception.getMessage());
                    } else {
                        responseMap.put("msg", "系统错误 " + exception.getMessage());
                    }
                    //responseMap.put("msg", exception.getMessage());
                    return writeWith(webFilterExchange.getExchange(), responseMap);
                })
                .loginPage("/login")
                .authenticationSuccessHandler((webFilterExchange, authentication) -> { //验证成功处理器(可以单独创建类处理)
                    User user = (User)authentication.getPrincipal();
                    userService.saveCacheUser(user);
                    String token = JwtTokenUtils.createToken(user.getUsername(), -1);
                    Map<String, String> responseMap = new HashMap<>();
                    responseMap.put("code", "success");
                    responseMap.put("data", token);
                    return writeWith(webFilterExchange.getExchange(), responseMap);
                }).and()
                .authorizeExchange()//请求进行授权
                .pathMatchers(HttpMethod.OPTIONS).permitAll()//特殊请求过滤
                .pathMatchers("/login").permitAll()//登录不需要验证
                .anyExchange()//任何请求
                .authenticated()//都需要身份认证
                .and().logout()
                .logoutSuccessHandler((webFilterExchange, authentication) -> { //退出成功处理器(可以单独创建类处理)
                    Map<String, String> responseMap = new HashMap<>();
                    responseMap.put("code", "logout");
                    responseMap.put("msg", "退出成功");
                    return writeWith(webFilterExchange.getExchange(), responseMap);
                }).and()
                .exceptionHandling()
                .accessDeniedHandler((exchange, denied) -> { // 无权限访问处理器(可以单独创建类处理)
                    Map<String, String> responseMap = new HashMap<>();
                    responseMap.put("code", "denied");
                    responseMap.put("msg", "账户无权限访问");
                    return writeWith(exchange, responseMap);
                });

        return http.build();
    }

    /**
     * 输出响应信息
     * @param exchange
     * @param responseMap
     * @return
     */
    public Mono<Void> writeWith(ServerWebExchange exchange, Map<String, String> responseMap){
        ServerHttpResponse response = exchange.getResponse();
        String body = JSONObject.toJSONString(responseMap);
        DataBuffer buffer = null;
        try{
            buffer = response.bufferFactory().wrap(body.getBytes("UTF-8"));
        }catch(UnsupportedEncodingException ue){
            ue.printStackTrace();
        }
        return response.writeWith(Mono.just(buffer));
    }

}
创建上下文验证器
JwtSecurityContextRepository.java
package com.webflux.demo.handler;

import com.webflux.demo.service.UserService;
import com.webflux.demo.util.JwtTokenUtils;
import lombok.extern.slf4j.Slf4j;
import org.apache.commons.lang3.StringUtils;
import org.springframework.http.HttpHeaders;
import org.springframework.security.authentication.*;
import org.springframework.security.core.Authentication;
import org.springframework.security.core.context.SecurityContext;
import org.springframework.security.core.context.SecurityContextImpl;
import org.springframework.security.core.userdetails.ReactiveUserDetailsService;
import org.springframework.security.core.userdetails.UserDetails;
import org.springframework.security.web.server.context.ServerSecurityContextRepository;
import org.springframework.web.server.ServerWebExchange;
import reactor.core.publisher.Mono;

import javax.annotation.Resource;

/**
 * @Description 获取请求头中带过来的token值,解析并验证用户信息
 * @Author JL
 * @Version V1.0
 */
@Slf4j
public class JwtSecurityContextRepository implements ServerSecurityContextRepository {

    private UserService userService;

    public JwtSecurityContextRepository(UserService userService){
        this.userService = userService;
    }

    @Override
    public Mono<Void> save(ServerWebExchange exchange, SecurityContext context) {
        return Mono.empty();
    }

    @Override
    public Mono<SecurityContext> load(ServerWebExchange exchange) {
        log.info("加载token:JwtSecurityContextRepository");
        String path = exchange.getRequest().getPath().toString();
        // 过滤路径
        if ("/login".equals(path)){
            return Mono.empty();
        }
        String token = exchange.getRequest().getHeaders().getFirst(HttpHeaders.AUTHORIZATION);
        if (StringUtils.isNotBlank(token)){
            // token能正常解析,表示token有效并对应数据库已知用户
            String subject = JwtTokenUtils.parseToken(token);
            Authentication newAuthentication = new UsernamePasswordAuthenticationToken(subject, subject);
            return new ReactiveAuthenticationManager(){
                @Override
                public Mono<Authentication> authenticate(Authentication authentication) {
                    // 如果对token有足够的安全认可,可以采用无状态凭证策略,将username和authorities放置在token串中解析获取,此处就可以不用查询数据库验证
                    Mono<UserDetails> userDetails = userService.findByUsername(authentication.getPrincipal().toString());
                    UserDetails user = userDetails.block();
                    if (user == null){
                        throw new DisabledException("账户不可用");
                    }
                    Authentication auth = new UsernamePasswordAuthenticationToken(user.getUsername(), null, user.getAuthorities());
                    return Mono.just(auth);
                }
            }.authenticate(newAuthentication).map(SecurityContextImpl::new);
        }else {
            return Mono.empty();
        }
    }
}
创建用户身份验证业务类
UserService.java
package com.webflux.demo.service;

import org.springframework.security.core.userdetails.ReactiveUserDetailsService;
import org.springframework.security.core.userdetails.User;
import org.springframework.security.core.userdetails.UserDetails;
import org.springframework.security.core.userdetails.UsernameNotFoundException;
import org.springframework.security.crypto.factory.PasswordEncoderFactories;
import org.springframework.security.crypto.password.PasswordEncoder;
import org.springframework.stereotype.Service;
import reactor.core.publisher.Mono;

import java.util.HashMap;
import java.util.Map;

/**
 * @Description 用户信息查询与登录状态保存
 * @Author JL
 * @Date 2021/08/12
 * @Version V1.0
 */
@Service
public class UserService implements ReactiveUserDetailsService {

    private static Map<String,UserDetails> userMap = new HashMap<>();

    /**
     * 获取指定用户信息与登录信息进行验证
     * @param username
     * @return
     */
    @Override
    public Mono<UserDetails> findByUsername(String username) {
        UserDetails userDetails = queryCacheUser(username);
        if (userDetails != null){
            return Mono.just(userDetails);
        }else {
            return Mono.just(queryDbUser(username));
        }
    }

    /**
     * 模拟查询redis缓存数据
     * @param username
     * @return
     */
    public UserDetails queryCacheUser(String username){
        return userMap.get(username);
    }

    /**
     * 模拟登录成功后保存redis缓存中
     * @param userDetails
     */
    public void saveCacheUser(UserDetails userDetails){
        userMap.put(userDetails.getUsername(), userDetails);
    }

    /**
     * 模拟查询数据库
     * @param username
     * @return
     */
    public UserDetails queryDbUser(String username){
        UserDetails userDetails = null;
        PasswordEncoder encoder = PasswordEncoderFactories.createDelegatingPasswordEncoder();
        if (username.equals("user")){
            userDetails = User.withUsername("user")
                    .password(encoder.encode("user"))
                    .roles("USER")
                    .build();
        }else if (username.equals("admin")) {
            userDetails = User.withUsername("admin")
                    .password(encoder.encode("admin"))
                    .roles("USER", "ADMIN")
                    .build();
        }else {
            throw new UsernameNotFoundException("无此账户");
        }
        System.out.println(userDetails.getPassword());
        return userDetails;
    }

}
创建JWT工具类
JwtTokenUtils.java
package com.webflux.demo.util;

import com.auth0.jwt.JWT;
import com.auth0.jwt.JWTCreator;
import com.auth0.jwt.algorithms.Algorithm;
import com.auth0.jwt.exceptions.SignatureVerificationException;
import com.auth0.jwt.exceptions.TokenExpiredException;
import com.auth0.jwt.interfaces.Claim;
import org.apache.commons.lang3.time.DateUtils;

import java.util.Date;
import java.util.HashMap;
import java.util.Map;

/**
 * @Description JWT跨域管理token工具类
 * @Author JL
 * @Version V1.0
 */
public class JwtTokenUtils {

    /**
     JSON Web Token(缩写 JWT)是目前最流行的跨域认证解决方案。
     JWT 的三个部分依次如下
     Header(头部):是一个 JSON 对象,描述 JWT 的元数据{ "alg": "HS256", typ": "JWT" }
     Payload(负载):也是一个 JSON 对象,用来存放实际需要传递的数据,JWT 规定了7个官方字段:
         iss (issuer):签发人
         exp (expiration time):过期时间
         sub (subject):主题
         aud (audience):受众
         nbf (Not Before):生效时间
         iat (Issued At):签发时间
         jti (JWT ID):编号
     Signature(签名):对前两部分的签名,防止数据篡改

     1.JWT中Header头和Payload有效载荷序列化的算法都用到了Base64URL,签名哈希部分是对Header与Payload两部分数据签名
     2.客户端接收服务器返回的JWT,将其存储在Cookie或localStorage中,客户端将在与服务器交互中都会带JWT,将它放入HTTP请求的Header Authorization字段中
     3.JWT的最大缺点是服务器不保存会话状态,所以在使用期间不可能取消令牌或更改令牌的权限
     4.JWT本身包含认证信息,因此一旦信息泄露,任何人都可以获得令牌的所有权限
     5.JWT不建议使用HTTP协议来传输代码,而是使用加密的HTTPS协议进行传输
     */

    /**
     * 加密密钥
     */
    private static final String SECRET = "f2f4f94c9065_wNmx01w27MQnPc3BtUQkty_23P0pVlAdj86o5XznUrE";

    /**
     * jwt创建token,考虑安全性,token中不因该放入太多信息(勿放密码之类的敏感信息),只放入关键字段值即可,如用户ID
     * @param sub     主题(可以放入关键数据,如:userid, 用户唯一值等)
     * @param timeout 过期时长(秒)
     * @return
     */
    public static String createToken(String sub, int timeout) {
        JWTCreator.Builder builder = JWT.create();
        builder.withSubject(sub);//主题
        builder.withIssuer("pro-server");
        if (timeout>0) {
            builder.withExpiresAt(DateUtils.addSeconds(new Date(), timeout));//过期时间
        }
        return builder.sign(Algorithm.HMAC256(SECRET));
    }

    /**
     * 对jwt创建的token进行验签与解析,返回Subject(主题)中存放的内容
     * @param token
     * @return
     * @throws TokenExpiredException          会话超时异常
     * @throws SignatureVerificationException 验签无效异常
     */
    public static String parseToken(String token) throws TokenExpiredException, SignatureVerificationException {
        return JWT.require(Algorithm.HMAC256(SECRET)).build().verify(token).getSubject();
    }

    /**
     * jwt创建token,考虑安全性,token中不因该放入太多信息(勿放密码之类的敏感信息)
     * @param loadMap   数据集合
     * @param timeout   过期时长(秒)
     * @return
     */
    public static String createToken(Map<String, Object> loadMap, int timeout) {
        JWTCreator.Builder builder = JWT.create();
        loadMap.forEach((k, v) -> {
            if (v instanceof String) {
                builder.withClaim(k, (String) v);
            } else if (v instanceof Date) {
                builder.withClaim(k, (Date) v);
            } else if (v instanceof Long) {
                builder.withClaim(k, (Long) v);
            } else if (v instanceof Integer) {
                builder.withClaim(k, (Integer) v);
            } else if (v instanceof Boolean) {
                builder.withClaim(k, (Boolean) v);
            }
        });
        builder.withIssuer("pro-server");
        if (timeout>0) {
            builder.withExpiresAt(DateUtils.addSeconds(new Date(), timeout));//过期时间
        }
        return builder.sign(Algorithm.HMAC256(SECRET));
    }

    /**
     * 对jwt创建的token进行验签与解析,返回集合
     * @param token
     * @return
     * @throws TokenExpiredException          会话超时异常
     * @throws SignatureVerificationException 验签无效异常
     */
    public static Map<String, Object> parseTokenToMap(String token) throws TokenExpiredException, SignatureVerificationException {
        Map<String, Claim> claimMap = JWT.require(Algorithm.HMAC256(SECRET)).build().verify(token).getClaims();
        if (claimMap == null){
            return null;
        }
        Map<String, Object> loadMap = new HashMap<>();
        claimMap.forEach((k, v) -> {
            Object obj = null;
            if (v.asString() != null) {
                obj = v.asString();
            } else if (v.asBoolean() != null) {
                obj = v.asBoolean();
            } else if (v.asDate() != null || v.asLong() != null) {//Date类型按Long方式来处理
                obj = v.asLong();
            } else if (v.asInt() != null) {
                obj = v.asInt();
            }
            loadMap.put(k, obj);
        });
        return loadMap;
    }
}
项目测试
1.启动项目
运行JwtAppStart
2.测试未登录状态,访问/user接口
http://127.0.0.1:8080/user
{
    "msg": "您还未登录",
    "code": "failure"
}
3.测试权限为USER的普通用户登录接口
POST http://127.0.0.1:8080/login
username=user
password=user
// data返回为jwt生成的token值,后续请求需在Http的headers中添加Authorization=token值
{
    "code": "success",
    "data": "eyJ0eXAiOiJKV1QiLCJhbGciOiJIUzI1NiJ9.eyJzdWIiOiJ1c2VyIiwiaXNzIjoicHJvLXNlcnZlciJ9.9eTmhl5fD0iIajFgWVaWEijENUtE34OU4lVZCAenBvc"
}
注:通过post访问/login,属于SpringSecurity安全验证框架默认拦截内置登录路径;
4.测试登录后访问/user接口
Http请求headers中添加Authorization=token值
GET http://127.0.0.1:8080/user
hello user5.测试登录后访问/admin接口
Http请求headers中添加Authorization=token值
GET http://127.0.0.1:8080/admin
//因控制器admin方法上有@PreAuthorize("hasRole('ADMIN')")注释,则需要验证用户权限为ADMIN才能访问
{
    "msg": "账户无权限访问",
    "code": "denied"
}
6.测试退出
Http请求headers中添加Authorization=token值
POST http://127.0.0.1:8080/logout
{
    "msg": "退出成功",
    "code": "logout"
}
注:通过post访问/logout,属于SpringSecurity安全验证框架默认拦截内置退出路径;
总结
本项目示例演示了在SpringBoot中用WebFlux非阻塞Web服务集成SpringSecurity安全验证框架,基于Netty容器上运行,并增加JWT数字签名,通过JWT识别用户唯一身份,通过SpringSecurity验证用户合法身份以及获取用户Role角色,通过@PreAuthorize注解标签,识别用户访问控制器方法是否具有权限角色;本示例过程只是基础演示,实际项目应用根据业务场景和要求对身份安全、权限管理会更加复杂;


 2472
2472

 被折叠的 条评论
为什么被折叠?
被折叠的 条评论
为什么被折叠?
 到【灌水乐园】发言


