


在前端优化方案中,减少HTTP请求,最常见的方法是css sprite。今天来说另一种方式,就是将小图片转换为base64码,直接在img的src中引用,这种方式不向服务器端发送HTTP请求。
但是并不是所有图片都适合这种方式,对于HTTP请求等待时间远小于图片的下载时间,图片小于十几K(可认为是15K)的图片,可以采用这种方式。
那么怎样将图片生成这种base64码呢?下面我们来介绍一下纯JavaScript方式生成base64码,代码的运行需要在支持HTML5的浏览器中进行。
<!DOCTYPE html>
<html>
 <head>
  <meta charset="utf-8" />
  <title>image to base64</title>
  <style type="text/css">
   html{font-family: "microsoft yahei";overflow: hidden;}
   html{height: 100%;padding: 0;margin: 0;}
   a{text-decoration: none;outline: none;}

   .title{color: #ddd;text-shadow: 2px 2px 5px #000;padding: 80px 0px 0px 100px;}
   .main,.img_main{float: left;background-color: rgba(255,255,255,.7);border-radius: 4px;padding: 20px;margin: 0 3px;}
   .main{width: 40%;margin-left:100px;}
   .img_main{max-width: 40%;}
   .preview{width: 100%;}

   .select-file{border:1px solid #9B59B6;position: relative;}
   .select-file:after{content: '';display: block;clear: both;}
   .select-file-title,.select-file-btn{float: left;line-height: 30px;height: 30px;}
   .select-file-title{width: 80%;}
   .select-file-btn{width: 20%;background-color: #8E44AD;text-align: center;color: #fff;transition: background-color .5s;}
   .select-file-btn:hover{background-color: #1ABC9C;}

   .base64-text{background-color:transparent;height: 300px;width: calc(100% - 6px);resize:none;overflow: auto;border: 1px solid #9B59B6;margin-top: 10px;word-break: break-all;}
  </style>
 </head>
 <body>
  <h1 class="title">图片转Base64</h1>
  <div class="main">
   <div class="control">
    <div class="select-file">
     <div class="select-file-title"></div>
     <a href="javascript:;" class="select-file-btn">选择文件</a>
    </div>
   </div>
   <div class="control">
    <textarea class="base64-text" readonly></textarea>
   </div>
  </div>
  <div class="img_main">
   <img src="" class="preview"/>
  </div>

  <script type="text/javascript">
   var inputFile =  document.createElement('input');
   inputFile.type = 'file';
   var selectFile = document.querySelector('.select-file');
   var base64Text = document.querySelector('.base64-text');
   var preview = document.querySelector('.preview');

   var reader = new FileReader();
   reader.onload = function(){
    // base64Text.innerText = this.result;
    var that = this;
    base64Text.value = '';
    setTimeout(function(){
      base64Text.value = that.result;
    },1000);

    // console.log(base64Text.value); //变化后的值
    // console.log(base64Text.innerText); //undefined
    // console.log(base64Text.innerHTML); //(空字符串)

    preview.src = this.result;
   };

   inputFile.addEventListener('change', function(){
    selectFile.querySelector('.select-file-title').innerHTML = this.value;
    if(this.files.length == 0){
     base64Text.innerText = '';
     return;
    }
    var file = inputFile.files[0];
    base64Text.placeholder = '';
    if(!(/^image/.test(file.type))){
     base64Text.placeholder = '不是图片文件';
     return;
    }
    reader.readAsDataURL(file);
   });

   selectFile.addEventListener('click', function(){
    inputFile.click();
   });
  </script>
 </body>
</html>
效果图如下所示:
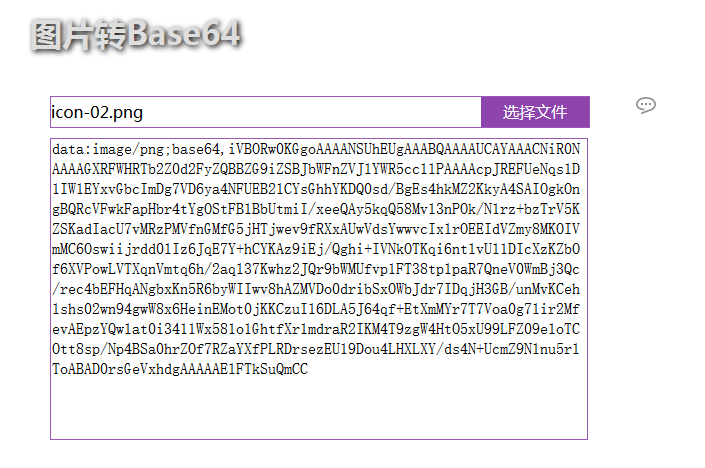
点击“选择文件”,更改当前所选文件,对应的图片就会在“选择文件”右侧显示,1s后下面的文本域会出现该小图标对应的base64码。
读取文件的代码块为:
   var reader = new FileReader();
   reader.onload = function(){
    // base64Text.innerText = this.result;
    var that = this;
    base64Text.value = '';
    setTimeout(function(){
      base64Text.value = that.result;
    },1000);

    // console.log(base64Text.value); //变化后的值
    // console.log(base64Text.innerText); //undefined
    // console.log(base64Text.innerHTML); //(空字符串)

    preview.src = this.result;
   };
input:file的files属性(var file = inputFile.files[0])结构如下图所示:

另一个要点是根据文件路径读取文件:
reader.readAsDataURL(file);


 1122
1122

 被折叠的 条评论
为什么被折叠?
被折叠的 条评论
为什么被折叠?
 到【灌水乐园】发言


