


运行环境:
- IntelliJ IDEA 2022.2.5 (Ultimate Edition) (注意:idea必须在2021版本以上)
- JDK17
项目目录:
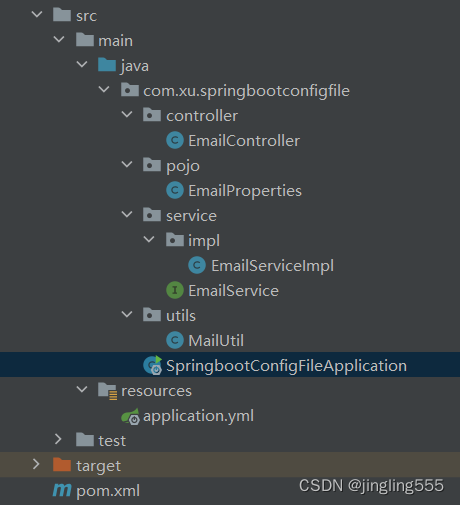
该项目分为pojo,service,controller,utils四个部分,
在pojo层里面写实体内容(发邮件需要的发件人邮箱,授权码,服务器域名,身份验证开关),
service层里面写send方法,
utils里面写发送邮件实现的工具类,
controller层里面调用service里面的方法测试send方法。
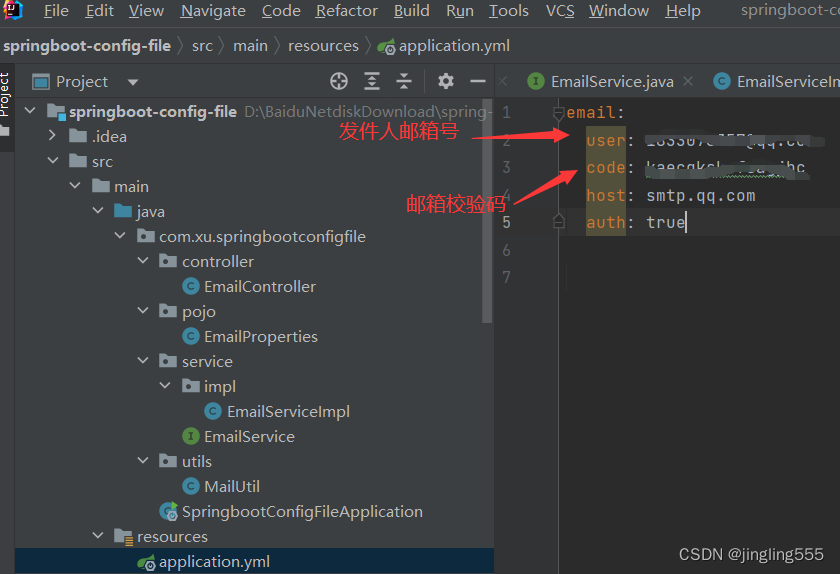
在resource里面的application.yml写相关的发邮件参数(user,code,host,auth)
前提:
该项目涉及到了邮件的发送,所以需要邮箱的授权码
怎么获取授权码?
在 账号与安全 --安全设置--SMTP/IMAP服务 中开启服务并获取授权码
代码:
pojo层:
package com.xu.springbootconfigfile.pojo;
import org.springframework.beans.factory.annotation.Value;
import org.springframework.boot.context.properties.ConfigurationProperties;
import org.springframework.stereotype.Component;

@Component
@ConfigurationProperties(prefix = "email")
public class EmailProperties {

    //@Value("${email.user}")
    //发件人邮箱
    public String user ;

    //@Value("${email.code}")
    //发件人邮箱授权码
    public String code ;

    //@Value("${email.host}")
    //发件人邮箱对应的服务器域名,如果是163邮箱:smtp.163.com   qq邮箱: smtp.qq.com
    public String host ;

    //@Value("${email.auth}")
    //身份验证开关
    private boolean auth ;

    public String getHost() {
        return host;
    }

    public void setHost(String host) {
        this.host = host;
    }

    public boolean isAuth() {
        return auth;
    }

    public void setAuth(boolean auth) {
        this.auth = auth;
    }

    public String getUser() {
        return user;
    }

    public void setUser(String user) {
        this.user = user;
    }

    public String getCode() {
        return code;
    }

    public void setCode(String code) {
        this.code = code;
    }

    @Override
    public String toString() {
        return "EmailProperties{" +
                "host='" + host + '\'' +
                ", auth=" + auth +
                ", user='" + user + '\'' +
                ", code='" + code + '\'' +
                '}';
    }
}
service层:
package com.xu.springbootconfigfile.service;
public interface EmailService {

    boolean send(String to,String title,String content);

}
package com.xu.springbootconfigfile.service.impl;
import com.xu.springbootconfigfile.pojo.EmailProperties;
import com.xu.springbootconfigfile.service.EmailService;
import com.xu.springbootconfigfile.utils.MailUtil;
import org.springframework.beans.factory.annotation.Autowired;
import org.springframework.stereotype.Service;

@Service
public class EmailServiceImpl  implements EmailService {
    //注入email配置信息实体类
    @Autowired
    private EmailProperties emailProperties;

    /**
     * @param to 收件人邮箱
     * @param title 邮件标题
     * @param content 邮件正文
     * @return
     */
    @Override
    public boolean send(String to, String title, String content) {
        //打印email配置信息
        System.out.println(emailProperties);
        //发送邮件
        boolean flag = MailUtil.sendMail(emailProperties,to, title, content);
        return flag;
    }
}
controller层:
package com.xu.springbootconfigfile.controller;
import com.xu.springbootconfigfile.service.EmailService;
import org.springframework.beans.factory.annotation.Autowired;
import org.springframework.web.bind.annotation.RequestMapping;
import org.springframework.web.bind.annotation.RestController;

@RestController
public class EmailController {
    //注入email配置信息实体类
    @Autowired
    private EmailService emailService;

    //测试方法
    @RequestMapping("/send")
    public Boolean send(){
        //收件人信箱
        String to = "邮箱号";
        //邮件标题
        String title = "test";
        //邮件正文
        String content  = "哈哈哈哈哈哈哈";
        //发送邮件
        boolean flag = emailService.send(to,title,content);
        return flag;
    }

}
utils层:
package com.xu.springbootconfigfile.utils;
import com.xu.springbootconfigfile.pojo.EmailProperties;
import jakarta.mail.*;
import jakarta.mail.internet.InternetAddress;
import jakarta.mail.internet.MimeMessage;
import java.util.Properties;

public class MailUtil {

    /**
     * 发送邮件
     * @param emailProperties 发件人信息(发件人邮箱,发件人授权码)及邮件服务器信息(邮件服务器域名,身份验证开关)
     * @param to 收件人邮箱
     * @param title 邮件标题
     * @param content 邮件正文
     * @return
     */
    public static boolean sendMail(EmailProperties emailProperties, String to, String title, String content){
        MimeMessage message = null;
        try {
            Properties properties = new Properties();
            properties.put("mail.smtp.host", emailProperties.getHost());
            properties.put("mail.smtp.auth",emailProperties.isAuth());
            properties.put("mail.user", emailProperties.getUser());
            properties.put("mail.password", emailProperties.getCode());

            // 构建授权信息,用于进行SMTP进行身份验证
            Authenticator authenticator = new Authenticator() {
                @Override
                protected PasswordAuthentication getPasswordAuthentication() {
                    return new PasswordAuthentication(emailProperties.getUser(), emailProperties.getCode());
                }
            };
            // 使用环境属性和授权信息,创建邮件会话
            Session mailSession = Session.getInstance(properties, authenticator);
            // 创建邮件消息
            message = new MimeMessage(mailSession);

        }catch (Exception e){
            e.printStackTrace();
        }

        //如果邮件创建失败,直接返回
        if (message==null){
            return false;
        }

        try {
            // 设置发件人
            InternetAddress form = new InternetAddress(emailProperties.getUser());
            message.setFrom(form);

            // 设置收件人
            InternetAddress toAddress = new InternetAddress(to);
            message.setRecipient(Message.RecipientType.TO, toAddress);

            // 设置邮件标题
            message.setSubject(title);

            // 设置邮件的内容体
            message.setContent(content, "text/html;charset=UTF-8");
            // 发送邮件
            Transport.send(message);
        }catch (Exception e){
            e.printStackTrace();
        }
        return true;
    }
}
application.yml
pom.xml文件:
<?xml version="1.0" encoding="UTF-8"?>
<project xmlns="http://maven.apache.org/POM/4.0.0" xmlns:xsi="http://www.w3.org/2001/XMLSchema-instance"
         xsi:schemaLocation="http://maven.apache.org/POM/4.0.0 https://maven.apache.org/xsd/maven-4.0.0.xsd">
    <modelVersion>4.0.0</modelVersion>
    <parent>
        <groupId>org.springframework.boot</groupId>
        <artifactId>spring-boot-starter-parent</artifactId>
        <version>3.1.2</version>
        <relativePath/> <!-- lookup parent from repository -->
    </parent>

    <groupId>com.xu</groupId>
    <artifactId>springboot-config-file</artifactId>
    <version>0.0.1-SNAPSHOT</version>
    <name>springboot-config-file</name>
    <description>springboot-config-file</description>

    <properties>
        <java.version>17</java.version>
    </properties>

    <dependencies>
        <!--web开发依赖-->
        <dependency>
            <groupId>org.springframework.boot</groupId>
            <artifactId>spring-boot-starter-web</artifactId>
        </dependency>

        <!--java mail 依赖-->
        <dependency>
            <groupId>org.eclipse.angus</groupId>
            <artifactId>jakarta.mail</artifactId>
        </dependency>


    </dependencies>

    <build>
        <plugins>
            <plugin>
                <groupId>org.springframework.boot</groupId>
                <artifactId>spring-boot-maven-plugin</artifactId>
            </plugin>
        </plugins>
    </build>

</project>
运行结果:
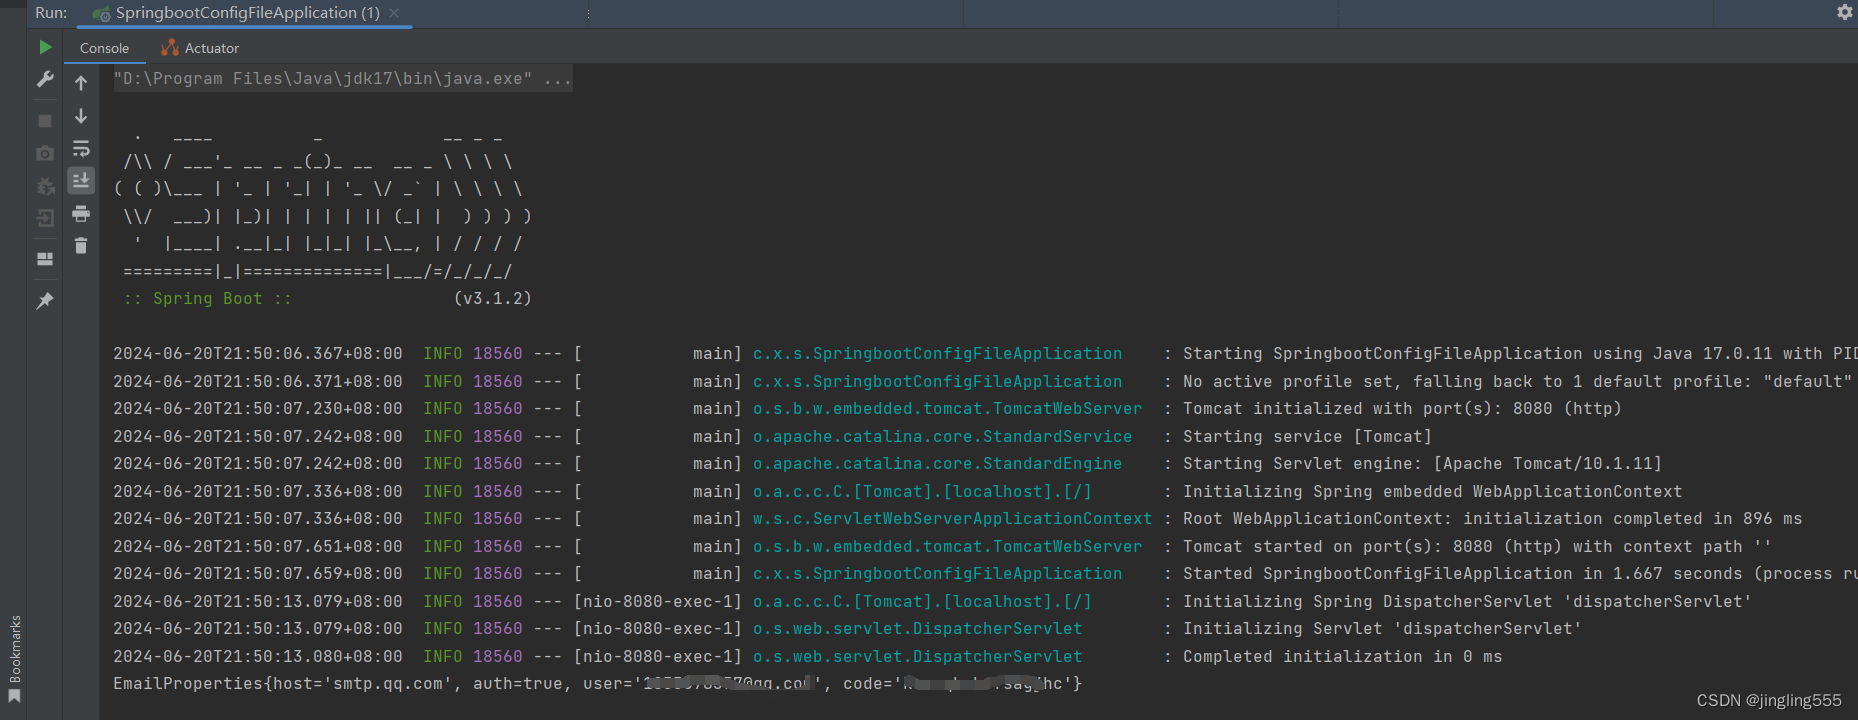

显示true后,检查一下邮箱,就可以收到对应的测试邮件


 2万+
2万+


 被折叠的 条评论
为什么被折叠?
被折叠的 条评论
为什么被折叠?
 到【灌水乐园】发言


