


跨进程间的通信:
关于IPC应该不用多介绍了,Android系统中的进程之间不能共享内存,那么如果两个不同的应用程序之间需要通讯怎么办呢?比如公司的一个项目要更新,产品的需求是依附于当前项目开发一个插件,但是呢这个插件功能以及界面比较复杂,不能和当前项目在一个进程中,同时呢,还要用到当前项目中已经写好了的一些东西,那么因为新开发的依附于当前项目的插件和当前项目不是一个进程,因此不能共享内存,就出现了问题,于是,需要提供一些机制在不同进程之间进行数据通信,这个机制就是AIDL了。
简单的AIDL案例:
假如是这样,现在有一个项目中提供了比较成熟的计算的方法,而现在我想开发一款软件其中一个模块想用到一个计算类,而我又不想重新写了,那么就可以通过AIDL实现啦。假设,已经开发完成的那个已经提供了比较成熟的计算类的程序叫AIDLCalculateDemoServer(相当于服务器),而我要写的程序叫AIDLCalculateDemoClient(相当于客户端),类似与客户端服务器模式。首先至关的看下工程结构图:
图1-1 服务器
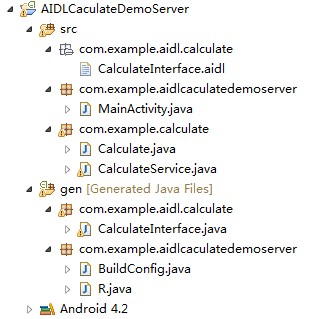
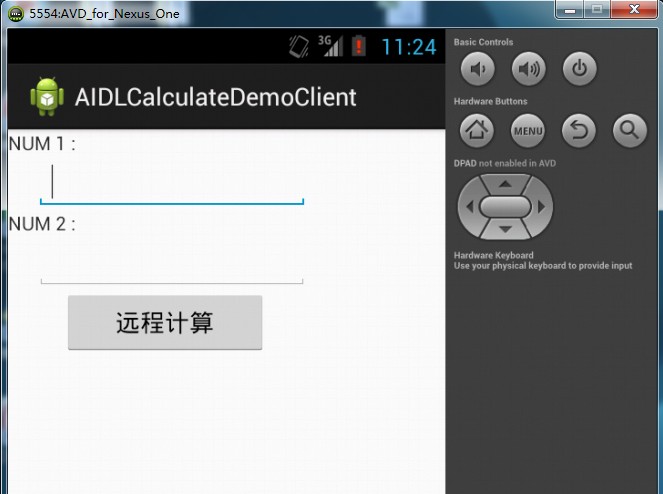
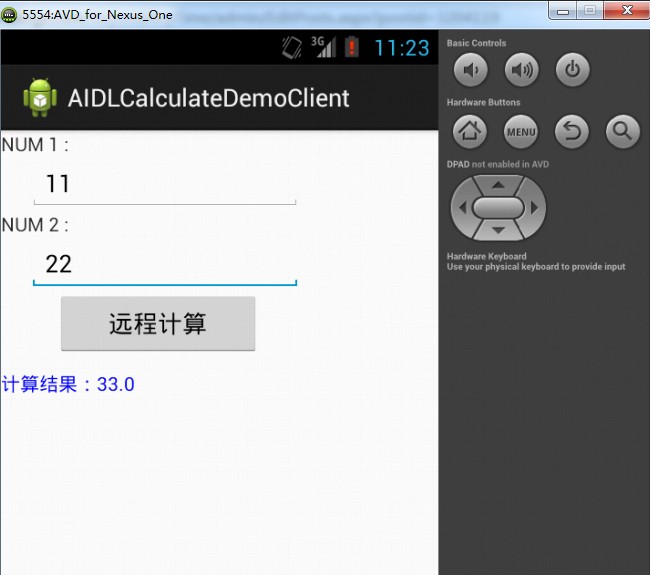
图1-2 客户端

现在假设自己写的程序要调用服务端的运算界面,输入num1和num2,进行远程运算,调用服务端的接口,服务端运算好之后,返回结果给客户端,效果图如下:
然后来看看实现,首先需要定义AIDL接口,客户端和服务器端都要定义,并且要在同一包中,也就是图1-1和图1-2 com.example.aidl.calculate中的CalculateInterface,其中的代码如下:
CalculateInterface.aidl
package com.example.aidl.calculate;
 interface CalculateInterface {
    double doCalculate(double a, doubleb);
 }
编译发现,目录结构如图1-1和图1-2中gen/com.example.aidl.calculate中多了 CalculateInterface.java文件,内容如下:
package com.example.aidl.calculate;
 interface CalculateInterface {
     double doCalculate(double a, double b);
 }
定义好接口就是要看服务端和客户端的代码啦,其中服务端主要看CalculateService代码,这个一个继承Service的类,在其中对AIDL中的接口进行赋予实际意义,如下:
package com.example.calculate;

import com.example.aidl.calculate.CalculateInterface;
import com.example.aidl.calculate.CalculateInterface.Stub;

import android.app.Service;
import android.content.Intent;
import android.os.IBinder;
import android.os.RemoteException;
import android.util.Log;

public class CalculateService extends Service {

    private static final String                            TAG                        =    "CalculateService";

    @Override
    public IBinder onBind(Intent arg0) {
        // TODO Auto-generated method stub
        logE("onBind()");
        return mBinder;
    }

    @Override
    public void onCreate() {
        // TODO Auto-generated method stub
        logE("onCreate()");
        super.onCreate();
    }

    @Override
    public void onStart(Intent intent, int startId) {
        // TODO Auto-generated method stub
        logE("onStart()");
        super.onStart(intent, startId);
    }

    @Override
    public boolean onUnbind(Intent intent) {
        // TODO Auto-generated method stub
        logE("onUnbind()");
        return super.onUnbind(intent);
    }

    @Override
    public void onDestroy() {
        // TODO Auto-generated method stub
        logE("onDestroy()");
        super.onDestroy();
    }

    private static void logE(String str) {
        Log.e(TAG, "--------" + str + "--------");
    }

    private final CalculateInterface.Stub mBinder = new CalculateInterface.Stub() {

        @Override
        public double doCalculate(double a, double b) throws RemoteException {
            // TODO Auto-generated method stub
            Log.e("Calculate", "远程计算中");
            Calculate calculate = new Calculate();
            double answer = calculate.calculateSum(a, b);
            return answer;
        }
    };
}
然后可以看看,关键的服务都提供完毕,那么在客户端是怎么访问的呢,要进行绑定服务和一个ServiceConnection类完成,如下:
package com.example.calculate;

import android.app.Activity;
import android.content.ComponentName;
import android.content.Context;
import android.content.Intent;
import android.content.ServiceConnection;
import android.graphics.Color;
import android.os.Bundle;
import android.os.IBinder;
import android.os.RemoteException;
import android.util.Log;
import android.view.View;
import android.widget.Button;
import android.widget.EditText;
import android.widget.TextView;

import com.example.aidl.calculate.CalculateInterface;
import com.example.aidlcalculatedemoclient.R;

public class CalculateClient extends Activity {
    private static final String                 TAG                        =            "CalculateClient";

    private              Button                 btnCalculate;

    private              EditText                etNum1;

    private                 EditText                etNum2;

    private              TextView                tvResult;

    private               CalculateInterface      mService;

    private              ServiceConnection        mServiceConnection = new ServiceConnection() {

        @Override
        public void onServiceDisconnected(ComponentName name) {
            // TODO Auto-generated method stub
            logE("disconnect service");
            mService = null;
        }

        @Override
        public void onServiceConnected(ComponentName name, IBinder service) {
            // TODO Auto-generated method stub
            logE("connect service");
            mService = CalculateInterface.Stub.asInterface(service);
        }
    };

    @Override
    protected void onCreate(Bundle savedInstanceState) {
        // TODO Auto-generated method stub
        super.onCreate(savedInstanceState);
        setContentView(R.layout.main);

        Bundle args = new Bundle();
        Intent intent = new Intent("com.example.calculate.CalculateService");
        intent.putExtras(args);
        bindService(intent, mServiceConnection, Context.BIND_AUTO_CREATE);

        etNum1 = (EditText) findViewById(R.id.et_num_one);
        etNum2 = (EditText) findViewById(R.id.et_num_two);

        tvResult = (TextView) findViewById(R.id.tv_result);

        btnCalculate = (Button) findViewById(R.id.btn_cal);

        btnCalculate.setOnClickListener(new View.OnClickListener() {

            @Override
            public void onClick(View v) {
                // TODO Auto-generated method stub

                logE("开始远程运算");
                try {
                    double num1 = Double.parseDouble(etNum1.getText().toString());
                    double num2 = Double.parseDouble(etNum2.getText().toString());
                    String answer = "计算结果:" + mService.doCalculate(num1, num2);
                    tvResult.setTextColor(Color.BLUE);
                    tvResult.setText(answer);

                } catch (RemoteException e) {
                }
            }
        });
    }

    private void logE(String str) {
        Log.e(TAG, "--------" + str + "--------");
    }
}
如此一来,大功已经基本告成,最后,我们在来看看服务端的配置文件吧:
<?xml version="1.0" encoding="utf-8"?>
<manifest xmlns:android="http://schemas.android.com/apk/res/android"
    package="com.example.aidlcaculatedemoserver"
    android:versionCode="1"
    android:versionName="1.0" >

    <uses-sdk
        android:minSdkVersion="8"
        android:targetSdkVersion="17" />

    <application
        android:allowBackup="true"
        android:icon="@drawable/ic_launcher"
        android:label="@string/app_name"
        android:theme="@style/AppTheme" >
        <activity
            android:name="com.example.aidlcaculatedemoserver.MainActivity"
            android:label="@string/app_name" >
            <intent-filter>
                <action android:name="android.intent.action.MAIN" />

                <category android:name="android.intent.category.LAUNCHER" />
            </intent-filter>
        </activity>
        <service android:name="com.example.calculate.CalculateService">
            <intent-filter>
                <action android:name="com.example.calculate.CalculateService" />
            </intent-filter>
        </service>
    </application>

</manifest>
二、写AIDL注意事项
1. 客户端和服务端的AIDL接口文件所在的包必须相同
2. 需要一个Service类的配合
相关文章:
学习AIDL,这一篇文章就够了上篇,下篇,代码


 2817
2817

 被折叠的 条评论
为什么被折叠?
被折叠的 条评论
为什么被折叠?
 到【灌水乐园】发言


