


I2C总线驱动框架详解
一、I2C子系统总体架构
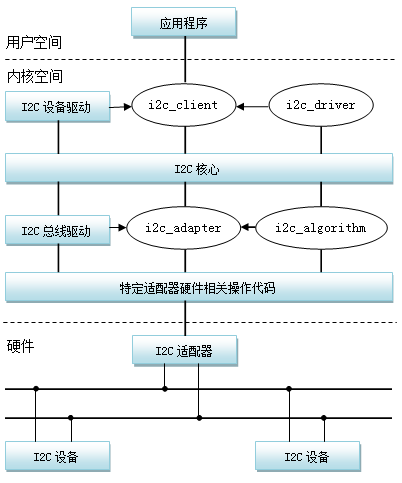
1、三大组成部分
(1)I2C核心(i2c-core):I2C核心提供了I2C总线驱动(适配器)和设备驱动的注册、注销方法,I2C通信方法(”algorithm”)上层的,与具体硬件无关的代码以及探测设备
检测设备地址的上层代码等。。
(2)I2C总线驱动(I2Cadapter):I2C总线驱动是I2C适配器的软件实现,提供I2C适配器与从设备间完成数据通信的能力。I2C总线驱动由i2c_adapter和i2c_algorithm来描述
I2C适配器是SoC中内置i2c控制器的软件抽象,可以理解为他所代表的是一个I2C主机。
(3)I2C设备驱动(I2Cclient driver):包括两部分:设备的注册和设备驱动的注册
2、I2C子系统的主要目标是:让驱动开发者可以在内核中方便的添加自己的I2C设备的驱动程序,让内核统一管理I2C设备,从而可以更容易的在linux下驱动自己的I2C接口硬件。
3、I2C子系统提供的两种驱动实现方法(源码中I2C相关的驱动均位于:drivers/i2c目录下)
(1)第一种叫i2c-dev,对应drivers/i2c/i2c-dev.c,这种方法只是封装了主机(I2Cmaster,一般是SoC中内置的I2C控制器)的I2C基本操作,并且向应用层提供相应的操作
接口,应用层代码需要自己去实现对slave的控制和操作,所以这种I2C驱动相当于只是提供给应用层可以访问slave硬件设备的接口,本身并未对硬件做任何操作,应用需要实
现对硬件的操作,因此写应用的人必须对硬件非常了解,其实相当于传统的驱动中干的活儿丢给应用去做了,所以这种I2C驱动又叫做“应用层驱动”,这种方式并不主流,它的优势是
把差异化都放在应用中,这样在设备比较难缠(尤其是slave是非标准I2C时)时不用动驱动,而只需要修改应用就可以实现对各种设备的驱动。
(2)第二种I2C驱动是所有的代码都放在驱动层实现,直接向应用层提供最终结果。应用层甚至不需要知道这里面有I2C存在,譬如电容式触摸屏驱动,直接向应用层提供/dev/input/event1
的操作接口,应用层编程的人根本不知道event1中涉及到了I2C。
4、相关的结构体
(1)struct i2c_adapter(I2C适配器)
struct i2c_adapter是用来描述一个I2C适配器,在SoC中的指的就是内部外设I2C控制器,当向I2C核心层注册一个I2C适配器时就需要提供这样的一个结构体变量。

 1 struct i2c_adapter {
 2     struct module *owner;             // 所有者
 3     unsigned int id;
 4     unsigned int class;               // 该适配器支持的从设备的类型
 5     const struct i2c_algorithm *algo; // 该适配器与从设备的通信算法
 6     void *algo_data;
 7
 8     /* data fields that are valid for all devices    */
 9     struct rt_mutex bus_lock;
10
11     int timeout;              // 超时时间
12     int retries;
13     struct device dev;        // 该适配器设备对应的device
14
15     int nr;                   // 适配器的编号
16     char name[48];            // 适配器的名字
17     struct completion dev_released;
18
19     struct list_head userspace_clients;  // 用来挂接与适配器匹配成功的从设备i2c_client的一个链表头
20 };
(2)struct i2c_algorithm(I2C算法)
struct i2c_algorithm结构体代表的是适配器的通信算法,在构建i2c_adapter结构体变量的时候会去填充这个元素。
 1 struct i2c_algorithm {
 2     /* If an adapter algorithm can't do I2C-level access, set master_xfer
 3        to NULL. If an adapter algorithm can do SMBus access, set
 4        smbus_xfer. If set to NULL, the SMBus protocol is simulated
 5        using common I2C messages */
 6     /* master_xfer should return the number of messages successfully
 7        processed, or a negative value on error */
 8     int (*master_xfer)(struct i2c_adapter *adap, struct i2c_msg *msgs,
 9                int num);
10     int (*smbus_xfer) (struct i2c_adapter *adap, u16 addr,
11                unsigned short flags, char read_write,
12                u8 command, int size, union i2c_smbus_data *data);
13
14     /* To determine what the adapter supports */
15     u32 (*functionality) (struct i2c_adapter *);
16 };
注意:smbus协议是从I2C协议的基础上发展而来的,他们之间有很大的相似度,SMBus与I2C总线之间在时序特性上存在一些差别,应用于移动PC和桌面PC系统中的低速率通讯。
(3)struct i2c_client
 1 struct i2c_client {    //  用来描述一个i2c次设备
 2     unsigned short flags;        //  描述i2c次设备特性的标志位
 3     unsigned short addr;         //  i2c 次设备的地址
 4
 5     char name[I2C_NAME_SIZE];    //  i2c次设备的名字
 6     struct i2c_adapter *adapter; //  指向与次设备匹配成功的适配器
 7     struct i2c_driver *driver;   //  指向与次设备匹配成功的设备驱动
 8     struct device dev;           //  该次设备对应的device
 9     int irq;                     //  次设备的中断引脚
10     struct list_head detected;   //  作为一个链表节点挂接到与他匹配成功的i2c_driver 相应的链表头上
11 };
(4)struct device_driver
 1 struct i2c_driver {    // 代表一个i2c设备驱动
 2     unsigned int class;      // i2c设备驱动所支持的i2c设备的类型
 3
 4     /* Notifies the driver that a new bus has appeared or is about to be
 5      * removed. You should avoid using this if you can, it will probably
 6      * be removed in a near future.
 7      */
 8     int (*attach_adapter)(struct i2c_adapter *);   // 用来匹配适配器的函数 adapter
 9     int (*detach_adapter)(struct i2c_adapter *);
10
11     /* Standard driver model interfaces */
12     int (*probe)(struct i2c_client *, const struct i2c_device_id *); // 设备驱动层的probe函数
13     int (*remove)(struct i2c_client *);                              // 设备驱动层卸载函数
14
15     /* driver model interfaces that don't relate to enumeration  */
16     void (*shutdown)(struct i2c_client *);
17     int (*suspend)(struct i2c_client *, pm_message_t mesg);
18     int (*resume)(struct i2c_client *);
19
20     /* Alert callback, for example for the SMBus alert protocol.
21      * The format and meaning of the data value depends on the protocol.
22      * For the SMBus alert protocol, there is a single bit of data passed
23      * as the alert response's low bit ("event flag").
24      */
25     void (*alert)(struct i2c_client *, unsigned int data);
26
27     /* a ioctl like command that can be used to perform specific functions
28      * with the device.
29      */
30     int (*command)(struct i2c_client *client, unsigned int cmd, void *arg);
31
32     struct device_driver driver;           //  该i2c设备驱动所对应的device_driver
33     const struct i2c_device_id *id_table;  //  设备驱动层用来匹配设备的id_table
34
35     /* Device detection callback for automatic device creation */
36     int (*detect)(struct i2c_client *, struct i2c_board_info *);
37     const unsigned short *address_list;    //  该设备驱动支持的所有次设备的地址数组
38     struct list_head clients;              //  用来挂接与该i2c_driver匹配成功的i2c_client (次设备)的一个链表头
39 };
 1 struct i2c_board_info {      //  这个结构体是用来描述板子上的一个i2c设备的信息
 2     char        type[I2C_NAME_SIZE];    //  i2c 设备的名字,用来初始化i2c_client.name
 3     unsigned short    flags;            //  用来初始化i2c_client.flags
 4     unsigned short    addr;             //  用来初始化 i2c_client.addr
 5     void        *platform_data;         //  用来初始化 i2c_client.dev.platform_data
 6     struct dev_archdata    *archdata;   //  用来初始化i2c_client.dev.archdata
 7 #ifdef CONFIG_OF
 8     struct device_node *of_node;
 9 #endif
10     int        irq;                     //  用来初始化i2c_client.irq
11 };
12
13
14
15 struct i2c_devinfo {
16     struct list_head    list;            // 作为一个链表节点挂接到__i2c_board_list 链表上去
17     int            busnum;               // 适配器的编号
18     struct i2c_board_info    board_info; //  内置的i2c_board_info 结构体
19 };
5、关键文件(drivers\i2c)
(1)i2c-core.c: i2c核心层
(2)busses目录:这个文件中是已经编写好的各种向i2c核心层注册的适配器
(3)algos目录:这个目录里面是一些I2C通信算法
二、I2C核心层源码分析
跟以前的分析一样,i2c子系统源代码同样是实现为一个模块,在内核配置的时候可以进行动态的加载和卸载。
1、I2C子系统注册函数:i2c_init
 1 static int __init i2c_init(void)
 2 {
 3     int retval;
 4
 5     retval = bus_register(&i2c_bus_type);      // 注册i2c总线  /sys/bus/i2c
 6     if (retval)
 7         return retval;
 8 #ifdef CONFIG_I2C_COMPAT
 9     i2c_adapter_compat_class = class_compat_register("i2c-adapter");
10     if (!i2c_adapter_compat_class) {
11         retval = -ENOMEM;
12         goto bus_err;
13     }
14 #endif
15     retval = i2c_add_driver(&dummy_driver);  // 注册一个空设备驱动  /sys/bus/i2c/driver/dummy
16     if (retval)
17         goto class_err;
18     return 0;
19
20 class_err:
21 #ifdef CONFIG_I2C_COMPAT
22     class_compat_unregister(i2c_adapter_compat_class);
23 bus_err:
24 #endif
25     bus_unregister(&i2c_bus_type);
26     return retval;
27 }
1 struct bus_type i2c_bus_type = {
2     .name        = "i2c",                     //  总线的名字
3     .match        = i2c_device_match,         //  总线下设备与设备驱动的匹配函数
4     .probe        = i2c_device_probe,         //  总线层的probr函数
5     .remove        = i2c_device_remove,       //  总线卸载时执行的函数
6     .shutdown    = i2c_device_shutdown,
7     .pm        = &i2c_device_pm_ops,           //  电源管理
8 };
2、i2c_device_match函数分析:
 1 static int i2c_device_match(struct device *dev, struct device_driver *drv)
 2 {
 3     struct i2c_client    *client = i2c_verify_client(dev);   //  通过device指针获取到对应的i2c_client指针
 4     struct i2c_driver    *driver;                            // 定义一个i2c_driver 指针
 5
 6     if (!client)
 7         return 0;
 8
 9     driver = to_i2c_driver(drv);                                //  通过device_driver指针获取到对应的i2c_driver指针
10     /* match on an id table if there is one */
11     if (driver->id_table)                                       //  如果设备驱动中存在id_table表,则通过这个来进行与设备的匹配
12         return i2c_match_id(driver->id_table, client) != NULL;  //  匹配的方式就是比较 id_table指向的i2c_device_id数组中各个元素的名字
13                                                                 //  如果匹配成功就会返回这个 i2c_device_id 元素项地址
14     return 0;                                                   //  匹配失败返回 0
15 }
由i2c_match_id函数分析可以知道,在i2c总线下的设备与设备驱动的匹配是通过设备的名字和设备驱动的i2c_device_id表中的各个表项中的依次进行匹配的,只要有一个匹配成功
则设备和设备驱动就匹配成功了,如果都没有匹配成功则表明匹配失败;由此可以对比platform平台总线的匹配原则,他们基本是一致的,但是platform总线下的设备与设备驱动
匹配过程中还会将设备的名字和设备驱动的名字进行一个匹配,如果这个也没有成功才说明设备与设备驱动匹配过程失败。
3、i2c_device_probe函数分析:
 1 static int i2c_device_probe(struct device *dev)
 2 {
 3     struct i2c_client    *client = i2c_verify_client(dev);  //  通过device指针获取到对应的i2c_client指针
 4     struct i2c_driver    *driver;
 5     int status;
 6
 7     if (!client)
 8         return 0;
 9
10     driver = to_i2c_driver(dev->driver);                    //  通过device->driver指针获取到对应的i2c_driver指针
11     if (!driver->probe || !driver->id_table)
12         return -ENODEV;
13     client->driver = driver;                                //  i2c设备通过i2c_client->driver指针去指向与他匹配成功的设备驱动i2c_driver
14     if (!device_can_wakeup(&client->dev))
15         device_init_wakeup(&client->dev,
16                     client->flags & I2C_CLIENT_WAKE);
17     dev_dbg(dev, "probe\n");
18
19     status = driver->probe(client, i2c_match_id(driver->id_table, client));  // 调用设备驱动层的probe函数
20     if (status) {
21         client->driver = NULL;
22         i2c_set_clientdata(client, NULL);
23     }
24     return status;
25 }
从上面的分析可以知道,总线层的probe函数最终还是会去调用设备驱动层的probe函数。
4、核心层开放给其他部分的注册接口
(1)i2c_add_adapter/i2c_add_numbered_adapter(注册adapter)
/******************************************************************/
i2c_add_adapter
i2c_register_adapter
i2c_add_numbered_adapter
i2c_register_adapter
/******************************************************************/
i2c_register_adapter函数是I2C子系统核心层提供给I2C总线驱动层的用来向核心层注册一个adapter(适配器)的接口函数。
从上可以知道这两个函数最终都是调用i2c_register_adapter函数去注册adapter,他们的区别在于:i2c_add_adapter函数是自动分配适配器编号,而i2c_add_numbered_adapter
是需要自己手动指定一个适配器编号。这个编号的作用第一是为了i2c子系统方便管理系统中的adapter。
i2c_register_adapter函数分析:
 1 static int i2c_register_adapter(struct i2c_adapter *adap)   //  向i2c总线注册适配器adapter
 2 {
 3     int res = 0, dummy;
 4
 5     /* Can't register until after driver model init */
 6     if (unlikely(WARN_ON(!i2c_bus_type.p))) {
 7         res = -EAGAIN;
 8         goto out_list;
 9     }
10
11     rt_mutex_init(&adap->bus_lock);
12     INIT_LIST_HEAD(&adap->userspace_clients);      //  初始化i2c_adapter->userspace_clients链表
13
14     /* Set default timeout to 1 second if not already set */
15     if (adap->timeout == 0)
16         adap->timeout = HZ;
17
18     dev_set_name(&adap->dev, "i2c-%d", adap->nr);   //  设置适配器设备的名字   i2c-%d(nr)
19     adap->dev.bus = &i2c_bus_type;                  //  设置设备的总线类型
20     adap->dev.type = &i2c_adapter_type;             //  设置设备的设备类型
21     res = device_register(&adap->dev);              //  注册设备  如果前面没有指定父设备那么创建的设备文件是: /sys/devices/i2c-%d
22     if (res)                                        //  samsung在注册适配器的时候是指定了父设备的,所以他创建的设备是: /sys/devices/platform/s3c2410-i2cn/i2c-%d
23         goto out_list;                              //  为什么是这个会在后面说到
24
25     dev_dbg(&adap->dev, "adapter [%s] registered\n", adap->name);
26
27 #ifdef CONFIG_I2C_COMPAT
28     res = class_compat_create_link(i2c_adapter_compat_class, &adap->dev,
29                        adap->dev.parent);
30     if (res)
31         dev_warn(&adap->dev,
32              "Failed to create compatibility class link\n");
33 #endif
34
35     /* create pre-declared device nodes */
36     if (adap->nr < __i2c_first_dynamic_bus_num)
37         i2c_scan_static_board_info(adap);          //   扫描__i2c_board_list链表上挂接的所有的i2c次设备信息并与适配器进行匹配,匹配成功创建i2c次设备
38
39     /* Notify drivers */
40     mutex_lock(&core_lock);
41     dummy = bus_for_each_drv(&i2c_bus_type, NULL, adap,
42                  __process_new_adapter);
43     mutex_unlock(&core_lock);
44
45     return 0;
46
47 out_list:
48     mutex_lock(&core_lock);
49     idr_remove(&i2c_adapter_idr, adap->nr);
50     mutex_unlock(&core_lock);
51     return res;
52 }
i2c_scan_static_board_info函数分析:
 1 static void i2c_scan_static_board_info(struct i2c_adapter *adapter)
 2 {
 3     struct i2c_devinfo    *devinfo;          //   定义一个i2c_devinfo 结构体指针
 4
 5     down_read(&__i2c_board_lock);
 6     list_for_each_entry(devinfo, &__i2c_board_list, list) {   //  遍历 __i2c_board_list 链表上的所有i2c_devinfo 结构体
 7         if (devinfo->busnum == adapter->nr                    //  比较 i2c_devinfo->busnum 与 适配器的编号是否匹配
 8                 && !i2c_new_device(adapter,                   //  如果匹配就会调用 i2c_new_device 函数进行注册添加新的次设备 i2c_client
 9                         &devinfo->board_info))
10             dev_err(&adapter->dev,
11                 "Can't create device at 0x%02x\n",
12                 devinfo->board_info.addr);
13     }
14     up_read(&__i2c_board_lock);
15 }
i2c_new_device函数分析:
 1 struct i2c_client *
 2 i2c_new_device(struct i2c_adapter *adap, struct i2c_board_info const *info)
 3 {
 4     struct i2c_client    *client;                  //  定义一个  i2c_client  指针
 5     int            status;
 6
 7     client = kzalloc(sizeof *client, GFP_KERNEL);  //  申请分配
 8     if (!client)
 9         return NULL;
10
11 //   对i2c_client结构体变量进行填充
12     client->adapter = adap;                               //  i2c次设备通过i2c_client->adapter指针去指向与它匹配成功的适配器i2c_adapter
13         client->dev.platform_data = info->platform_data;  //  将传进来的i2c_board_info结构体作为i2c次设备的platform平台数据
14
15     if (info->archdata)
16         client->dev.archdata = *info->archdata;
17
18     client->flags = info->flags;   //  标志位
19     client->addr = info->addr;     //  i2c次设备的地址
20     client->irq = info->irq;       //  中断号
21
22     strlcpy(client->name, info->type, sizeof(client->name));  //  名字
23
24     /* Check for address validity */
25     status = i2c_check_client_addr_validity(client);          //   次设备地址校验
26     if (status) {
27         dev_err(&adap->dev, "Invalid %d-bit I2C address 0x%02hx\n",
28             client->flags & I2C_CLIENT_TEN ? 10 : 7, client->addr);
29         goto out_err_silent;
30     }
31
32     /* Check for address business */
33     status = i2c_check_addr_busy(adap, client->addr);
34     if (status)
35         goto out_err;
36
37     client->dev.parent = &client->adapter->dev;   //  指定i2c 次设备的父设备是与它匹配成功的适配器对应的设备
38     client->dev.bus = &i2c_bus_type;              //  指定次设备的总线类型
39     client->dev.type = &i2c_client_type;          //  指定次设备的设备类型
40 #ifdef CONFIG_OF
41     client->dev.of_node = info->of_node;
42 #endif
43
44     dev_set_name(&client->dev, "%d-%04x", i2c_adapter_id(adap), //  设置次设备的名字    %d-%04x
45              client->addr);
46     status = device_register(&client->dev);                     //  注册次设备:   /sys/devices/platform/s3c2410-i2cn/i2c-%d/%d-%04x
47     if (status)
48         goto out_err;
49
50     dev_dbg(&adap->dev, "client [%s] registered with bus id %s\n",
51         client->name, dev_name(&client->dev));
52
53     return client;
54
55 out_err:
56     dev_err(&adap->dev, "Failed to register i2c client %s at 0x%02x "
57         "(%d)\n", client->name, client->addr, status);
58 out_err_silent:
59     kfree(client);
60     return NULL;
61 }
i2c_new_device是I2C核心层提供给设备层注册i2c设备时使用的一个接口函数,我们可以在注册i2c设备时直接调用这个函数进行注册,在这里i2c核心层还提供了另一种
机制去实现制动注册,他的原理就是: 我们在系统启动的时候在他的硬件机器初始化函数中(例如: smdkc110_machine_init)去注册板子上的i2c次设备
(实际上就是构建i2c_devinfo结构体变量挂接到__i2c_board_list链表上),当我们去向i2c总线核心层注册适配器的时候就会去扫描该链表,然后根据
相关的信息去注册i2c次设备,也就是上面的那个函数的意义了。
/***********************************************************************************************************/
smdkc110_machine_init
platform_add_devices(smdkc110_devices, ARRAY_SIZE(smdkc110_devices));
s3c_i2c1_set_platdata(NULL); /* 这个是设置的是SoC中的i2c控制器(适配器)作为平台设备的私有数据 */
i2c_register_board_info(1, i2c_devs1, ARRAY_SIZE(i2c_devs0)); // 通过这个函数注册板子上的i2c次设备的信息
/*********************************************************************************************************/
i2c_add_driver函数分析:
i2c_add_driver函数是定义在 include\linux\i2c.h 头文件中的一个静态内敛函数,但是函数内部是直接调用了I2C核心层的i2c_register_driver函数来进行正真的工作。
该函数是提供用来注册一个I2C总线下的设备驱动的接口。
 1 int i2c_register_driver(struct module *owner, struct i2c_driver *driver)
 2 {
 3     int res;
 4
 5     /* Can't register until after driver model init */
 6     if (unlikely(WARN_ON(!i2c_bus_type.p)))
 7         return -EAGAIN;
 8
 9     /* add the driver to the list of i2c drivers in the driver core */
10     driver->driver.owner = owner;
11     driver->driver.bus = &i2c_bus_type;            //  指定该设备驱动的总线类型  i2c
12
13     /* When registration returns, the driver core
14      * will have called probe() for all matching-but-unbound devices.
15      */
16     res = driver_register(&driver->driver);          //  注册设备驱动   /sys/bus/i2c/drivers/dummy     dummy就是一个设备驱动文件
17     if (res)
18         return res;
19
20     pr_debug("i2c-core: driver [%s] registered\n", driver->driver.name);
21
22     INIT_LIST_HEAD(&driver->clients);                //   初始化i2c_driver -> clients 链表
23     /* Walk the adapters that are already present */
24     mutex_lock(&core_lock);
25     bus_for_each_dev(&i2c_bus_type, NULL, driver, __process_new_driver);   //  可以忽略这条语句的执行效果
26     mutex_unlock(&core_lock);
27
28     return 0;
29 }
总结:从上面的分析其实可以知道:i2c子系统内部存在着2个匹配过程:
(1)i2c总线下的设备与设备驱动之间的匹配(通过设备驱动的id_table)
(2)adapter适配器与设备之间的匹配(通过适配器编号)
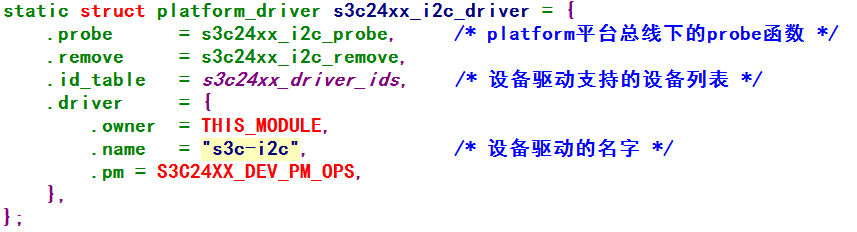
三、I2C总线驱动层代码分析(drivers\i2c\busses\i2c-s3c2410.c)
I2C总线驱动是I2C适配器的软件实现,提供I2C适配器与从设备间完成数据通信的能力,I2C总线驱动由i2c_adapter和i2c_algorithm来描述。
1、入口函数:
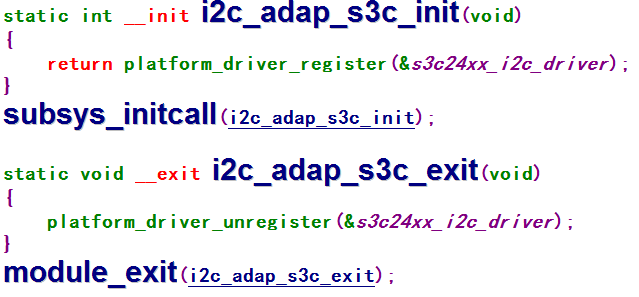
从上面可以知道,adapter的注册实现为模块的方式,可以在内核配置的时候进行动态的加载和卸载,并且是基于platform平台总线,本文件提供的是platform平台设备驱动
的注册,那么他的platform平台设备注册在mach文件中,我这里是mach-x210.c文件。
2、probe函数分析:
  1 static int s3c24xx_i2c_probe(struct platform_device *pdev)
  2 {
  3     struct s3c24xx_i2c *i2c;               //   次结构体是三星对本SoC中的i2c控制器的一个描述,是一个用来在多文件中进行数据传递的全局结构体
  4     struct s3c2410_platform_i2c *pdata;    //   此结构体用来表示平台设备的私有数据
  5     struct resource *res;
  6     int ret;
  7
  8     pdata = pdev->dev.platform_data;       //  获取到平台设备层中的平台数据
  9     if (!pdata) {
 10         dev_err(&pdev->dev, "no platform data\n");
 11         return -EINVAL;
 12     }
 13
 14     i2c = kzalloc(sizeof(struct s3c24xx_i2c), GFP_KERNEL); //  给s3c24xx_i2c类型指针申请分配内存空间
 15     if (!i2c) {
 16         dev_err(&pdev->dev, "no memory for state\n");
 17         return -ENOMEM;
 18     }
 19
 20 //   以下主要是对s3c24xx_i2c 结构体中的i2c_adapter变量的一个填充
 21     strlcpy(i2c->adap.name, "s3c2410-i2c", sizeof(i2c->adap.name)); //  设置适配器的名字    s3c2410-i2c
 22     i2c->adap.owner   = THIS_MODULE;
 23     i2c->adap.algo    = &s3c24xx_i2c_algorithm;                     //  通信算法
 24     i2c->adap.retries = 2;
 25     i2c->adap.class   = I2C_CLASS_HWMON | I2C_CLASS_SPD;            //  该适配器所支持的次设备类有哪些
 26     i2c->tx_setup     = 50;
 27
 28     spin_lock_init(&i2c->lock);       //  初始化互斥锁
 29     init_waitqueue_head(&i2c->wait);  //  初始化工作队列
 30
 31     /* find the clock and enable it */
 32
 33     i2c->dev = &pdev->dev;            //  通过s3c24xx_i2c->dev 指针指向平台设备的device结构体
 34     i2c->clk = clk_get(&pdev->dev, "i2c");
 35
 36     if (IS_ERR(i2c->clk)) {
 37         dev_err(&pdev->dev, "cannot get clock\n");
 38         ret = -ENOENT;
 39         goto err_noclk;
 40     }
 41
 42     dev_dbg(&pdev->dev, "clock source %p\n", i2c->clk);
 43
 44     clk_enable(i2c->clk);             //  使能时钟
 45
 46     /* map the registers */
 47
 48     res = platform_get_resource(pdev, IORESOURCE_MEM, 0);  //  获取平台设备资源
 49     if (res == NULL) {
 50         dev_err(&pdev->dev, "cannot find IO resource\n");
 51         ret = -ENOENT;
 52         goto err_clk;
 53     }
 54
 55     i2c->ioarea = request_mem_region(res->start, resource_size(res), //  物理地址到虚拟地址的映射请求
 56                      pdev->name);
 57
 58     if (i2c->ioarea == NULL) {
 59         dev_err(&pdev->dev, "cannot request IO\n");
 60         ret = -ENXIO;
 61         goto err_clk;
 62     }
 63
 64     i2c->regs = ioremap(res->start, resource_size(res));    //  地址映射
 65
 66     if (i2c->regs == NULL) {
 67         dev_err(&pdev->dev, "cannot map IO\n");
 68         ret = -ENXIO;
 69         goto err_ioarea;
 70     }
 71
 72     dev_dbg(&pdev->dev, "registers %p (%p, %p)\n",
 73         i2c->regs, i2c->ioarea, res);
 74
 75     /* setup info block for the i2c core */
 76
 77     i2c->adap.algo_data = i2c;          //  将s3c24xx_i2c 结构体变量作为s3c24xx_i2c中内置的i2c_adapter适配器中的私有数据
 78     i2c->adap.dev.parent = &pdev->dev;  //  指定适配器设备的父设备是平台设备device :   /sys/devices/platform/s3c2410-i2cn这个目录下
 79
 80     /* initialise the i2c controller */
 81
 82     ret = s3c24xx_i2c_init(i2c);        //  i2c控制器(适配器)    寄存器相关的配置
 83     if (ret != 0)
 84         goto err_iomap;
 85
 86     /* find the IRQ for this unit (note, this relies on the init call to
 87      * ensure no current IRQs pending
 88      */
 89
 90     i2c->irq = ret = platform_get_irq(pdev, 0); //  获取平台设备中的i2c中断号(这个中断是I2C控制器产生的中断)
 91     if (ret <= 0) {
 92         dev_err(&pdev->dev, "cannot find IRQ\n");
 93         goto err_iomap;
 94     }
 95
 96     ret = request_irq(i2c->irq, s3c24xx_i2c_irq, IRQF_DISABLED,  //  申请中断
 97               dev_name(&pdev->dev), i2c);
 98
 99     if (ret != 0) {
100         dev_err(&pdev->dev, "cannot claim IRQ %d\n", i2c->irq);
101         goto err_iomap;
102     }
103
104     ret = s3c24xx_i2c_register_cpufreq(i2c);   //  这个不清楚
105     if (ret < 0) {
106         dev_err(&pdev->dev, "failed to register cpufreq notifier\n");
107         goto err_irq;
108     }
109
110     /* Note, previous versions of the driver used i2c_add_adapter()
111      * to add the bus at any number. We now pass the bus number via
112      * the platform data, so if unset it will now default to always
113      * being bus 0.
114      */
115
116     i2c->adap.nr = pdata->bus_num;              //  确定i2c主机(适配器)的编号
117
118     ret = i2c_add_numbered_adapter(&i2c->adap); //  向i2c核心注册i2c适配器  /sys/devices/platform/s3c2410-i2cn/s3c2410-i2c   因为在函数内会将 i2c-%d作为适配器的名字
119     if (ret < 0) {
120         dev_err(&pdev->dev, "failed to add bus to i2c core\n");
121         goto err_cpufreq;
122     }
123
124     platform_set_drvdata(pdev, i2c);   //  将s3c24xx_i2c变量作为平台设备私有数据中的设备驱动私有数据  dev->p->driver_data
125                                        //  因为这个变量还会在本文件中其他函数中会用到了
126     clk_disable(i2c->clk);
127
128     dev_info(&pdev->dev, "%s: S3C I2C adapter\n", dev_name(&i2c->adap.dev));
129     return 0;
130
131  err_cpufreq:
132     s3c24xx_i2c_deregister_cpufreq(i2c);
133
134  err_irq:
135     free_irq(i2c->irq, i2c);
136
137  err_iomap:
138     iounmap(i2c->regs);
139
140  err_ioarea:
141     release_resource(i2c->ioarea);
142     kfree(i2c->ioarea);
143
144  err_clk:
145     clk_disable(i2c->clk);
146     clk_put(i2c->clk);
147
148  err_noclk:
149     kfree(i2c);
150     return ret;
151 }
struct i2c_msg:
 1 struct i2c_msg {
 2     __u16 addr;           /* slave address 设备地址 */
 3     __u16 flags;          /* 本次消息的标志位,就是下面的这些 */
 4 #define I2C_M_TEN           0x0010    /* 设置了这个标志位表示从设备的地址是10bit */
 5 #define I2C_M_RD            0x0001    /* 设置了这个标志位表示本次通信i2c控制器是处于接收方,否则就是发送方 */
 6 #define I2C_M_NOSTART       0x4000
 7 #define I2C_M_REV_DIR_ADDR  0x2000    /* 设置这个标志位表示需要将读写标志位反转过来 */
 8 #define I2C_M_IGNORE_NAK    0x1000    /* 设置这个标志意味当前i2c_msg忽略I2C器件的ack和nack信号 */
 9 #define I2C_M_NO_RD_ACK     0x0800    /* 设置这个标志位表示在读操作中主机不用ACK */
10 #define I2C_M_RECV_LEN      0x0400
11     __u16 len;                        /* 数据长度 */
12     __u8 *buf;                        /* 数据缓冲区指针 */
13 };
这个结构体就是用来表示一个通信周期的数据相关的结构体,包括通信从设备的信息,通信数据长度等等。函数中填充的通信算法会在i2c主设备与从设备
通信的时候调用到。
平台设备的注册会随着smdkc110_machine_init函数中的platform_add_devices函数的执行被注册(s3c_device_i2c0、s3c_device_i2c1...)
四、I2C设备驱动层代码分析(drivers\input\touchscreen\gslX680.c)
同platform平台总线一样,I2C总线下也是分为i2c总线设备层(struct i2c_client)和i2c总线设备驱动层(struct i2c_driver),这两个结构体已经在上面分析过了
因为我的板子上使用的是一款I2C接口的电容触摸屏:gslx680
所以就以这个I2C设备为例进行分析(源代码文件: gslX680.c),代码是由触摸品IC原厂工程师提供的,代码中涉及到很多的触摸屏专业方面的知识,这个就不用去管了。
同样的gslX680.c文件提供的是I2C设备驱动的注册,相应的I2C设备注册是在mach文件中,我这里同样还是:mach-x210.c
1、I2C总线设备驱动的注册


2、gsl_ts_probe函数分析
 1 static int __devinit gsl_ts_probe(struct i2c_client *client,
 2             const struct i2c_device_id *id)
 3 {
 4     struct gsl_ts *ts;      //  设备驱动层封装的一个全局结构体
 5     int rc;
 6
 7     print_info("GSLX680 Enter %s\n", __func__);
 8     if (!i2c_check_functionality(client->adapter, I2C_FUNC_I2C)) {
 9         dev_err(&client->dev, "I2C functionality not supported\n");
10         return -ENODEV;
11     }
12
13     ts = kzalloc(sizeof(*ts), GFP_KERNEL);  //  给 gsl_ts类型的指针申请分配内存
14     if (!ts)
15         return -ENOMEM;
16     print_info("==kzalloc success=\n");
17
18     ts->client = client;                    //  通过gsl_ts->client指针去指向传进来的i2c次设备i2c_client
19     i2c_set_clientdata(client, ts);         //  将gsl_ts作为i2c次设备的私有数据区中的设备驱动私有数据
20     ts->device_id = id->driver_data;
21
22     rc = gslX680_ts_init(client, ts);       //   初始化操作
23     if (rc < 0) {
24         dev_err(&client->dev, "GSLX680 init failed\n");
25         goto error_mutex_destroy;
26     }
27
28     gsl_client = client;       //  通过一个全局的i2c_client指针gsl_client去指向传进来的i2c次设备i2c_client
29
30     gslX680_init();            //  gslX680 触摸屏相关的gpio初始化操作
31     init_chip(ts->client);     //  gslX680触摸屏芯片相关的初始化操作
32     check_mem_data(ts->client);
33
34     rc=  request_irq(client->irq, gsl_ts_irq, IRQF_TRIGGER_RISING, client->name, ts); //  申请中断,这个中断是接在SoC的一个外部中断引脚上的
35     if (rc < 0) {                                                                     // 当发生中断的时候表示有数据可以进行读取了,那么就会通知
36         print_info( "gsl_probe: request irq failed\n");                               //  I2C主机去去读数据
37         goto error_req_irq_fail;
38     }
39
40     /* create debug attribute */
41     //rc = device_create_file(&ts->input->dev, &dev_attr_debug_enable);
42
43 #ifdef CONFIG_HAS_EARLYSUSPEND
44     ts->early_suspend.level = EARLY_SUSPEND_LEVEL_BLANK_SCREEN + 1;
45     //ts->early_suspend.level = EARLY_SUSPEND_LEVEL_DISABLE_FB + 1;
46     ts->early_suspend.suspend = gsl_ts_early_suspend;
47     ts->early_suspend.resume = gsl_ts_late_resume;
48     register_early_suspend(&ts->early_suspend);
49 #endif
50
51
52 #ifdef GSL_MONITOR
53     print_info( "gsl_ts_probe () : queue gsl_monitor_workqueue\n");
54
55     INIT_DELAYED_WORK(&gsl_monitor_work, gsl_monitor_worker);
56     gsl_monitor_workqueue = create_singlethread_workqueue("gsl_monitor_workqueue");
57     queue_delayed_work(gsl_monitor_workqueue, &gsl_monitor_work, 1000);
58 #endif
59
60     print_info("[GSLX680] End %s\n", __func__);
61
62     return 0;
63
64 //exit_set_irq_mode:
65 error_req_irq_fail:
66     free_irq(ts->irq, ts);
67
68 error_mutex_destroy:
69     input_free_device(ts->input);
70     kfree(ts);
71     return rc;
72 }
gslX680_ts_init函数分析:
 1 static int gslX680_ts_init(struct i2c_client *client, struct gsl_ts *ts)
 2 {
 3     struct input_dev *input_device;            //   定义一个 input_dev 结构体指针
 4     int rc = 0;
 5
 6     printk("[GSLX680] Enter %s\n", __func__);
 7
 8     ts->dd = &devices[ts->device_id];
 9
10     if (ts->device_id == 0) {
11         ts->dd->data_size = MAX_FINGERS * ts->dd->touch_bytes + ts->dd->touch_meta_data;
12         ts->dd->touch_index = 0;
13     }
14
15     ts->touch_data = kzalloc(ts->dd->data_size, GFP_KERNEL);
16     if (!ts->touch_data) {
17         pr_err("%s: Unable to allocate memory\n", __func__);
18         return -ENOMEM;
19     }
20
21     input_device = input_allocate_device();    //  给input_device指针申请分配内存
22     if (!input_device) {
23         rc = -ENOMEM;
24         goto error_alloc_dev;
25     }
26
27     ts->input = input_device;                  //  通过gsl_ts->input指针去指向input输入设备
28     input_device->name = GSLX680_I2C_NAME;     //  设置input设备的名字
29     input_device->id.bustype = BUS_I2C;        //  设置input设备的总线类型
30     input_device->dev.parent = &client->dev;   //  设置input设备的父设备:   /sys/devices/platform/s3c2410-i2cn/i2c-%d/%d-%04x
31                                                //  但是通过后面的分析可知,最终不是这个父设备
32     input_set_drvdata(input_device, ts);       //  将gsl_ts结构体作为input设备的私有数据区中的设备驱动数据
33
34 //   以下是对input_dev 输入设备的一些设置  设置input设备可以上报的事件类型
35     set_bit(EV_ABS, input_device->evbit);
36     set_bit(BTN_TOUCH, input_device->keybit);
37     set_bit(EV_ABS, input_device->evbit);
38     set_bit(EV_KEY, input_device->evbit);
39     input_set_abs_params(input_device, ABS_X, 0, SCREEN_MAX_X, 0, 0);
40     input_set_abs_params(input_device, ABS_Y, 0, SCREEN_MAX_Y, 0, 0);
41     input_set_abs_params(input_device, ABS_PRESSURE, 0, 1, 0, 0);
42 #ifdef HAVE_TOUCH_KEY
43     input_device->evbit[0] = BIT_MASK(EV_KEY);
44     //input_device->evbit[0] = BIT_MASK(EV_SYN) | BIT_MASK(EV_KEY) | BIT_MASK(EV_ABS);
45     for (i = 0; i < MAX_KEY_NUM; i++)
46         set_bit(key_array[i], input_device->keybit);
47 #endif
48
49     client->irq = IRQ_PORT;               //  触摸屏使用到的中断号
50     ts->irq = client->irq;                //
51
52     ts->wq = create_singlethread_workqueue("kworkqueue_ts");
53     if (!ts->wq) {
54         dev_err(&client->dev, "Could not create workqueue\n");
55         goto error_wq_create;
56     }
57     flush_workqueue(ts->wq);
58
59     INIT_WORK(&ts->work, gslX680_ts_worker);   //  初始化工作队列  当发生中断的时候在在中断处理函数中就会调用这个工作队列
60                                                //  作为中断的下半部
61     rc = input_register_device(input_device);  //   注册input设备
62     if (rc)
63         goto error_unreg_device;
64
65     return 0;
66
67 error_unreg_device:
68     destroy_workqueue(ts->wq);
69 error_wq_create:
70     input_free_device(input_device);
71 error_alloc_dev:
72     kfree(ts->touch_data);
73     return rc;
74 }
/*******************************************************************************************/
因为在中断中需要做的事情很多,所以在这里采用了中断上下半部的方式来处理,上半部就是probe函数中的申请中断时绑定的函数gsl_ts_irq
在这个函数中做了一些最必要做的事情,然后开启下半部,在下半部中继续执行未处理完的事情gslX680_ts_worker。
需要注意的是这里的中断指的是触摸屏方的中断信号,他的思想是这样的:当有人按下电容触摸屏的时候,在触摸屏IC就会将产生的模拟量转化为数字量,当转换完成之后
由于I2C协议本身的限制,所有的通信周期都是由主机方发起,从机只能被动的相应。I2c控制器这边如何知道数据已经可以读取了呢?这就得通过触摸屏接口这边引出一个
中断信号引脚来告知I2C主机控制器读取数据,然后I2C主机就会发起一次通信来读取数据。
所以由此可以推知在gslX680_ts_worker(中断下半部)函数中需要做两件事: 读取触摸屏数据、向input核心层上报数据
/*****************************************************************************/
gslX680_ts_worker
gsl_ts_read(I2C总线设备驱动层提供的函数)
i2c_master_recv (I2C子系统核心层提供的函数)
i2c_transfer(I2C子系统核心层提供的函数)
adap->algo->master_xfer(adap, msgs, num)(I2C子系统总线驱动层提供的函数)
/****************************************************************************/
gsl_ts_write(I2C总线设备驱动层提供的函数)
i2c_master_send(I2C子系统核心层提供的函数)
i2c_transfer(I2C子系统核心层提供的函数)
adap->algo->master_xfer(adap, msgs, num)(I2C子系统总线驱动层提供的函数)
/******************************************************/
现在来分析一下整个的工作流程:
当触摸屏有人按下并且在触摸屏IC中已经完成了AD转换之后就会产生一个中断信号给I2C控制器,就会触发I2C设备驱动层的中断函数。在设备驱动层的中断函数中会调用
核心层提供的读写函数来读取触摸屏的数据,然后核心层最终调用的是I2C总线驱动层(适配器)中注册的通信算法函数来发起一个起始信号来开启一个接收数据的通信周期,
之后的事情就都交给I2C总线驱动层的中断函数来读取数据了,当数据读取完成之后就会将数据存放在缓冲区中。所以我们最终在设备驱动层的中断函数中将读取到的数据进
行一些处理,然后上报给input核心层。
https://www.cnblogs.com/deng-tao/p/6130080.html
************************************************end******************************************************


 559
559


 被折叠的 条评论
为什么被折叠?
被折叠的 条评论
为什么被折叠?
 到【灌水乐园】发言


