


 本文详细介绍了Git的基础知识和常用操作,包括git的四个工作区域、初始化配置、日常操作如添加、提交、查看版本记录,以及更复杂的文件修改删除、版本回退、stash操作、分支管理和标签管理。适合Git初学者入门。
【Git基础入门】Git工具的日常基本使用
一、git介绍
Git是一个开源的分布式版本控制系统,可以有效、高速地处理从很小到非常大的项目版本管理,也是Linus Torvalds为了帮助管理Linux内核开发而开发的一个开放源码的版本控制软件。
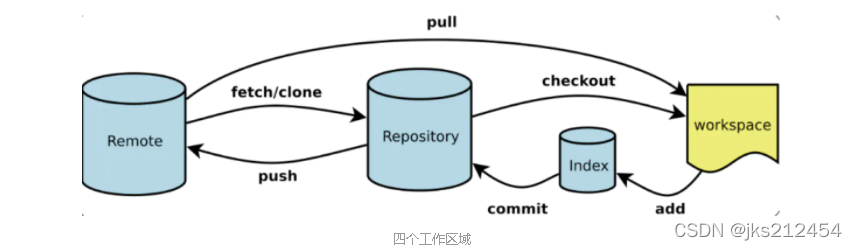
二、git的四个区域
2.git四个区域名称
- Remote:远程仓库
- Repository:本地仓库
- index:暂存区
- workspace:工作区
2.2 git四个区域工作关系
Git的4个区域关系图示如下:
三、git工作的三种场景
1. 场景1——本地目录有代码
当在本地目录中,已经存在代码,想要进行版本控制四,直接初始化本地目录。
[root@k8s work]# ls
hello.sh
[root@k8s work]# git init .
Initialized empty Git repository in /data/work/.git/
[root@k8s work]# ls -a
.  ..  .git  hello.sh
2.场景2——本地目录无代码
当本地目录没有代码时,直接创建代码版本控制的工作区。
[root@k8s data]# ls
work
[root@k8s data]# git init git_ansible
Initialized empty Git repository in /data/git_ansible/.git/
[root@k8s data]# ls
git_ansible  work
3.场景3——直接github拉取代码
直接从github仓库中下载
git clone https://github.com/pallets/flask.git
四、git初始化操作
1.配置该git的使用者
git config --global user.name "wangming"
2.配置git使用者的邮箱
git config --global user.email "123456@qq.com"
3.使文本高亮
git config --global color.ui true
4.查看git配置信息
[root@k8s git_code]# cat ~/.gitconfig
[user]
	name = wangming
	email = 123456@qq.com
[color]
	ui = true
[root@k8s git_code]#
五、git的日常操作
1.创建工作区
git init git_code
2.在工作区创建文件
[root@k8s git_code]#  echo 'HCIE is cool!' > git.sh
[root@k8s git_code]# ls
git.sh
3.查看git工作区状态
[root@k8s git_code]# git status
# On branch master
#
# Initial commit
#
# Untracked files:
#   (use "git add <file>..." to include in what will be committed)
#
#	git.sh
nothing added to commit but untracked files present (use "git add" to track)
4.将编辑好的文件添加到暂存区
[root@k8s git_code]# git add .     #将编辑好的文件添加到暂存区
[root@k8s git_code]# ls
git.sh
[root@k8s git_code]# git status
# On branch master
#
# Initial commit
#
# Changes to be committed:
#   (use "git rm --cached <file>..." to unstage)
#
#	new file:   git.sh
#
5.提交版本信息
[root@k8s git_code]# git commit -m "1.0 master-wangming create file "
[master (root-commit) a072160] 1.0 master-wangming create file
 1 file changed, 1 insertion(+)
 create mode 100644 git.sh
6.查看版本记录
①查看全部版本记录
[root@k8s git_code]# git log
commit a072160a3f482254cf65fdfc9672e7271549859b
Author: wangming <123456@qq.com>
Date:   Wed Mar 16 03:24:16 2022 +0800

    1.0 master-wangming create file
②查看简要版本记录
[root@k8s git_code]# git log --oneline
a072160 1.0 master-wangming create file
③显示版本演进
[root@k8s git_code]# git log --oneline --graph
* a072160 1.0 master-wangming create file
六、文件的修改删除
1.直接修改删除文件
[root@k8s git_code]# echo "modify the git.sh context" > git.sh
[root@k8s git_code]# git status
# On branch master
# Changes not staged for commit:
#   (use "git add <file>..." to update what will be committed)
#   (use "git checkout -- <file>..." to discard changes in working directory)
#
#	modified:   git.sh
#
no changes added to commit (use "git add" and/or "git commit -a")
[root@k8s git_code]# git add .
[root@k8s git_code]# git commit -m "2.0 master-wangming modify the file git.sh"
[master 09e1f67] 2.0 master-wangming modify the file git.sh
 1 file changed, 1 insertion(+), 1 deletion(-)
[root@k8s git_code]# git log --oneline
09e1f67 2.0 master-wangming modify the file git.sh
a072160 1.0 master-wangming create file
2.从git本地仓库中直接删除文件
①重新添加一个文件到本地仓库
[root@k8s git_code]# git commit -m "3.0-msater-wangming create file02.txt"
[master 6230372] 3.0-msater-wangming create file02.txt
 1 file changed, 1 insertion(+)
 create mode 100644 file02.txt
[root@k8s git_code]# git log --oneline
6230372 3.0-msater-wangming create file02.txt
09e1f67 2.0 master-wangming modify the file git.sh
a072160 1.0 master-wangming create file
[root@k8s git_code]#
②从本地仓库直接删除文件
git rm --cached file02.txt
③后续操作1——删除工作区的文件
rm -rf file02.txt
④后续操作2——撤销刚才删除操作
git reset HEAD file02.txt
七、版本回退
1.回到上个版本
[root@k8s git_code]# git reset --hard  HEAD^
HEAD is now at 09e1f67 2.0 master-wangming modify the file git.sh
[root@k8s git_code]# git log --oneline
09e1f67 2.0 master-wangming modify the file git.sh
a072160 1.0 master-wangming create file
2.回到上上个版本
git reset --hard HEAD^^
3.回到指定ID版本
git reset --hard a072160
[root@k8s git_code]# ls
git.sh
[root@k8s git_code]# cat git.sh
modify the git.sh context
[root@k8s git_code]# git reset --hard  a072160
HEAD is now at a072160 1.0 master-wangming create file
[root@k8s git_code]# git log --oneline
a072160 1.0 master-wangming create file
[root@k8s git_code]# ls
git.sh
[root@k8s git_code]# cat git.sh
HCIE is cool!
[root@k8s git_code]#
4.查看历史所有版本操作信息
[root@k8s git_code]# git reflog
a072160 HEAD@{0}: reset: moving to a072160
09e1f67 HEAD@{1}: reset: moving to HEAD^
6230372 HEAD@{2}: commit: 3.0-msater-wangming create file02.txt
09e1f67 HEAD@{3}: commit: 2.0 master-wangming modify the file git.sh
a072160 HEAD@{4}: commit (initial): 1.0 master-wangming create file
5.回退到未操作前的版本
[root@k8s git_code]# git reset --hard 6230372
HEAD is now at 6230372 3.0-msater-wangming create file02.txt
[root@k8s git_code]# ls
file02.txt  git.sh
[root@k8s git_code]# git log --oneline
6230372 3.0-msater-wangming create file02.txt
09e1f67 2.0 master-wangming modify the file git.sh
a072160 1.0 master-wangming create file
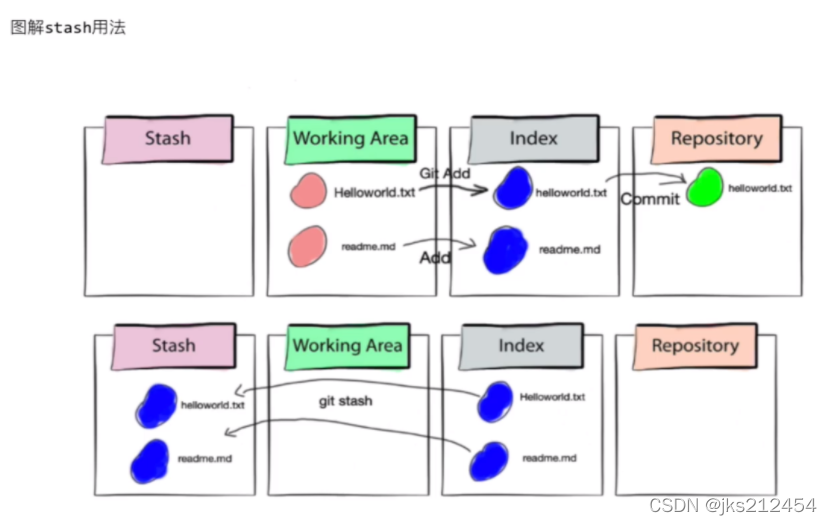
八、git的stash操作
1.git的stash介绍
stash:临时空间,临时存储的区域
2.新创建一个文件提交到暂存区
[root@k8s git_code]# echo "file03-  hello" > file03.sh
[root@k8s git_code]# git add .
3.将暂存区的文件放入stash临时区
git stash save "NEW create file03.sh"
4.查看stash区状态
[root@k8s git_code]# git stash list
stash@{0}: On master: NEW create file03.sh
[root@k8s git_code]# git status
# On branch master
nothing to commit, working directory clean
5.恢复stash区的最新进度到工作区
git stash pop
6.恢复stash区指定进度到工作区
[root@k8s git_code]# git stash pop stash@{0}
# On branch master
# Changes to be committed:
#   (use "git reset HEAD <file>..." to unstage)
#
#	new file:   file03.sh
#
Dropped stash@{0} (2e05819d72cf2ff1e790b2f9cbba8281f4cad9df)
[root@k8s git_code]# git status
# On branch master
# Changes to be committed:
#   (use "git reset HEAD <file>..." to unstage)
#
#	new file:   file03.sh
#
[root@k8s git_code]#
7.清除存储的stash进度
git stash clear
8.删除某个存储的stash进度
git stash drop stash_id
9.git stash的工作图
九、git 分支
1.查看当前分支情况
[root@k8s git_code]# git branch
* master
2.新建zhangsan用户的分支
[root@k8s git_code]# git branch zhangsan
[root@k8s git_code]# git branch
* master
  zhangsan
3.切换zhangsan分支
git checkout zhangsan
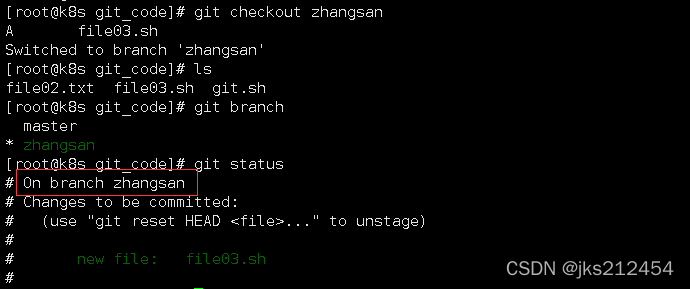
4.提交暂存区文件
git commit -m "04-zhangsan- file03 is wangming create "
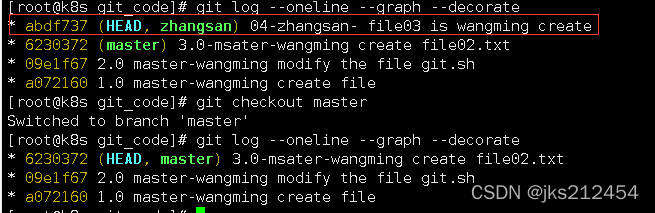
5.查看版本分支的信息
git log --oneline --graph --decorate
6.合并分支
git checkout -b lisi    #创建分支并切换该分支
echo "lisi file" > lisi.txt     #在lisi分支下,创建新文件
git add .
git commit -m "5.0-lisi create file lisi.txt"   #提交lisifen分支版本信息
git checkout master     #切换到主分支
git merge lisi      #将lisi分支合并到master主分支
7.查看当前版本信息
[root@k8s git_code]#  git log --oneline
8a0dfd6 5.0-lisi create file lisi.txt
6230372 3.0-msater-wangming create file02.txt
09e1f67 2.0 master-wangming modify the file git.sh
a072160 1.0 master-wangming create file
8.删除分支
git branch -d lisi  #合并后,该分支下无文件,用-d
git branch -D lisi  #合并前,该分支下有文件,强制删除分支用-D
9.分支冲突解决
master分支和其他分支有相同文件名,合并后:
1.此时git会自动修改内容,告诉哪个分支下的文件是什么内容
2.人工处理合并后的文件内容
十、git tag
1.git tag 介绍
git tag 就是一个便于记忆的标签,可以是字符,也可以是数字,
tag主要是和commit记录绑定在一起的
2.给当前最新版本加标签
git tag -a "V1.0" -m "开发完毕版本"
3.查看标签信息
[root@k8s git_code]# git tag
V1.0
[root@k8s git_code]# git log --oneline  --decorate
8a0dfd6 (HEAD, tag: V1.0, master, lisi) 5.0-lisi crate file lisi.txt
6230372 3.0-msater-wangming create file02.txt
09e1f67 2.0 master-wangming modify the file git.sh
a072160 1.0 master-wangming create file
[root@k8s git_code]#
4.自定义某个版本的标签
git tag -a V0.9 09e1f67 -m "master modify the file git.sh && success"
5.查某个标签具体信息
[root@k8s git_code]# git show V1.0
tag V1.0
Tagger: wangming <123456@qq.com>
Date:   Wed Mar 16 05:54:22 2022 +0800

开发完毕版本

commit 8a0dfd65e4060729aa1144f9678e3143ac458b76
Author: wangming <123456@qq.com>
Date:   Wed Mar 16 05:46:45 2022 +0800

    5.0-lisi crate file lisi.txt

diff --git a/lisi.txt b/lisi.txt
new file mode 100644
index 0000000..e0c3ffa
--- /dev/null
+++ b/lisi.txt
@@ -0,0 +1 @@
+lisi file
[root@k8s git_code]#
6.删除标签
git tag -d v0.9


 3万+
3万+

 被折叠的 条评论
为什么被折叠?
被折叠的 条评论
为什么被折叠?
 到【灌水乐园】发言


