


Today we’ll discuss three simple ways to access the data stored on VMFS datastore of the ESXi host (these are configuration files, data files and snapshots of virtual machines) from Linux, Windows and ESXi. Actually, this article is based on a real case of our customer when the only productive server with VMware ESXi hypervisor has suddenly stopped working.
If your ESXi host crashes, but the local disk (disks) of the server are still functional, you can always copy the virtual machine files (both data drives and configuration files) from VMFS datastore and run VM on a different server (even on VMware Workstation or Hyper-V). The main problem is that the common operating systems (Windows and Linux) by default do not recognize the partition with the VMFS file system, because they do not have a VMFS driver. In this article we’ll look at how to access virtual machine files on a disk with a VMFS file system.
The issue was that backup of VMware virtual machines hadn’t been configured as well as there was no time to diagnose and solve ESXi host boot problems. Therefore, it was decided to manually copy the files of critical virtual machine from VMFS storage and run it on another host with an urgently installed ESXi.
Let’s examine three scenarios of accessing data on the VMFS datastore.
Contents:
- How to Mount VMFS file system on Linux (Ubuntu)
- Access VMFS Volume from Windows
- Mounting an existing VMFS Datastore on a new ESXi host
How to Mount VMFS file system on Linux (Ubuntu)
You can mount a partition with the VMFS file system on a computer with Ubuntu installed (Ubuntu Live CD won’t suit us in this case).
Firstly, you have to connect a physical disk with VMFS file system to the computer (server) with Ubuntu. To access the data on the VMFS volume, you have to install a special third-party vmfs-tools package. This package allows you to access VMFS from non-ESXi hosts. You can access data on this partition in read-only mode. The second important limitation: the developers of vmfs-tools officially announced support for versions of the VMFS file system up to VMFS 5.0. The possibility to connect a partition with VMFS 6 (vSphere 6.0 and 6.5.) is not guaranteed.
Install the package with the following command:
1 | apt-get install vmfs-tools |
Note. In Ubuntu repository, only vmfs-tools 0.2.1 is available, and its main drawback is that it can work only with VMFS v3. If you need to mount a VMFS 5 datastore, you will have to download and install vmfs-tools 0.2.5 or higher, for instance, here:
- http://mirrors.kernel.org/ubuntu/pool/universe/v/vmfs-tools/vmfs-tools_0.2.5-1_amd64.deb – a package for a 32-bit system.
- http://mirrors.kernel.org/ubuntu/pool/universe/v/vmfs-tools/vmfs-tools_0.2.5-1_i386.deb – a package for a 64-bit system.
Download the corresponding package version as follows:
1 | #wget http://mirrors.kernel.org/ubuntu/pool/universe/v/vmfs-tools/vmfs-tools_0.2.5-1_amd64.deb |
And install it:
1 | #dpkg -i vmfs-tools_0.2.5-1_amd64.deb |
To install package dependencies, use this command:
1 | #apt-get install vmfs-tools |
After the package is installed, you need to create a mount point in which the VMFS partition will be mounted:
1 | #mkdir /mnt/vmfs |
The next step is to look into the partitions on the disks. creates a number of service partitions when installed in addition to the partition for virtual machine files (VMFS partition).
If the ESXi version is 4 or earlier, or a VMFS storage has been updated from VMFS 3 to VMFS 5, and its size doesn’t exceed 2TB, display the list of disks and partitions like this:
1 | #fdisk -l |
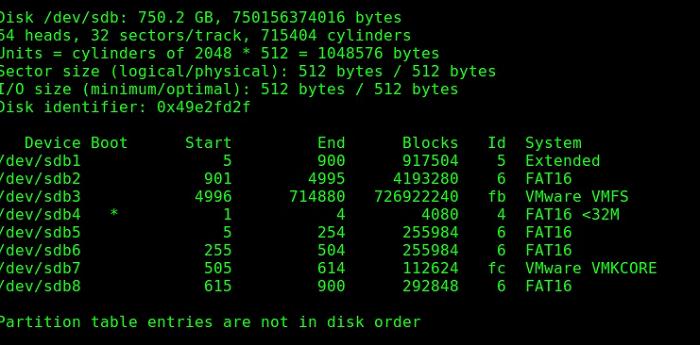
As you can see, the VMFS partition is /dev/sdb3 (label VMware VMFS).
Important. In ESXi 5 and later, VMFS v5 is used with the GPT partition table. GUID Partition Table allows to create larger storages (larger than 2TB), as well as connect RDM-drives in the physical compatibility mode. So to view the partition table you have to use the command parted instead of fdisk.
So, display the partition information as follows:
1 | #parted -l |
Now you only have to mount a partition with the VMFS storage:
1 | #vmfs-fuse /dev/sdb3 /mnt/vmfs |
List the contents of the mounted partition:
1 | #ls -all /mnt/vmfs |
Now you see all the virtual machine files on the VMFS storage that is available in read-only mode. That means that you can copy the directories and/or individual files of the necessary virtual machines to a separate drive and run them on another ESXi host.
Access VMFS Volume from Windows
To connect the VMFS volume and access virtual machine files from Windows, you’ll need a special Java driver – Open Source VMFS Driver. This driver requires Java version 6 or later and allows to mount VMFS volumes in read-only mode.
You can download Open Source VMFS Driver here: https://code.google.com/archive/p/vmfs/. At the current moment this project has not been updated since 2010 and the latest version of the driver that is available on the site is VMFS Driver r95, which supports only VMFS 3 (< ESXi 5).
Note. If you try to connect to a newer version of VMFS, you will receive an error message: No VMware File System detected.
-
- Download Open Source VMFS Driver (fvmfs_r95_dist.zip and unpack it to any directory (e.g., C:\vmfs).
- You can check the operation of the java-application fvmfs.jar as follows:
1
2
cd \vmfs
java -jar fvmfs.jar
- Next, you need to determine the number of the HDDs containing VMFS storage that is connected to your Windows computer. You can find the disk number in the Disk Management Console or using diskpart (in our example, the connected disk has the index 1 – Disk1. For fvmfs driver, this disk has the following name: \\.\PhysicalDrive1).
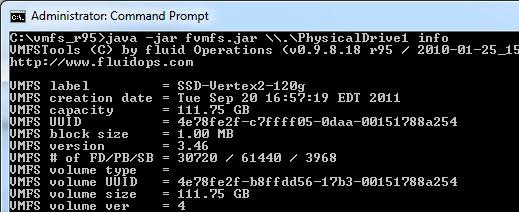
- Try to get information about this disk:
1
java -jar fvmfs.jar \\.\PhysicalDrive1 info
- Share this disk with WebDAV:
1
java -jar fvmfs.jar \\.\PhysicalDrive1 webdav
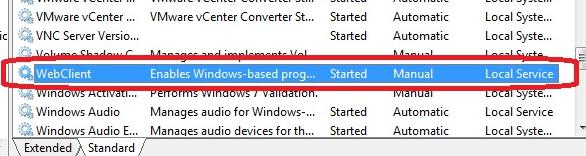
- Make sure that service WebClient is started. If service disabled, run it.
- Mount the shared disk:
1
net use * http://localhost:50080/vmfs
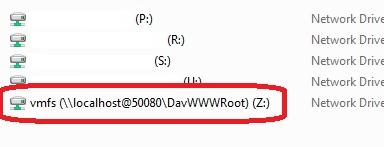
- A new disk that contains VMFS datastore available for reading should appear in the system;
- A new disk that contains VMFS datastore available for reading should appear in the system;
- Do not close the console window while working with files on the VMFS storage.
Mounting an existing VMFS Datastore on a new ESXi host
As you can see, in both of the above cases, third-party VMFS drivers for Linux and Windows do not allow working with VMFS 6.0. Therefore, the most universal way to access data on a VMFS partition of a failed server is to connect its disks to a new ESXi server (you can install ESXi on a new host in less than an hour). This is the easiest way. In this way, you can reconnect both the physical hard disk and the LUN from the storage device (via FC or iSCSI).
The new ESXi host must correctly identify the attached VMFS datastore and you will be able to access the files on it.
Follow the steps below to connect an existing VMFS storage to a new ESXi host without formatting it:
- Connect to the new ESXi server using the vSphere Web Client;
- Connect the drive to the new server and run Storage rescan;
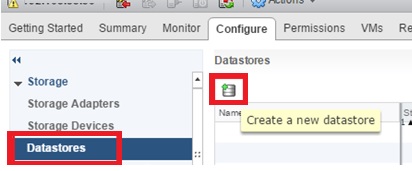
- Go to the Configure -> Datastores section and select Create a new datastore item;
- Select the storage type: Disk or LUN;
- In the list of available devices, select the connected drive (LUN) with the VMFS storage;
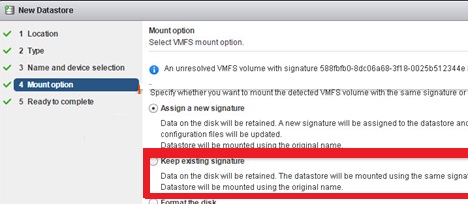
- Select the connection mode. Select Keep the existing signature item;
- Click the Finish button;
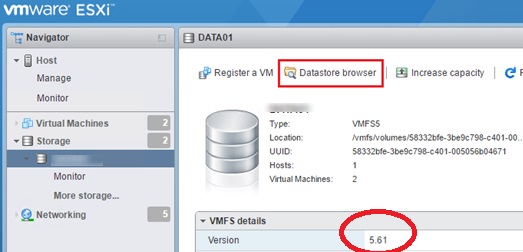
- Go to the host’s storage section. Select the connected storage. Its contents can be displayed by clicking on the Datastore browser button;
- Now you can find the necessary vmx files, register them on host and immediately start the critical virtual machines.


 372
372


 被折叠的 条评论
为什么被折叠?
被折叠的 条评论
为什么被折叠?
 到【灌水乐园】发言


