用cxf发布和调用web service
http://cxf.apache.org/docs/jax-ws-configuration.html 官方API helloword地址
用CXF来做web service是比较简单的,本文就简单介绍一下如何一步步发布web service,以及调用现有的web service。另外如果系统已经使用了Spring MVC,那么引入CXF需要额外的步骤,见本人另外一篇博客http://kyfxbl.iteye.com/blog/1432920。如果展现层没有用spring mvc,而是用struts2之类的,可以省去这一步
用CXF来做web service是比较简单的,本文就简单介绍一下如何一步步发布web service,以及调用现有的web service。另外如果系统已经使用了Spring MVC,那么引入CXF需要额外的步骤,见本人另外一篇博客http://kyfxbl.iteye.com/blog/1432920。如果展现层没有用spring mvc,而是用struts2之类的,可以省去这一步
首先介绍怎么发布web service:
第1步是创建一个普通的java接口,然后用@WebService注解声明这是一个web service
- package com.huawei.framework.webservice;
- import javax.jws.WebService;
- import com.huawei.framework.model.User;
- @WebService
- public interface HelloWorld {
- String sayHi(User user);
- }
可以看到,这个接口非常普通,不需要继承什么额外的接口,只需要注解一个@WebService就可以
第2步当然是需要给这个接口提供一个实现类
- package com.huawei.framework.webservice;
- import com.huawei.framework.model.User;
- public class HelloWorldImpl implements HelloWorld {
- public String sayHi(User theUser) {
- return "Hello " + theUser.getName() + " ,your age is "
- + theUser.getAge();
- }
- }
这个类更加简单,连注解都省了,但是如果这个类实现了不止一个接口,那么就需要加上@WebService注解,不过一般不会这样
第3步就到了cxf出场的时候了,需要在spring配置文件中加上cxf的配置
- <?xml version="1.0" encoding="UTF-8"?>
- <beans xmlns="http://www.springframework.org/schema/beans"
- xmlns:xsi="http://www.w3.org/2001/XMLSchema-instance" xmlns:jaxws="http://cxf.apache.org/jaxws"
- xsi:schemaLocation="http://www.springframework.org/schema/beans ;
- http://www.springframework.org/schema/beans/spring-beans-3.1.xsd ;
- http://cxf.apache.org/jaxws ;
- http://cxf.apache.org/schemas/jaxws.xsd">
- <import resource="classpath:META-INF/cxf/cxf.xml" />
- <import resource="classpath:META-INF/cxf/cxf-servlet.xml" />
- <jaxws:endpoint id="helloWorld"
- implementorClass="com.huawei.framework.webservice.HelloWorldImpl"
- address="/HelloWorld" />
- </beans>
这里只写了CXF所需的配置,spring配置文件的其他内容已省略。用到的元素是<jaxws:endpoint>,implementorClass属性就是我们提供的实现类,然后address属性是这个web service对外暴露的路径
最后第4步是在web.xml中加载cxf
- <?xml version="1.0" encoding="UTF-8"?>
- <web-app xmlns:xsi="http://www.w3.org/2001/XMLSchema-instance"
- xmlns="http://java.sun.com/xml/ns/javaee"
- xsi:schemaLocation="http://java.sun.com/xml/ns/javaee http://java.sun.com/xml/ns/javaee/web-app_3_0.xsd"
- id="MyFramework" version="3.0">
- <display-name>MyFramework</display-name>
- <context-param>
- <param-name>contextConfigLocation</param-name>
- <param-value>
- WEB-INF/beans.xml,
- WEB-INF/cxf.xml
- </param-value>
- </context-param>
- <listener>
- <listener-class>
- org.springframework.web.context.ContextLoaderListener
- </listener-class>
- </listener>
- <servlet>
- <servlet-name>framework</servlet-name>
- <servlet-class>org.springframework.web.servlet.DispatcherServlet</servlet-class>
- <init-param>
- <param-name>contextConfigLocation</param-name>
- <param-value>WEB-INF/spring-mvc.xml</param-value>
- </init-param>
- <load-on-startup>1</load-on-startup>
- </servlet>
- <servlet-mapping>
- <servlet-name>framework</servlet-name>
- <url-pattern>/</url-pattern>
- </servlet-mapping>
- <servlet>
- <servlet-name>CXFServlet</servlet-name>
- <servlet-class>org.apache.cxf.transport.servlet.CXFServlet</servlet-class>
- <load-on-startup>2</load-on-startup>
- </servlet>
- <servlet-mapping>
- <servlet-name>CXFServlet</servlet-name>
- <url-pattern>/webservice/*</url-pattern>
- </servlet-mapping>
- </web-app>
这里写的比较复杂,是为了兼容spring mvc。这里把/webservice/*作为对外暴露的路径,和上面的web service address要结合起来,比如说http://ip:port/app_name/webservice/HelloWorld,就会指向这个例子里声明的web service接口
=========================================================================================================
还有另一种配置方式
第3步 需要在applicationContext.xml配置文件中加上cxf的配置
<!-- ant提供给shopping的接口 2016-03-01 by 于瀚韬 这是对外发布 -->
<cxf:server serviceClass="com.qianhui.ant.web.shoppingInterface.AddUserInAnt" address="/antInterface">
<cxf:serviceBean>
<bean class="com.qianhui.ant.web.shoppingInterface.AddUserInAntImpl"></bean>
</cxf:serviceBean>
</cxf:server>
<!-- LiteratorsMarkWSInterface 这是接收外部接口 -->
<cxf:client id="LiteratorsMarkWSInterface"
serviceClass="com.qianhui.ant.web.LiteratorsMarkWSInterface.neusoft.LiteratorsMarkWSInterface"
address="
http://221.226.179.230/webservice/searchMarkWS"/>
第4步 在web.xml配置中加上
地址为:url-pattener + address
通过以上4步,就发布了一个web service,在浏览器里输入
http://ip:port/app_name/webservice
,就会看到这个sayHi的web service了,并且cxf已经自动生成了wsdl文件
第4步 在web.xml配置中加上
<!-- cxf webService begin -->
<servlet>
<servlet-name>cxf</servlet-name>
<servlet-class>org.apache.cxf.transport.servlet.CXFServlet</servlet-class>
</servlet>
<servlet-mapping>
<servlet-name>cxf</servlet-name>
<url-pattern>/ant/*</url-pattern>
</servlet-mapping>
<!-- cxf webService end -->
地址为:url-pattener + address
-----------------------------------------------------------------------------------------------------------------------------------------------------------------------
然后介绍一下怎么通过cxf调用已有的web service
第一种 获得了wsdl地址
用wsdl2java命令,生成所需的java文件
将生成文件导入工程即可
------------------------------------------------------------------------------------------------------------------------------------------------------------
第二种 获得了wsdl文件
1、首先用wsdl2java命令,生成所需的java文件,当然前提是已经得到了wsdl文件
wsdl2java -p com.huawei.wfm.czekh.webservice.remedy -d ../../src/remedy -all fileName.wsdl
用上面这个命令,就可以根据wsdl文件,生成所需的所有java文件,参数说明如下:
-p 指定生成java文件的package name
-d 生成java文件的存放路径
-all 生成客户端和服务端代码,这里还可以用-client生成客户端,用-server生成服务端,不过实际上区别不大,只要用-all就可以了
最后一个参数就是目标wsdl文件
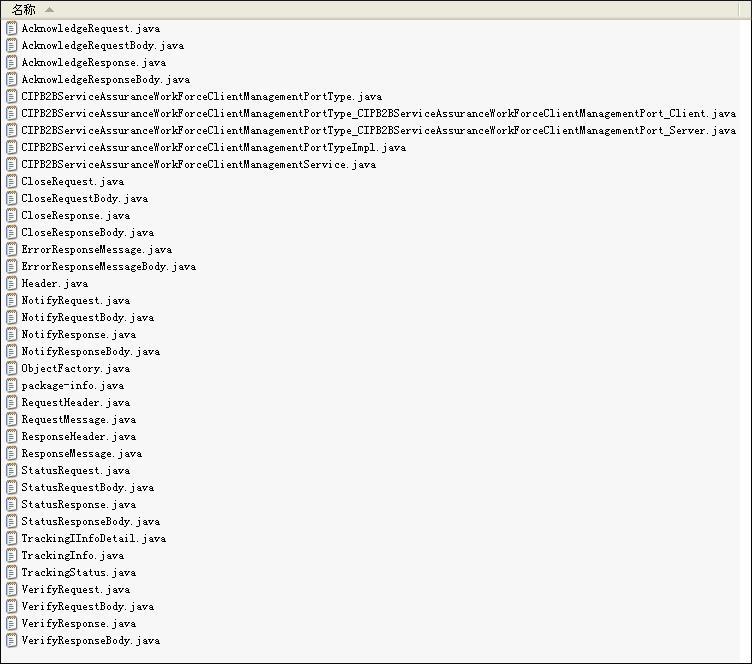
2、查看生成的文件列表,可以看到有以下文件:

大部分都是model类,可以不管。以下文件是比较特殊的:
ObjectFactory.java
package-info.java
这2个文件我也不知道是干嘛的,不过反正是不能删的
以_Client结尾的那个文件,是一个客户端,没有用,可以删除
以_Server结尾的那个文件,是启动服务端(貌似是内置的jetty),没有用,可以删除
以Service结尾的那个文件,不但没有用,还要坏事,因为其中有以下代码:
里面有一个"file:CIP-B2B_ServiceAssuranceWorkForceClientManagement.wsdl",因为这些类是根据一个本地的wsdl文件生成的,但是实际部署的时候一般不会放这个文件,所以在加载cxf配置的时候,是会出错的
实际上试验发现,这个文件可以直接删掉
以PortType结尾的文件,很关键,是接口类
以PortTypeImpl结尾的文件,是接口类的实现类,其中也有一行注解:
要把这里的
删除
所以在用wsdl2java命令生成java类之后,只需要把XXXService.java、XXX_Client.java、XXX_Server.java删除,把XXXPortTypeImpl.java改一下,就能用了
然后如果是要做客户端的话,就把除了XXXPortTypeImpl.java以外的所有文件拷贝到工程里;如果是做服务端的话,就把所有文件拷贝到工程里,然后根据实际情况修改XXXPortTypeImpl.java就可以了
3、最后是cxf的配置文件,这里和http://kyfxbl.iteye.com/blog/1432952提到的方式是一样的,没有区别
首先是服务端:
可以看到,配置方式没有变化,也可以用spring进行依赖注入
然后是客户端:
客户端的配置也是一样的。有一点要注意,好像只能通过getBean("client")拿到实例化的bean,通过@Autowired可能是搞不定的
wsdl2java -p com.huawei.wfm.czekh.webservice.remedy -d ../../src/remedy -all fileName.wsdl
用上面这个命令,就可以根据wsdl文件,生成所需的所有java文件,参数说明如下:
-p 指定生成java文件的package name
-d 生成java文件的存放路径
-all 生成客户端和服务端代码,这里还可以用-client生成客户端,用-server生成服务端,不过实际上区别不大,只要用-all就可以了
最后一个参数就是目标wsdl文件
2、查看生成的文件列表,可以看到有以下文件:

大部分都是model类,可以不管。以下文件是比较特殊的:
ObjectFactory.java
package-info.java
这2个文件我也不知道是干嘛的,不过反正是不能删的
以_Client结尾的那个文件,是一个客户端,没有用,可以删除
以_Server结尾的那个文件,是启动服务端(貌似是内置的jetty),没有用,可以删除
以Service结尾的那个文件,不但没有用,还要坏事,因为其中有以下代码:
- @WebServiceClient(name = "CIP-B2B_ServiceAssuranceWorkForceClientManagementService", wsdlLocation = "file:CIP-B2B_ServiceAssuranceWorkForceClientManagement.wsdl", targetNamespace = "http://cz.o2.com/systems/integrationinfrastructure/CIP-B2B/CIP-B2B_ServiceAssuranceWorkForceClientManagement/1.0")
里面有一个"file:CIP-B2B_ServiceAssuranceWorkForceClientManagement.wsdl",因为这些类是根据一个本地的wsdl文件生成的,但是实际部署的时候一般不会放这个文件,所以在加载cxf配置的时候,是会出错的
实际上试验发现,这个文件可以直接删掉
以PortType结尾的文件,很关键,是接口类
以PortTypeImpl结尾的文件,是接口类的实现类,其中也有一行注解:
- @javax.jws.WebService(
- serviceName = "CIP-B2B_ServiceAssuranceWorkForceClientManagementService",
- portName = "CIP-B2B_ServiceAssuranceWorkForceClientManagementPort",
- targetNamespace = "http://cz.o2.com/systems/integrationinfrastructure/CIP-B2B/CIP-B2B_ServiceAssuranceWorkForceClientManagement/1.0",
- wsdlLocation = "file:CIP-B2B_ServiceAssuranceWorkForceClientManagement.wsdl",
- endpointInterface = "com.huawei.wfm.czekh.webservice.remedy.CIPB2BServiceAssuranceWorkForceClientManagementPortType")
要把这里的
删除
所以在用wsdl2java命令生成java类之后,只需要把XXXService.java、XXX_Client.java、XXX_Server.java删除,把XXXPortTypeImpl.java改一下,就能用了
然后如果是要做客户端的话,就把除了XXXPortTypeImpl.java以外的所有文件拷贝到工程里;如果是做服务端的话,就把所有文件拷贝到工程里,然后根据实际情况修改XXXPortTypeImpl.java就可以了
3、最后是cxf的配置文件,这里和http://kyfxbl.iteye.com/blog/1432952提到的方式是一样的,没有区别
首先是服务端:
- <?xml version="1.0" encoding="UTF-8"?>
- <beans xmlns="http://www.springframework.org/schema/beans"
- xmlns:xsi="http://www.w3.org/2001/XMLSchema-instance" xmlns:context="http://www.springframework.org/schema/context"
- xmlns:jaxws="http://cxf.apache.org/jaxws"
- xsi:schemaLocation="http://www.springframework.org/schema/beans ;
- http://www.springframework.org/schema/beans/spring-beans-3.0.xsd ;
- http://www.springframework.org/schema/context ;
- http://www.springframework.org/schema/context/spring-context-3.0.xsd ;
- http://cxf.apache.org/jaxws ;
- http://cxf.apache.org/schemas/jaxws.xsd">
- <context:component-scan base-package="com.huawei.wfm.czekh" />
- <import resource="classpath:META-INF/cxf/cxf.xml" />
- <import resource="classpath:META-INF/cxf/cxf-extension-soap.xml" />
- <import resource="classpath:META-INF/cxf/cxf-servlet.xml" />
- <jaxws:endpoint id="remedy" implementor="#MyWebserviceServer"
- address="/RemedyWebService" />
- </beans>
- @Component("MyWebserviceServer")
- @WebService(serviceName = "CIP-B2B_ServiceAssuranceWorkForceClientManagementService", portName = "CIP-B2B_ServiceAssuranceWorkForceClientManagementPort", targetNamespace = "http://cz.o2.com/systems/integrationinfrastructure/CIP-B2B/CIP-B2B_ServiceAssuranceWorkForceClientManagement/1.0", endpointInterface = "com.huawei.wfm.czekh.webservice.remedy.CIPB2BServiceAssuranceWorkForceClientManagementPortType")
- public class CIPB2BServiceAssuranceWorkForceClientManagementPortTypeImpl
- implements CIPB2BServiceAssuranceWorkForceClientManagementPortType {
- @Autowired
- private Test test;
- // 省略无关方法
- public AcknowledgeResponse acknowledge(
- AcknowledgeRequest body) {
- test.sayHi("somebody");
- AcknowledgeResponseBody responseBody = new AcknowledgeResponseBody();
- responseBody.setStatus(true);
- responseBody.setErrorDescription("wcnm");
- AcknowledgeResponse result = new AcknowledgeResponse();
- result.setResponseBody(responseBody);
- return result;
- }
- }
可以看到,配置方式没有变化,也可以用spring进行依赖注入
然后是客户端:
- <?xml version="1.0" encoding="UTF-8"?>
- <beans xmlns="http://www.springframework.org/schema/beans"
- xmlns:jaxws="http://cxf.apache.org/jaxws" xmlns:xsi="http://www.w3.org/2001/XMLSchema-instance"
- xsi:schemaLocation="http://www.springframework.org/schema/beans ;
- http://www.springframework.org/schema/beans/spring-beans.xsd ;
- http://cxf.apache.org/jaxws ;
- http://cxf.apache.org/schemas/jaxws.xsd">
- <bean id="propertyConfigurer"
- class="org.springframework.beans.factory.config.PropertyPlaceholderConfigurer">
- <property name="locations">
- <list>
- <value>classpath:webservice_address.properties</value>
- </list>
- </property>
- </bean>
- <jaxws:client id="client"
- serviceClass="com.huawei.wfm.remedy.CIPB2BServiceAssuranceWorkForceClientManagementPortType"
- address="${remedy_address}" />
- </beans>
- public class Main {
- public static void main(String[] args) {
- ApplicationContext context = new ClassPathXmlApplicationContext(
- "cxf.xml");
- CIPB2BServiceAssuranceWorkForceClientManagementPortType client = (CIPB2BServiceAssuranceWorkForceClientManagementPortType) context
- .getBean("client");
- AcknowledgeRequestBody body = new AcknowledgeRequestBody();
- body.setCustSysId("123456");
- AcknowledgeRequest request = new AcknowledgeRequest();
- request.setRequestBody(body);
- AcknowledgeResponse response = client.acknowledge(request);
- String desc = response.getResponseBody().getErrorDescription();
- System.out.println(desc);
- }
- }
客户端的配置也是一样的。有一点要注意,好像只能通过getBean("client")拿到实例化的bean,通过@Autowired可能是搞不定的


 84
84

 被折叠的 条评论
为什么被折叠?


