


Dynamsoft 条码阅读器 Android 版
Dynamsoft Barcode Reader (DBR) SDK Android 版是一款专为 Android 开发人员设计的条形码读取工具。
您既可以通过BarcodeScanner API快速上手,也可以通过基础 API进行高度可定制的开发。此外,DBR 还提供了强大的参数系统,以应对各种场景。
| 使用 BarcodeScanner API 进行开发 | 使用基础 API 进行开发 | |
|---|---|---|
| 代码行数 | 15+行 | 60多行 |
| 用户界面 | 预设 | 完全可定制 |
| 从实时视频解码 | ✔ | ✔ |
| 从图像解码 | 十 | ✔ |
| 性能定制 | ✔ | ✔ |
| 相机控制 | 有限的 | ✔ |
| 中间结果 | 十 | ✔ |
使用 BarcodeScanner API 进行开发
BarcodeScanner是具有以下特征的组件:
- 最少代码:高级 API 仅用一行代码即可实现全部功能。
- 即用型 UI:预先集成的组件和 UI 可实现快速设置。
- 常见的定制:配置对象简化了典型的算法和 UI 设置。
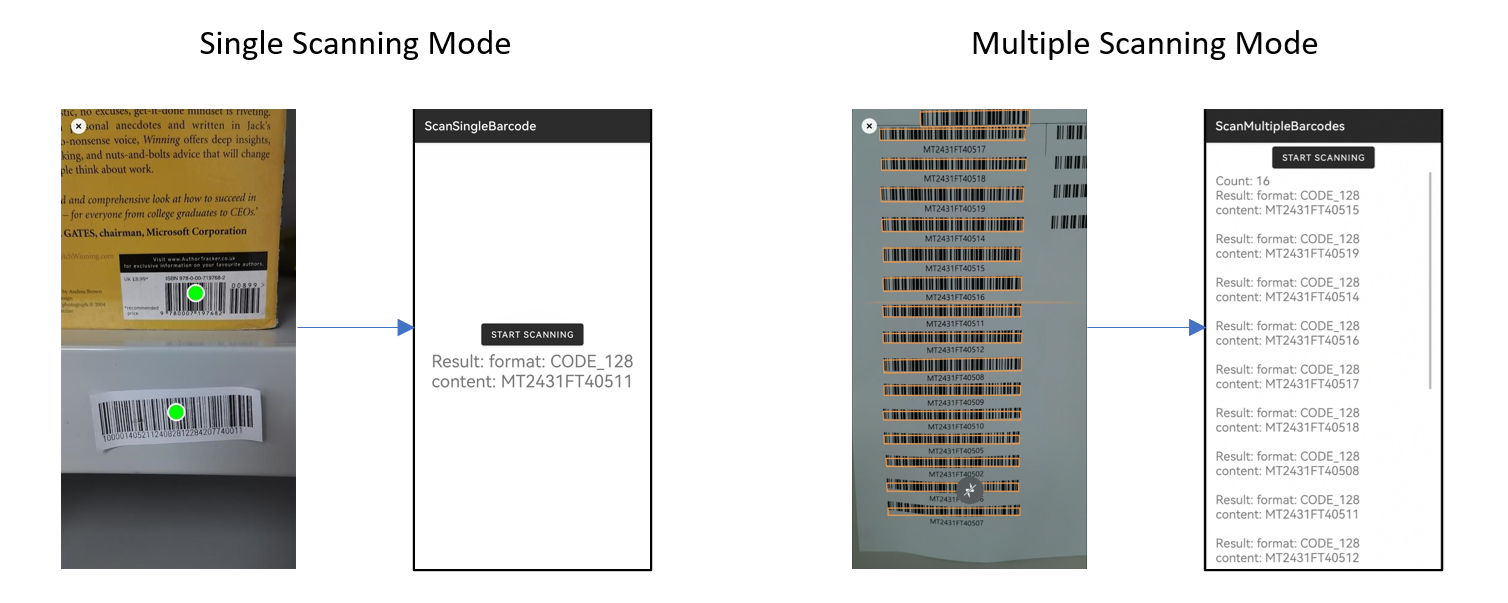
BarcodeScanner支持两种不同的扫描模式
- 单条码扫描模式
- 扫描任意数量的条形码但只返回一个结果。
- 速度优先。
- 要求用户在扫描多个条形码时选择一个作为结果。
- 多种条码扫描模式
- 扫描多个条形码并返回所有扫描结果。
- 读取率优先。
注意:如果您正在寻找扫描大量条形码的解决方案,请参阅BatchBarcodeScanner。它
BatchBarcodeScanner具有更高的扫描大量条形码的能力。它还提供了高度交互的用户界面,方便您预览、编辑、保存、重复使用和共享结果。
使用基础 API 进行开发
如果您正在寻找完全可定制的条形码解码库,欢迎使用基础 API。
系统要求
- 支持的操作系统:Android 5.0(API 级别 21)或更高版本。
- 支持的 ABI:armeabi-v7a、arm64-v8a、x86和x86_64。
- 开发环境:Android Studio 2022.2.1或更高版本。
BarcodeScanner Android User Guide--使用指南
This user guide will walk through the ScanSingleBarcode sample app. When creating your own project, please use this sample as a reference. This guide uses BarcodeScanner API which aim to elevate the UI creation process with less code and offer a more pleasant and intuitive UI for your app.
Note:
This guide aims at scanning a single barcode with the
BarcodeScannercomponent.
- If you have requirement for scanning multiple barcodes, you may refer to the ScanMultipleBarcodes sample or read Enable Multiple Barcode Scanning article.
- If you have more complex customization requirements for the interface, you may refer to the Foundational API Samples or Build your APP with Foundational APIs article.
Requirements
- Supported OS: Android 5.0 (API Level 21) or higher.
- Supported ABI: armeabi-v7a, arm64-v8a, x86 and x86_64.
- Development Environment: Android Studio 2022.2.1 or higher.
Add the SDK
There are two ways in which you can include the dynamsoftbarcodereaderbundle library in your app:
Option 1: Add the Library via Maven
-
Open the file
[App Project Root Path]\settings.gradleand add the Maven repository:- groovy
- kts
-
dependencyResolutionManagement { repositoriesMode.set(RepositoriesMode.FAIL_ON_PROJECT_REPOS) repositories { google() mavenCentral() maven { url "https://download2.dynamsoft.com/maven/aar" } } } -
dependencyResolutionManagement {
   repositoriesMode.set(RepositoriesMode.FAIL_ON_PROJECT_REPOS)
   repositories {
      google()
      mavenCentral()
      maven {
         url = uri("https://download2.dynamsoft.com/maven/aar")
      }
   }
}
Note: If you are using gradle 6.x or older version, the maven dependencies should be configured in
[App Project Root Path]\app\build.gradle -
Open the file
[App Project Root Path]\app\build.gradleand add the dependencies:- groovy
- kts
-
dependencies { implementation 'com.dynamsoft:barcodereaderbundle:11.0.3000' } -
dependencies {
   implementation("com.dynamsoft:barcodereaderbundle:11.0.3000")
}
-
Click Sync Now. After the synchronization is complete, the SDK is added to the project.
Option 2: Add the Libraries via Local .aar Files
-
Download the SDK package from the Dynamsoft Website. After unzipping, several aar files can be found in the Dynamsoft\Libs directory:
- 📄 DynamsoftBarcodeReaderBundle.aar
- 📄 DynamsoftCaptureVisionBundle.aar
-
Copy the above .aar files to the target directory such as [App Project Root Path]\app\libs
-
Open the file
[App Project Root Path]\app\build.gradleand add the reference in the dependencies:- groovy
- kts
-
dependencies { implementation fileTree(dir: 'libs', include: ['*.aar']) def camerax_version = '1.3.4' implementation "androidx.camera:camera-core:$camerax_version" implementation "androidx.camera:camera-camera2:$camerax_version" implementation "androidx.camera:camera-lifecycle:$camerax_version" implementation "androidx.camera:camera-view:$camerax_version" implementation(platform("org.jetbrains.kotlin:kotlin-bom:1.8.0")) } -
val camerax_version = "1.3.4"
dependencies {
   implementation(fileTree(mapOf("dir" to "libs", "include" to listOf("*.aar"))))
   implementation("androidx.camera:camera-core:$camerax_version")
   implementation("androidx.camera:camera-camera2:$camerax_version")
   implementation("androidx.camera:camera-lifecycle:$camerax_version")
   implementation("androidx.camera:camera-view:$camerax_version")
   implementation(platform("org.jetbrains.kotlin:kotlin-bom:1.8.0"))
}
Note:
The camera features require the camerax dependencies.
-
Click Sync Now. After the synchronization is complete, the SDK is added to the project.
Build Your BarcodeScanner APP
Step 1: Create a New Project
The first thing that we are going to do is to create a fresh new project. Here are the steps on how to quickly do that
-
Open Android Studio and select File > New > New Project.
-
Choose the correct template for your project. In this sample, we use Empty Views Activity.
-
When prompted, set your app name to ScanSingleBarcode and set the Save location, Language, and Minimum SDK (we use 21 here).
Note:
- With minSdkVersion set to 21, your app is compatible with more than 99.6% of devices on the Google Play Store (last update: October 2023).
Step 2: Include the Library
Add the SDK to your new project. Please read Add the SDK section for more details.
Step 3: Get Prepare for the Layout File
Open your activity_main.xml and replace it with the following code. In the layout file, we prepared 2 UI elements:
- A “Start Scanning” button for opening the scanner view.
- A
TextViewfor displaying the barcode decoding result.
<?xml version="1.0" encoding="utf-8"?>
<LinearLayout xmlns:android="http://schemas.android.com/apk/res/android"
   android:layout_width="match_parent"
   android:layout_height="match_parent"
   android:gravity="center"
   android:orientation="vertical">

   <Button
      android:id="@+id/btn_navigate"
      android:layout_width="wrap_content"
      android:layout_height="wrap_content"
      android:text="Start Scanning" />

   <TextView
      android:id="@+id/tv_result"
      android:layout_width="wrap_content"
      android:layout_height="wrap_content"
      android:textSize="20sp"
      android:text=""/>
</LinearLayout>
Step 4: Initialize the License
The first step in code configuration is to include a valid license in the BarcodeScannerConfig object, which is used when launching the scanner.
We first start with the package imports and then start implementing the MainActivity class, which starts with some simple Android UI configuration and creating the TextView that will display the results, followed by defining the license via the setLicense method of BarcodeScannerConfig.
- Java
- Kotlin
package com.dynamsoft.scansinglebarcode;
import android.os.Bundle;
import android.widget.TextView;
import com.dynamsoft.dbrbundle.ui.BarcodeScanResult;
import com.dynamsoft.dbrbundle.ui.BarcodeScannerActivity;
import com.dynamsoft.dbrbundle.ui.BarcodeScannerConfig;
import com.dynamsoft.core.basic_structures.DSRect;
import androidx.activity.result.ActivityResultLauncher;
import androidx.annotation.Nullable;
import androidx.appcompat.app.AppCompatActivity;
public class MainActivity extends AppCompatActivity {
   private ActivityResultLauncher<BarcodeScannerConfig> launcher;
   @Override
   protected void onCreate(@Nullable Bundle savedInstanceState) {
      super.onCreate(savedInstanceState);
      setContentView(R.layout.activity_main);
      TextView textView = findViewById(R.id.tv_result);
      BarcodeScannerConfig config = new BarcodeScannerConfig();
      config.setLicense("DLS2eyJvcmdhbml6YXRpb25JRCI6IjIwMDAwMSJ9");
   }
}
package com.dynamsoft.scansinglebarcode import android.os.Bundle import android.view.View import android.widget.TextView import androidx.activity.result.ActivityResultLauncher import androidx.appcompat.app.AppCompatActivity import com.dynamsoft.dbrbundle.ui.BarcodeScanResult import com.dynamsoft.dbrbundle.ui.BarcodeScannerActivity import com.dynamsoft.dbrbundle.ui.BarcodeScannerConfig import com.dynamsoft.core.basic_structures.DSRect class MainActivity : AppCompatActivity() { private lateinit var launcher: ActivityResultLauncher<BarcodeScannerConfig> override fun onCreate(savedInstanceState: Bundle?) { super.onCreate(savedInstanceState) setContentView(R.layout.activity_main) val textView = findViewById<TextView>(R.id.tv_result) val config = BarcodeScannerConfig().apply { license = "DLS2eyJvcmdhbml6YXRpb25JRCI6IjIwMDAwMSJ9" } } }
Note:
- The license string here grants a time-limited free trial which requires network connection to work.
- You can request a 30-day trial license via the Request a Trial License link.
- If you download the Installation Package, it comes with a 30-day trial license by default.
Step 5: Implementing the Barcode Scanner
Now that the Barcode Scanner is configured and the license has been set, it is time to implement the actions (via the launcher) to take when a barcode is scanned. Once the launcher is called, the Barcode Scanner opens the camera and begins the decoding process.
Each result comes with a resultStatus that can be one of RS_FINISHED, RS_CANCELED, or RS_EXCEPTION. The first, RS_FINISHED, indicates that the result has been decoded and is available - while RS_CANCELED indicates that the operation has been halted. If RS_EXCEPTION is the result status, then that means that an error has occurred during the barcode detection process.
Once a barcode is found, the content of the barcode (text result as well as barcode format) is outputted to the TextView object set up earlier. Continuing the code from step 3:
- Java
- Kotlin
public class MainActivity extends AppCompatActivity {
   private ActivityResultLauncher<BarcodeScannerConfig> launcher;
      @Override
      protected void onCreate(@Nullable Bundle savedInstanceState) {
      /* <CONTINUATION OF THE CODE FROM STEP 3> */
      launcher = registerForActivityResult(new BarcodeScannerActivity.ResultContract(), result -> {
         if (result.getResultStatus() == BarcodeScanResult.EnumResultStatus.RS_FINISHED && result.getBarcodes() != null) {
            String content = "Result: format: " + result.getBarcodes()[0].getFormatString() + "\n" + "content: "
               + result.getBarcodes()[0].getText();
            textView.setText(content);
         } else if(result.getResultStatus() == BarcodeScanResult.EnumResultStatus.RS_CANCELED ){
            textView.setText("Scan canceled.");
         }
         if (result.getErrorString() != null && !result.getErrorString().isEmpty()) {
            textView.setText(result.getErrorString());
         }
      });
      findViewById(R.id.btn_navigate).setOnClickListener(v -> launcher.launch(config));
   }
}
class MainActivity : AppCompatActivity() { private lateinit var launcher: ActivityResultLauncher<BarcodeScannerConfig> override fun onCreate(savedInstanceState: Bundle?) { launcher = registerForActivityResult(BarcodeScannerActivity.ResultContract()) { result -> if (result.resultStatus == BarcodeScanResult.EnumResultStatus.RS_FINISHED && result.barcodes != null) { val content = """ Result: format: ${result.barcodes[0].formatString} content: ${result.barcodes[0].text} """.trimIndent() textView.text = content } else if (result.resultStatus == BarcodeScanResult.EnumResultStatus.RS_CANCELED) { textView.text = "Scan canceled." } if (result.errorString != null && result.errorString.isNotEmpty()) { textView.text = result.errorString } } findViewById<View>(R.id.btn_navigate).setOnClickListener { launcher.launch(config) } } }
Step 6: Configure the Barcode Scanner (optional)
This next step, although optional, is highly recommended to help achieve a more smooth-looking and intuitive UI. In this setup we will configure the visibility of the torch button as well as the close button. In addition, a scan region will be defined that will limit the reading region of the Barcode Scanner to the specified dimensions. To do this, we are going back to the BarcodeScannerConfig object we used to define the license, and will make use of some of the other parameters available in the BarcodeScannerConfig class.
- Java
- Kotlin
import com.dynamsoft.dbr.EnumBarcodeFormat
public class MainActivity extends AppCompatActivity {
   private ActivityResultLauncher<BarcodeScannerConfig> launcher;
   @Override
   protected void onCreate(@Nullable Bundle savedInstanceState) {
      /* CONTINUATION OF THE CODE FROM STEP 3 */
      BarcodeScannerConfig config = new BarcodeScannerConfig();
      config.setLicense("DLS2eyJvcmdhbml6YXRpb25JRCI6IjIwMDAwMSJ9");
      // You can use the following code to specify the barcode format. If you are using a template file, the "BarcodeFormat" can also be specified via the template file.
      config.setBarcodeFormats(EnumBarcodeFormat.BF_ONED | EnumBarcodeFormat.BF_QR_CODE);
      // If you have a customized template file, please put it under "src\main\assets\Templates\" and call the following code.
      config.setTemplateFile("ReadSingleBarcode.json");
      // The following settings will display a scan region on the view. Only the barcode in the scan region can be decoded.
      config.setScanRegion(new DSRect(0.15f, 0.25f, 0.85f, 0.65f, true));
      // The following code enables the beep sound when a barcode is scanned.
      config.setBeepEnabled = true
      // The following code controls whether to display a torch button.
      config.setTorchButtonVisible(true);
      // The following code controls whether to display a close button.
      config.setCloseButtonVisible(true);
      // The following code controls whether to display the scan laser.
      config.setScanLaserVisible(true);
      /* CONTINUATION OF THE CODE FROM STEP 4 */
   }
}
import com.dynamsoft.dbr.EnumBarcodeFormat class MainActivity : AppCompatActivity() { private lateinit var launcher: ActivityResultLauncher<BarcodeScannerConfig> override fun onCreate(savedInstanceState: Bundle?) { /* CONTINUATION OF THE CODE FROM STEP 3 */ val config = BarcodeScannerConfig().apply { license = "DLS2eyJvcmdhbml6YXRpb25JRCI6IjIwMDAwMSJ9"; // You can use the following code to specify the barcode format. If you are using a template file, the "BarcodeFormat" can also be specified via the template file. barcodeFormats = EnumBarcodeFormat.BF_ONED or EnumBarcodeFormat.BF_QR_CODE // If you have a customized template file, please put it under "src\main\assets\Templates\" and call the following code. templateFile = "ReadSingleBarcode.json" // The following settings will display a scan region on the view. Only the barcode in the scan region can be decoded. scanRegion = DSRect(0.15f, 0.3f, 0.85f, 0.7f, true) // Add the following line to disable the beep sound. isBeepEnabled = false // Add the following line if you don't want to display the torch button. isTorchButtonVisible = false // Add the following line if you don't want to display the close button. isCloseButtonVisible = false // Add the following line if you want to hide the scan laser. isScanLaserVisible = false // Add the following line if you want the camera to auto-zoom when the barcode is far away. isAutoZoomEnabled = true } /* CONTINUATION OF THE CODE FROM STEP 4 */ } }
Step 7: Run the Project
Now that the code has been written and the project complete, it’s time to run the project. During setup, all of the gradle settings should have already been configured for you, so pretty much all you need to do now is to connect a physical Android device, select the proper configuration, and click Run.
Conclusion
Now that your BarcodeScanner project is up and running you should be able to see a clean and simplified UI that contains all the necessary UI elements that are needed to make the barcode scanning process as easy and intuitive for the user as it can be.


 被折叠的 条评论
为什么被折叠?
被折叠的 条评论
为什么被折叠?
 到【灌水乐园】发言


