


原帖:http://my.oschina.net/jsk/blog/77652
一、安装beanstalkd
切换到 root用户下:
yum install libevent libevent-devel
所有版本地址: https://github.com/kr/beanstalkd/downloads
下载地址:
wget http://cloud.github.com/downloads/kr/beanstalkd/beanstalkd-1.4.6.tar.gz (或附件的beanstalkd-1.4.6.tar.gz)
解压:
tar xzf beanstalkd-1.4.6.tar.gz
cd beanstalkd-1.4.6
./configure
make
make install
默认安装路径 :/usr/local/bin/
查看版本:
/usr/local/bin/beanstalkd -v
1.4.6
添加用户组:
groupadd beanstalkd
添加用户:
adduser -M -g beanstalkd -s /sbin/nologin beanstalkd
添加启动脚本,放入 /etc/init.d/ 目录下
#!/bin/sh
#
# beanstalkd - a simple, fast workqueue service
#
# chkconfig:   - 57 47
# description: a simple, fast workqueue service
# processname:  beanstalkd
# config:       /etc/sysconfig/beanstalkd
#

### BEGIN INIT INFO
# Provides: beanstalkd
# Required-Start: $local_fs $network $remote_fs
# Required-Stop: $local_fs $network $remote_fs
# Default-Stop: 0 1 2 6
# Short-Description: start and stop beanstalkd
# Description: a simple, fast work-queue service
### END INIT INFO

# Source function library.
. /etc/rc.d/init.d/functions

# Source networking configuration.
. /etc/sysconfig/network

# Check that networking is up.
[ "$NETWORKING" = "no" ] && exit
exec="/usr/local/bin/beanstalkd"
prog=$(basename $exec)

# default options, overruled by items in sysconfig
BEANSTALKD_ADDR=127.0.0.1
BEANSTALKD_PORT=11300
BEANSTALKD_USER=beanstalkd

[ -e /etc/sysconfig/beanstalkd ] && . /etc/sysconfig/beanstalkd

lockfile=/var/lock/subsys/beanstalkd

start() {
    [ -x $exec ] || exit 5
    echo -n $"Starting $prog: "
    # if not running, start it up here, usually something like "daemon $exec"
    options="-l ${BEANSTALKD_ADDR} -p ${BEANSTALKD_PORT} -u ${BEANSTALKD_USER}"
    if [ "${BEANSTALKD_MAX_JOB_SIZE}" != ""  ]; then
        options="${options} -z ${BEANSTALKD_MAX_JOB_SIZE}"
    fi

    if [ "${BEANSTALKD_BINLOG_DIR}" != "" ]; then
        if [ ! -d "${BEANSTALKD_BINLOG_DIR}" ]; then
            echo "Creating binlog directory (${BEANSTALKD_BINLOG_DIR})"
            mkdir -p ${BEANSTALKD_BINLOG_DIR} && chown ${BEANSTALKD_USER}:${BEANSTALKD_USER} ${BEANSTALKD_BINLOG_DIR}
        fi
        options="${options} -b ${BEANSTALKD_BINLOG_DIR}"
        if [ "${BEANSTALKD_BINLOG_FSYNC_PERIOD}" != "" ]; then
            options="${options} -f ${BEANSTALKD_BINLOG_FSYNC_PERIOD}"
        else
            options="${options} -F"
        fi
        if [ "${BEANSTALKD_BINLOG_SIZE}" != "" ]; then
            options="${options} -s ${BEANSTALKD_BINLOG_SIZE}"
        fi
    fi

    daemon $exec -d $options
    retval=$?
    echo
    [ $retval -eq 0 ] && touch $lockfile
    return $retval
}

stop() {
    echo -n $"Stopping $prog: "
    # stop it here, often "killproc $prog"
    killproc $prog -INT
    retval=$?
    echo
    [ $retval -eq 0 ] && rm -f $lockfile
    return $retval
}

restart() {
    stop
    start
}

reload() {
    restart
}

force_reload() {
    restart
}

rh_status() {
    # run checks to determine if the service is running or use generic status
    status $prog
}

rh_status_q() {
    rh_status >/dev/null 2>&1
}


case "$1" in
    start)
        rh_status_q && exit 0
        $1
        ;;
    stop)
        rh_status_q || exit 0
        $1
        ;;
    restart)
        $1
        ;;
    reload)
        rh_status_q || exit 7
        $1
        ;;
    force-reload)
        force_reload
        ;;
    status)
        rh_status
        ;;
    condrestart|try-restart)
        rh_status_q || exit 0
        restart
        ;;
    *)
        echo $"Usage: $0 {start|stop|status|restart|condrestart|try-restart|reload|force-reload}"
        exit 2
esac
exit $?
chmod 755 /etc/init.d/beanstalkd
加入开机启动:
chkconfig beanstalkd on
启动:
service beanstalkd start
安装完毕
--- 备注:
1.8以后版本,只需要 执行 (没有 configure这一步)
make
make install
二、PHP demo
原文:http://xiaodi667.iteye.com/blog/1413840
建议采用源码的方式,不用扩展的方式。
http://sourceforge.net/projects/beanstalk/ 下载php客户端代码
(或附件的 beanstalk-php-1.2.1.tar.gz)
<?php
require('./BeanStalk.class.php');

$beanstalk = BeanStalk::open(array(
        'servers'       => array( '127.0.0.1:11300' ),
        'select'        => 'random peek'
    ));

$beanstalk->use_tube('foo');

$beanstalk->put(0,0, 120, 'say hello world');

$beanstalk->watch('foo');

$job = $beanstalk->reserve_with_timeout();

$aa= $job->get();                                   // Output: 'say hello world'

Beanstalk::delete($job);
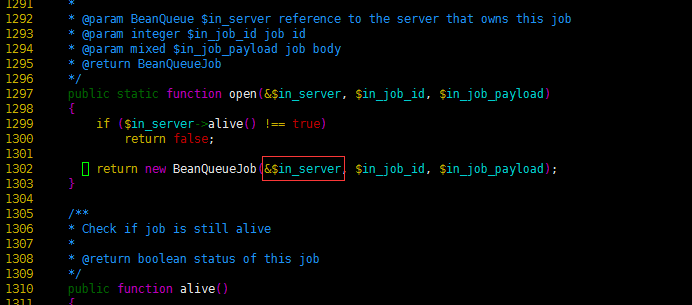
注:在高版本的php中,BeanStalk.class.php会报错

修改 BeanStalk.class.php 的第 1302 行,如图去掉$in_server前的&即可
三、后台常驻php进程demo
测试数据为json:{"userName":"testUser","userAge":32,"userAddress":"china"}
<?php
set_time_limit(0);

require('./BeanStalk.class.php');

$beanstalk = BeanStalk::open(array(
        'servers'       => array( '127.0.0.1:11300' ),
        'select'        => 'random peek'
));

while(true){

        $beanstalk->watch('foo');

        $job = $beanstalk->reserve_with_timeout();

        is_object($job) && $aa = $job->get();

        if (is_object($job) && isset($aa) &&  !empty($aa)){

                $aa = json_decode($aa, true);

                $con = mysql_connect("localhost", "root", "123456");

                if (!$con){
                  die('Could not connect: ' . mysql_error());
                }

                $db_selected = mysql_select_db("test",$con);
                $sql = "INSERT INTO user (userName, userAge, userAddress) VALUES ('{$aa['userName']}',{$aa['userAge']}, '{$aa['userAddress']}')";

                $result = mysql_query($sql,$con);

                mysql_close($con);

                unset($aa);

                Beanstalk::delete($job);


        }

        sleep(2);
}
附件:


 555
555

 被折叠的 条评论
为什么被折叠?
被折叠的 条评论
为什么被折叠?
 到【灌水乐园】发言


