


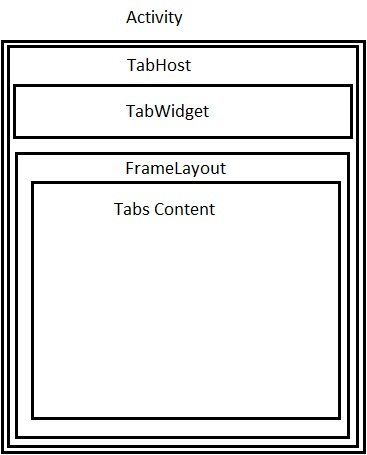
有时,我们想在一个window中显示多个视图,这时就需要用到Tab容器。在Android里它叫TabHost。
使用TabHost有两种方式:
- 在相同的activity中使用TabHost导航多个视图
- 使用TabHost导航多个Activity(通过intents)
- <?xml version="1.0" encoding="utf-8"?>
- <TabHost android:layout_width="fill_parent"
- android:layout_height="fill_parent"
- android:id="@+id/tabHost"
- xmlns:android="http://schemas.android.com/apk/res/android"
- >
- <TabWidget
- android:layout_width="fill_parent"
- android:layout_height="wrap_content"
- android:id="@android:id/tabs"
- />
- <FrameLayout
- android:layout_width="fill_parent"
- android:layout_height="fill_parent"
- android:id="@android:id/tabcontent"
- >
- <LinearLayout
- android:layout_width="fill_parent"
- android:layout_height="wrap_content"
- android:id="@+id/tab1"
- android:orientation="vertical"
- android:paddingTop="60px"
- >
- <TextView
- android:layout_width="fill_parent"
- android:layout_height="100px"
- android:text="This is tab1"
- android:id="@+id/txt1"
- />
- </LinearLayout>
- <LinearLayout
- android:layout_width="fill_parent"
- android:layout_height="fill_parent"
- android:id="@+id/tab2"
- android:orientation="vertical"
- android:paddingTop="60px"
- >
- <TextView
- android:layout_width="fill_parent"
- android:layout_height="100px"
- android:text="This is tab 2"
- android:id="@+id/txt2"
- />
- </LinearLayout>
- <LinearLayout
- android:layout_width="fill_parent"
- android:layout_height="fill_parent"
- android:id="@+id/tab3"
- android:orientation="vertical"
- android:paddingTop="60px"
- >
- <TextView
- android:layout_width="fill_parent"
- android:layout_height="100px"
- android:text="This is tab 3"
- android:id="@+id/txt3"
- />
- </LinearLayout>
- </FrameLayout>
- </TabHost>
- public void onCreate(Bundle savedInstanceState) {
- super.onCreate(savedInstanceState);
- setContentView(R.layout.main);
- TabHost tabHost=(TabHost)findViewById(R.id.tabHost);
- tabHost.setup();
- TabSpec spec1=tabHost.newTabSpec("Tab 1");
- spec1.setContent(R.id.tab1);
- spec1.setIndicator("Tab 1");
- TabSpec spec2=tabHost.newTabSpec("Tab 2");
- spec2.setIndicator("Tab 2");
- spec2.setContent(R.id.tab2);
- TabSpec spec3=tabHost.newTabSpec("Tab 3");
- spec3.setIndicator("Tab 3");
- spec3.setContent(R.id.tab3);
- tabHost.addTab(spec1);
- tabHost.addTab(spec2);
- tabHost.addTab(spec3);
- }
- 这里通过TabSpecs类创建Tab
- 使用setIndicator方法设置tab的文字
- 使用setContent设置tab的内容
- 如果你使用TabActivity作为你的Activity的基类,你不用调用TabHost.Setup()方法。

- TabSpec spec1=tabHost.newTabSpec("Tab 1");
- spec1.setContent(R.id.tab1);
- TextView txt=new TextView(this);
- txt.setText("Tab 1");
- txt.setBackgroundColor(Color.RED);
- spec1.setIndicator(txt);
设置tab的内容
- <?xml version="1.0" encoding="utf-8"?>
- <TabHost android:layout_width="fill_parent"
- android:layout_height="fill_parent"
- android:id="@android:id/tabhost"
- xmlns:android="http://schemas.android.com/apk/res/android"
- >
- <TabWidget
- android:layout_width="fill_parent"
- android:layout_height="wrap_content"
- android:id="@android:id/tabs"
- />
- <FrameLayout
- android:layout_width="fill_parent"
- android:layout_height="fill_parent"
- android:id="@android:id/tabcontent"
- >
- </FrameLayout>
- </TabHost>
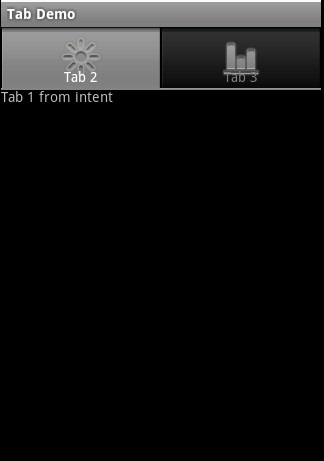
Activity:
- public class TabDemo extends TabActivity {
- /** Called when the activity is first created. */
- @Override
- public void onCreate(Bundle savedInstanceState) {
- super.onCreate(savedInstanceState);
- setContentView(R.layout.main);
- TabHost tabHost=getTabHost();
- // no need to call TabHost.Setup()
- //First Tab
- TabSpec spec1=tabHost.newTabSpec("Tab 1");
- spec1.setIndicator("Tab 1",getResources().getDrawable(R.drawable.sun));
- Intent in1=new Intent(this, Act1.class);
- spec1.setContent(in1);
- TabSpec spec2=tabHost.newTabSpec("Tab 2");
- spec2.setIndicator("Tab 2",getResources().getDrawable(R.drawable.chart));
- Intent in2=new Intent(this,Act2.class);
- spec2.setContent(in2);
- tabHost.addTab(spec2);
- tabHost.addTab(spec3);
- }
- }
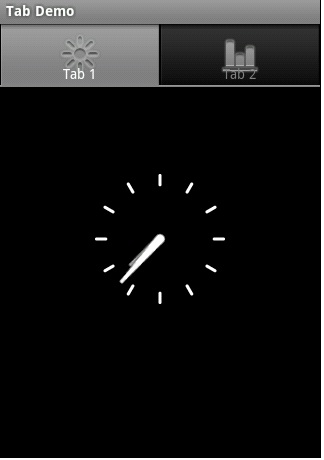
- <span style="white-space:pre"> </span>TabSpec spec1=tabHost.newTabSpec("Tab 1");
- spec1.setIndicator("Tab 1",getResources().getDrawable(R.drawable.sun));
- spec1.setContent(new TabContentFactory() {
- <span style="white-space:pre"> </span> @Override
- <span style="white-space:pre"> </span> public View createTabContent(String tag) {
- <span style="white-space:pre"> </span> // TODO Auto-generated method stub
- <span style="white-space:pre"> </span> return (new AnalogClock(TabDemo.this));
- <span style="white-space:pre"> </span> }
- <span style="white-space:pre"> </span> });
菜单是用户界面中最常见的元素之一,使用非常频繁,在Android中,菜单被分为如下三种,选项菜单(OptionsMenu)、上下文菜单(ContextMenu)和子菜单(SubMenu),今天这讲是OptionsMenu
一、概述
public boolean onCreateOptionsMenu(Menu menu):使用此方法调用OptionsMenu 。
public boolean onOptionsItemSelected(MenuItem item):选中菜单项后发生的动作。
public void onOptionsMenuClosed(Menu menu):菜单关闭后发生的动作。
public boolean onPrepareOptionsMenu(Menu menu):选项菜单显示之前onPrepareOptionsMenu方法会被调用,你可以用此方法来根据打当时的情况调整菜单。
public boolean onMenuOpened(int featureId, Menu menu):单打开后发生的动作。
二、默认样式
默认样式是在屏幕底部弹出一个菜单,这个菜单我们就叫他选项菜单OptionsMenu,一般情况下,选项菜单最多显示2排每排3个菜单项,这些菜单项有文字有图标,也被称作Icon Menus,如果多于6项,从第六项开始会被隐藏,在第六项会出现一个More里,点击More才出现第六项以及以后的菜单项,这些菜单项也被称作Expanded Menus。下面介绍。
 1.main.xml
2。重载onCreateOptionsMenu(Menu menu)方法
重载onCreateOptionsMenu(Menu menu)方法,并在此方法中添加菜单项,最后返回true,如果false,菜单则不会显示。
public boolean onCreateOptionsMenu(Menu menu)
3。为菜单项注册事件
使用onOptionsItemSelected(MenuItem item)方法为菜单项注册事件
public boolean onOptionsItemSelected(MenuItem item)
4。其他按需要重载
完整代码
DefaultMenu
5.效果浏览

三、自定义样式
1.gridview_menu.xml
首先自定义菜单界面,我是GridView来包含菜单项,4列3行
2.item_menu.xml
菜单项的现实样式,一个图标和一个文字。
3.定义
代码
4.public boolean onMenuOpened(int featureId, Menu menu)
如果第一次打开则设置视图,否则直接显示menuDialog视图。
5.private SimpleAdapter getMenuAdapter(String[] menuNameArray,
为菜单添加菜单项。

     @Override


     public

      boolean onCreateOptionsMenu(Menu menu) {
        menu.add(

     "

     menu

     "

     );

     //

      必须创建一项


     return

      super.onCreateOptionsMenu(menu);
    }

     @Override


     protected


     void

      onCreate(Bundle savedInstanceState) {


     //

      TODO Auto-generated method stub


             super.onCreate(savedInstanceState);

        setContentView(R.layout.main);

        menuView

     =

      View.inflate(

     this

     , R.layout.gridview_menu,

     null

     );


     //

      创建AlertDialog


             menuDialog

     =


     new

      AlertDialog.Builder(

     this

     ).create();
        menuDialog.setView(menuView);
        menuDialog.setOnKeyListener(

     new

      OnKeyListener() {


     public

      boolean onKey(DialogInterface dialog,

     int

      keyCode,
                    KeyEvent

     event

     ) {


     if

      (keyCode

     ==

      KeyEvent.KEYCODE_MENU)

     //

      监听按键


                         dialog.dismiss();


     return


     false

     ;
            }
        });

        menuGrid

     =

      (GridView) menuView.findViewById(R.id.gridview);
        menuGrid.setAdapter(getMenuAdapter(menu_name_array, menu_image_array));


     /*

     * 监听menu选项 *

     */


        menuGrid.setOnItemClickListener(

     new

      OnItemClickListener() {


     public


     void

      onItemClick(AdapterView

     <?>

      arg0, View arg1,

     int

      arg2,


     long

      arg3) {


     switch

      (arg2) {


     case

      ITEM_SEARCH:

     //

      搜索


     break

     ;


     case

      ITEM_FILE_MANAGER:

     //

      文件管理


     break

     ;


     case

      ITEM_DOWN_MANAGER:

     //

      下载管理


     break

     ;


     case

      ITEM_FULLSCREEN:

     //

      全屏


     break

     ;


     case

      ITEM_MORE:

     //

      翻页


     if

      (isMore) {
                        menuGrid.setAdapter(getMenuAdapter(menu_name_array2,
                                menu_image_array2));
                        isMore

     =


     false

     ;
                    }

     else

      {

     //

      首页


                             menuGrid.setAdapter(getMenuAdapter(menu_name_array,
                                menu_image_array));
                        isMore

     =


     true

     ;
                    }
                    menuGrid.invalidate();

     //

      更新menu


                         menuGrid.setSelection(ITEM_MORE);


     break

     ;
                }


            }
        });
    }
     package com.wjq.menu;


import java.util.ArrayList;
import java.util.HashMap;

import android.app.Activity;
import android.app.AlertDialog;
import android.content.DialogInterface;
import android.content.DialogInterface.OnKeyListener;
import android.os.Bundle;
import android.view.KeyEvent;
import android.view.Menu;
import android.view.View;
import android.widget.AdapterView;
import android.widget.GridView;
import android.widget.SimpleAdapter;
import android.widget.AdapterView.OnItemClickListener;


     public


     class

      CustomizeMenu extends Activity {


     private

      boolean isMore

     =


     false

     ;

     //

      menu菜单翻页控制


         AlertDialog menuDialog;

     //

      menu菜单Dialog


         GridView menuGrid;
    View menuView;


     private

      final

     int

      ITEM_SEARCH

     =


     0

     ;

     //

      搜索


     private

      final

     int

      ITEM_FILE_MANAGER

     =


     1

     ;

     //

      文件管理


     private

      final

     int

      ITEM_DOWN_MANAGER

     =


     2

     ;

     //

      下载管理


     private

      final

     int

      ITEM_FULLSCREEN

     =


     3

     ;

     //

      全屏


     private

      final

     int

      ITEM_MORE

     =


     11

     ;

     //

      菜单


     /*

     * 菜单图片 *

     */


     int

     [] menu_image_array

     =

      { R.drawable.menu_search,
            R.drawable.menu_filemanager, R.drawable.menu_downmanager,
            R.drawable.menu_fullscreen, R.drawable.menu_inputurl,
            R.drawable.menu_bookmark, R.drawable.menu_bookmark_sync_import,
            R.drawable.menu_sharepage, R.drawable.menu_quit,
            R.drawable.menu_nightmode, R.drawable.menu_refresh,
            R.drawable.menu_more };


     /*

     * 菜单文字 *

     */


    String[] menu_name_array

     =

      {

     "

     搜索

     "

     ,

     "

     文件管理

     "

     ,

     "

     下载管理

     "

     ,

     "

     全屏

     "

     ,

     "

     网址

     "

     ,

     "

     书签

     "

     ,


     "

     加入书签

     "

     ,

     "

     分享页面

     "

     ,

     "

     退出

     "

     ,

     "

     夜间模式

     "

     ,

     "

     刷新

     "

     ,

     "

     更多

     "

      };


     /*

     * 菜单图片2 *

     */


     int

     [] menu_image_array2

     =

      { R.drawable.menu_auto_landscape,
            R.drawable.menu_penselectmodel, R.drawable.menu_page_attr,
            R.drawable.menu_novel_mode, R.drawable.menu_page_updown,
            R.drawable.menu_checkupdate, R.drawable.menu_checknet,
            R.drawable.menu_refreshtimer, R.drawable.menu_syssettings,
            R.drawable.menu_help, R.drawable.menu_about, R.drawable.menu_return };


     /*

     * 菜单文字2 *

     */


    String[] menu_name_array2

     =

      {

     "

     自动横屏

     "

     ,

     "

     笔选模式

     "

     ,

     "

     阅读模式

     "

     ,

     "

     浏览模式

     "

     ,

     "

     快捷翻页

     "

     ,


     "

     检查更新

     "

     ,

     "

     检查网络

     "

     ,

     "

     定时刷新

     "

     ,

     "

     设置

     "

     ,

     "

     帮助

     "

     ,

     "

     关于

     "

     ,

     "

     返回

     "

      };
    @Override


     protected


     void

      onCreate(Bundle savedInstanceState) {


     //

      TODO Auto-generated method stub


             super.onCreate(savedInstanceState);

        setContentView(R.layout.main);

        menuView

     =

      View.inflate(

     this

     , R.layout.gridview_menu,

     null

     );


     //

      创建AlertDialog


             menuDialog

     =


     new

      AlertDialog.Builder(

     this

     ).create();
        menuDialog.setView(menuView);
        menuDialog.setOnKeyListener(

     new

      OnKeyListener() {


     public

      boolean onKey(DialogInterface dialog,

     int

      keyCode,
                    KeyEvent

     event

     ) {


     if

      (keyCode

     ==

      KeyEvent.KEYCODE_MENU)

     //

      监听按键


                         dialog.dismiss();


     return


     false

     ;
            }
        });

        menuGrid

     =

      (GridView) menuView.findViewById(R.id.gridview);
        menuGrid.setAdapter(getMenuAdapter(menu_name_array, menu_image_array));


     /*

     * 监听menu选项 *

     */


        menuGrid.setOnItemClickListener(

     new

      OnItemClickListener() {


     public


     void

      onItemClick(AdapterView

     <?>

      arg0, View arg1,

     int

      arg2,


     long

      arg3) {


     switch

      (arg2) {


     case

      ITEM_SEARCH:

     //

      搜索


     break

     ;


     case

      ITEM_FILE_MANAGER:

     //

      文件管理


     break

     ;


     case

      ITEM_DOWN_MANAGER:

     //

      下载管理


     break

     ;


     case

      ITEM_FULLSCREEN:

     //

      全屏


     break

     ;


     case

      ITEM_MORE:

     //

      翻页


     if

      (isMore) {
                        menuGrid.setAdapter(getMenuAdapter(menu_name_array2,
                                menu_image_array2));
                        isMore

     =


     false

     ;
                    }

     else

      {

     //

      首页


                             menuGrid.setAdapter(getMenuAdapter(menu_name_array,
                                menu_image_array));
                        isMore

     =


     true

     ;
                    }
                    menuGrid.invalidate();

     //

      更新menu


                         menuGrid.setSelection(ITEM_MORE);


     break

     ;
                }


            }
        });
    }
    @Override


     public

      boolean onCreateOptionsMenu(Menu menu) {
        menu.add(

     "

     menu

     "

     );

     //

      必须创建一项


     return

      super.onCreateOptionsMenu(menu);
    }


     private

      SimpleAdapter getMenuAdapter(String[] menuNameArray,


     int

     [] imageResourceArray) {
        ArrayList

     <

     HashMap

     <

     String, Object

     >>

      data

     =


     new

      ArrayList

     <

     HashMap

     <

     String, Object

     >>

     ();


     for

      (

     int

      i

     =


     0

     ; i

     <

      menuNameArray.length; i

     ++

     ) {
            HashMap

     <

     String, Object

     >

      map

     =


     new

      HashMap

     <

     String, Object

     >

     ();
            map.put(

     "

     itemImage

     "

     , imageResourceArray[i]);
            map.put(

     "

     itemText

     "

     , menuNameArray[i]);
            data.add(map);
        }
        SimpleAdapter simperAdapter

     =


     new

      SimpleAdapter(

     this

     , data,
                R.layout.item_menu,

     new

      String[] {

     "

     itemImage

     "

     ,

     "

     itemText

     "

      },


     new


     int

     [] { R.id.item_image, R.id.item_text });


     return

      simperAdapter;
    }
    @Override


     public

      boolean onMenuOpened(

     int

      featureId, Menu menu) {


     if

      (menuDialog

     ==


     null

     ) {
            menuDialog

     =


     new

      AlertDialog.Builder(

     this

     ).setView(menuView).show();
        }

     else

      {
            menuDialog.show();
        }


     return


     false

     ;

     //

      返回为true 则显示系统menu


         }

}
原代码下载点击这里
效果浏览


 430
430

 被折叠的 条评论
为什么被折叠?
被折叠的 条评论
为什么被折叠?
 到【灌水乐园】发言


