


演示地址 http://gblog-revel.herokuapp.com/
1.首页
好,我用revel new GBlog 建了我们的项目。
在设计之前(为什么总是设计,没有结果没有动力啊),我们先来做点东西。将public/css/bootstrap.css删了换成bootstrap3(因为它给我们生成的是2,我喜欢用3,不能说喜欢,而是正在用3,你也可以继续使用2哦!可能样式有点不一样而已。),在public/css/新建一个我们的样式:style.css,,添加内容:
body{
	margin: 0 auto;
	padding: 0;
	background: url('../img/section_bg.png');
	font: 14px "Hiragino Sans GB", "Microsoft YaHei", Arial, sans-serif;
	line-height: 20px;
	letter-spacing: 0.02em;
	color: #666;
	background-attachment:fixed;
}
a{
	color: #1abc9c;
	text-decoration: none;
	-webkit-transition: 0.25s;
	-moz-transition: 0.25s;
	-o-transition: 0.25s;
	transition: 0.25s;
	-webkit-backface-visibility: hidden;
}
.main-nav{
	margin: 0 auto;
	width: 692px;
	padding:0;
}
.top-bar{
	width:100%;
	background: #34495e;
	border-bottom-right-radius: 6px;
	border-bottom-left-radius: 6px;
	box-shadow:  0 2px rgba(0,0,0,0.075),0 0 6px #7aba7b;
	-webkit-box-shadow:0 2px  rgba(0,0,0,0.075),0 0 6px #7aba7b;
	-moz-box-shadow:0 2px  rgba(0,0,0,0.075),0 0 6px #7aba7b;
	margin-bottom:28px;
}
.top-bar-inner{
	min-height: 48px;
	padding:0 4px;
}
.ul-nav{
	position: relative;
	left: 0;
	display: block;
	float: left;
	margin: 0 10px 0 0;
	list-style: none;
	font-size: 18px;
	padding:0;
}
.ul-nav>li {
	position: relative;
	float: left;
	line-height: 20px;
}
.ul-nav>li>a{
	padding: 14px 24px 17px;
	text-decoration: none;
	display: block;
	color: white;
	text-shadow: 0 -1px 0 rgba(0,0,0,0.25);
}
.ul-nav>li>a:hover,.ul-nav>li>a:focus{
	color: #1abc9c;
}
.navbar-news {
	background-color: #e74c3c;
	border-radius: 30px;
	color: white;
	display: block;
	font-size: 12px;
	font-weight: 500;
	line-height: 18px;
	min-width: 8px;
	padding: 0 5px;
	position: absolute;
	right: -7px;
	text-align: center;
	text-shadow: none;
	top: 8px;
	z-index: 10;
}
.ul-nav .active > a, .ul-nav .active > a:hover, .ul-nav .active > a:focus {
  background-color: transparent;
  color: #1abc9c;
  -webkit-box-shadow: none;
  -moz-box-shadow: none;
  box-shadow: none;
}
.cell{
	background-color:#1bc6a5;
	color: #cff3ec;
	font-size: 15px;
	border-radius: 4px;
	-webkit-border-radius: 4px;
	-moz-border-radius: 4px;
	-o-border-radius: 4px;
	-khtml-border-radius: 4px;
	padding: 18px 20px 0px 20px;
	margin-bottom: 30px;
	box-shadow: 0 1px 1px rgba(0, 0, 0, 0.2);

}
.cell-subject{
	margin: 0;
}
.cell-subject-title{
	color: #34495e;
	font-size: 24px;
	font-weight: 700;
	text-decoration: none;
}
a.cell-subject-title:hover{
	text-decoration: underline;
}
.subject-infor{
	color:#34495e;
	line-height: 19px;
	padding: 2px 0;
	font-size: 13px;
	margin:2px 0;
}
.cell-text{
	padding: 4px 0;
	word-break: break-all;
}
.comment-num{
	float:right;
	border: 5px solid #d7dce0;
	border-radius: 50px;
	font-size: 14px;
	line-height: 16px;
	padding: 0 4px;
	-webkit-transition: background 0.2s ease-out, border-color 0s ease-out, color 0.2s ease-out;
	-moz-transition: background 0.2s ease-out, border-color 0s ease-out, color 0.2s ease-out;
	-o-transition: background 0.2s ease-out, border-color 0s ease-out, color 0.2s ease-out;
	transition: background 0.2s ease-out, border-color 0s ease-out, color 0.2s ease-out;
	-webkit-backface-visibility: hidden;
	background-color: white;
	border-color: white;
	border-width: 2px;
	color: #BBB6B6;
}
恩其中的背景图片,太小了,上传上来也看不清除,大家自己找一个或者不用也行。
关于css这种东西,不会写,我们就copy,这种东西,只能说你喜欢就认真去做,不喜欢,就随便高高。
好,打开app/views/header.html,添加进去:
<link rel="stylesheet" type="text/css" href="/public/css/styles.css">等一下,我们先来看看header.html里面的内容:
<!DOCTYPE html>

<html>
  <head>
    <title>{{.title}}</title>
    <meta http-equiv="Content-Type" content="text/html; charset=utf-8">
    <link rel="stylesheet" type="text/css" href="/public/css/bootstrap.min.css">
    <link rel="stylesheet" type="text/css" href="/public/css/styles.css">
    <link rel="shortcut icon" type="image/png" href="/public/img/favicon.png">
    <script src="/public/js/jquery-1.9.1.min.js" type="text/javascript" charset="utf-8"></script>
    {{range .moreStyles}}
      <link rel="stylesheet" type="text/css" href="/public/{{.}}">
    {{end}}
    {{range .moreScripts}}
      <script src="/public/{{.}}" type="text/javascript" charset="utf-8"></script>
    {{end}}
  </head>
  <body>
{{.title}}这是一个变量我们后面会看到,css与js的引入到没什么区别,不过icon这个不错,居然支持png等格式。{{range .moreStyles}}和{{range .moreScripts}}这两个是循环,
也就是说我们如果不同的页面需要不同的css文件或者js文件,我们可以在那个页面上采用
最后不要忘了在footer.html加入</div>,好我们来看一下效果:
好,我们打开views/App/Index.html(话说,大小写很重要的哦,它是根据你方法的名称来加载对于view下的页面),把里面的东西全部替换:
{{append . "moreScripts" "js/jquery-ui-1.7.2.custom.min.js"}}这种凡是把我们需要的东西加载进去。由于,我们目前东西比较少,这两个循环可以去掉。
那么在header.html的body之后加入下面代码:
<div class="container main-nav">
    <div class="top-bar">
        <div class="top-bar-inner">
          <ul class="ul-nav ">
              <li class="{{.home}}">
                <a href="/" >Home</a>
                <span class="navbar-news " title="最近1小时有1个更新">1</span>
              </li>
              <li class="{{.write}}">
                <a href="/write" title="Put up your blogs">投稿</a>
              </li>
              <li class="{{.mess}}">
                <a href="/message" title="Message Boards">留言</a>
              </li>
              <li class="{{.history}}">
                <a href="/history" title="History blogs">归档</a>
              </li>
              <li class="{{.about}}">
                <a href="/about" title="About Me">About Me</a>
              </li>
              <li class="{{.ema}}">
                <a href="/email" title="The emails of the blog's author">Email</a>
              </li>
              <li>
                <a href="#" title="">RSS</a>
              </li>
          </ul>
        </div>
    </div>
最后不要忘了在footer.html加入</div>,好我们来看一下效果:

恩,看起来还是不错的,虽然有点挫。
{{set . "title" "Home - GBlog" }}
{{set . "home" "active" }}
{{template "header.html" .}}
<div class="content">
    <div class="cell">
      <div class="cell-subject">
          <div>
            <a href="#" class="cell-subject-title" ><strang>Test size=45</strang></a>
            <a href="#" class="comment-num" title="Comments">10</a>
          </div>
          <div class="subject-infor">
            <span class="label label-success">Author</span>   <span>jov123@163.com</span>
            <span class="label label-default">Date</span>  2014-04-15 12:25
            <span class="label label-info">Read</span>  0
          </div>
      </div>
      <div class="cell-text">
          <pre><code>怎么说呢,稍微有点迷茫,不管是id</code></pre>
      </div>
    </div>
</div>
{{template "footer.html" .}}
恩,看到了吗,set . title这中东西很有作用把,template也不用我多说什么把。再次刷新看一下效果:
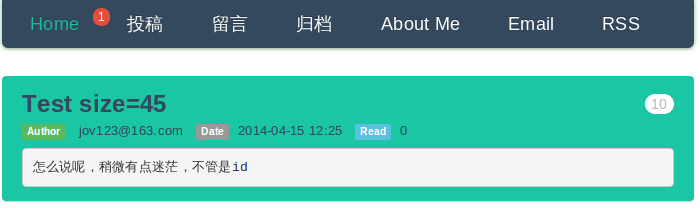
呀~~,是不是更挫了。好把。首页就这样完成了设计,下面我们先做投稿的设计,没有投稿哪有数据啊,是不是?
2.投稿
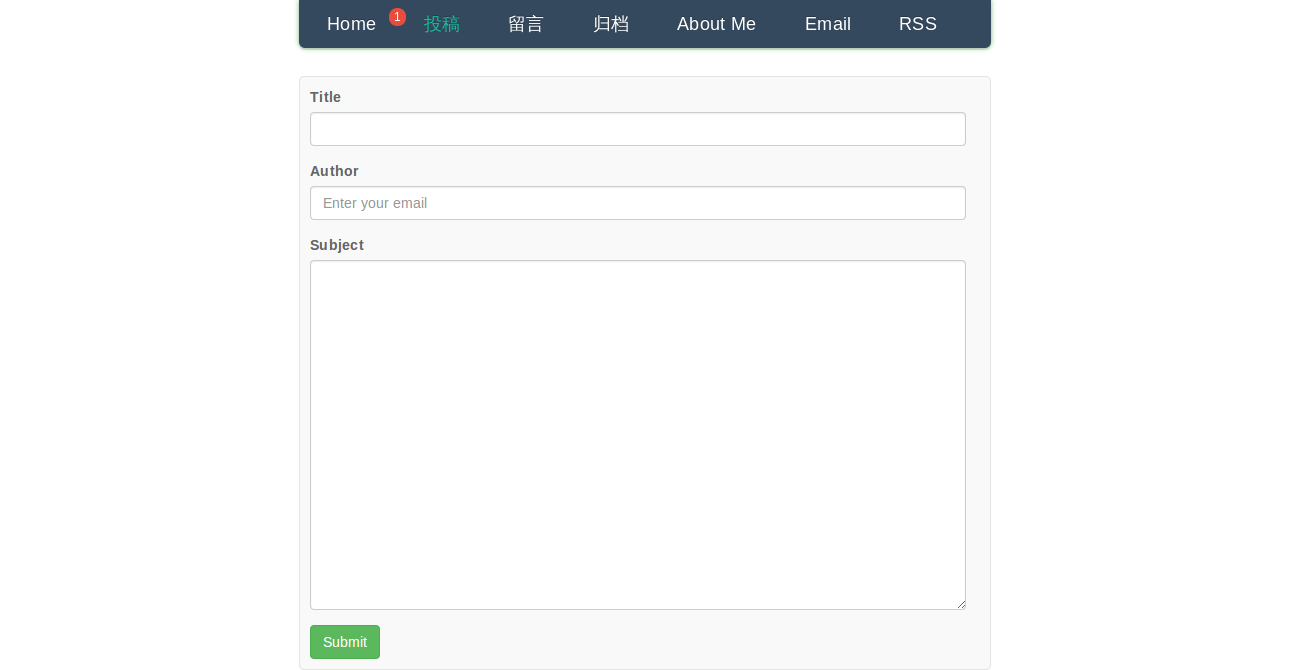
在view/App/下新建WBlog.html,内容如下:
{{set . "title" "投稿 - GBlog"}}
{{set . "write" "active" }}
{{template "header.html" .}}
<div class="content">
    <div class="write-nav">
      <form action="/putblog" method="post" >
          <div class="form-group" >
            <label style="font-weight: bold;">Title</label>
            {{with $field := field "blog.Title" .}}
            <input type="text" id="{{$field.Id}}" name="{{$field.Name}}"  class="form-control" style="width:98%;min-height:28px;" required  value="{{if $field.Flash}}{{$field.Flash}}{{else}}{{$field.Value}}{{end}}">
              <span class="help-inline erro">{{$field.Error}}</span>
            {{end}}
          </div>
          <div class="form-group" >
            <label style="font-weight: bold;">Author</label>
            {{with $field := field "blog.Email" .}}
            <input type="email" id="{{$field.Id}}" name="{{$field.Name}}" class="form-control" style="width:98%;min-height:28px;" placeholder="Enter your email" required value="{{if $field.Flash}}{{$field.Flash}}{{else}}{{$field.Value}}{{end}}">
              <span class="help-inline erro">{{$field.Error}}</span>
            {{end}}
          </div>
          <div class="form-group" >
            <label style="font-weight: bold;">Subject</label>
            {{with $field := field "blog.Subject" .}}
            <textarea class="form-control" id="{{$field.Id}}" name="{{$field.Name}}"  style="width:98%;line-height: 22px;height: 350px;resize: vertical;" required >{{if $field.Flash}}{{$field.Flash}}{{else}}{{$field.Value}}{{end}}</textarea>
              <span class="help-inline erro">{{$field.Error}}</span>
            {{end}}
          </div>
         <button type="submit" class="btn btn-success">Submit</button>
      </form>
    </div>
</div>
{{template "footer.html" .}}
这里面我先把后面要降到的的东西放了出来,先不用管,后面会讲到。
那么怎么看效果呢,先在app/controllers/app.go 里面加入一个方法:
func (c App) WBlog() revel.Result {
	return c.Render()
}
来看这个方法,他的接收者是App,就是这个文件上面的struct,它里面放的是revel.Controller对象,这个我们不用管它,而c.Render(),相当与forward跳转。
在conf/routes里面加入一个路由控制:
GET /write App.WBlog当然我们也是可以通过http://localhost:9000/App/WBlog这样的方式直接 访问的,但是我不喜欢这种大写的名称(在go中你需要时刻注意大小写,因为大写相当于public的是可以被外部访问的),说明一下为什么可以用这种方式访问,看到conf/routes里面的:
* /:controller/:action :controller.:action它已经给我们配置好了。
ok,我们刷一下页面,点投稿看看效果:
有了这两个基本的东西我们可以来实现它了。
内容比较多,我们在下一章来做实现。


 8649
8649

 被折叠的 条评论
为什么被折叠?
被折叠的 条评论
为什么被折叠?
 到【灌水乐园】发言


