


目录
一、JSTL 简介
JSTL 标签库,全称是 JSP Standard Tag Library,JSP 标准标签库。是一个不断完善的开放源代码的 JSP 标签库。
EL 表达式主要是为了替换 jsp 中的表达式脚本,而 JSTL 则是为了替换代码脚本。依靠这两个替代,使得整个更为简洁。
1、JSTL 的组成
JSTL 是由五个功能不同的标签库组成的:

2、标签库如何引入
(1)先导入 JSTL 的 jar 包(根据自己的 Tomcat 选择对应版本):
- taglibs-standard-impl-1.2.1.jar
- taglibs-standard-spec-1.2.1.jar
(2)使用 taglib 指令引入标签库:
<%@ taglib prefix="c" uri="http://java.sun.com/jsp/jstl/core" %>二、核心标签库 core
在 JSTL 的使用中,大部分情况都是使用核心标签库,因此重点介绍核心标签库。
1、set 标签
<c:set></c:set>作用:set 标签可以往域中保存数据。
(1)属性
(1-1)scope 属性设置保存到哪个域
- scope = "page":表示 pageContext 域(默认)
- scope = "request":表示 request 域
- scope = "session":表示 session 域
- scope = "application":表示 application 域
(1-2)var 属性设置 key
(1-3)value 属性设置 value
(2)示例
<%@ page contentType="text/html;charset=UTF-8" language="java" %>
<%@ taglib prefix="c" uri="http://java.sun.com/jsp/jstl/core" %>
<html>
<head>
    <title>Title</title>
</head>
<body>
    保存之前:${ pageScope.key_0 } <br/>
    <c:set scope = "page" var = "key_0" value = "value_0"></c:set>
    保存之后:${ pageScope.key_0 } <br/>
</body>
</html>
2、if 标签
<c:if></c:if>作用:用来做 if 判断,若条件为 true,则会执行标签内的内容。
(1)属性
(1-1)test 属性表示判断的条件(使用 EL 表达式字符串作为值)
- test = "${ 1 == 2 }":表示判断条件为 1 是否等于 2
(2)示例
<%@ page contentType="text/html;charset=UTF-8" language="java" %>
<%@ taglib prefix="c" uri="http://java.sun.com/jsp/jstl/core" %>
<html>
<head>
    <title>Title</title>
</head>
<body>
    <c:if test = "${ 10 == 10 }">
        <h1> 10 == 10 </h1>
    </c:if>
</body>
</html>
3、choose、when、otherwise 标签
<c:choose>
    <c:when></c:when>
    <c:otherwise></c:otherwise>
</c:choose>
作用:可以进行多路判断,使用方法与 if ... else if ... else ... 类似。
(1)标签
(1-1)choose 标签表示开始选择判断
(1-2)when 标签表示每一种判断情况
- test 属性表示当前这种判断情况
(1-3)otherwise 标签表示其他情况
(2)示例
<%@ page contentType="text/html;charset=UTF-8" language="java" %>
<%@ taglib prefix="c" uri="http://java.sun.com/jsp/jstl/core" %>
<html>
<head>
    <title>Title</title>
</head>
<body>
    <%
      request.setAttribute("key+0", 114514);
    %>
    <c:choose>
        <c:when test = "${ requestScope['key+0'] > 114514 }">
            <h1> > 114514 </h1>
        </c:when>
        <c:when test = "${ requestScope['key+0'] < 114514 }">
            <h1> < 114514 </h1>
        </c:when>
        <c:otherwise>
            <h1> == 114514 </h1>
            <c:choose>
                <c:when test = "${ 1 != 2 }">
                    1 != 2
                </c:when>
            </c:choose>
        </c:otherwise>
    </c:choose>
</body>
</html>(3)注意点:
- 该标签内部不能使用 html 注释,要使用注释,只能使用 jsp 注释
- when 标签的父标签一定要是 choose 标签(如果想要嵌套,必须多写一层 choose 标签)
4、forEach 标签
<c:forEach></c:forEach>作用:遍历输出。
(1)属性
(1-1)begin = "1" 属性设置开始的索引(若定义了 items 属性,则从 item 的第二个元素开始遍历)
(1-2)end = "10" 属性设置结束的索引(与 begin 构成左闭右闭区间)
(1-3)var = "iterator" 属性表示循环变量
(1-4)items = "${ request.arr }" 属性设置遍历的数据源(遍历的集合)
(1-5)step = "5" 属性设置遍历的步长
(2)示例
(2-1)循环输出 10 行:
<%@ page contentType="text/html;charset=UTF-8" language="java" %>
<%@ taglib prefix="c" uri="http://java.sun.com/jsp/jstl/core" %>
<html>
<head>
    <title>Title</title>
</head>
<body>
    <table>
        <c:forEach var = "i" begin = "1" end = "10">
            <tr>
                <td> 第 ${ i } 行</td>
            </tr>
        </c:forEach>
    </table>
</body>
</html>
(2-2)遍历 Object 类型数组:
<%@ page contentType="text/html;charset=UTF-8" language="java" %>
<%@ taglib prefix="c" uri="http://java.sun.com/jsp/jstl/core" %>
<html>
<head>
    <title>Title</title>
</head>
<body>
<%-- 使用 item 遍历 --%>
    <%
        pageContext.setAttribute("array", new String[] {"114514", "998244353", "666666"});
    %>
    <c:forEach var = "i" items = "${ pageScope.array }">
        ${ i } <br/>
    </c:forEach>
<%-- 用下标遍历,需要知道数组长度才可以使用 --%>
    <c:forEach var = "i" begin = "0" end = "2">
        ${ array[i] } <br/>
    </c:forEach>
<%-- 原生 jsp 用表达式脚本和代码脚本将遍历结果输出到页面(对比) --%>
    <%! /* 这里的定义用代码脚本也可以 */
        String[] array = new String[] {"114514", "998244353", "666666"};
    %>
    <%
        for (int i = 0; i < array.length; ++ i) {
    %>
        <%= array[i] %> <br/>
    <%
        }
    %>
</body>
</html>
(2-3)遍历 map 类型的集合:
<%@ page contentType="text/html;charset=UTF-8" language="java" %>
<%@ taglib prefix="c" uri="http://java.sun.com/jsp/jstl/core" %>
<%@ page import="java.util.*" %>
<html>
<head>
    <title>Title</title>
</head>
<body>
    <%
        Map<String, Object> map = new HashMap<>();
        map.put("key_0", "value_0");
        map.put("key_1", "value_1");
        map.put("key_2", "value_2");
        request.setAttribute("map", map);
    %>
    <c:forEach var = "entry" items="${ requestScope.map }">
        key: ${ entry.key } - value: ${ entry.value } <br/>
    </c:forEach>
</body>
</html>
(2-4)遍历 list 类型的集合:
(2-4-1)Student 类:
package com.test;

public class Student {
    private Integer id;
    private String name;
    private Integer age;
    private String phone;

    public Student() {
    }

    public Student(Integer id, String name, Integer age, String phone) {
        this.id = id;
        this.name = name;
        this.age = age;
        this.phone = phone;
    }

    public Integer getId() {
        return id;
    }

    public void setId(Integer id) {
        this.id = id;
    }

    public String getName() {
        return name;
    }

    public void setName(String name) {
        this.name = name;
    }

    public Integer getAge() {
        return age;
    }

    public void setAge(Integer age) {
        this.age = age;
    }

    public String getPhone() {
        return phone;
    }

    public void setPhone(String phone) {
        this.phone = phone;
    }

    @Override
    public String toString() {
        return "Student{" +
                "id=" + id +
                ", name='" + name + '\'' +
                ", age=" + age +
                ", phone='" + phone + '\'' +
                '}';
    }
}
(2-4-2)Test.jsp:
<%@ page contentType="text/html;charset=UTF-8" language="java" %>
<%@ taglib prefix="c" uri="http://java.sun.com/jsp/jstl/core" %>
<%@ page import="java.util.*" %>
<%@ page import="com.test.Student"%>
<html>
<head>
    <title>Title</title>
</head>
<body>
    <%
        List<Student> studentList = new ArrayList<>();
        for (int i = 1; i <= 6; ++ i) {
            studentList.add(new Student(i, "name" + i, 18 + i, "10086_" + i));
        }
        request.setAttribute("studentList", studentList);
    %>
    <table>
        <tr>
            <th> 编号 </th>
            <th> 姓名 </th>
            <th> 年龄 </th>
            <th> 电话 </th>
        </tr>
        <c:forEach var = "student" items = "${ requestScope.studentList }">
            <tr>
                <td> ${ student.id } </td>
                <td> ${ student.name } </td>
                <td> ${ student.age } </td>
                <td> ${ student.phone } </td>
            </tr>
        </c:forEach>
    </table>
</body>
</html>
(5)输出某个范围内的数据:
<%@ page contentType="text/html;charset=UTF-8" language="java" %>
<%@ taglib prefix="c" uri="http://java.sun.com/jsp/jstl/core" %>
<%@ page import="java.util.*" %>
<html>
<head>
<title>Title</title>
</head>
<body>
<%
List<String> stringList = new ArrayList<>();
stringList.add("value_0");
stringList.add("value_0");
stringList.add("value_0");
stringList.add("value_0");
stringList.add("value_0");
pageContext.setAttribute("list", stringList);
%>
<%-- 输出第二个到第四个元素 --%>
<c:forEach var = "entry" begin = "1" end = "3" items="${ pageScope.list }">
${ entry } <br/>
</c:forEach>
<%-- 全部输出(begin和end可以省略),步长为 2 --%>
<c:forEach var = "entry" begin = "0" end = "4" step = "2" items="${ pageScope.list }">
${ entry } <br/>
</c:forEach>
</body>
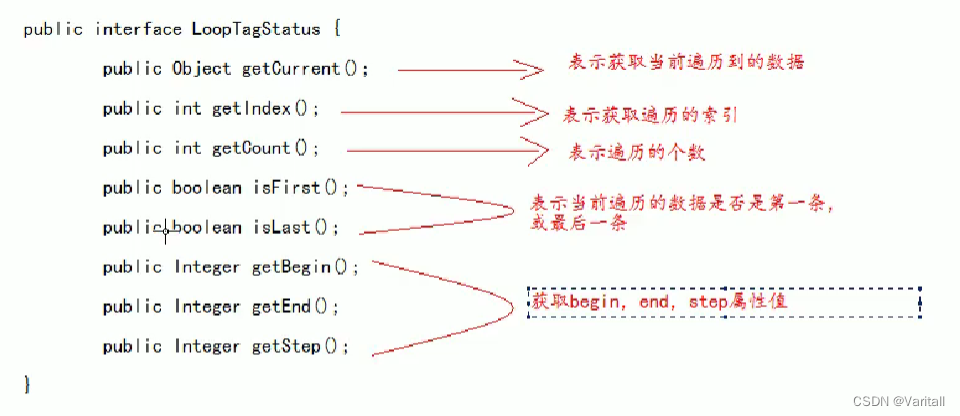
</html>5、其他属性
如下所示的方法,都可以通过类似 ${ Object.Index } 这样的写法获取到相应的值。
复习:is 方法和 get 方法都是读方法,区别仅在于对象的类型是否为 Boolean。


 1672
1672


 被折叠的 条评论
为什么被折叠?
被折叠的 条评论
为什么被折叠?
 到【灌水乐园】发言


