


1 spring boot 其设计目的是用来简化Spring应用 减少了spring.xml和springmvc.xml的配置 优化了开发 。spring boot的使用必须在pom.xml中配置必需的文件,只有配置了它 spring boot 才能继续 使用。
<project xmlns="http://maven.apache.org/POM/4.0.0" xmlns:xsi="http://www.w3.org/2001/XMLSchema-instance" xsi:schemaLocation="http://maven.apache.org/POM/4.0.0 http://maven.apache.org/xsd/maven-4.0.0.xsd">
  <modelVersion>4.0.0</modelVersion>
  <groupId>cn.et</groupId>
  <artifactId>SBless</artifactId>
  <version>0.0.1-SNAPSHOT</version>
  <!-- springboot必须的 -->
  <parent>
    <groupId>org.springframework.boot</groupId>
    <artifactId>spring-boot-starter-parent</artifactId>
    <version>1.5.9.RELEASE</version>
</parent>
2.配置 spring boot的文件
	<!-- springboot每一个框架的集成都是一个starter -->
    <dependency>
        <groupId>org.springframework.boot</groupId>
        <artifactId>spring-boot-starter-web</artifactId>
    </dependency>
3. Spring boot的启动
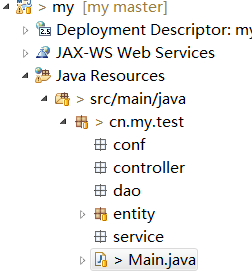
1.创建一个类 这个类必须和controller 包齐平 ,这样启动main 方法是才会扫描到controller 这些包 ,类名随便你取
2. 在这个类里面的main方法中 设置 ,run方法里面的Main.class 是这个类的类名
package cn.et.less02;

import org.springframework.boot.SpringApplication;
import org.springframework.boot.autoconfigure.SpringBootApplication;

//必须添加SpringbootApplication 启用Spring的自动配置功能

@SpringBootApplication
public class Main {
	public static void main(String[] args) {
		SpringApplication.run(Main.class, args);
	}
}
4.连接数据库,在pom.xml 中配置数据库
<!-- 查看数据库 -->
    <dependency>
        <groupId>org.springframework.boot</groupId>
        <artifactId>spring-boot-starter-data-jpa</artifactId>
    </dependency>
     <!-- 要连接的数据库 -->
    <dependency>
        <groupId>mysql</groupId>
        <artifactId>mysql-connector-java</artifactId>
    </dependency>
在src/main/resources中创建一个叫application.properties的文件,配置要连接的数据库
spring.datasource.url=jdbc:mysql://localhost:3306/webpage
spring.datasource.driver-class-name=com.mysql.jdbc.Driver
spring.datasource.username=root
spring.datasource.password=123456
spring.datasource.type=com.alibaba.druid.pool.DruidDataSource
spring.datasource.filters=stat,config
spring.jpa.show-sql=true
#配置端口
server.port=89
#配置上下午路径
server.context-path=/my
debug=true
5.创建一个实体类 类里面的属性和你要查询的数据库里的表的列名一致,@ID是标识主键 @GeneratedValue是标识主键增长的类型,@Column标识列名
package cn.et.less01;

import javax.persistence.Column;
import javax.persistence.Entity;
import javax.persistence.GeneratedValue;
import javax.persistence.GenerationType;
import javax.persistence.Id;

@Entity
public class Cook {
	@Id
	@GeneratedValue(strategy=GenerationType.AUTO)
	private Integer fid;
	@Column
	private String fname;
	@Column
	private Integer cid;

	public Integer getFid() {
		return fid;
	}
	public void setFid(Integer fid) {
		this.fid = fid;
	}
	public String getFname() {
		return fname;
	}
	public void setFname(String fname) {
		this.fname = fname;
	}
	public Integer getCid() {
		return cid;
	}
	public void setCid(Integer cid) {
		this.cid = cid;
	}
}
6. 在dao层创建一个接口,接口继承了 CrudRepository 这个类 ,这个类里面有增删改查 的方法
package cn.et.less01.dao;

import org.springframework.data.repository.CrudRepository;

import cn.et.less01.Cook;

public interface cookRepository extends CrudRepository<Cook, Integer> {

}
7.查询 创建一个controller 类 在类上加一个@RestController 这样运行run方法才会扫描到这个controller,在controller中的两个查询
package cn.et.less01;
import java.util.HashMap;
import java.util.List;
import java.util.Map;
import org.springframework.beans.factory.annotation.Autowired;
import org.springframework.boot.SpringApplication;
import org.springframework.boot.autoconfigure.EnableAutoConfiguration;
import org.springframework.jdbc.core.JdbcTemplate;
import org.springframework.web.bind.annotation.PathVariable;
import org.springframework.web.bind.annotation.RequestMapping;
import org.springframework.web.bind.annotation.RestController;
import cn.et.less01.dao.cookRepository;
import cn.et.less01.entity.Result;
@RestController
@EnableAutoConfiguration
public class SbController {
@Autowired
JdbcTemplate jt;
@Autowired
cookRepository cr;
//根据id查询
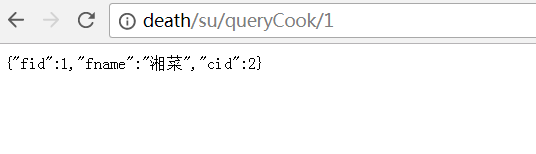
@RequestMapping("/queryCook/{id}")
public Map getCook(@PathVariable String id){
List<Map<String,Object>> e=jt.queryForList("select * from cook where fid="+id);
return e.get(0);
}
//查询所有
@RequestMapping("/queryk")
public List<Map<String, Object>> getC(){
List<Map<String,Object>> e=jt.queryForList("select * from cook");
return e;
}
}8 .运行run方法


 138
138

 被折叠的 条评论
为什么被折叠?
被折叠的 条评论
为什么被折叠?
 到【灌水乐园】发言


