


Kubernetes介绍
Kubernetes,也被称为K8s或Kube,是谷歌推出的业界最受欢迎的容器编排器。
K8s是一个最初由Google开发的,用于自动化部署、扩展和管理容器化应用的开源容器编排器技术。K8s使部署和管理微服务架构应用程序变得很简单。它通过在集群之上形成一个抽象层来实现这一点,允许开发团队平滑地部署应用程序。
K8s是第一个由云原生计算基金会(Cloud Native Computing Foundation, CNCF)和谷歌基金会倡议的项目,是继Linux之后增长最快的开源软件项目。
Kubernetes特性
可移植性和灵活性:K8s有很强的兼容性,因为它可以在各种基础设施和环境设置下运行。大多数其他编排器没有这种灵活性。它们被锁定在特定的运行时或基础架构中。
开源:CNCF负责管理K8s,这是一个完全开源、由社区驱动的项目。它有许多重要的企业赞助商,但没有一家公司能“控制”这个平台或者控制它的发展方向。
多云兼容性:K8s不但可以将工作负载托管在单个云上,而且可以将工作负载分布在多个云上。 K8s也能轻松地将其环境从一个云扩展到另一个云。虽然其它编排器也能支持多云架构,但K8s在多云兼容性性方面可以完全超越它们。
市场领导者:大部分公司都在使用K8s。根据红帽公司的一项调查,K8s被客户广泛使用 (88%),尤其在生产环境中(74%)。
Kubernetes架构
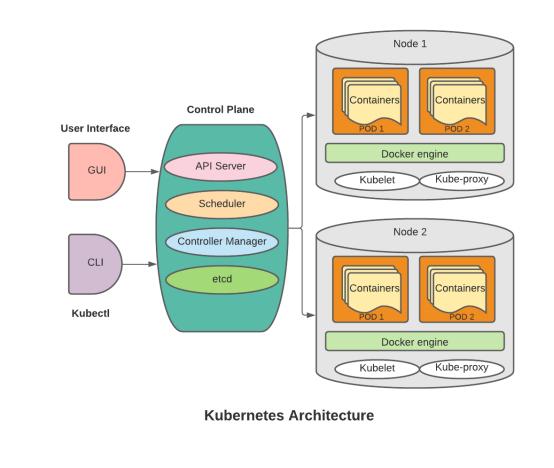
K8s组件组件介绍
控制平面
控制平面是管理员和用户管理不同节点的地方。它通过HTTP调用接收命令或者连接到系统并且运行命令行脚本。顾名思义,它控制了K8s与应用程序的交互方式。
API 服务器
API 服务器为K8s集群提供了一个REST接口。 所有在pod上激活的服务和别的对象都是可以用可编程的方式与与终端进行交互。
调度器
调度器负责将任务分配给各个节点。它监控资源容量并保证工作节点的性能保持在可接受的范围内。
控制器管理器
K8s控制器管理器是管理K8s核心控制循环的服务。它负责确保集群的共享状态正常运行。
Etcd
K8s使用了Etcd,一个提供分布式键值存储的数据库,用来共享集群的整体状态的信息。
节点(Node)
节点是运行了pod的物理机或虚拟机。控制平面管理集群中的每个节点,该节点包含运行 pod所需的服务。
Pods
K8s pod 是K8s管理容器集的最小单位。 每个pod有一个分配给pod中的所有容器的单独的IP 地址。在pod中的容器内存和存储资源是共享的。当应用程序只有一个进程时,pod 也可以有一个容器。
Kubelet
Kubelet是一个工作节点组件。它的任务是跟踪pod及其容器的运行状态。它与pod的YAML 或JSON描述文件相关。Kubelet检查 pod 规格并确定 pod 是否健康。
Kube代理(proxy)
Kube代理是一个网络代理和负载均衡器,充当每个节点和API服务器之间的连接。它在集群中的每个节点上运行,并允许你从内部和外部连接到pod。
Kubectl
Kubectl是K8s的命令行工具。它用于部署应用程序、监控和控制集群资源以及查看日志。从用户的角度来看,Kubectl 是你的K8s的控制面板。它使你能够执行所有K8s操作。从技术角度来看,Kubectl 是K8s API的客户端。
Kubernetes安装
环境要求
主机名 | IP | 配置 | 操作系统版本 |
k8s-master01 | 192.168.160.100 | 2C 8G 80G | CentOS Linux release 7.9 |
k8s-node01 | 192.168.160.101 | 2C 8G 80G | CentOS Linux release 7.9 |
k8s-node02 | 192.168.160.102 | 2C 8G 80G | CentOS Linux release 7.9 |
配置Host
编辑三台服务器的 /etc/hosts 文件 ,添加下面内容:
192.168.160.100 k8s-master01
192.168.160.101 k8s-node01
192.168.160.102 k8s-node02
时间同步
#启动chronyd服务
systemctl start chronyd
systemctl enable chronyd
date
Tips:执行命令前 可以 使用 rpm -qa |grep chrony 查看系统是否已安装chrony
如果没有安装环境可使用 yum install chrony 命令安装禁用selinux和firewalld服务
firewalld服务停止:
systemctl stop firewalld
systemctl disable firewalld
selinux服务停止:
执行命令:setenforce 0临时关闭SELinux
永久关闭SElinux:sed -i 's/enforcing/disabled/' /etc/selinux/config #重启后生效
运行命令:getenforce,验证SELinux状态为disabled,表明SELinux已关闭
禁用swap分区
swap分区指的是虚拟内存分区,它的作用是物理内存使用完,之后将磁盘空间虚拟成内存来使用,
启用swap设备会对系统的性能产生非常负面的影响,因此kubernetes要求每个节点都要禁用swap设备。但是如果因为某些原因确实不能关闭swap分区,就需要在集群安装过程中通过明确的参数进行配置说明。
编辑分区配置文件/etc/fstab,注释掉swap分区一行 # 注意修改完毕之后需要重启linux服务[root@k8s-master01 ~]# free -g
total used free shared buff/cache available
Mem: 7 4 0 0 3 3
Swap: 0 0 0添加网桥过滤和地址转发功能
cat > /etc/sysctl.d/kubernetes.conf << EOF
net.bridge.bridge-nf-call-ip6tables = 1
net.bridge.bridge-nf-call-iptables = 1
net.ipv4.ip_forward = 1
EOF

sysctl --system   //生效命令
docker安装
安装docker依赖
yum install -y yum-utils设置docker仓库镜像地址
yum-config-manager --add-repo http://mirrors.aliyun.com/docker-ce/linux/centos/docker-ce.repo安装下载docker
yum install docker-ce docker-ce-cli containerd.io设置docker开机启动
systemctl enable docker && systemctl start docker配置docker 镜像加速器
> cat <<EOF> /etc/docker/daemon.json
{
    "exec-opts": ["native.cgroupdriver=systemd"],
    "registry-mirrors": ["https://kn0t2bca.mirror.aliyuncs.com"]
 }
EOF
重启docker服务
systemctl restart dockerkubernetes镜像切换成国内源(3个节点都执行)
cat > /etc/yum.repos.d/kubernetes.repo << EOF
[kubernetes]
name=Kubernetes
baseurl=https://mirrors.aliyun.com/kubernetes/yum/repos/kubernetes-el7-x86_64
enabled=1
gpgcheck=0
repo_gpgcheck=0
gpgkey=https://mirrors.aliyun.com/kubernetes/yum/doc/yum-key.gpg
https://mirrors.aliyun.com/kubernetes/yum/doc/rpm-package-key.gpg
EOF
安装指定版本 kubeadm,kubelet和kubectl(3个节点都执行)
#安装kubeadm,kubelet,kubectl,并且指定版本,因为1.24的版本默认运行时环境不是docker了
yum install -y kubelet-1.23.6 kubeadm-1.23.6 kubectl-1.23.6
设置开机自启
systemctl enable  kubelet
部署kubernetes master(master节点上执行)
docker pull coredns/coredns:1.8.4kubeadm init \
--apiserver-advertise-address=192.168.160.100 \
--image-repository registry.aliyuncs.com/google_containers \
--service-cidr=10.1.0.0/16 \
--pod-network-cidr=10.244.0.0/16运行结果:
[root@k8s-master01 ~]# kubeadm init \
> --apiserver-advertise-address=192.168.160.100 \
> --image-repository registry.aliyuncs.com/google_containers \
> --service-cidr=10.1.0.0/16 \
> --pod-network-cidr=10.244.0.0/16
I0323 15:13:03.362423    5344 version.go:255] remote version is much newer: v1.26.3; falling back to: stable-1.23
[init] Using Kubernetes version: v1.23.17
[preflight] Running pre-flight checks
[preflight] Pulling images required for setting up a Kubernetes cluster
[preflight] This might take a minute or two, depending on the speed of your internet connection
[preflight] You can also perform this action in beforehand using 'kubeadm config images pull'
[certs] Using certificateDir folder "/etc/kubernetes/pki"
[certs] Generating "ca" certificate and key
[certs] Generating "apiserver" certificate and key
[certs] apiserver serving cert is signed for DNS names [k8s-master01 kubernetes kubernetes.default kubernetes.default.svc kubernetes.default.svc.cluster.local] and IPs [10.1.0.1 192.168.160.100]
[certs] Generating "apiserver-kubelet-client" certificate and key
[certs] Generating "front-proxy-ca" certificate and key
[certs] Generating "front-proxy-client" certificate and key
[certs] Generating "etcd/ca" certificate and key
[certs] Generating "etcd/server" certificate and key
[certs] etcd/server serving cert is signed for DNS names [k8s-master01 localhost] and IPs [192.168.160.100 127.0.0.1 ::1]
[certs] Generating "etcd/peer" certificate and key
[certs] etcd/peer serving cert is signed for DNS names [k8s-master01 localhost] and IPs [192.168.160.100 127.0.0.1 ::1]
[certs] Generating "etcd/healthcheck-client" certificate and key
[certs] Generating "apiserver-etcd-client" certificate and key
[certs] Generating "sa" key and public key
[kubeconfig] Using kubeconfig folder "/etc/kubernetes"
[kubeconfig] Writing "admin.conf" kubeconfig file
[kubeconfig] Writing "kubelet.conf" kubeconfig file
[kubeconfig] Writing "controller-manager.conf" kubeconfig file
[kubeconfig] Writing "scheduler.conf" kubeconfig file
[kubelet-start] Writing kubelet environment file with flags to file "/var/lib/kubelet/kubeadm-flags.env"
[kubelet-start] Writing kubelet configuration to file "/var/lib/kubelet/config.yaml"
[kubelet-start] Starting the kubelet
[control-plane] Using manifest folder "/etc/kubernetes/manifests"
[control-plane] Creating static Pod manifest for "kube-apiserver"
[control-plane] Creating static Pod manifest for "kube-controller-manager"
[control-plane] Creating static Pod manifest for "kube-scheduler"
[etcd] Creating static Pod manifest for local etcd in "/etc/kubernetes/manifests"
[wait-control-plane] Waiting for the kubelet to boot up the control plane as static Pods from directory "/etc/kubernetes/manifests". This can take up to 4m0s
[apiclient] All control plane components are healthy after 11.504510 seconds
[upload-config] Storing the configuration used in ConfigMap "kubeadm-config" in the "kube-system" Namespace
[kubelet] Creating a ConfigMap "kubelet-config-1.23" in namespace kube-system with the configuration for the kubelets in the cluster
NOTE: The "kubelet-config-1.23" naming of the kubelet ConfigMap is deprecated. Once the UnversionedKubeletConfigMap feature gate graduates to Beta the default name will become just "kubelet-config". Kubeadm upgrade will handle this transition transparently.
[upload-certs] Skipping phase. Please see --upload-certs
[mark-control-plane] Marking the node k8s-master01 as control-plane by adding the labels: [node-role.kubernetes.io/master(deprecated) node-role.kubernetes.io/control-plane node.kubernetes.io/exclude-from-external-load-balancers]
[mark-control-plane] Marking the node k8s-master01 as control-plane by adding the taints [node-role.kubernetes.io/master:NoSchedule]
[bootstrap-token] Using token: i8vqqd.9ydw9fhvi7dtppc0
[bootstrap-token] Configuring bootstrap tokens, cluster-info ConfigMap, RBAC Roles
[bootstrap-token] configured RBAC rules to allow Node Bootstrap tokens to get nodes
[bootstrap-token] configured RBAC rules to allow Node Bootstrap tokens to post CSRs in order for nodes to get long term certificate credentials
[bootstrap-token] configured RBAC rules to allow the csrapprover controller automatically approve CSRs from a Node Bootstrap Token
[bootstrap-token] configured RBAC rules to allow certificate rotation for all node client certificates in the cluster
[bootstrap-token] Creating the "cluster-info" ConfigMap in the "kube-public" namespace
[kubelet-finalize] Updating "/etc/kubernetes/kubelet.conf" to point to a rotatable kubelet client certificate and key
[addons] Applied essential addon: CoreDNS
[addons] Applied essential addon: kube-proxy

Your Kubernetes control-plane has initialized successfully!

To start using your cluster, you need to run the following as a regular user:

  mkdir -p $HOME/.kube
  sudo cp -i /etc/kubernetes/admin.conf $HOME/.kube/config
  sudo chown $(id -u):$(id -g) $HOME/.kube/config

Alternatively, if you are the root user, you can run:

  export KUBECONFIG=/etc/kubernetes/admin.conf

You should now deploy a pod network to the cluster.
Run "kubectl apply -f [podnetwork].yaml" with one of the options listed at:
  https://kubernetes.io/docs/concepts/cluster-administration/addons/

Then you can join any number of worker nodes by running the following on each as root:

kubeadm join 192.168.160.100:6443 --token i8vqqd.9ydw9fhvi7dtppc0 \
        --discovery-token-ca-cert-hash sha256:ccc07dfc6ca63e82eec774141aabea2a705ab3289df0a3431df9e29cfb589f14
完成初始化的新建文件和目录的操作,在master上完成
To start using your cluster, you need to run the following as a regular user:

  mkdir -p $HOME/.kube
  sudo cp -i /etc/kubernetes/admin.conf $HOME/.kube/config
  sudo chown $(id -u):$(id -g) $HOME/.kube/config

Alternatively, if you are the root user, you can run:

  export KUBECONFIG=/etc/kubernetes/admin.conf
将node节点服务器加入k8s集群(两个Node节点上执行)
kubeadm join 192.168.160.100:6443 --token i8vqqd.9ydw9fhvi7dtppc0 \
        --discovery-token-ca-cert-hash sha256:ccc07dfc6ca63e82eec774141aabea2a705ab3289df0a3431df9e29cfb589f14
[root@k8s-node02 sysctl.d]# kubeadm join 192.168.160.100:6443 --token i8vqqd.9ydw9fhvi7dtppc0 \
> --discovery-token-ca-cert-hash sha256:ccc07dfc6ca63e82eec774141aabea2a705ab3289df0a3431df9e29cfb589f14
[preflight] Running pre-flight checks
[preflight] Reading configuration from the cluster...
[preflight] FYI: You can look at this config file with 'kubectl -n kube-system get cm kubeadm-config -o yaml'
[kubelet-start] Writing kubelet configuration to file "/var/lib/kubelet/config.yaml"
[kubelet-start] Writing kubelet environment file with flags to file "/var/lib/kubelet/kubeadm-flags.env"
[kubelet-start] Starting the kubelet
[kubelet-start] Waiting for the kubelet to perform the TLS Bootstrap...
This node has joined the cluster:
* Certificate signing request was sent to apiserver and a response was received.
* The Kubelet was informed of the new secure connection details.
Run 'kubectl get nodes' on the control-plane to see this node join the cluster.在master上查看node节点信息
[root@k8s-master01 ~]# kubectl get nodes
NAME           STATUS   ROLES                  AGE     VERSION
k8s-master01   NotReady    control-plane,master   3h19m   v1.23.6
k8s-node01     NotReady    <none>                 3h14m   v1.23.1
k8s-node02     NotReady    <none>                 3h14m   v1.23.1
NotReady 说明master和node节点之间的通信还是有问题的,容器之间通信还没有准备好
安装网络插件flannel(在master节点执行)
kube-flannel.yaml 文件需要自己去创建,内容如下:

cat <<EOF> /root/kube-flannel.yaml
---
kind: Namespace
apiVersion: v1
metadata:
  name: kube-flannel
  labels:
    pod-security.kubernetes.io/enforce: privileged
---
kind: ClusterRole
apiVersion: rbac.authorization.k8s.io/v1
metadata:
  name: flannel
rules:
- apiGroups:
  - ""
  resources:
  - pods
  verbs:
  - get
- apiGroups:
  - ""
  resources:
  - nodes
  verbs:
  - list
  - watch
- apiGroups:
  - ""
  resources:
  - nodes/status
  verbs:
  - patch
---
kind: ClusterRoleBinding
apiVersion: rbac.authorization.k8s.io/v1
metadata:
  name: flannel
roleRef:
  apiGroup: rbac.authorization.k8s.io
  kind: ClusterRole
  name: flannel
subjects:
- kind: ServiceAccount
  name: flannel
  namespace: kube-flannel
---
apiVersion: v1
kind: ServiceAccount
metadata:
  name: flannel
  namespace: kube-flannel
---
kind: ConfigMap
apiVersion: v1
metadata:
  name: kube-flannel-cfg
  namespace: kube-flannel
  labels:
    tier: node
    app: flannel
data:
  cni-conf.json: |
    {
      "name": "cbr0",
      "cniVersion": "0.3.1",
      "plugins": [
        {
          "type": "flannel",
          "delegate": {
            "hairpinMode": true,
            "isDefaultGateway": true
          }
        },
        {
          "type": "portmap",
          "capabilities": {
            "portMappings": true
          }
        }
      ]
    }
  net-conf.json: |
    {
      "Network": "10.244.0.0/16",
      "Backend": {
        "Type": "vxlan"
      }
    }
---
apiVersion: apps/v1
kind: DaemonSet
metadata:
  name: kube-flannel-ds
  namespace: kube-flannel
  labels:
    tier: node
    app: flannel
spec:
  selector:
    matchLabels:
      app: flannel
  template:
    metadata:
      labels:
        tier: node
        app: flannel
    spec:
      affinity:
        nodeAffinity:
          requiredDuringSchedulingIgnoredDuringExecution:
            nodeSelectorTerms:
            - matchExpressions:
              - key: kubernetes.io/os
                operator: In
                values:
                - linux
      hostNetwork: true
      priorityClassName: system-node-critical
      tolerations:
      - operator: Exists
        effect: NoSchedule
      serviceAccountName: flannel
      initContainers:
      - name: install-cni-plugin
       #image: flannelcni/flannel-cni-plugin:v1.1.0 for ppc64le and mips64le (dockerhub limitations may apply)
        image: docker.io/rancher/mirrored-flannelcni-flannel-cni-plugin:v1.1.0
        command:
        - cp
        args:
        - -f
        - /flannel
        - /opt/cni/bin/flannel
        volumeMounts:
        - name: cni-plugin
          mountPath: /opt/cni/bin
      - name: install-cni
       #image: flannelcni/flannel:v0.19.1 for ppc64le and mips64le (dockerhub limitations may apply)
        image: docker.io/rancher/mirrored-flannelcni-flannel:v0.19.1
        command:
        - cp
        args:
        - -f
        - /etc/kube-flannel/cni-conf.json
        - /etc/cni/net.d/10-flannel.conflist
        volumeMounts:
        - name: cni
          mountPath: /etc/cni/net.d
        - name: flannel-cfg
          mountPath: /etc/kube-flannel/
      containers:
      - name: kube-flannel
       #image: flannelcni/flannel:v0.19.1 for ppc64le and mips64le (dockerhub limitations may apply)
        image: docker.io/rancher/mirrored-flannelcni-flannel:v0.19.1
        command:
        - /opt/bin/flanneld
        args:
        - --ip-masq
        - --kube-subnet-mgr
        resources:
          requests:
            cpu: "100m"
            memory: "50Mi"
          limits:
            cpu: "100m"
            memory: "50Mi"
        securityContext:
          privileged: false
          capabilities:
            add: ["NET_ADMIN", "NET_RAW"]
        env:
        - name: POD_NAME
          valueFrom:
            fieldRef:
              fieldPath: metadata.name
        - name: POD_NAMESPACE
          valueFrom:
            fieldRef:
              fieldPath: metadata.namespace
        - name: EVENT_QUEUE_DEPTH
          value: "5000"
        volumeMounts:
        - name: run
          mountPath: /run/flannel
        - name: flannel-cfg
          mountPath: /etc/kube-flannel/
        - name: xtables-lock
          mountPath: /run/xtables.lock
      volumes:
      - name: run
        hostPath:
          path: /run/flannel
      - name: cni-plugin
        hostPath:
          path: /opt/cni/bin
      - name: cni
        hostPath:
          path: /etc/cni/net.d
      - name: flannel-cfg
        configMap:
          name: kube-flannel-cfg
      - name: xtables-lock
        hostPath:
          path: /run/xtables.lock
          type: FileOrCreate
EOF
[root@k8s-master01 ~]# kubectl apply -f /root/kube-flannel.yaml
namespace/kube-flannel created
clusterrole.rbac.authorization.k8s.io/flannel created
clusterrolebinding.rbac.authorization.k8s.io/flannel created
serviceaccount/flannel created
configmap/kube-flannel-cfg created
daemonset.apps/kube-flannel-ds created[root@k8s-master01 ~]# kubectl get nodes
NAME STATUS ROLES AGE VERSION
k8s-master01 Ready control-plane,master 3h19m v1.23.6
k8s-node01 Ready <none> 3h14m v1.23.1
k8s-node02 Ready <none> 3h14m v1.23.1安装完毕!!!
后续部署应用,再介绍。


 2930
2930


 被折叠的 条评论
为什么被折叠?
被折叠的 条评论
为什么被折叠?
 到【灌水乐园】发言


