


主题
测试多个await和使用promise.all作优化,是否promise.all性能更好?
1. 测压工具介绍
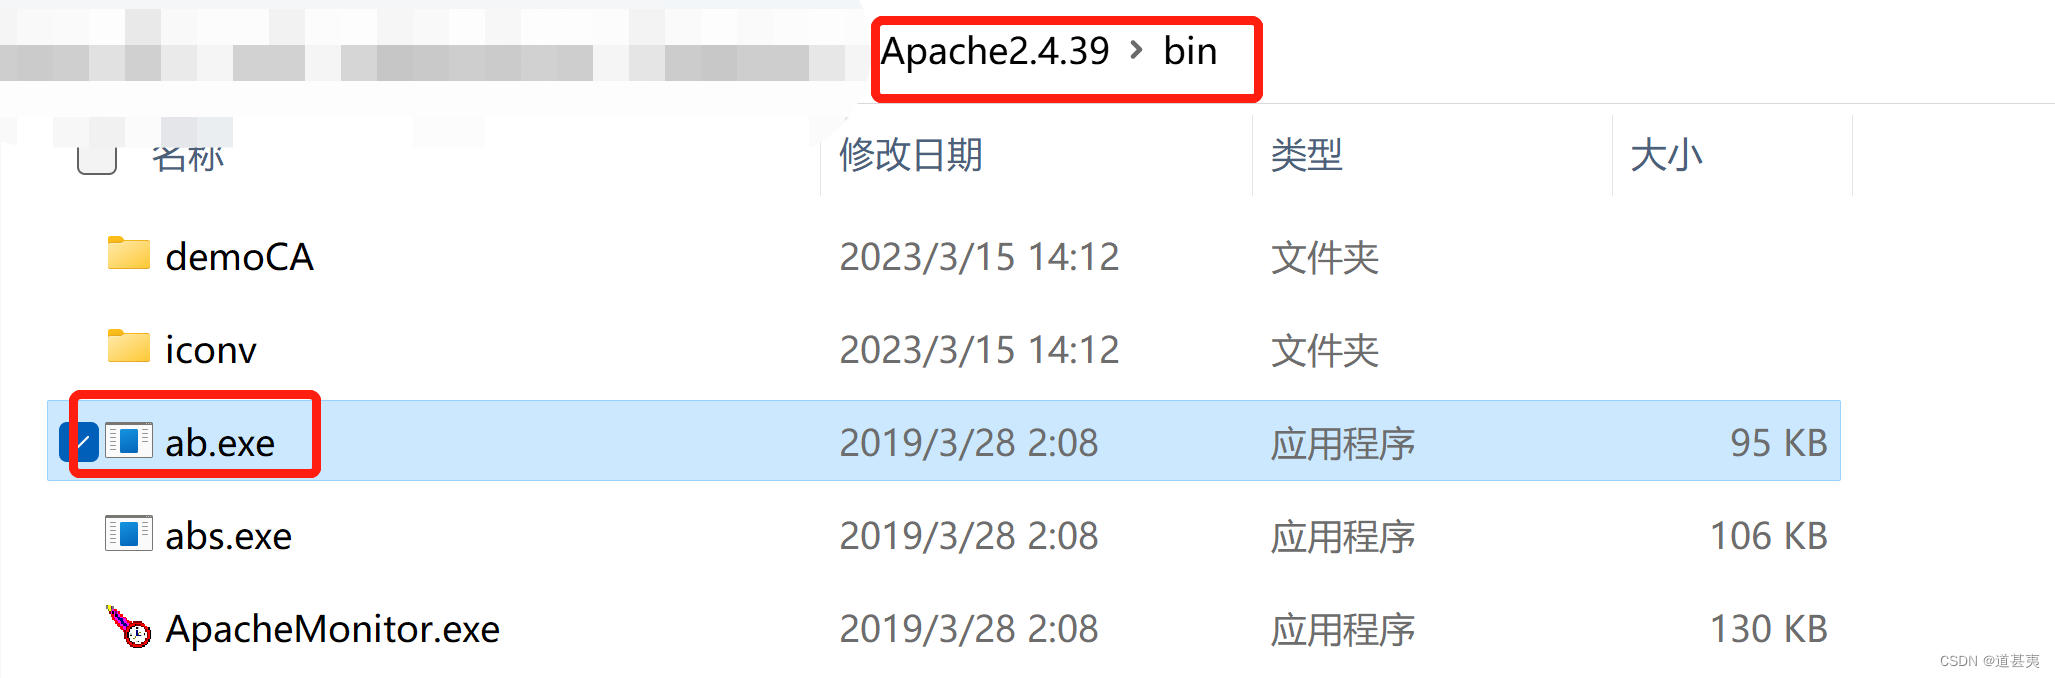
测压工具:apachebench
简称:ab
环境:windows
- 从apache里面提取
apachebench下载地址
-
本地以及安装过,则切换到该目录下,或者将目录加入环境变量
-
查看版本

windows下需要执行这样
.\ab localhost:port/
或者,之前使用上面的写法,后面又说不行,试了下下面的用法,又可以。
ab -x localhost:port/
ps:注意最后的'/'(必须)
2. 本地服务测试
2.1 一测:单例下
'use strict';
const http = require('node:http');
const PORT = 8081;

http.createServer((req, res) => {
  async function await4() {
    const ret = await new Promise((resolve, reject) => {
      setTimeout(resolve, 6000, 4)
    })
    return ret
  }
  function q2() {
    return new Promise((resolve, reject) => {
      setTimeout(resolve, 1000, 5)
    })
  }
  async function await5() {
    const ret = await q2()
    return ret
  }
  async function test() {
    // const [
    //   ret4,
    //   ret5
    // ] = await Promise.all([
    //   await4(),
    //   await5()
    // ])
    const ret4 = await await4()
    const ret5 = await await5()
    console.log(ret4, 'ret4')
    console.log(ret5, 'ret5')
    // 并发请求
    // 阻塞请求
  }
  (async function() {
    const id = Date.now() + Math.random(10)
    console.time(id)
    await test()
    console.timeEnd(id)
  })()
  res.end('ok');
}).listen(PORT, () => {
  http.get(`http://127.0.0.1:${PORT}`);
});
.\ab -n 5000 -c 500 localohost:8081
从promise.all改为两个阻塞await
得到两份测试结果数据
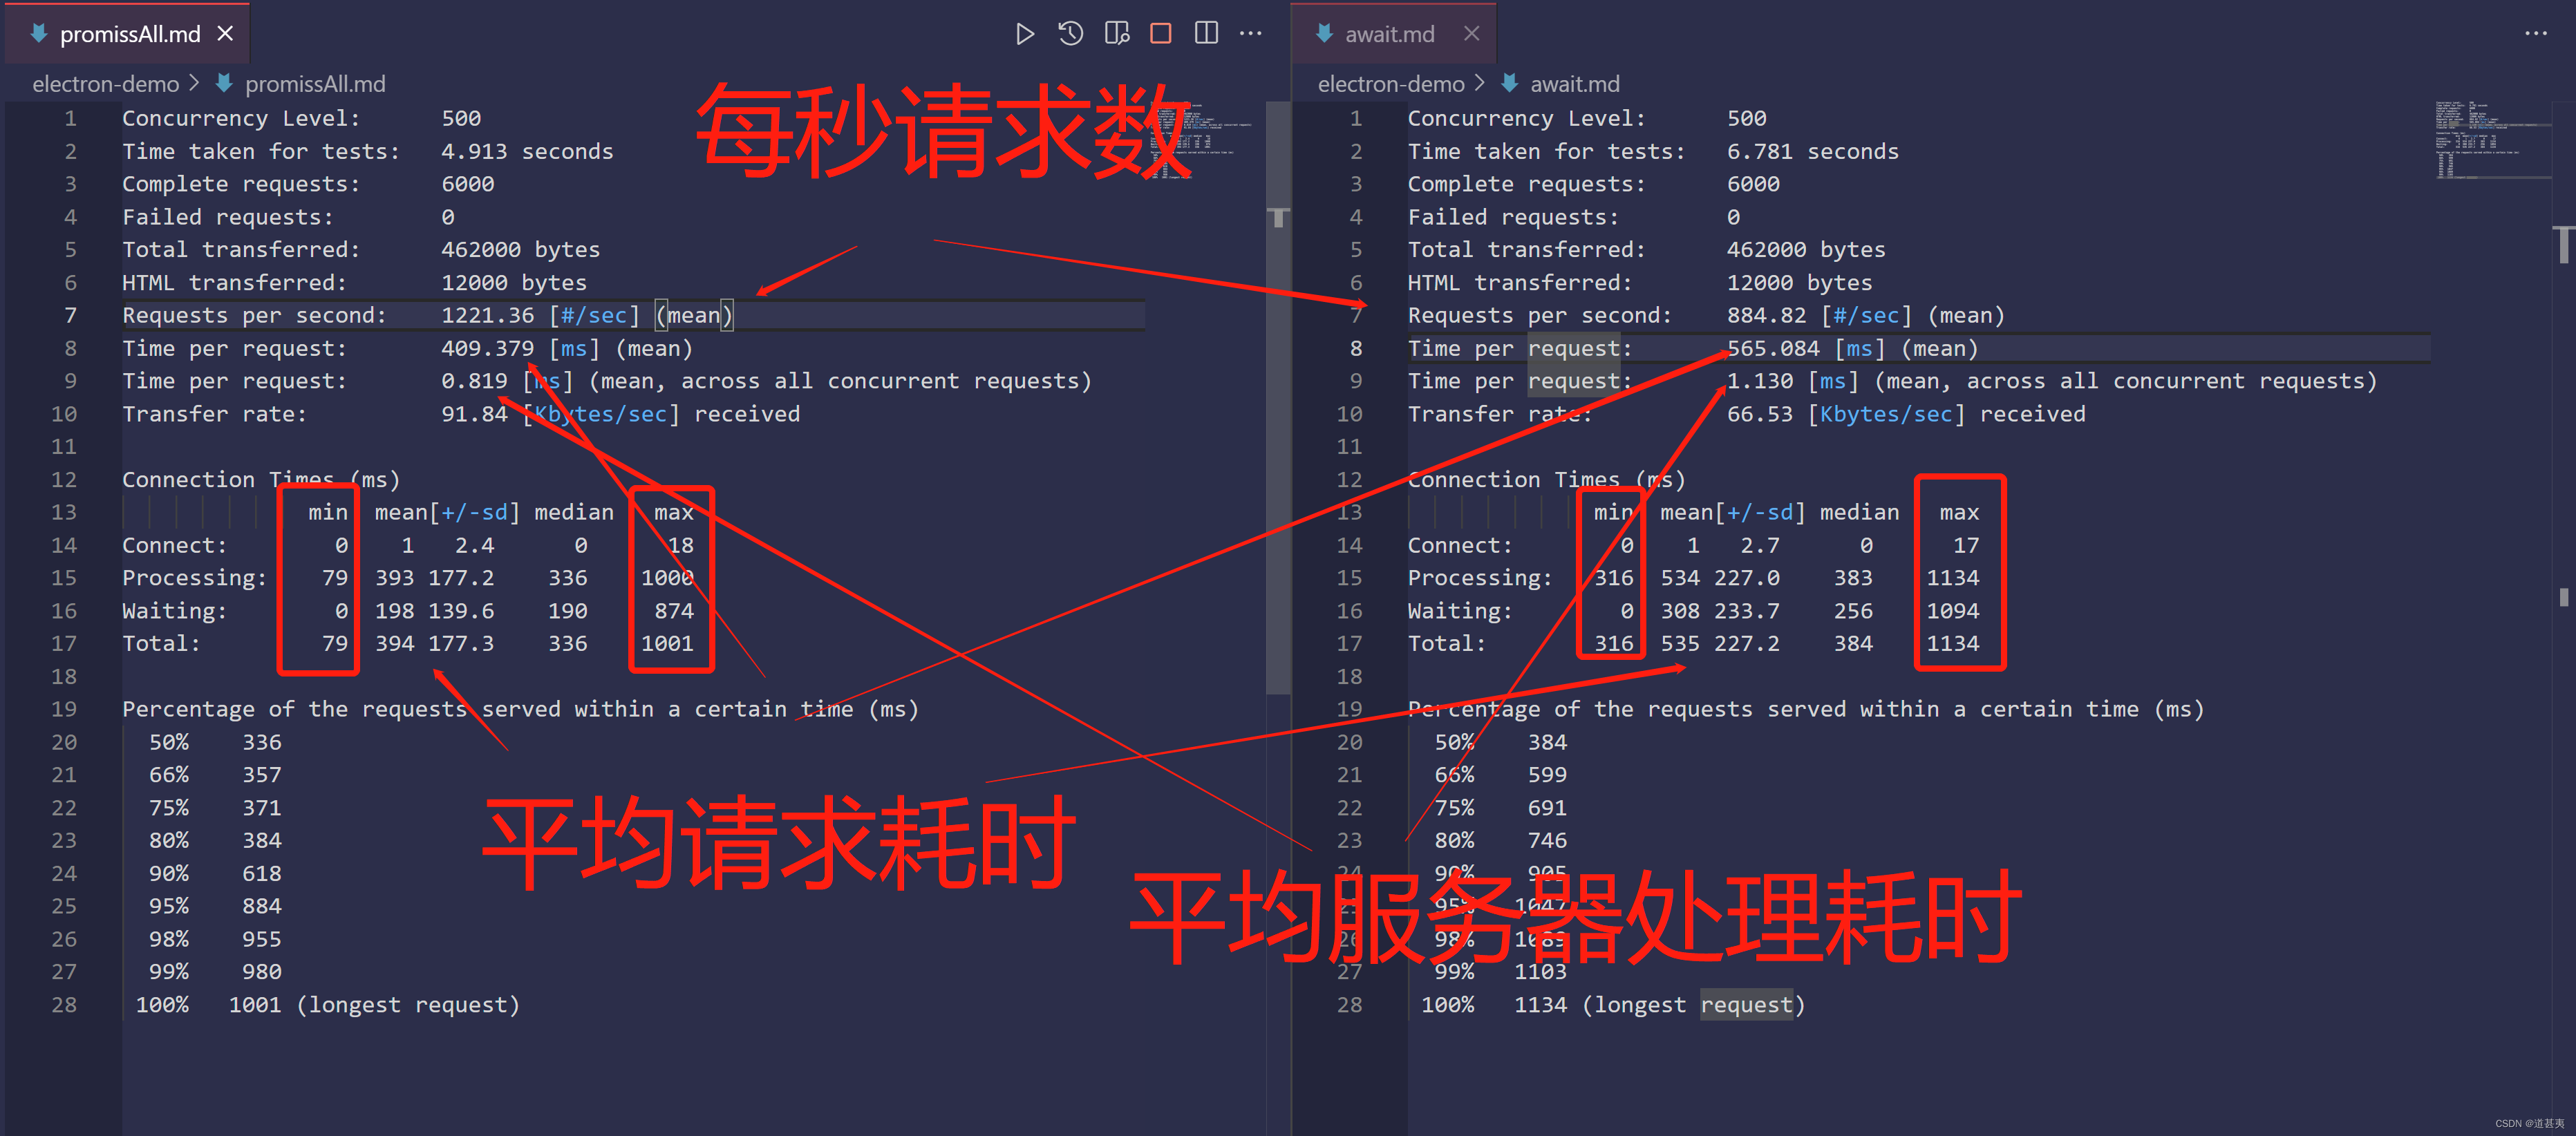
前面的请求差别不是很大,只有请求数量上去了,await才逐渐的增加耗时
平均每秒请求耗时也是差不多几十ms可以忽略不计。
总结:单例模式下,await和promise写法效果是一样的。
2.2 二测:集群下少量请求(2个)
const cluster = require('cluster')
const cpuNumber = require('os').cpus().length;
const http = require('http')

async function await4() {
  const ret = await new Promise((resolve, reject) => {
    setTimeout(resolve, 6000, 4)
  })
  return ret
}
function q2() {
  return new Promise((resolve, reject) => {
    setTimeout(resolve, 1000, 5)
  })
}
async function await5() {
  const ret = await q2()
  return ret
}
// 阻塞请求
async function testAwait() {
  const ret4 = await await4()
  const ret5 = await await5()
  console.log(ret4, 'ret4')
  console.log(ret5, 'ret5')
}
// 并发请求
async function testPromise() {
  const [
    ret4,
    ret5
  ] = await Promise.all([
    await4(),
    await5()
  ])
  console.log(ret4, 'ret4')
  console.log(ret5, 'ret5')
}

if (cluster.isMaster) {
  for (let i = 0; i < cpuNumber; i++) {
    cluster.fork()
  }
} else {
  http.createServer(async (req, res) => {
    await testAwait()
    // await testPromise()
    res.end()
  }).listen(3000)
  console.log('worker %d started', process.pid)
}

console.log('cpuNunber: %d', cpuNumber) // 目前电脑是八核
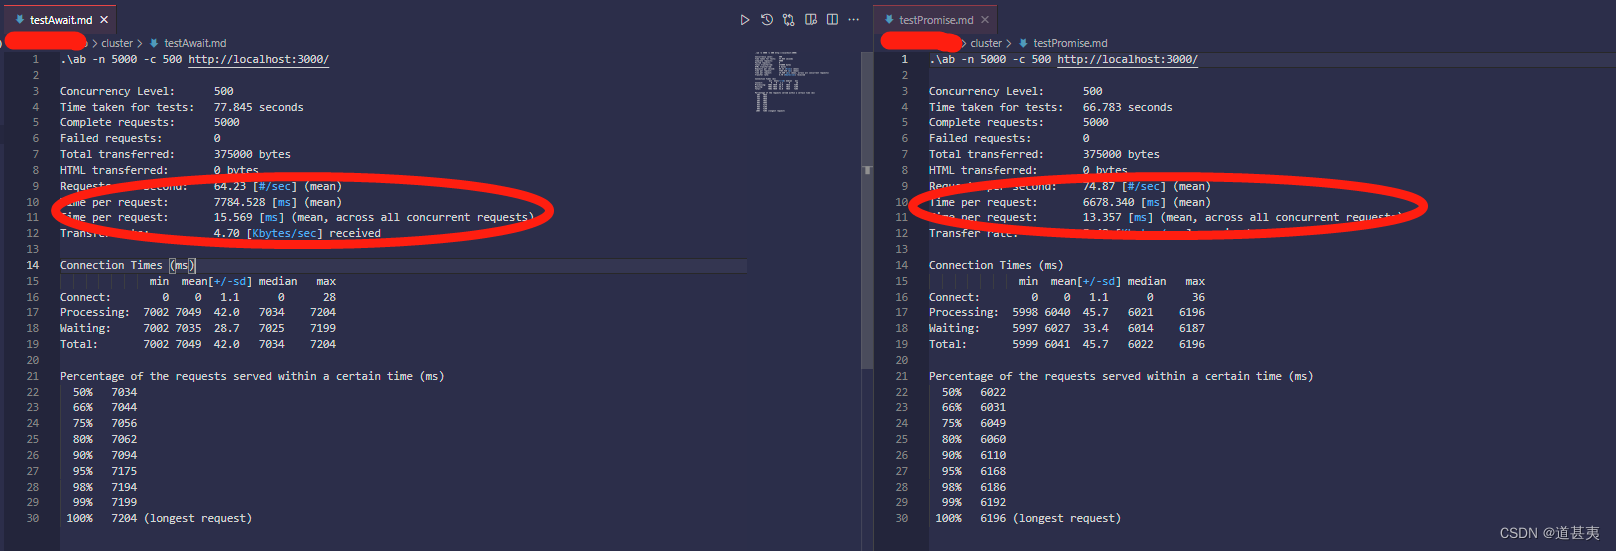
总结:集群少量请求模式下,await耗时比promise稍微多1s。
2.3 三测:集群下多个请求(8个)
const cluster = require('cluster')
const cpuNumber = require('os').cpus().length;
const http = require('http')

async function await4() {
  const ret = await new Promise((resolve, reject) => {
    setTimeout(resolve, 6000, 4)
  })
  return ret
}
function q2() {
  return new Promise((resolve, reject) => {
    setTimeout(resolve, 1000, 5)
  })
}
async function await5() {
  const ret = await q2()
  return ret
}
// 阻塞请求
async function testAwait() {
  const ret1 = await await4()
  const ret2 = await await5()
  const ret3 = await await4()
  const ret4 = await await5()
  const ret5 = await await4()
  const ret6 = await await5()
  const ret7 = await await4()
  const ret8 = await await5()
  const data = {
    ret1,
    ret2,
    ret3,
    ret4,
    ret5,
    ret6,
    ret7,
    ret8,
  }
  console.log(data)
  console.log('testAwait req over')
}
// 并发请求
async function testPromise() {
  const [
    ret1,
    ret2,
    ret3,
    ret4,
    ret5,
    ret6,
    ret7,
    ret8,
  ] = await Promise.all([
    await4(),
    await5(),
    await4(),
    await5(),
    await4(),
    await5(),
    await4(),
    await5(),
  ])
  const data = {
    ret1,
    ret2,
    ret3,
    ret4,
    ret5,
    ret6,
    ret7,
    ret8,
  }
  console.log(data)
  console.log('testPromise req over')
}

// since v16.0.0 - use isPrimary.
if (cluster.isMaster) {
  for (let i = 0; i < cpuNumber; i++) {
    cluster.fork()
  }
} else {
  http.createServer(async (req, res) => {
    // await testAwait()
    await testPromise()
    res.end()
  }).listen(5000)
  console.log('worker %d started', process.pid)
}

console.log('cpuNunber: %d', cpuNumber)
ab -n 3000 -c 500 http://localhost:5000/
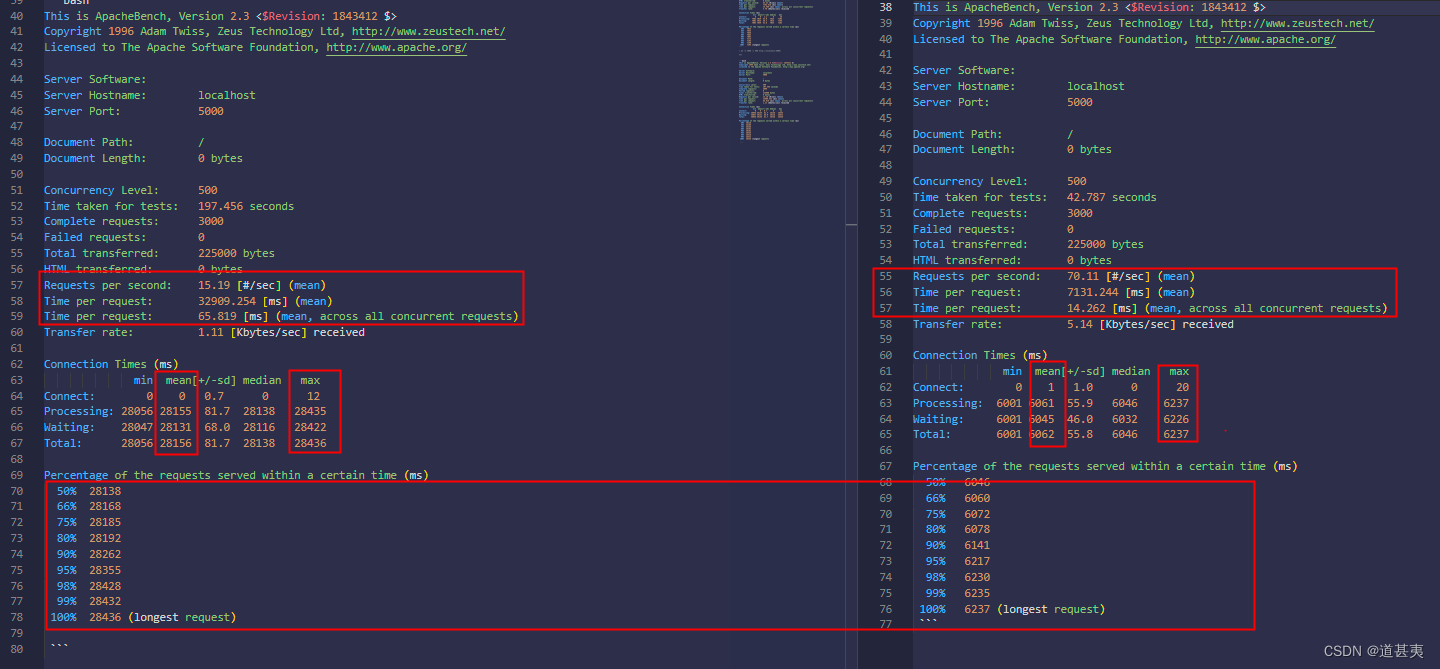
总结:集群模式多个请求下,await耗时比promise多出达到2s+。promise.all处理的平均每秒请求可比await多达50+。可见集群模式下多个请求合并后,优势明显。
promise.all每次请求时间:是根据最大的那个请求返回的时间为总的耗时。
await每次请求时间:是根据await数量的请求数耗时之和(应该内层还做了优化,所以实际是少一点)。
这是由于node的多线程和事件非阻塞及阻塞模式导致的。
promise.all为非阻塞模式,每个请求都调用空闲地线程来处理;
而await是每次都使用一个线程,导致其他线程出于空闲状态,所以没有充分利用cup的多核处理能力。
3. 总结
- 在node应用中平时使用promise.all来代替多个await,当发布正式上线处于集群模型下时,会得到明显的效果收益。
- promise.all确实能够对多个await的处理性能做到优化效果。
附录1:
Options are:
    -n requests    #执行的请求数,即一共发起多少请求。
    -c concurrency    #请求并发数。
    -t timelimit    #测试所进行的最大秒数。其内部隐含值是-n 50000,它可以使对服务器的测试限制在一个固定的总时间以内。默认时,没有时间限制。
    -s timeout    #指定每个请求的超时时间,默认是30秒。
    -b windowsize    #指定tcp窗口的大小,单位是字节。
    -B address    #指定在发起连接时绑定的ip地址是什么。
    -p postfile    #指定要POST的文件,同时要设置-T参数。
    -u putfile    #指定要PUT的文件,同时要设置-T参数。
    -T content-type    #指定使用POST或PUT上传文本时的文本类型,默认是'text/plain'。
    -v verbosity    #设置详细模式等级。
    -w    #将结果输出到html的表中。
    -i    #使用HEAD方式代替GET发起请求。
    -y attributes    #以表格方式输出时,设置html表格tr属性。
    -z attributes    #以表格方式输出时,设置html表格th或td属性。
    -C attribute    #添加cookie,比如'Apache=1234'。(可重复)
    -H attribute    #为请求追加一个额外的头部,比如'Accept-Encoding: gzip'。(可重复)
    -A attribute    #对服务器提供BASIC认证信任。用户名和密码由一个:隔开,并以base64编码形式发送。无论服务器是否需要(即,是否发送了401认证需求代码),此字符串都会被发送。
    -P attribute    #对一个中转代理提供BASIC认证信任。用户名和密码由一个:隔开,并以base64编码形式发送。无论服务器是否需要(即, 是否发送了401认证需求代码),此字符串都会被发送。
    -X proxy:port   #指定代理服务器的IP和端口。
    -V              #打印版本信息。
    -k              #启用HTTP KeepAlive功能,即在一个HTTP会话中执行多个请求。默认时,不启用KeepAlive功能。
    -d              #不显示"percentage served within XX [ms] table"的消息(为以前的版本提供支持)。
    -q              #如果处理的请求数大于150,ab每处理大约10%或者100个请求时,会在stderr输出一个进度计数。此-q标记可以抑制这些信息。
    -g filename     #把所有测试结果写入一个'gnuplot'或者TSV(以Tab分隔的)文件。此文件可以方便地导入到Gnuplot,IDL,Mathematica,Igor甚至Excel中。其中的第一行为标题。
    -e filename     #产生一个以逗号分隔的(CSV)文件,其中包含了处理每个相应百分比的请求所需要(从1%到100%)的相应百分比的(以微妙为单位)时间。由于这种格式已经“二进制化”,所以比'gnuplot'格式更有用。
    -r              #当收到错误时不要退出。
    -h              #输出帮助信息
    -Z ciphersuite  指定SSL/TLS密码套件
    -f protocol     指定SSL/TLS协议(SSL3, TLS1, TLS1.1, TLS1.2 or ALL)

结果参数说明:

  Concurrency Level 并发数多少,等于-c后面的数值。
  Time taken for tests 测试总耗时。
  Complete requests 成功收到的请求数。
  Failed requests 请求失败数目,可能因为网络连接,异常,请求数据长度等等。
  Non-2xx responses 表示返回的HTTP status code不是2xx的数目(比如404,401,500...),如果都是2xx,这个指标不显示在结果里面。
  Requests per second 每秒请求数,等于总请求数/测试总耗时。
  Time per request 每一个请求平均花费时间。
  第一个Time per request等于concurrency * time taken * 1000 / done,
  第二个Time per request(mean, across all concurrency requests)等于time taken * 1000 / done,
  第一个可以理解为用户平均请求等待时间,
  第二可以理解为服务器平均请求等待时间。


 2935
2935


 被折叠的 条评论
为什么被折叠?
被折叠的 条评论
为什么被折叠?
 到【灌水乐园】发言


