


1、微信侧文档 模板消息 | 微信开放文档
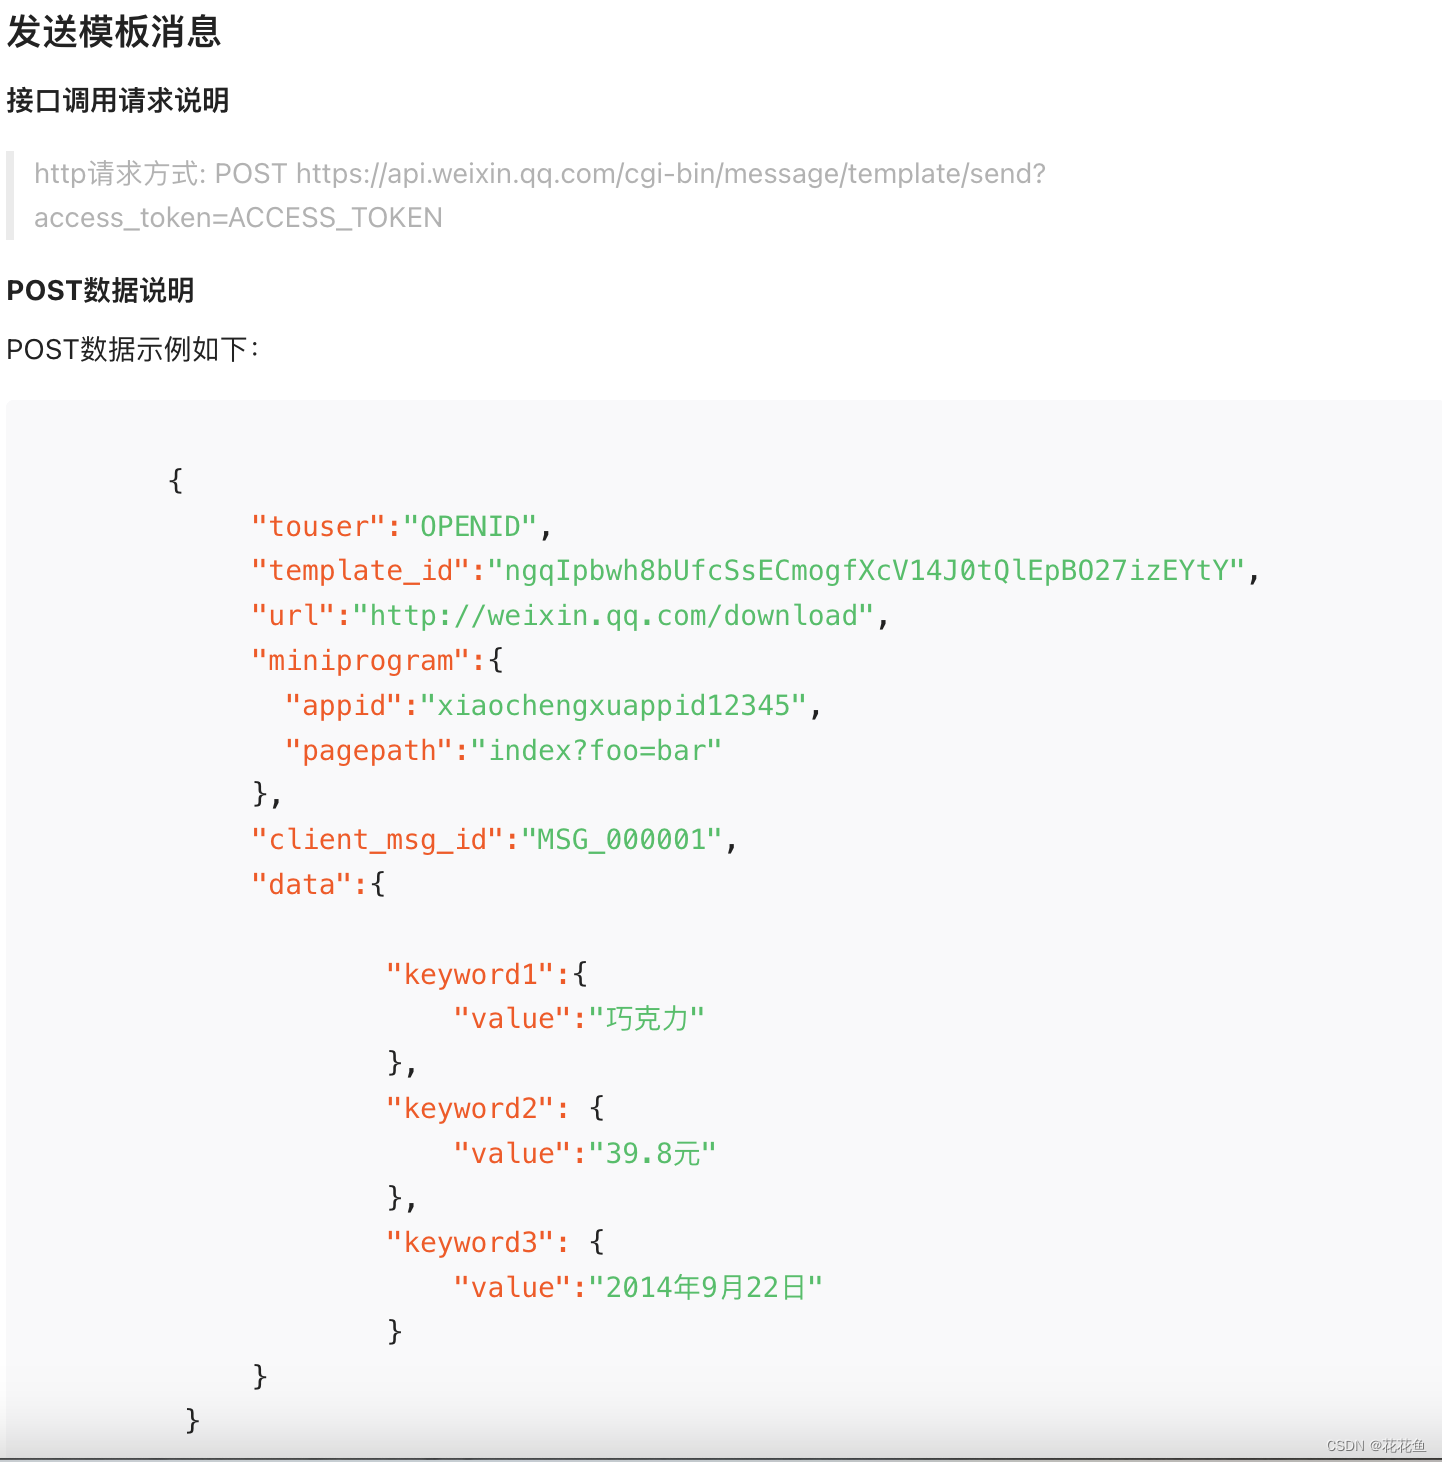
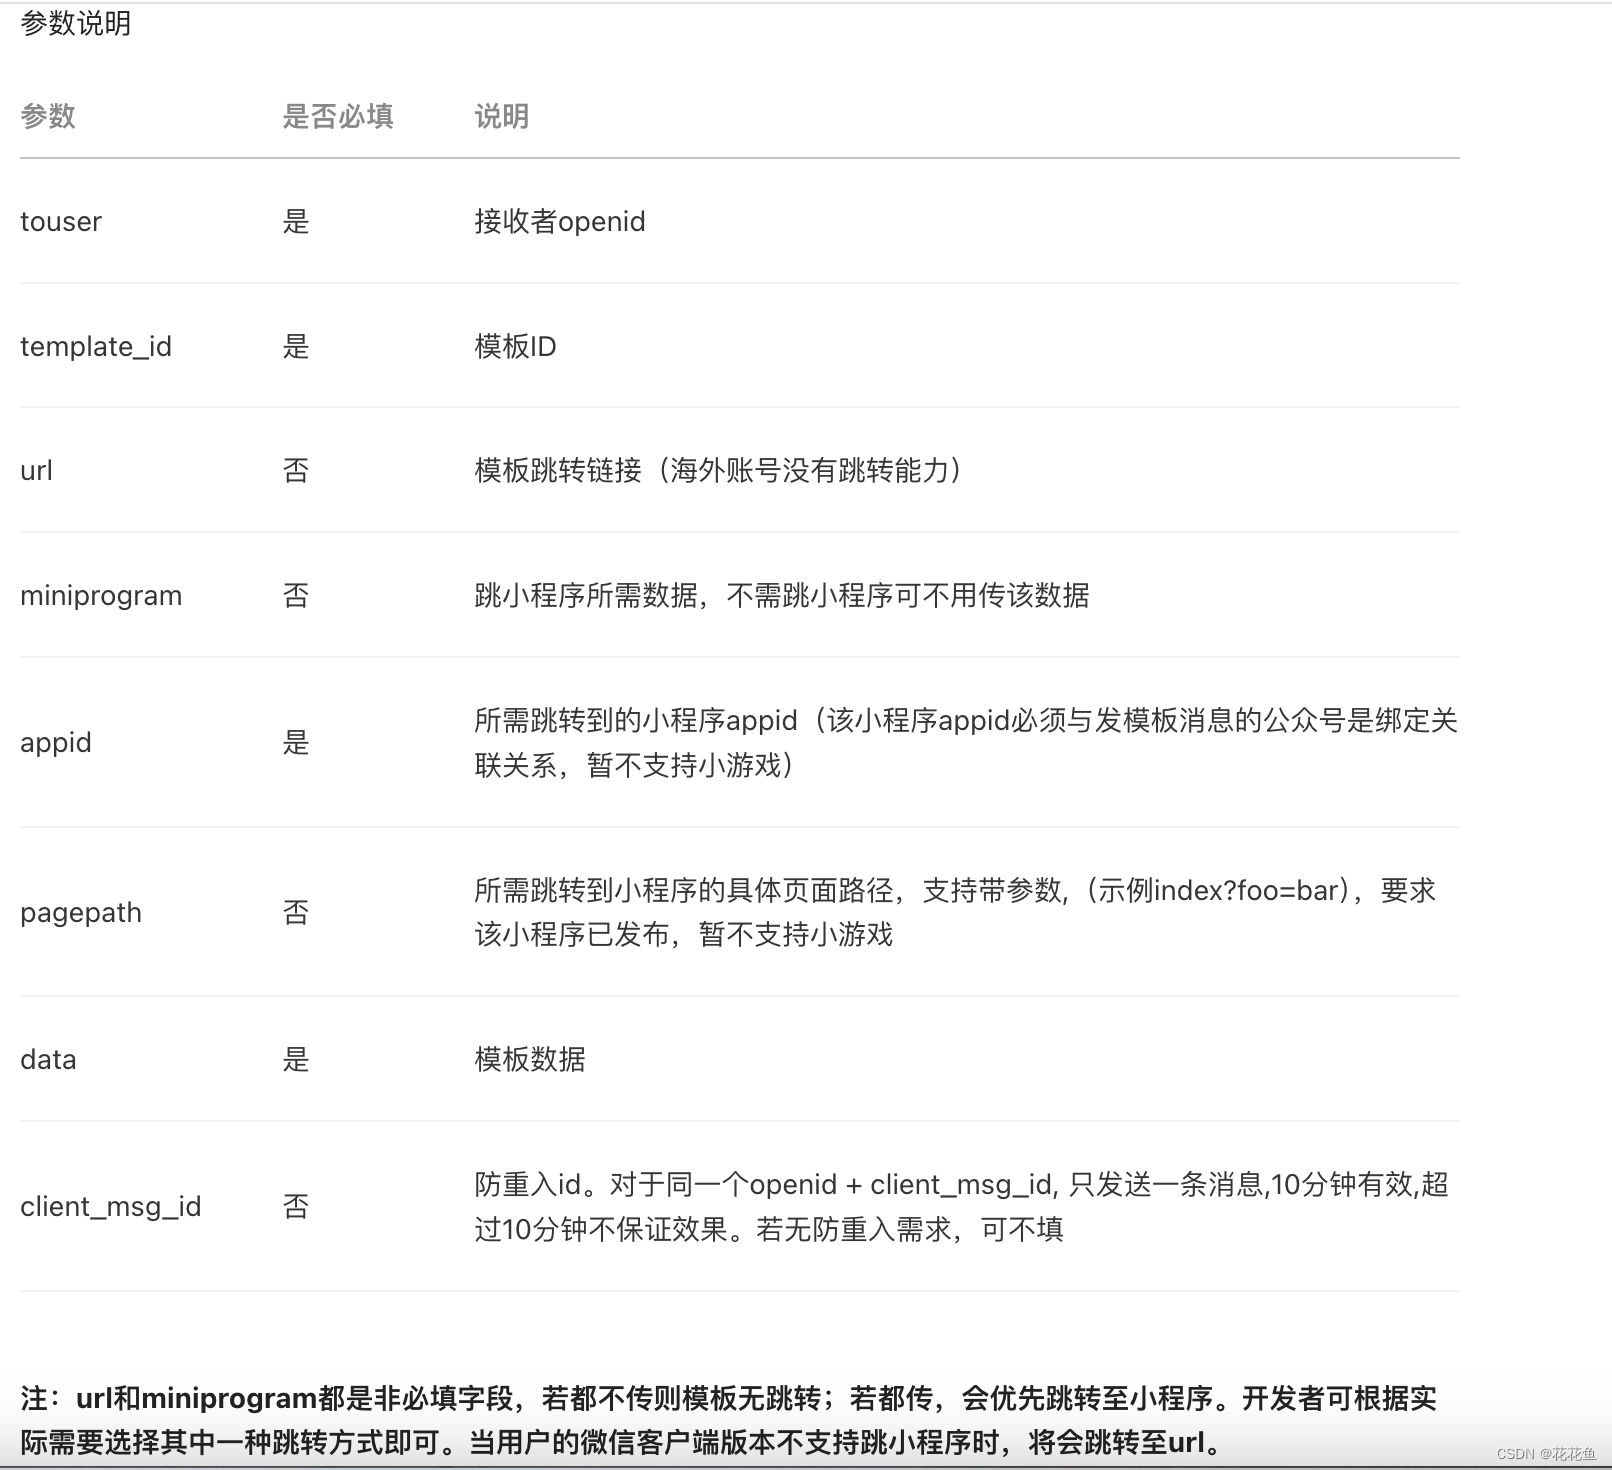
参数说明:
说明:发送模板消息,是一个post请求。
touser:是接收者openid,这个openid是公众号h5网页获取的openid,与小程序侧的openid是不一样的。(必填)如果开通了开放平台会有一个UnionID。
(
如果开发者拥有多个移动应用、网站应用、和公众账号(包括小程序),可通过 UnionID 来区分用户的唯一性,因为只要是同一个微信开放平台账号下的移动应用、网站应用和公众账号(包括小程序),用户的 UnionID 是唯一的。换句话说,同一用户,对同一个微信开放平台下的不同应用,unionid是相同的。UnionID 机制说明 | 微信开放文档
)
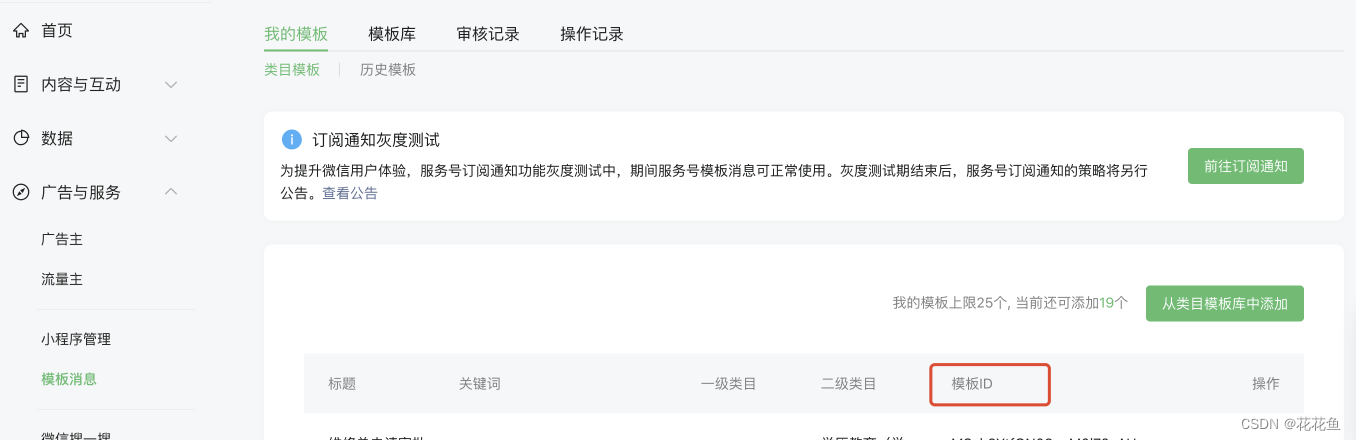
template_id:模板ID,这个就是公众号--模板消息--我的模板--类目模板。
url:跳转的url,这个可以是一个h5的页面。(非必填)
miniprogram:设置跳转到小程序(非必填)。
appid:小程序的appid(必填,如果你指定要跳转小程序。)
appid,是要在公众号平台里进行绑定的,那小程序是一定要发布一版本的。
公众号-- 小程序管理--进行绑定,输入小程序appid,然后就可以。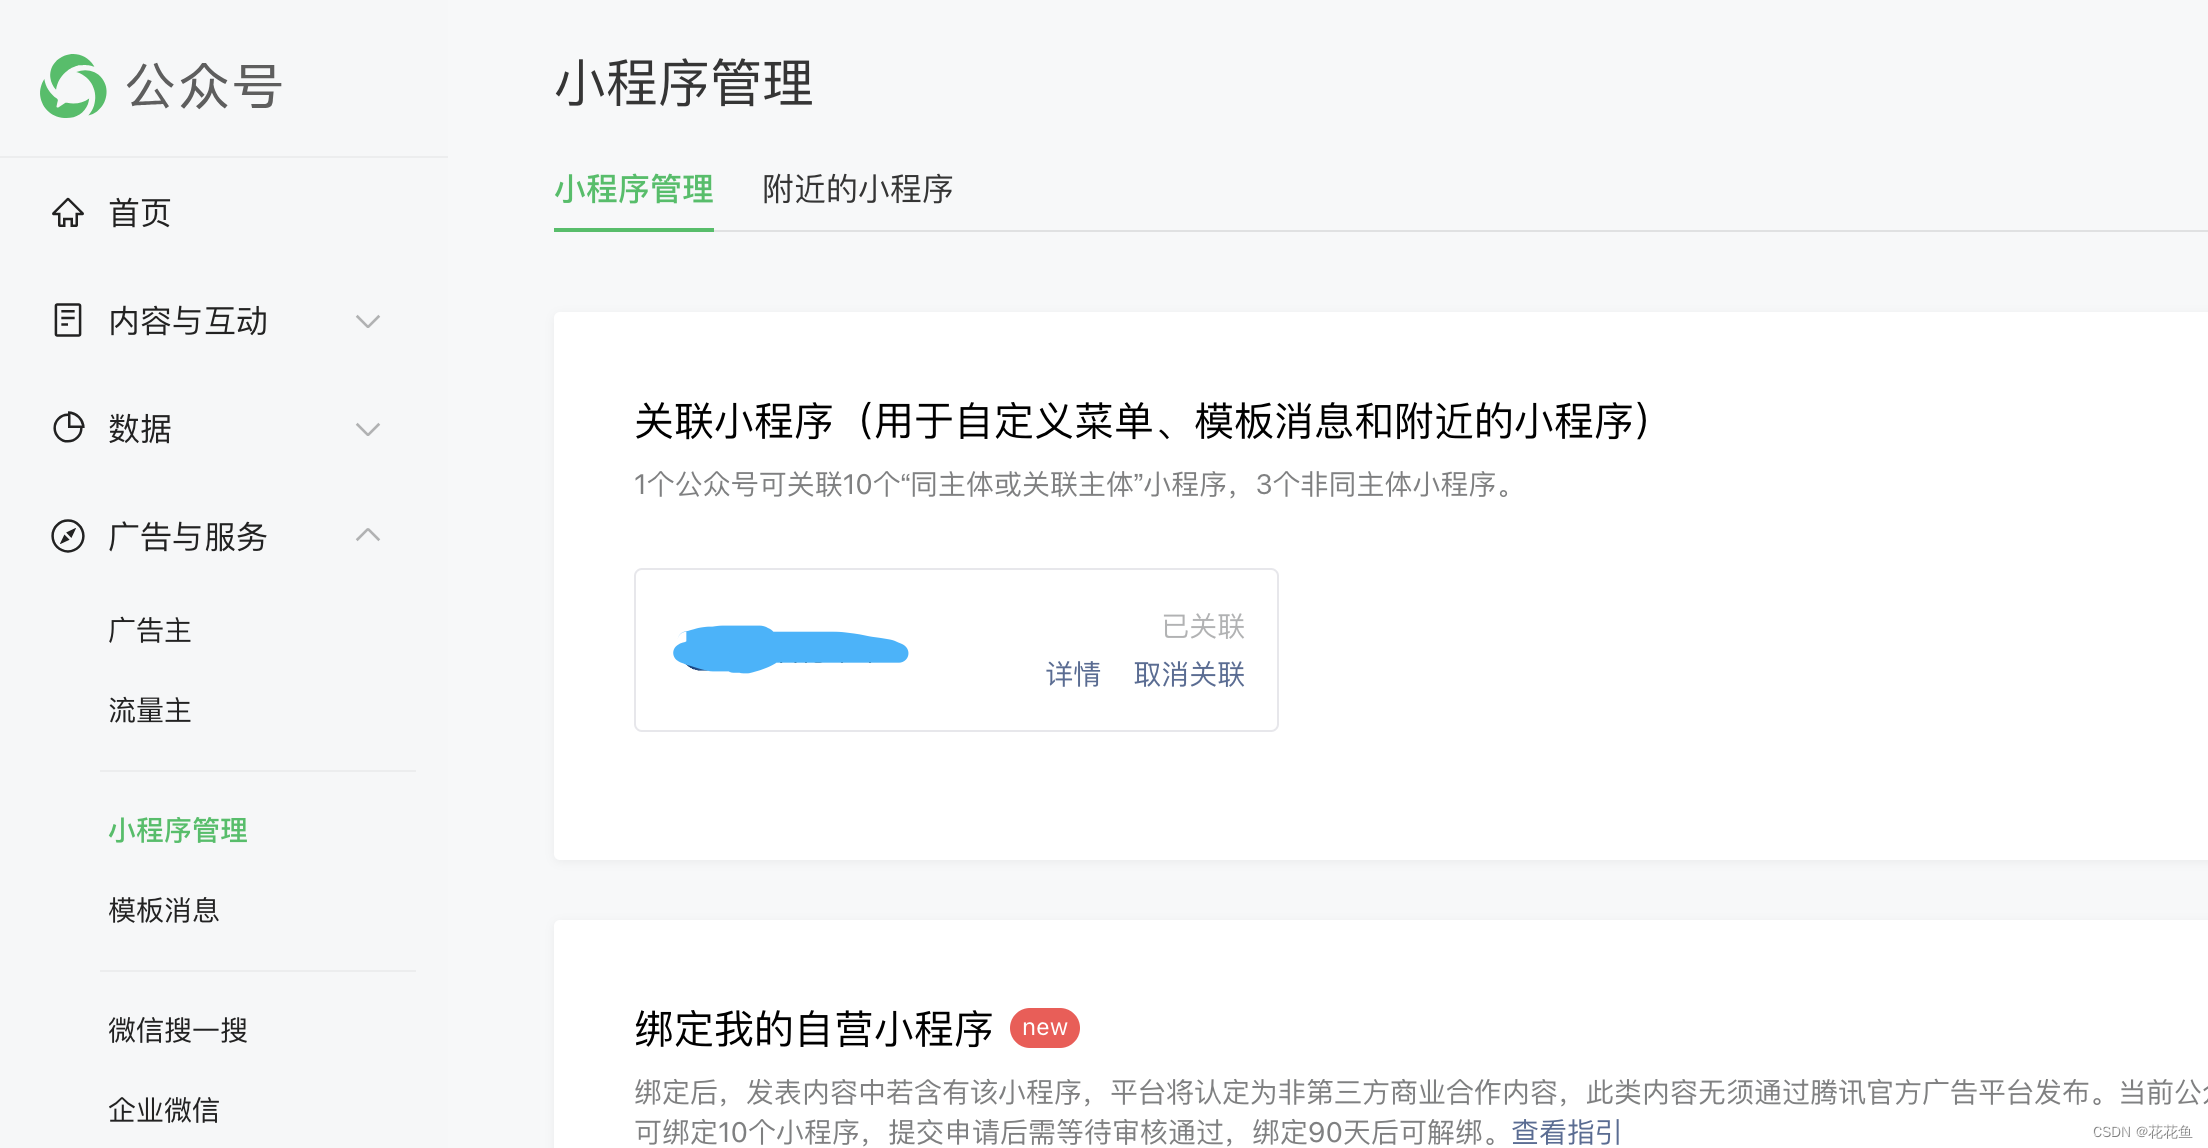
pagepath:小程序的访问位置+参数,比如pages/index/index?id=1,传入参数id=1,然后我们在小程序里就可以接收id参数,并且进行相关数据的获取直接展示或者进行页面的跳转等等。
data:上述模板消息中的详情中的页面的相关参数(必填):

client_msg_id:(非必填),可以不传。
2、根据文档,我们进行编码。
1) pom.xml中加入fastjson
<dependency>
	<groupId>com.alibaba</groupId>
	<artifactId>fastjson</artifactId>
	<version>1.2.73</version>
</dependency>
2) 编写相关发送工具类中的方法:
/**
* 公众号模板消息发送
*
* @param openid 接收用户openid
* @param access_token 全局访问令牌
* @param data 测试模板:发送的内容
* @param rdate 时间
* @param id 维修单id
* @param fybxdh 申请单号
* @param realname 申请人
* @param result 审批结果
* @param companyname 所在单位
* @return
*/
public static String sendMsg2WeChat(String path, String openid, String rdate,
Integer id, String result, String fybxdh, String realname, String companyname) {
// SvrPrint.print("sendMsg2Usr");
String access_token = getAccessToken(path, WxConstant.AppId, WxConstant.AppSecret);
String url = "https://api.weixin.qq.com/cgi-bin/message/template/send?access_token=" + access_token;
System.out.println("请求微信的Url:" + url);
JSONObject json = new JSONObject();
String template_id = "";
try {
JSONObject data = new JSONObject();
json.put("touser", openid);
// 维修单申请审批结果通知
template_id = templateId_repair_result;
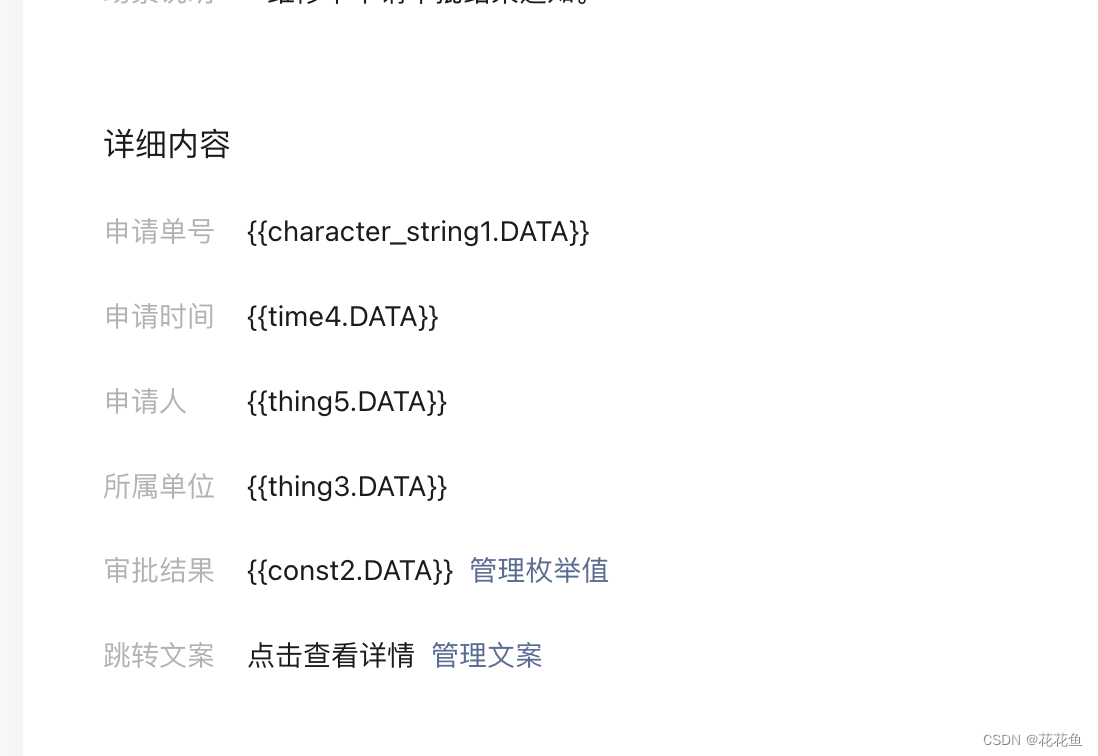
// 申请单号{{character_string1.DATA}}
data.put("character_string1", JSONObject.parse("{\"value\":\"" + fybxdh + "\"}"));
// 申请时间{{time4.DATA}}
data.put("time4", JSONObject.parse("{\"value\":\"" + rdate + "\"}"));
// 申请人{{thing5.DATA}}
data.put("thing5", JSONObject.parse("{\"value\":\"" + realname + "\"}"));
// 所属单位{{thing3.DATA}}
data.put("thing3", JSONObject.parse("{\"value\":\"" + companyname + "\"}"));
//审批结果{{const2.DATA}} 管理枚举值(审核通过\驳回申请)
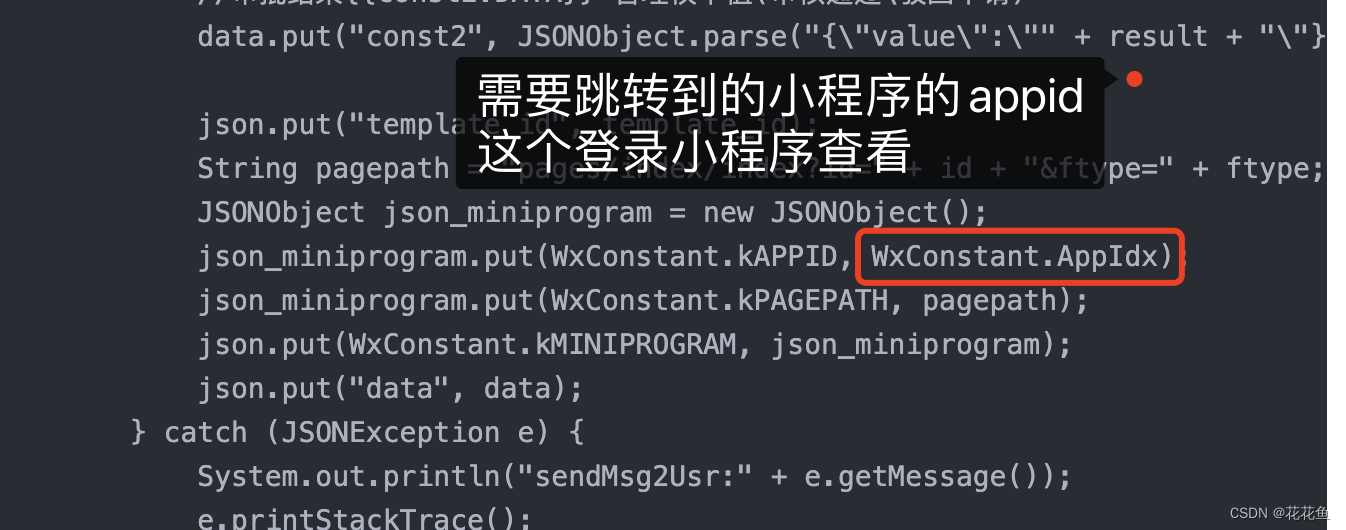
data.put("const2", JSONObject.parse("{\"value\":\"" + result + "\"}"));
json.put("template_id", template_id);
String pagepath = "pages/index/index?id=" + id;
JSONObject json_miniprogram = new JSONObject();
json_miniprogram.put(WxConstant.kAPPID, WxConstant.AppIdx);
json_miniprogram.put(WxConstant.kPAGEPATH, pagepath);
json.put(WxConstant.kMINIPROGRAM, json_miniprogram);
json.put("data", data);
} catch (JSONException e) {
System.out.println("sendMsg2Usr:" + e.getMessage());
e.printStackTrace();
}
String resultStr = HttpRequest.sendPost(url, json.toString());
try {
JSONObject parseObject = JSONObject.parseObject(resultStr);
System.out.println("resultStr:" + resultStr);
String errmsg = parseObject.getString("errmsg");
if (!"ok".equals(errmsg)) {
String status = "发送通知失败";
String note = "发送通知,单号:" + fybxdh + ",错误:" + resultStr;
int type = 1;
// 日志
//addLog("admin", "127.0.0.1", status, type, note, fybxdh);
System.out.println("发送通知错误:" + resultStr);
return "error";
}
} catch (JSONException e) {
System.out.println("发送通知异常:" + e.getMessage());
String status = "发送通知异常";
String note = "发送通知,单号:" + fybxdh + ",错误:" + e.getMessage();
int type = 1;
// 日志
// addLog("admin", "127.0.0.1", status, type, note, fybxdh);
return "error";
}
return "success";
}
getAccessToken: 只是获取方法,并没有进行存储,实际开发是要存到服务器磁盘文件,有效期
是2小时,7200秒。
public static String getAccessToken(String APPID, String APPSECRET) {
		//https://api.weixin.qq.com/cgi-bin/token?grant_type=client_credential&appid=wxd76a692bcec1f4df&secret=daedcccd73b1a23a071d2e0f2gf41dc1
		String url = "https://api.weixin.qq.com/cgi-bin/token";
		String params = "grant_type=client_credential&appid=" + APPID
				+ "&secret=" + APPSECRET;
		System.out.println(url+":"+params);
		String resultStr =  "" ;
		try {
			resultStr = HttpRequest.sendGet(url, params);
		}catch(Exception e) {
			System.out.println(e.toString());
		}
		return resultStr;
	}
微信开放文档 获取access_token
/**
 * All rights Reserved, Designed By 花花鱼
 * @Title:  HttpRequest.java
 * @Description:
 * @author: 花花鱼
 * @date:   2016年8月8日 上午9:27:31
 * @version v1.0
 */
package com.jstonesoft.qd.util;

import java.io.BufferedReader;
import java.io.IOException;
import java.io.InputStreamReader;
import java.io.OutputStreamWriter;
import java.io.PrintWriter;
import java.net.URL;
import java.net.URLConnection;

public class HttpRequest {
	/**
	 * 向指定URL发送GET方法的请求
	 *
	 * @param url
	 *            发送请求的URL
	 * @param param
	 *            请求参数,请求参数应该是 name1=value1&name2=value2 的形式。
	 * @return URL 所代表远程资源的响应结果
	 */
	public static String sendGet(String url, String param) {
		String result = "";
		BufferedReader in = null;
		try {
			String urlNameString = url + "?" + param;
			URL realUrl = new URL(urlNameString);
			// 打开和URL之间的连接
			URLConnection connection = realUrl.openConnection();
			// 设置通用的请求属性
			connection.setRequestProperty("accept", "*/*");
			connection.setRequestProperty("connection", "Keep-Alive");
			connection.setRequestProperty("user-agent",
					"Mozilla/4.0 (compatible; MSIE 6.0; Windows NT 5.1;SV1)");
			// 建立实际的连接
			connection.connect();
			// 获取所有响应头字段
//			Map<String, List<String>> map = connection.getHeaderFields();
			// 遍历所有的响应头字段
//			for (String key : map.keySet()) {
//				System.out.println(key + "--->" + map.get(key));
//			}
			// 定义 BufferedReader输入流来读取URL的响应
			// 获取URLConnection对象对应的输出流
			in = new BufferedReader(new InputStreamReader(
					connection.getInputStream(), "utf-8"));
			String line;
			while ((line = in.readLine()) != null) {
				result += line;
			}
//			System.out.println(result);
		} catch (Exception e) {
			System.out.println("发送GET请求出现异常!" + e);
			e.printStackTrace();
		}
		// 使用finally块来关闭输入流
		finally {
			try {
				if (in != null) {
					in.close();
				}
			} catch (Exception e2) {
				e2.printStackTrace();
			}
		}
		return result;
	}

	/**
	 * 向指定 URL 发送POST方法的请求
	 *
	 * @param url
	 *            发送请求的 URL
	 * @param param
	 *            请求参数,请求参数应该是 name1=value1&name2=value2 的形式。
	 * @return 所代表远程资源的响应结果
	 */
	public static String sendPost(String url, String param) {
		PrintWriter out = null;
		BufferedReader in = null;
		String result = "";
		try {
			URL realUrl = new URL(url);
			// 打开和URL之间的连接
			URLConnection conn = realUrl.openConnection();
			//设置通用的请求属性
			conn.setRequestProperty("user-agent","Mozilla/5.0 (Windows NT 6.1; WOW64; rv:21.0) Gecko/20100101 Firefox/21.0)");
			// 发送POST请求必须设置如下两行
			conn.setDoOutput(true);
			conn.setDoInput(true);
			// 获取URLConnection对象对应的输出流
			OutputStreamWriter outWriter = new OutputStreamWriter(conn.getOutputStream(), "utf-8");
			out = new PrintWriter(outWriter);
			// 发送请求参数
			out.print(param);
			// flush输出流的缓冲
			out.flush();
			// 定义BufferedReader输入流来读取URL的响应
			in = new BufferedReader(new InputStreamReader(conn.getInputStream(), "utf-8"));
			String line;
			while ((line = in.readLine()) != null) {
				in = new BufferedReader(new BufferedReader(new InputStreamReader(conn.getInputStream(), "utf-8")));
				result += line;
			}
		} catch (Exception e) {
			System.out.println("发送 POST 请求出现异常!"+e);
			e.printStackTrace();
		}
		//使用finally块来关闭输出流、输入流
		finally{
			try{
				if(out!=null){
					out.close();
				}
				if(in!=null){
					in.close();
				}
			}
			catch(IOException ex){
				ex.printStackTrace();
			}
		}
		return result;
	}
}
3) 编写测试用例
@Controller
@RequestMapping("wx")
public class WxTplController {
    /**
	 * 维修申请单结果推送消息调用
	 *
	 * @return
	 */
	@ResponseBody
	@RequestMapping(path = "/repairresult", method = RequestMethod.GET)
	public String RepairResultSend(Repairreq repairreq, HttpServletRequest req) {
		repairreq = new Repairreq();
		repairreq.setId(1);
		repairreq.setRdate(getCurrentDateStr2());
		repairreq.setRtitle("维修申请001");
		repairreq.setRcontent("维修申请001");
		repairreq.setCompanyName("花花鱼");
		repairreq.setFybxdh("WXSQ-2024-05-001");
		repairreq.setRealname("管理员");
		repairreq.setUserId(105);
		Userinfo userinfo = userinfoService.getById(repairreq.getUserId());
		if (userinfo != null) {
			String path = req.getSession().getServletContext().getRealPath("/wx/");
			String openid = userinfo.getOpenidg();
			if (openid != null && !openid.equals("")) {
				String rtitle = repairreq.getRtitle();
				if (rtitle.length() > 20) {
					rtitle = rtitle.substring(0, 18) + "..";
				}
				String rdate = repairreq.getRdate();
				String fybxdh = repairreq.getFybxdh();
				String realname = repairreq.getRealname();
				String companyname = repairreq.getCompanyName();
				// 发送订阅消息
				String kind = WxConstant.kNotifyRepairResult;
				Integer id = repairreq.getId();// 维修单id
				String result = "审核通过";
				result = WXPublicUtils.sendMsg2WeChat(path, openid, rtitle, rdate, id, result, fybxdh,
						realname, companyname);
				if (result != null && result.equals("success")) {
					System.err.println(result);
				}
			} else {
				System.err.println("openid is null");
			}

		} else {
			System.err.println("userinfo is null");
		}
		return "ok";
	}

}
以上是实现发送模板消息的基本代码,注意,这个一定要先获取公众号下的openid才可以,一般我们会通过小程序直接通过授权域名的h5网页来进行绑定操作。这样就可以实现通过手机号来获取openid的方法。
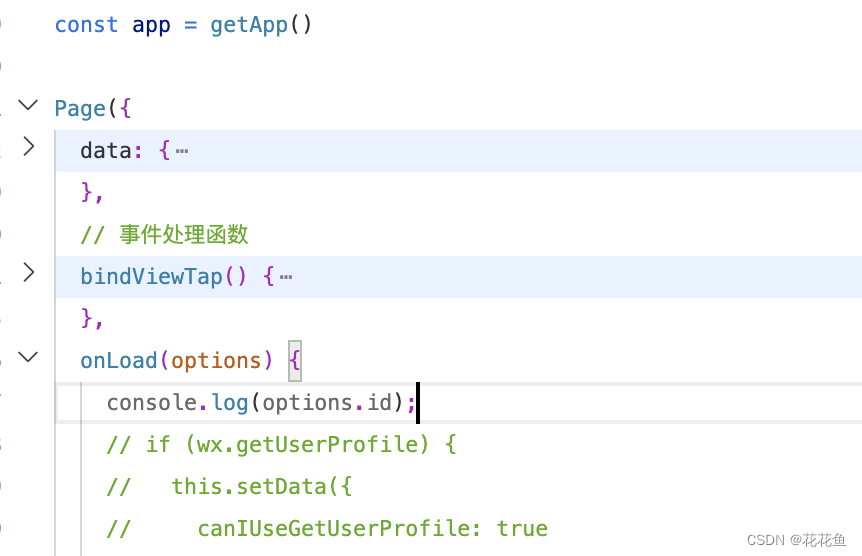
小程序中去获取参数:
  onLoad(options) {
     console.log(options.id); //接收到的id值。
  }
下面我们就要进行调试了......


 953
953

 被折叠的 条评论
为什么被折叠?
被折叠的 条评论
为什么被折叠?
 到【灌水乐园】发言


