部署wordpress论坛,并实现正常访问登录论坛

用Base源安装 

 yum -y install https://mirrors.tuna.tsinghua.edu.cn/remi/enterprise/remi-release-7.rpm

安装完成之后,进入/etc/yum.repos.d修改remi-php74.repo文件


用vim打开的话将里面所有 enabled=0 改为 enabled=1 或者用sed直接在命令行中更改

sed -i 's#enabled=0#enabled=1#g'  /etc/yum.repos.d/remi-php74.repo
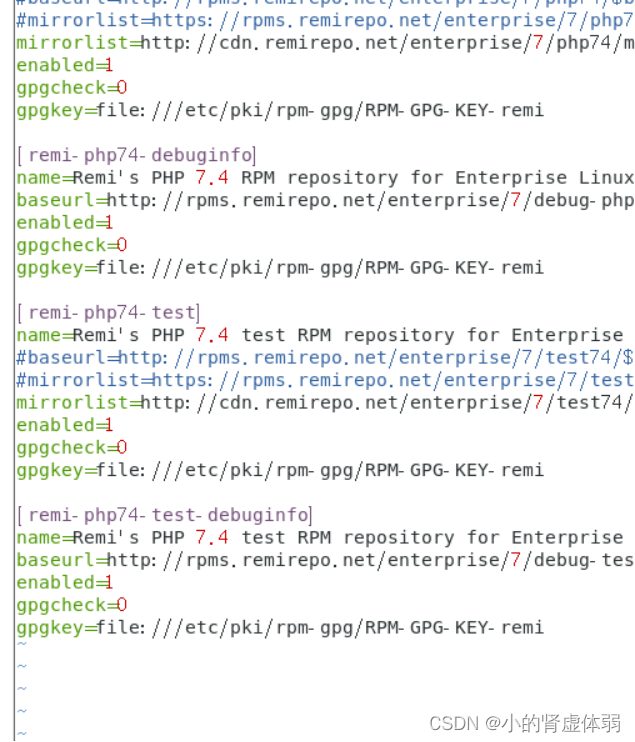
 安装php5.6

yum -y install php56-php php56-php-mysqlnd mariadb-server

开启httpd服务和mariadb服务

systemctl start httpd

systemctl start mariadb

或者设置开机自启httpd服务mariadb服务

systemctl enable  httpd 
systemctl enable mariadb

命令行输入 mysql

进入MariaDB交互界面

                                          输入create database wordpress;创建资源库

MariaDB [(none)]> create database wordpress;

授予所有的wordpress到wordpress@ 'localhost ' 'xue@ '标识;

MariaDB [(none)]> grant all on wordpress.* to wordpress@'localhost' identified by 'xue@';

 下载最新wordpress简体中文版

wget https://cn.wordpress.org/latest-zh_CN.zip

解压缩下载到的文件

unzip latest-zh_CN.zip 

将解压缩后的文件放到/var/www/html目录下

mv wordpress/ /var/www/html/

将所有html目录下所有属主和属组改为apache

chown -R apache.apache /var/www/html

                Cp一份配置文件中信息 复制到wp-config.php 修改wp-config.php配置信息


                                                                       浏览器访问

www.本机IP地址/wordpress

感谢观看!!!

  • 0
    点赞
  • 1
    收藏
    觉得还不错? 一键收藏
  • 0
    评论
以下是在 LNMP 环境下部署 WordPress 论坛的详细配置步骤: 1. 安装 LNMP 环境 首先需要安装 LNMP 环境,这里我们以 Ubuntu 18.04 为例,执行以下命令: ``` sudo apt-get update sudo apt-get install nginx mysql-server php-fpm php-mysql ``` 2. 配置 Nginx 在配置文件 /etc/nginx/sites-available/default 中添加以下内容: ``` server { listen 80; listen [::]:80; root /var/www/html; index index.php index.html index.htm index.nginx-debian.html; server_name yourdomain.com; location / { try_files $uri $uri/ /index.php?$args; } location ~ \.php$ { include snippets/fastcgi-php.conf; fastcgi_pass unix:/var/run/php/php7.4-fpm.sock; } location ~ /\.ht { deny all; } } ``` 3. 安装 WordPress 下载最新版 WordPress,并解压到 /var/www/html 目录下: ``` cd /tmp wget https://wordpress.org/latest.tar.gz tar -zxvf latest.tar.gz sudo mv wordpress /var/www/html/ ``` 4. 配置数据库 进入 MySQL 终端: ``` sudo mysql -u root -p ``` 创建一个新的数据库: ``` CREATE DATABASE wordpress; ``` 创建一个新用户并授权: ``` CREATE USER 'wordpressuser'@'localhost' IDENTIFIED BY 'password'; GRANT ALL PRIVILEGES ON wordpress.* TO 'wordpressuser'@'localhost'; FLUSH PRIVILEGES; exit; ``` 5. 配置 WordPress 在 /var/www/html/wordpress 目录下,将 wp-config-sample.php 文件重命名为 wp-config.php: ``` cd /var/www/html/wordpress mv wp-config-sample.php wp-config.php ``` 编辑 wp-config.php 文件,修改以下内容: ``` define( 'DB_NAME', 'wordpress' ); define( 'DB_USER', 'wordpressuser' ); define( 'DB_PASSWORD', 'password' ); define( 'DB_HOST', 'localhost' ); ``` 6. 安装 WordPress 在浏览器中输入你的域名,进入 WordPress 安装界面,根据提示完成安装。 7. 配置 HTTPS 为了保证网站的安全性,我们可以配置 HTTPS。可以使用 Let's Encrypt 进行免费的 SSL 证书申请和配置。 安装 Certbot: ``` sudo apt-get install certbot python3-certbot-nginx ``` 执行以下命令申请证书: ``` sudo certbot --nginx -d yourdomain.com ``` 根据提示完成证书申请和配置即可。 至此,LNMP 平台下的 WordPress 论坛部署配置完成。

“相关推荐”对你有帮助么?

  • 非常没帮助
  • 没帮助
  • 一般
  • 有帮助
  • 非常有帮助
提交
评论
添加红包

请填写红包祝福语或标题

红包个数最小为10个

红包金额最低5元

当前余额3.43前往充值 >
需支付:10.00
成就一亿技术人!
领取后你会自动成为博主和红包主的粉丝 规则
hope_wisdom
发出的红包
实付
使用余额支付
点击重新获取
扫码支付
钱包余额 0

抵扣说明:

1.余额是钱包充值的虚拟货币,按照1:1的比例进行支付金额的抵扣。
2.余额无法直接购买下载,可以购买VIP、付费专栏及课程。

余额充值