


1、什么是ListView
ListView常用来以列表的方式显示视图,它是由一条一条的数据项组成的
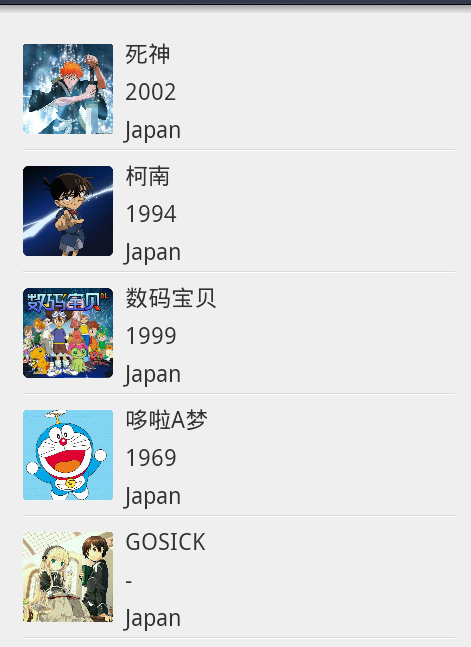
如上图,这些动漫的信息就是在ListView中显示的,其中每一条数据项包含一张图片和3个TextView
2、实现ListView
下面我们来实现一个ListView
(1)在布局中添加一个ListView控件,给其一个id叫做listview,并将它的宽和高都设为match_parent。
<ListView xmlns:android="http://schemas.android.com/apk/res/android"
    android:id="@+id/listview"
    android:layout_width="match_parent"
    android:layout_height="match_parent" >

</ListView>
(2)现在我们要设定数据项的基本布局
在layout下再new一个xml文件取名为items.xml,将它的布局设定为LinearLayout,然后添加一个ImageView和3个TextView,代码如下:
   <LinearLayout
        android:layout_width="match_parent"
        android:layout_height="wrap_content"
        android:layout_alignParentLeft="true"
        android:layout_alignParentTop="true" >

        <ImageView
            android:id="@+id/pic"
            android:layout_width="60dp"
            android:layout_height="80dp"
            android:src="@drawable/ic_launcher" />

        <LinearLayout
            android:layout_width="match_parent"
            android:layout_height="match_parent"
            android:orientation="vertical" >

            <TextView
                android:id="@+id/name"
                android:layout_width="match_parent"
                android:layout_height="20dp"
                android:text="TextView"
                android:layout_marginTop="5dp"
                android:textSize="15dp"/>

            <TextView
                android:id="@+id/year"
                android:layout_width="match_parent"
                android:layout_height="20dp"
                android:layout_marginTop="5dp"
                android:text="TextView"
                android:textSize="15dp" />

            <TextView
                android:id="@+id/country"
                android:layout_width="match_parent"
                android:layout_height="20dp"
                android:layout_marginTop="5dp"
                android:text="TextView"
                android:textSize="15dp" />

        </LinearLayout>

    </LinearLayout>
(3)布局配置好了以后,就要到Activity中去绑定数据和布局了
首先,定义几个数组来存放图片的名称和文字内容等。在上图中可以看到,我的数据有4个:图片、动漫名称、动漫国家、播出年份
所以在MainActivity中我定义了四个数组,如下:
private int[] icon={R.drawable.bleach,R.drawable.conan,R.drawable.shuma,R.drawable.doraamon,R.drawable.gosick};
//icon中存放图片,图片事先放进drawable文件夹下。注意icon应该是int类型,因为实际引用的是图片的id
private String[] iconName={"死神","柯南","数码宝贝","哆啦A梦","GOSICK"};
//iconName放置动漫名称
private String[] country={"Japan","Japan","Japan","Japan","Japan"};
//动漫出产国家
private String[] years={"2002","1994","1999","1969","-"};
//动漫播出年份
(4)接下来老规矩,定义和初始化ListView
private ListView listview;
listview = (ListView) findViewById(R.id.mylist);
(5)下面是难点,这时,我们需要一个SimpleAdapter(简单适配器),用来将ListView和数据绑定在一起。
private SimpleAdapter simple_adapter;

simple_adapter = new SimpleAdapter(this, getData(), R.layout.items,new String[]{"pic","name","year","country"}, new int[]{R.id.pic,R.id.name,R.id.year,R.id.country});
SimpleAdapter类的原型如下:
SimpleAdapter(context, data, resource, from, to);
context:指上下文,这里使用this代替
data:需要绑定的数据,这里定义了一个getData()方法来返回数据
resource:表示数据项的布局文件的id,在这里就是之前定义的items.xml了
from:from和后面的to形成了对应关系,它们实际上构成了键-值对,
to:from和to的关系就像是名字和id的对应关系一样
(6)简单了解了SimpleAdapter后,再来实现上面出现的getData()方法
//首先定义一个List集合
private List<Map<String,Object>> datalist;
//这是一个由Map组成的List集合,每一个Map都对应了ListView中的一行,
//每一个Map(键-值对)中的键必须去包含所有在from中所指定的键
datalist = new ArrayList<Map<String,Object>>();
    private List<Map<String, Object>> getData() {
        // TODO Auto-generated method stub
        for(int i=0;i<iconName.length;i++){
            Map<String, Object> map = new HashMap<String,Object>();
            //将数据添加到Map中
            map.put("pic", icon[i]);
            map.put("name", "  "+iconName[i]);
            map.put("year", "  "+years[i]);
            map.put("country", "  "+country[i]);
            //将map添加到ListView中
            datalist.add(map);
        }
        return datalist;
    }
(7)最后要做的就是让视图加载适配器
listview.setAdapter(simple_adapter);现在运行,就可以看到上图中的效果了
Activity的完整代码如下:
public class MainActivity extends Activity{

    private ListView listview;
    private SimpleAdapter simple_adapter;
    private List<Map<String,Object>> datalist;
    private int[] icon={R.drawable.bleach,R.drawable.conan1,R.drawable.shuma,R.drawable.doraamon,R.drawable.gosick};
    private String[] iconName={"死神","柯南","数码宝贝","哆啦A梦","GOSICK"};
    private String[] country={"Japan","Japan","Japan","Japan","Japan"};
    private String[] years={"2002","1994","1999","1969","-"};

    @Override
    protected void onCreate(Bundle savedInstanceState) {
        super.onCreate(savedInstanceState);
        setContentView(R.layout.activity_main);
        listview = (ListView) findViewById(R.id.myist);
        datalist = new ArrayList<Map<String,Object>>();
        simple_adapter = new SimpleAdapter(this, getData(), R.layout.items,new String[]{"pic","name","year","country"}, new int[]{R.id.pic,R.id.name,R.id.year,R.id.country});
        listview.setAdapter(simple_adapter);
    }

    private List<Map<String, Object>> getData() {
        // TODO Auto-generated method stub
        for(int i=0;i<iconName.length;i++){
            Map<String, Object>map = new HashMap<String,Object>();
            map.put("pic", icon[i]);
            map.put("name", "  "+iconName[i]);
            map.put("year", "  "+years[i]);
            map.put("country", "  "+country[i]);
            datalist.add(map);
        }
        return datalist;
    }

}
3、ListView的显示已经实现了,但是通常情况下,我们还需要为其添加事件监听器,例如我们在使用其他APP时,通常会出现“下拉查看更多”这种情况,下面我们就要来实现它
ListView可以有两种监听方式:
OnItemClickListener:点击数据项时的监听方式
OnScrollListener:滑动屏幕时的监听方式
只要在Activity中继承这两个接口,就可以实现它们的监听方式了,这里就不详细说了,大家自己可以去实现试试


 1680
1680

 被折叠的 条评论
为什么被折叠?
被折叠的 条评论
为什么被折叠?
 到【灌水乐园】发言


