


 本文介绍了如何实现58同城加载数据时的动画效果,重点在于通过属性动画控制图片上升时减速、下降时加速的技巧。首先完成LoadingView布局,然后使用动画让各个View动起来,利用自定义插值器实现先减速再加速的效果,以增强视觉体验。
最近看了58同城新版 app ,里面还是做了很多动画特效,其中我看到加载数据时的一个加载动画比较好玩,就试着做了一下,先一起来看看效果
很多人看了这个效果图,第一个疑问就是底下的阴影部分是如何实现的?其实如果真要自己动手实现的话,这个问题反而不是问题,而真正有困难的是,如何控制这个图片上升的时候速度减慢,而下降的时候速度加快,当然这个问题只有在动手做的过程中才会发现。
这里还是按步骤来实现
1、实现整个 LoadingView的布局
public class LoadingLayout extends RelativeLayout {
    public LoadingLayout(Context context) {
        this(context, null);
    }

    public LoadingLayout(Context context, AttributeSet attrs) {
        this(context, attrs, 0);
    }

    public LoadingLayout(Context context, AttributeSet attrs, int defStyleAttr) {
        super(context, attrs, defStyleAttr);
        //添加所需要的效果图片,并根据需求排列
        initView(getContext());
    }
}
private void initView(Context context) {
/*固定这几个图片的大小为28个 dp 值*/
int viewSize = (int) (28 * getResources().getDisplayMetrics().density + .5f);
/*创建一个 显示圆形图片的View*/
mCircleView = new View(context);
/*设置参数*/
RelativeLayout.LayoutParams circleParams = new LayoutParams(viewSize, viewSize);
/*让他水平居中显示*/
circleParams.addRule(RelativeLayout.CENTER_HORIZONTAL, RelativeLayout.TRUE);
mCircleView.setLayoutParams(circleParams);
/*设置背景图片*/
mCircleView.setBackgroundResource(R.mipmap.loading_yuan);
/*设置 id,这里的作用,是为了下面阴影的排列,需要用此View 作为参考对象*/
mCircleView.setId(R.id.action_bar_root);
/*创建一个显示正方形图片的View*/
mRectView = new View(context);
RelativeLayout.LayoutParams rectParams = new LayoutParams(viewSize, viewSize);
rectParams.addRule(RelativeLayout.CENTER_HORIZONTAL, RelativeLayout.TRUE);
mRectView.setLayoutParams(rectParams);
mRectView.setBackgroundResource(R.mipmap.loading_fangxing);
/*创建一个显示三角形图片的View*/
mTriangleView = new View(context);
RelativeLayout.LayoutParams triangleParams = new LayoutParams(viewSize, viewSize);
triangleParams.addRule(RelativeLayout.CENTER_HORIZONTAL, RelativeLayout.TRUE);
mTriangleView.setLayoutParams(triangleParams);
mTriangleView.setBackgroundResource(R.mipmap.loading_sanjiao);
/*创建一个显示底部阴影图片的ImageView*/
mBottomView = new ImageView(context);
RelativeLayout.LayoutParams bottomParams = new LayoutParams(ViewGroup.LayoutParams.WRAP_CONTENT, ViewGroup.LayoutParams.WRAP_CONTENT);
/*设置水平居中*/
bottomParams.addRule(RelativeLayout.CENTER_HORIZONTAL, RelativeLayout.TRUE);
/*设置在圆形图片的下方*/
bottomParams.addRule(RelativeLayout.BELOW, R.id.action_bar_root);
mBottomView.setLayoutParams(bottomParams);
mBottomView.setBackgroundResource(R.mipmap.loading_bottom);
/*整个Layout 中的View 居中显示*/
setGravity(Gravity.CENTER);
/*添加View*/
addView(mCircleView);
addView(mRectView);
addView(mTriangleView);
addView(mBottomView);
mRectView.setVisibility(INVISIBLE);
mTriangleView.setVisibility(INVISIBLE);
}到这里,第一步算是完成了,能够正常显示我们想要的数据,接下来看第二步,
2、为这几个 View 设置动画,让他们都动起来,这里说一下底部阴影的实现原理,其实没什么特别的,跟其他三个图片一样,通过属性动画改变其 X的放缩。
    private void startAnim() {
        Log.v("zgy","=========startAnim========") ;
        isAnim = true ;
        if (mCircleView.getVisibility() != VISIBLE){
            mCircleView.setVisibility(VISIBLE);
            mRectView.setVisibility(INVISIBLE);
            mTriangleView.setVisibility(INVISIBLE);
        }
        /*圆形图片的动画集合*/
        mCircleAnim = new AnimatorSet();
        /*设置执行时长800ms*/
        mCircleAnim.setDuration(800L);
        /*这里设置播放动画的个数,移动动画和底部阴影放缩动画*/
        mCircleAnim.playTogether(translationAnim(mCircleView),bottomAnim());
        /*开始动画*/
        mCircleAnim.start();
        /*设置动画监听事件*/
        mCircleAnim.addListener(mCircleListener);

        mRectAnim = new AnimatorSet();
        mRectAnim.setStartDelay(800L);
        mRectAnim.setDuration(800L);
        mRectAnim.playTogether(translationAnim(mRectView),bottomAnim(),rotationAnim(mRectView));
        mRectAnim.start();
        mRectAnim.addListener(mRectListener);

        mTriangleAnim = new AnimatorSet();
        mTriangleAnim.setStartDelay(1600L);
        mTriangleAnim.setDuration(800L);
        mTriangleAnim.playTogether(translationAnim(mTriangleView),bottomAnim(),rotationAnim(mTriangleView));
        mTriangleAnim.start();
        mTriangleAnim.addListener(mTriangleListener);
到这里,动画效果就已经实现了,来看看
但是总感觉效果不对劲,一般东西往下掉,给人的感觉是,也往下速度越快,而这里只是做匀速变化,那好,我们来改变插值器,因为这里动画是从下往上再往下算是一个完整的动画,其值为:
        mAnimTransValueRec = new float[7];
        mAnimTransValueRec[0] = 0f;
        mAnimTransValueRec[1] = -50f;
        mAnimTransValueRec[2] = -100f;
        mAnimTransValueRec[3] = -150f;
        mAnimTransValueRec[4] = -100f;
        mAnimTransValueRec[5] = -50f;
        mAnimTransValueRec[6] = 0f;
所以我们设插值器的时候,希望设置先减速再加速的插值器,可是,不巧的是,加速插值器有,减速插值器有,先加速再减速插值器也有,就是没有提供先减速再加速的插值器,不过没关系,我们自己实现一个;
要实现插值器,其实就是把
public interface TimeInterpolator {

    /**
     * Maps a value representing the elapsed fraction of an animation to a value that represents
     * the interpolated fraction. This interpolated value is then multiplied by the change in
     * value of an animation to derive the animated value at the current elapsed animation time.
     *
     * @param input A value between 0 and 1.0 indicating our current point
     *        in the animation where 0 represents the start and 1.0 represents
     *        the end
     * @return The interpolation value. This value can be more than 1.0 for
     *         interpolators which overshoot their targets, or less than 0 for
     *         interpolators that undershoot their targets.
     */
    float getInterpolation(float input);
}
中的 input 值转化成另一个 float,
如果什么都不做处理,就是线性变化,也就是匀速变化
/**
 * An interpolator where the rate of change is constant
 *
 */
public class LinearInterpolator implements Interpolator {

    public LinearInterpolator() {
    }

    public LinearInterpolator(Context context, AttributeSet attrs) {
    }

    public float getInterpolation(float input) {
        return input;
    }
}
再来看看先加速后减速的插值器
/**
 * An interpolator where the rate of change starts and ends slowly but
 * accelerates through the middle.
 *
 */
public class AccelerateDecelerateInterpolator implements Interpolator {
    public AccelerateDecelerateInterpolator() {
    }

    @SuppressWarnings({"UnusedDeclaration"})
    public AccelerateDecelerateInterpolator(Context context, AttributeSet attrs) {
    }

    public float getInterpolation(float input) {
        return (float)(Math.cos((input + 1) * Math.PI) / 2.0f) + 0.5f;
    }
}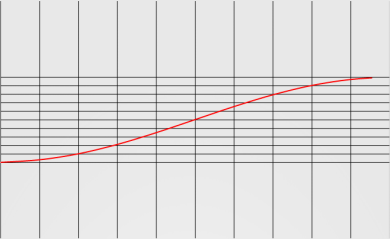
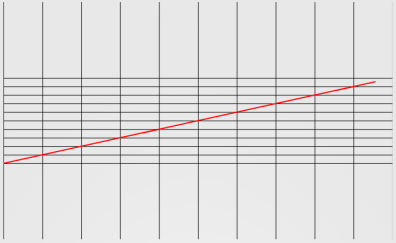
那怎么来实现先减速后加速的插值器呢,根据上面的图形我们可以知道,要实现我们想要的效果,则在0~0.5之间的曲线应该是凸起来的,而在0.5~1之间应该是凹下去的,跟上图刚好要相反,这样的曲线怎么实现呢,来看一张图
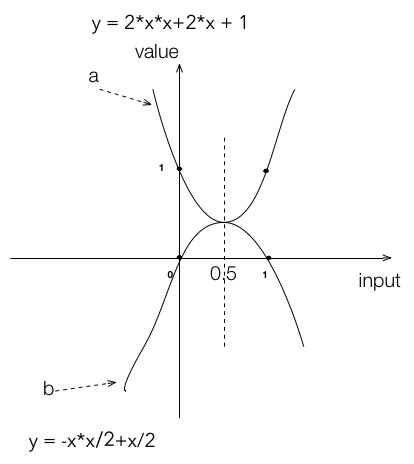
以上图片是由两个抛物线组成,如果在0~0.5范围内取抛物线 b,在0.5~1.0取抛物线 a,刚好就是我们想要的曲线。而根据高中所学的数学知识,二次曲线求导可知,我们所截取的曲线其速度就是先减速再加速。
所以实现先减速再加速的插值器代码如下:
public final class DecelerateAccelerateInterpolator implements Interpolator {

    public final float getInterpolation(float input) {

        if (input < 0.5) {
            return - (input * (input/2.0f) -  input/2.0f);
        }else {
            return 1.0F + (input * (2.0F * input) - 2.0F * input) ;
        }
    }
}
ok,记得为动画设置插值器
animator.setInterpolator(new DecelerateAccelerateInterpolator());最后测试效果就是第一副动态图的效果,明显比第二张动态图跟符合视觉逻辑;


 1928
1928

 被折叠的 条评论
为什么被折叠?
被折叠的 条评论
为什么被折叠?
 到【灌水乐园】发言


