


最近没什么事,所以想看看FIMC驱动和v4l2驱动框架,下面做一下笔记,现在学的不是很透,有错误的地方希望大家批评指正,相互学习,下面先推荐几篇博文,个人觉得挺好的
1、刘老师的《FS_S5PC100平台上Linux Camera驱动开发详解》
http://blog.csdn.net/hongtao_liu/article/details/7579663
http://blog.csdn.net/hongtao_liu/article/details/7591412
2、深入理解linux内核v4l2框架值video for linux 2
http://blog.csdn.net/ramon1892/article/details/8443668
http://blog.csdn.net/ramon1892/article/details/8443921
3、深入理解linux内核v4l2框架之videobuf
http://blog.csdn.net/ramon1892/article/details/8444175
http://blog.csdn.net/ramon1892/article/details/8444193
4、v4l2 soc-camera分析-调用关系
http://blog.csdn.net/kickxxx/article/details/8480067
==============================开始了======================================
FIMC的驱动在内核中的位置在drivers/media/video/samsung/fimc目录下,其中包含的文件有如下所示:
fimc40_regs.cfimc43_regs.c
fimc_capture.c
fimc_dev.c
fimc_output.c
fimc_overlay.c
fimc_v4l2.c
首先看一下drivers/media/video/samsung/fimc/目录下的fimc_dev.c文件,在这里fimc_driver是一个platform_driver驱动,这里面注册了一个platform_driver,这种SOC上的控制器一般都会挂接在platform_bus上以实现在系统初始化时的device和driver的匹配,具体如下所示:
static struct platform_driver fimc_driver = {
	.probe		= fimc_probe,
	.remove		= fimc_remove,
	.suspend	= fimc_suspend,
	.resume		= fimc_resume,
	.driver		= {
		.name	= FIMC_NAME,
		.owner	= THIS_MODULE,
	},
};struct video_device fimc_video_device[FIMC_DEVICES] = {
[0] = {
.fops = &fimc_fops,
.ioctl_ops = &fimc_v4l2_ops,
.release = fimc_vdev_release,
},
[1] = {
.fops = &fimc_fops,
.ioctl_ops = &fimc_v4l2_ops,
.release = fimc_vdev_release,
},
[2] = {
.fops = &fimc_fops,
.ioctl_ops = &fimc_v4l2_ops,
.release = fimc_vdev_release,
},
};
struct video_device
{
	/* device ops */
	const struct v4l2_file_operations *fops;

	/* sysfs */
	struct device dev;		/* v4l device */
	struct cdev *cdev;		/* character device */

	/* Set either parent or v4l2_dev if your driver uses v4l2_device */
	struct device *parent;		/* device parent */
	struct v4l2_device *v4l2_dev;	/* v4l2_device parent */

	/* device info */
	char name[32];
	int vfl_type;
	/* 'minor' is set to -1 if the registration failed */
	int minor;
	u16 num;
	/* use bitops to set/clear/test flags */
	unsigned long flags;
	/* attribute to differentiate multiple indices on one physical device */
	int index;

	/* V4L2 file handles */
	spinlock_t		fh_lock; /* Lock for all v4l2_fhs */
	struct list_head	fh_list; /* List of struct v4l2_fh */

	int debug;			/* Activates debug level*/

	/* Video standard vars */
	v4l2_std_id tvnorms;		/* Supported tv norms */
	v4l2_std_id current_norm;	/* Current tvnorm */

	/* callbacks */
	void (*release)(struct video_device *vdev);

	/* ioctl callbacks */
	const struct v4l2_ioctl_ops *ioctl_ops;
};
上面所示,video device是一个字符型的设备(struct cdev *cdev;),这个字符驱动会在执行video_register_device函数时注册
int video_register_device(struct video_device *vdev, int type, int nr)
{
	return __video_register_device(vdev, type, nr, 1);
}
video device真正的注册在__video_register_device函数中,在__video_register_device这个函数中会初始化并注册一个字符设备驱动,代码段如下所示如下所示:
/* Part 3: Initialize the character device */
vdev->cdev = cdev_alloc();
if (vdev->cdev == NULL) {
	ret = -ENOMEM;
	goto cleanup;
}
if (vdev->fops->unlocked_ioctl)
	vdev->cdev->ops = &v4l2_unlocked_fops;
else
	vdev->cdev->ops = &v4l2_fops;
vdev->cdev->owner = vdev->fops->owner;
ret = cdev_add(vdev->cdev, MKDEV(VIDEO_MAJOR, vdev->minor), 1);
if (ret < 0) {
	printk(KERN_ERR "%s: cdev_add failed\n", __func__);
	kfree(vdev->cdev);
	vdev->cdev = NULL;
	goto cleanup;
}

/* Part 4: register the device with sysfs */
memset(&vdev->dev, 0, sizeof(vdev->dev));
/* The memset above cleared the device's drvdata, so
	put back the copy we made earlier. */
video_set_drvdata(vdev, priv);
vdev->dev.class = &video_class;
vdev->dev.devt = MKDEV(VIDEO_MAJOR, vdev->minor);
if (vdev->parent)
	vdev->dev.parent = vdev->parent;
dev_set_name(&vdev->dev, "%s%d", name_base, vdev->num);
ret = device_register(&vdev->dev);
if (ret < 0) {
	printk(KERN_ERR "%s: device_register failed\n", __func__);
	goto cleanup;
}static const struct file_operations v4l2_unlocked_fops = {
.owner = THIS_MODULE,
.read = v4l2_read,
.write = v4l2_write,
.open = v4l2_open,
.get_unmapped_area = v4l2_get_unmapped_area,
.mmap = v4l2_mmap,
.unlocked_ioctl = v4l2_unlocked_ioctl,
#ifdef CONFIG_COMPAT
.compat_ioctl = v4l2_compat_ioctl32,
#endif
.release = v4l2_release,
.poll = v4l2_poll,
.llseek = no_llseek,
};
static const struct file_operations v4l2_fops = {
.owner = THIS_MODULE,
.read = v4l2_read,
.write = v4l2_write,
.open = v4l2_open,
.get_unmapped_area = v4l2_get_unmapped_area,
.mmap = v4l2_mmap,
.ioctl = v4l2_ioctl,
#ifdef CONFIG_COMPAT
.compat_ioctl = v4l2_compat_ioctl32,
#endif
.release = v4l2_release,
.poll = v4l2_poll,
.llseek = no_llseek,
};在v4l2_dev.c中实现了v4l2_open、v4l2_read,v4l2_write、v4l2_ioctl等,奇妙的是在这些实现函数中会调用video的ops结构体重的操作函数,如在v4l2_ioctl等函数中中会调用一句
//v4l2_ioctl中
return vdev->fops->ioctl(filp, cmd, arg);
//v4l2_open中
ret = vdev->fops->open(filp);
//v4l2_read中
return vdev->fops->read(filp, buf, sz, off);
//v4l2_write中
return vdev->fops->write(filp, buf, sz, off);
//v4l2_poll中
return vdev->fops->poll(filp, poll);
//v4l2_mmap中
return vdev->fops->mmap(filp, vm);
在这里每一个函数中面会调用vdev中的fops所指对应的操作函数,这里的vdev其实就是在video_register_device函数注册时的那个video_device,即上面所指的fimc_video_device[id]数组的其中一个video_device,在这些操作函数中这个设备可以通过如下的操作获取,然后操作,struct video_device *vdev = video_devdata(filp);。如上面fimc_video_device数组定义初始化时所示
struct video_device fimc_video_device[FIMC_DEVICES] = {
	[0] = {
		.fops = &fimc_fops,
		.ioctl_ops = &fimc_v4l2_ops,
		.release = fimc_vdev_release,
	},
	.............
};
这样在应用层操作read、write、ioctl等函数时在底层首先调用v4l2_fops中的操作函数,在v4l2_fops的操作函数中会调用video_device中的fops所对应的操作函数,即在我们这里会调用上面代码中的fimc_fops中的操作函数。
下面我们回过头来看看fimc驱动中fimc_fops相关的内容
在probe函数中会调用fimc_register_controller函数,在fimc_register_controller中指定要注册的video device,通过
ctrl->vd = &fimc_video_device[id];fimc_fops的定义(fimc_dev.c)如下所示:
static const struct v4l2_file_operations fimc_fops = {
	.owner		= THIS_MODULE,
	.open		= fimc_open,
	.release	= fimc_release,
	.ioctl		= video_ioctl2,
	.read		= fimc_read,
	.write		= fimc_write,
	.mmap		= fimc_mmap,
	.poll		= fimc_poll,
};const struct v4l2_ioctl_ops fimc_v4l2_ops = {
.vidioc_querycap = fimc_querycap,
.vidioc_reqbufs = fimc_reqbufs,
.vidioc_querybuf = fimc_querybuf,
.vidioc_g_ctrl = fimc_g_ctrl,
.vidioc_s_ctrl = fimc_s_ctrl,
.vidioc_s_ext_ctrls = fimc_s_ext_ctrls,
.vidioc_cropcap = fimc_cropcap,
.vidioc_g_crop = fimc_g_crop,
.vidioc_s_crop = fimc_s_crop,
.vidioc_streamon = fimc_streamon,
.vidioc_streamoff = fimc_streamoff,
.vidioc_qbuf = fimc_qbuf,
.vidioc_dqbuf = fimc_dqbuf,
.vidioc_enum_fmt_vid_cap = fimc_enum_fmt_vid_capture,
.vidioc_g_fmt_vid_cap = fimc_g_fmt_vid_capture,
.vidioc_s_fmt_vid_cap = fimc_s_fmt_vid_capture,
.vidioc_try_fmt_vid_cap = fimc_try_fmt_vid_capture,
.vidioc_enum_input = fimc_enum_input,
.vidioc_g_input = fimc_g_input,
.vidioc_s_input = fimc_s_input,
.vidioc_g_parm = fimc_g_parm,
.vidioc_s_parm = fimc_s_parm,
.vidioc_queryctrl = fimc_queryctrl,
.vidioc_querymenu = fimc_querymenu,
.vidioc_g_fmt_vid_out = fimc_g_fmt_vid_out,
.vidioc_s_fmt_vid_out = fimc_s_fmt_vid_out,
.vidioc_try_fmt_vid_out = fimc_try_fmt_vid_out,
.vidioc_g_fbuf = fimc_g_fbuf,
.vidioc_s_fbuf = fimc_s_fbuf,
.vidioc_try_fmt_vid_overlay = fimc_try_fmt_overlay,
.vidioc_g_fmt_vid_overlay = fimc_g_fmt_vid_overlay,
.vidioc_s_fmt_vid_overlay = fimc_s_fmt_vid_overlay,
};在fimc_fops中怎么看video_ioctl2(在v4l2_ioctl.c文件中)这么怪异,仔细一看,原来video_ioctl2在fimc_fops中的起到桥梁的作用,将fimc_fops和fimc_v4l2_fops联系起来,在video_ioctl2中有这样一句,如下:
err = __video_do_ioctl(file, cmd, parg);这就是真正的桥梁,在__video_do_ioctl(在v4l2_ioctl.c文件中)函数中
static long __video_do_ioctl(struct file *file,
		unsigned int cmd, void *arg)
{
	struct video_device *vfd = video_devdata(file);
	const struct v4l2_ioctl_ops *ops = vfd->ioctl_ops;
	//.................
	//这里面处理cmd
	switch (cmd) {
		case VIDIOC_S_PRIORITY:
		{
			//....................
			ret = ops->vidioc_s_priority(file, fh, *p);
			break;
		}
	}
	//...............................

}
在这里面会调用ops里面的操作函数,而实际上ops就是指向我们前面的fimc_video_device的ioctl_ops,即fimc_v4l2_fops,到这应用层的ioctl所发的指令什么的都会到fimc_v4l_fops里来处理,fimc_v4l2_ops是定义在fimc_v4l2.c文件中。
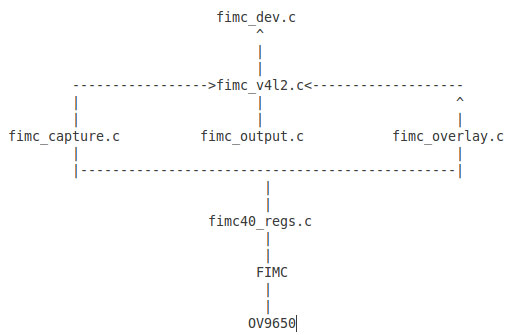
由fimc_v4l2.c中的fimc_v4l2_ops可以看到,FIMC的驱动实现了v4l2所有的接口,可以分为v4l2-input设备接口,v4l2-output设备接口以及v4l2-overlay设备接口。这里我们主要关注v4l2-input设备接口,因为摄像头属于视频输入设备。
fimc_v4l2.c里面注册了很多的回调函数,都是用于实现v4l2的标准接口的,但是这些回调函数基本上都不是在fimc_v4l2.c里面实现的,而是有相应的.c分别去实现。比如:
v4l2-input设备的操作实现: fimc_capture.c
v4l2-output设备的操作实现: fimc_output.c
v4l2-overlay设备的操作实现: fimc_overlay.c
这些代码其实都是和具体硬件操作无关的,这个驱动把所有操作硬件寄存器的代码都写到一个文件里面了,就是fimc40_regs.c。这样把硬件相关的代码和硬件无关的代码分开来实现是非常好的方式,可以最大限度的实现代码复用。
这些驱动源码的组织关系如下:
接下来在probe中调用v4l2_device_register函数注册一个v4l2设备实例,然后调用fimc_init_global函数,在这个函数中完成摄像头的分配以及时钟的获取:这个函数的原型如下:
static int fimc_init_global( struct platform_device *pdev );
static int fimc_init_global(struct platform_device *pdev)
{
	struct fimc_control *ctrl;
	struct s3c_platform_fimc *pdata;
	//这个结构体就是用来描述一个摄像头的,先不管它里面的内容
	//等会儿在分析平台代码的时候可以看到它是如何被填充的
	struct s3c_platform_camera *cam;
	struct clk *srclk;
	int id, i;

	//获得平台信息
	pdata = to_fimc_plat(&pdev->dev);
	id = pdev->id; //id号可能是0,1,2
	ctrl = get_fimc_ctrl(id); //获得id号对应的fimc_control结构体指针

	/* Registering external camera modules. re-arrange order to be sure */
	for (i = 0; i < FIMC_MAXCAMS; i++) {
		cam = pdata->camera[i]; //从平台数据取得camera的信息
		if (!cam)
			continue; // change break to continue by ys

		/* WriteBack doesn't need clock setting */
		if(cam->id == CAMERA_WB) {
			fimc_dev->camera[cam->id] = cam;
				break;
		}

		// 获得时钟源信息
		srclk = clk_get(&pdev->dev, cam->srclk_name);
		if (IS_ERR(srclk)) {
			fimc_err("%s: failed to get mclk source\n", __func__);
			return -EINVAL;
		}

		// 获得camera的时钟信息
		/* mclk */
		cam->clk = clk_get(&pdev->dev, cam->clk_name);
		if (IS_ERR(cam->clk)) {
			fimc_err("%s: failed to get mclk source\n", __func__);
			return -EINVAL;
		}

		if (cam->clk->set_parent) {
			cam->clk->parent = srclk;
			cam->clk->set_parent(cam->clk, srclk);
		}

		/* Assign camera device to fimc */
		fimc_dev->camera[cam->id] = cam; // 将从平台获得的camera分配给全局数据结构
                                                                                        // fimc_dev
	}

	fimc_dev->initialized = 1;

	return 0;
}
/* global */
struct fimc_global {
	struct fimc_control		ctrl[FIMC_DEVICES];
	struct s3c_platform_camera	camera[FIMC_MAXCAMS];
	int				camera_isvalid[FIMC_MAXCAMS];
	int				active_camera;
	int				initialized;
};下面我们看看在平台文件中怎么定义一个camera的,我们使用的友善的开发板,所以对应的平台代码位于arch/arm/mach-s5pv210/mach-mini210.c。我们就以ov7725为例说明一下在平台代码中怎样描述一个camera,如下所示:
#ifdef CONFIG_VIDEO_OV9650
static int ov9650_power_en(int onoff)
{
	printk("ov9650: power %s\n", onoff ? "ON" : "Off");
	return 0;
}

static struct ov9650_platform_data ov9650_plat = {
	.default_width = 1280,
	.default_height = 1024,
	.pixelformat = V4L2_PIX_FMT_YUYV,
	.freq = 40000000,
	.is_mipi = 0,
};

static struct i2c_board_info ov9650_i2c_info = {
	I2C_BOARD_INFO("ov9650", 0x30),
	.platform_data = &ov9650_plat,
};

static struct s3c_platform_camera ov9650 = {
	#ifdef CAM_ITU_CH_A
	.id		= CAMERA_PAR_A,
	#else
	.id		= CAMERA_PAR_B,
	#endif
	.type		= CAM_TYPE_ITU,
	.fmt		= ITU_601_YCBCR422_8BIT,
	.order422	= CAM_ORDER422_8BIT_YCBYCR,
	.i2c_busnum	= 0,
	.info		= &ov9650_i2c_info,
	.pixelformat	= V4L2_PIX_FMT_YUYV,
	.srclk_name	= "mout_mpll",
	/* .srclk_name	= "xusbxti", */
	.clk_name	= "sclk_cam1",
	.clk_rate	= 40000000,
	.line_length	= 1920,
	.width		= 1280,
	.height		= 1024,
	.window		= {
		.left	= 0,
		.top	= 0,
		.width	= 1280,
		.height	= 1024,
	},

	/* Polarity */
	.inv_pclk	= 1,
	.inv_vsync	= 1,
	.inv_href	= 0,
	.inv_hsync	= 0,

	.initialized	= 0,
	.cam_power	= ov9650_power_en,
};
#endifi2c_busnum是I2C总线编号,我们的camera 传感器连接在0号总线上,所以i2c_busnum为0.
然后再看一下下面这块代码:
/* Interface setting */
static struct s3c_platform_fimc fimc_plat_lsi = {
	.srclk_name	= "mout_mpll",
	.clk_name	= "sclk_fimc",
	.lclk_name	= "sclk_fimc_lclk",
	.clk_rate	= 166750000,
#if defined(CONFIG_VIDEO_S5K4EA)
	.default_cam	= CAMERA_CSI_C,
#else
#ifdef CAM_ITU_CH_A
	.default_cam	= CAMERA_PAR_A,
#else
	.default_cam	= CAMERA_PAR_B,
#endif
#endif
	.camera		= {
//..............................
#ifdef CONFIG_VIDEO_OV9650
			&ov9650,
#endif
//..............................

	.hw_ver		= 0x43,
};
/* For camera interface driver */
struct s3c_platform_fimc {
	const char			srclk_name[16];		/* source of interface clock name */
	const char			clk_name[16];		/* interface clock name */
	const char			lclk_name[16];		/* interface clock name */
	u32				clk_rate;		/* clockrate for interface clock */
	enum fimc_cam_index		default_cam;		/* index of default cam */
	struct s3c_platform_camera	*camera[5];		/* FIXME */
	int				hw_ver;
	phys_addr_t			pmem_start;		/* starting physical address of memory region */
	size_t				pmem_size;		/* size of memory region */

	void				(*cfg_gpio)(struct platform_device *pdev);
	int				(*clk_on)(struct platform_device *pdev, struct clk *clk);
	int				(*clk_off)(struct platform_device *pdev, struct clk *clk);
};在mach-mini210.c文件的 函数中有如下一段代码:
#ifdef CONFIG_VIDEO_FIMC
	/* fimc */
	s3c_fimc0_set_platdata(&fimc_plat_lsi);
	s3c_fimc1_set_platdata(&fimc_plat_lsi);
	s3c_fimc2_set_platdata(&fimc_plat_lsi);
	/* external camera */
	/* smdkv210_cam0_power(1); */
	/* smdkv210_cam1_power(1); */
#endif
void __init s3c_fimc0_set_platdata(struct s3c_platform_fimc *pd)
{
	struct s3c_platform_fimc *npd;

	if (!pd)
		pd = &default_fimc0_data;

	npd = kmemdup(pd, sizeof(struct s3c_platform_fimc), GFP_KERNEL);
	if (!npd)
		printk(KERN_ERR "%s: no memory for platform data\n", __func__);
	else {
		if (!npd->cfg_gpio)
			npd->cfg_gpio = s3c_fimc0_cfg_gpio;

		if (!npd->clk_on)
			npd->clk_on = s3c_fimc_clk_on;

		if (!npd->clk_off)
			npd->clk_off = s3c_fimc_clk_off;

		npd->hw_ver = 0x45;

		/* starting physical address of memory region */
		npd->pmem_start = s5p_get_media_memory_bank(S5P_MDEV_FIMC0, 1);
		/* size of memory region */
		npd->pmem_size = s5p_get_media_memsize_bank(S5P_MDEV_FIMC0, 1);

		s3c_device_fimc0.dev.platform_data = npd;
	}
}
s3c_device_fimc0是一个platform_device设备,这个设备的定义以及其一些资源都在arch/arm/plat-s5p/devs.c文件中,如下所示:
#ifdef CONFIG_VIDEO_FIMC
static struct resource s3c_fimc0_resource[] = {
	[0] = {
		.start	= S5P_PA_FIMC0,
		.end	= S5P_PA_FIMC0 + S5P_SZ_FIMC0 - 1,
		.flags	= IORESOURCE_MEM,
	},
	[1] = {
		.start	= IRQ_FIMC0,
		.end	= IRQ_FIMC0,
		.flags	= IORESOURCE_IRQ,
	},
};

struct platform_device s3c_device_fimc0 = {
	.name		= "s3c-fimc",
	.id		= 0,
	.num_resources	= ARRAY_SIZE(s3c_fimc0_resource),
	.resource	= s3c_fimc0_resource,
};

static struct s3c_platform_fimc default_fimc0_data __initdata = {
	.default_cam	= CAMERA_PAR_A,
	.hw_ver	= 0x45,
};

void __init s3c_fimc0_set_platdata(struct s3c_platform_fimc *pd)
{
//.........................
}


//s3c_device_fimc1相关的,省略了
//..............................

//s3c_device_fimc2相关的,省略了
//...............................

#endif
platform_device会在下面代码的init_machine所指的函数被执行时注册初始化,
MACHINE_START(MINI210, "MINI210")
	/* Maintainer: Kukjin Kim <kgene.kim@samsung.com> */
	.phys_io	= S3C_PA_UART & 0xfff00000,
	.io_pg_offst	= (((u32)S3C_VA_UART) >> 18) & 0xfffc,
	.boot_params	= S5P_PA_SDRAM + 0x100,
	.fixup		= mini210_fixup,
	.init_irq	= s5pv210_init_irq,
	.map_io		= mini210_map_io,
	.init_machine	= mini210_machine_init,
	.timer		= &s5p_systimer,
MACHINE_END
platform_add_devices(mini210_devices, ARRAY_SIZE(mini210_devices));
static struct platform_device *mini210_devices[] __initdata = {

//..................................

#ifdef CONFIG_VIDEO_FIMC
	&s3c_device_fimc0,
	&s3c_device_fimc1,
	&s3c_device_fimc2,
#endif

//..................................
}
/**
 * platform_add_devices - add a numbers of platform devices
 * @devs: array of platform devices to add
 * @num: number of platform devices in array
 */
int platform_add_devices(struct platform_device **devs, int num)
{
	int i, ret = 0;

	for (i = 0; i < num; i++) {
		ret = platform_device_register(devs[i]);
		if (ret) {
			while (--i >= 0)
				platform_device_unregister(devs[i]);
			break;
		}
	}

	return ret;
}


 1826
1826

 被折叠的 条评论
为什么被折叠?
被折叠的 条评论
为什么被折叠?
 到【灌水乐园】发言


