


Starter是Spring Boot中的一个非常重要的概念,Starter 相当于模块,它能将模块所需的依赖整合起来并对模块内的Bean根据环境(条件)进行自动配置。使用者只需要依赖相应功能的Starter,无需做过多的配置和依赖,Spring Boot就能自动扫描并加载相应的模块。
比如我们在Maven的依赖中加入spring-bootstarter-web 就能使项目支持 Spring MVC,并且 Spring Boot 还为我们做了很多默认配置,无需再依赖 spring-web、 spring-webmvc 等相关包及做相关配置就能够立即使用起来。
SpringBoot 存在很多开箱即用的 Starter 依赖,使得我们 在开发业务代码时能够非常方便的、不需要过多关注框架的配置,而只需要关注业务即可。
问题一:starter命名规范?
spring官方:spring-boot-starter-{name}
自行提供:{name}-spring-boot-starter
问题二:starter中有什么?
比如下面是 mybatis-spring-boot-starter:
主要包含以下三部分:
基础jar包:引入了本来组件的jar包(mybatis.jar)及 jdbc的jar包
整合Spring的jar包:引入了与Spring整合的jar(mybatis-spring.jar)
自动装配的jar包:引入了具体自动创建相关bean的jar包(mybatis-spring-boot-autoconfigure.jar)
注:无需规定starter内jar包的具体版本,只用管大版本即可
OK,下面进入本篇的正文部分。假如现在我们要写一个能实现将对象转换为 String 或者 Json 的工具,并且暴露一个 HelloTemplate 对象去给用户调用。那我们该如何实现呢?
首先,我们来看如何实现这个组件。
1.组件基本实现
步骤一:首先得有一个统一的接口把,去规范要做的事情是转化对象
public interface FormatProcessor {
    // 定义一个格式化方法
    // 注:入参数一个object没什么说的,而处理结果中都是string类型(json也是String类型)
    <T>String format(T obj);
}
步骤二:下面我们要定义两个实现类:StringFormatProcessor ,JsonFormatProcessor
// 通过对象的toString()方法,直接将obj转化为String
public class JsonFormatProcessor implements FormatProcessor {
    @Override
    public <T> String format(T obj) {
        return "JsonFormatProcessor:" + JSON.toJSONString(obj);
    }
}

// 通过FastJson将obj转化为json字符串
public class StringFormatProcessor implements FormatProcessor{
    @Override
    public <T> String format(T obj) {
        return "StringFormatProcessor:" + Objects.toString(obj);
    }
}
步骤三:我们还需要创建一个 HelloTemplate 对象去供用户调用
public class HelloFormatTemplate {

    private FormatProcessor formatProcessor;

	// 根据构造 HelloTemplate 传入的对象,决定具体转化配普通string还是json串
    public HelloFormatTemplate(FormatProcessor formatProcessor) {
        this.formatProcessor = formatProcessor;
    }

	// 暴露的转化对象的方法
    public <T> String doFormat(T obj) {
        StringBuilder stringBuilder = new StringBuilder();
        stringBuilder.append("Execute format").append("\n");
        // 调用上面实现类的 format 方法进行转化
        stringBuilder.append("Obj format result: ").append(formatProcessor.format(obj)).append("\n");
        return stringBuilder.toString();
    }
}
好了,现在组件我们已经实现了,结构如下: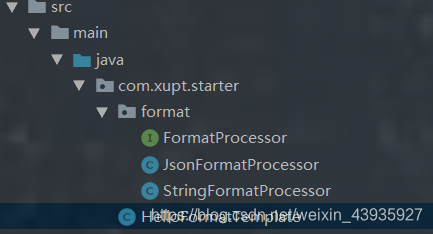
然后将组件 install 到本地,那用户该如何用调用这个组件呢?
=> 通过 new 进行外部调用
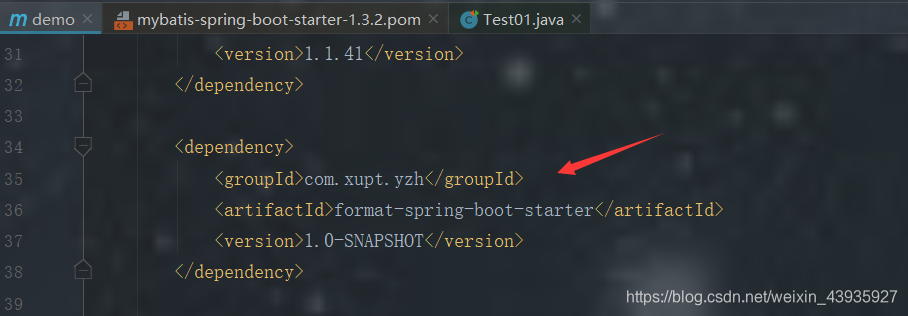
最简单的方式就是,在外部项目的 pom 文件中导入相应依赖坐标,然后直接 new HelloTemplate() 传入要转化的实现类。
@Test
public void f() {
	// new 出来 HelloTmeplate,并指定转化为 json
    HelloFormatTemplate helloFormatTemplate = new HelloFormatTemplate(new JsonFormatProcessor());
    String res = helloFormatTemplate.doFormat("hello starter");
    System.out.println(res);
}
问题:这里还是要将 HelloTemplate给 new出来,而我们希望的是直接@Autowired就直接使用了
既然要通过 @Autowired 直接获取对象使用,那势必该对象已经被初始化好并放到了 IOC 容器中。所以我们需要对上面的组件进行改造,目的是实现自动装配 HelloTemplate 对象。
2.组件改造,实现自动装配
步骤一:pom.xml 引入 spring-boot-starter相关注解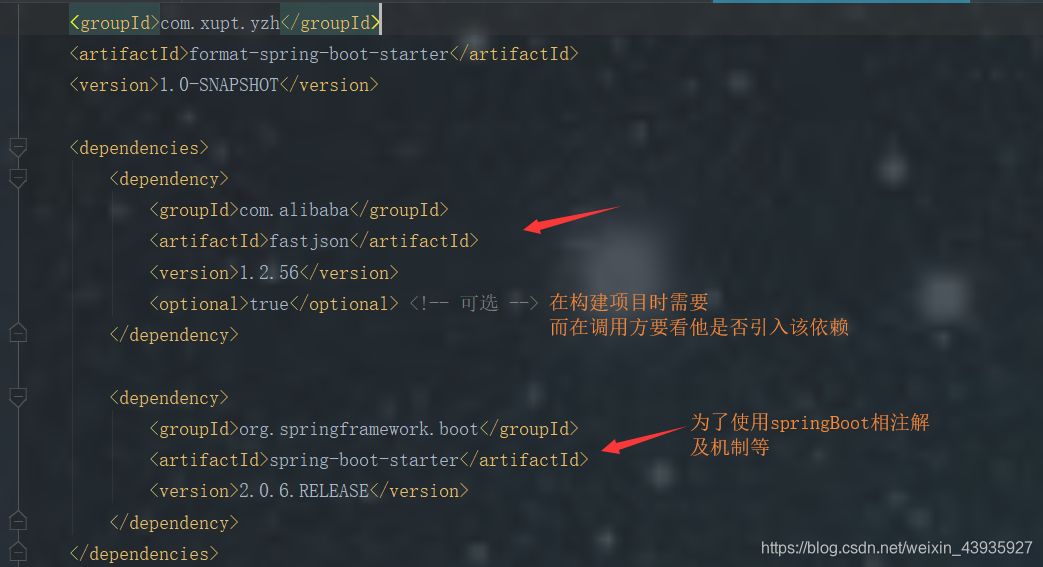
步骤二 :创建配置类,去定义我们要用到的 bean(三个)
- FormatAutoConfiguration:定义 StringFormatProcessor 和 JsonFormatProcessor
- HelloAutoConfiguration:定义 HelloTemplate
@Configuration
// 将具体工具类装载到Spring容器
public class FormatAutoConfiguration {

    @Bean
    @Primary // FormatProcessor有多个实现类时,要具体指定默认使用哪个
    @ConditionalOnMissingClass("com.alibaba.fastjson.JSON") // 当没有fastjson时注入StringFormat
    public FormatProcessor stringFormat() {        			// 注:这里是以核心类代替整个组
        return new StringFormatProcessor();        			//比如我们判断如果有redis时,是拿使用redis的核心类
    }

    @Bean
    @ConditionalOnClass(name = "com.alibaba.fastjson.JSON") // 当存在fastjson时注入JsonFormat
    public FormatProcessor jsonFormat() {
        return new JsonFormatProcessor();
    }
}
@Configuration @Import(FormatAutoConfiguration.class) // 将具体FormatProcess的Bean扫描进来(@ComponentScan 可以替换@Import,但一般不这么做) // 将对外HelloTemplate交给Spring容器 public class HelloAutoConfiguration { @Bean // 由于import了Format这Bean的配置类,spring就有据可依的能找到相应bean作为入参 // 这里还会根据具体Condition判断注入哪个bean public HelloFormatTemplate helloFormatTemplate(FormatProcessor formatProcessor) { return new HelloFormatTemplate(formatProcessor); } }现在这个配置类是写好了,但是如何让 Spring 将它加载进来呢?(因为加载后就会将里面配置的bean放到IOC容器中)
根据我们上一篇 【SpringBoot】原理分析(一):自动装配原理分析,我们知道 SpringBoot 能实现自动装配的核心就是实现了类似 SPI 的加载机制,可以动态装载 spring.factories 中配置的bean。
步骤三:创建 spring.factories 将要加载的类配置进去
#  spring.factories
# key是EnableAutoConfiguration注解
# 作用:类似于Bean扫描,让Spring动态加载这些类,并且这动态加载时还可再进行判断筛选
org.springframework.boot.autoconfigure.EnableAutoConfiguration=\
  com.xupt.starter.autoConfiguration.FormatAutoConfiguration,\
  com.xupt.starter.autoConfiguration.HelloAutoConfiguration
此时项目结构如下:
=> 通过 @Autowired 进行外部调用

问题:上面的自动装配算是完了,但是我们可不可以也在 application.properties 定义属性,然后读取到 HelloTemplate 中。
3.改造组件,实现自定义属性
可以实现用户设置property,实质上是读取有用的property
步骤一:编写 HelloProperties 去读取我们在 application.properties 中的配置
@ConfigurationProperties(prefix = HelloProperties.HELLO_FORMAT_PREFIX) // 标识这是个读取属性类
public class HelloProperties {                        				   // 注:设置属性与读取属性是因果关系
                                                                       // 即配置文件中设置什么都可以,但读不出就不一定
	// 要配置属性到前缀名
    public static final String HELLO_FORMAT_PREFIX = "hello.format";
    // 要配置属性的类型
    private Map<String, String> info;

    // getter,setter是必须的
    public Map<String, String> getInfo() {
        return info;
    }
    public void setInfo(Map<String, String> info) {
        this.info = info;
    }
}
步骤二:改造 helloFormatTemplate 的 doFormat 方法,使用读入的参数(将参数打印出来)

步骤三:改造 HelloAutoConfiguration,构造HelloTemplate时注入配置内容
@Configuration
@Import(FormatAutoConfiguration.class) // 将具体FormatProcessor的Bean扫描进来
@EnableConfigurationProperties(HelloProperties.class) // 将具体属性Bean(HelloProperties)扫描进来
public class HelloAutoConfiguration {                 // 注:这不是要加入IOC的Bean,所以不能用Componet替换

    @Bean
    // 将扫描进来的FormatProcessor与属性Bean注入到HelloTemplate
    public HelloFormatTemplate helloFormatTemplate(FormatProcessor formatProcessor, HelloProperties helloProperties) {
        return new HelloFormatTemplate(formatProcessor, helloProperties);
    }
}
=> 通过 application.properties 读取自定义参数
 具体调用代码不变
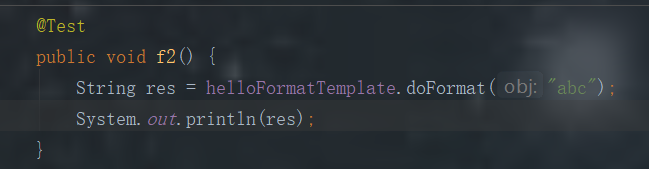 结果如下:
结果如下:

完整代码我放到 GitHub 上了,点击这里跳转…
-----------------------
原文链接:【SpringBoot】手写 starter 及自定义配置参数_spring starter 注入_A minor的博客-CSDN博客


 375
375


 被折叠的 条评论
为什么被折叠?
被折叠的 条评论
为什么被折叠?
 到【灌水乐园】发言


