


SPRINGBOOT
1 入门
1 .1 springBoot具体流程
1yaml 配置文件
2 自动装配
3集成web框架
4 集成数据库
5分布式开发 Dubbo(rpc) zookeeper
6 swagger 接口文档
7 任务调度
8 springSecurity :shiro
1.2 springCould
1 微服务
2 springcould入门
3 RestFul
4 eureka
5 Ribbon
feign
HyStrix
zuul 路由网关
SpringCloud config:git
1.3 什么是微服务
MVC三层 MVVM微服务架构
微服务:是一种架构风格 是一系列小服务的组合 可以通过http互通,把需要的功能调度组合。
2 搭建框架
2.1 idea创建springBoot项目
1直接创建
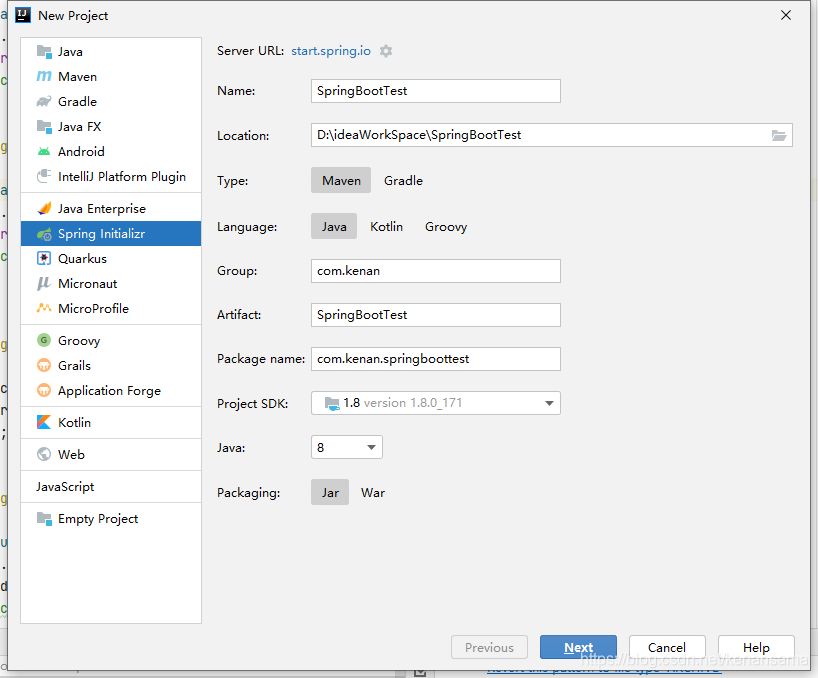
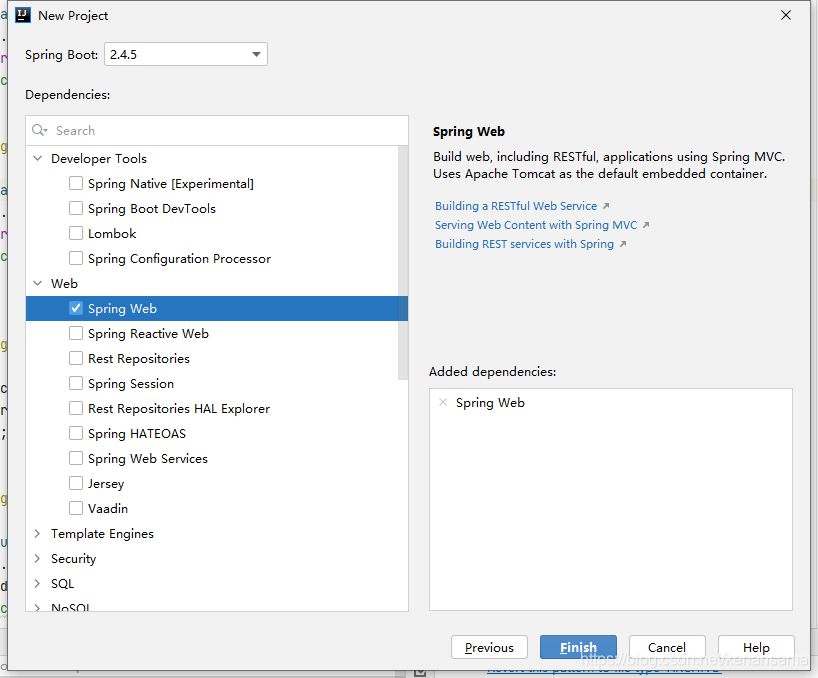
2 配置完成后创建controller测试
@RestController
public class Mycontroller {


    @RequestMapping("/hello")
    public String h1(){
        return "我要死了";
    }

}
3 打包成jar包
4 终端调用
java -jar bootpro-0.0.1-SNAPSHOT.jar
5 配置文件 properties
#更改项目端口号
server.port=8081


#自定义banner
spring.banner.location=banner.txt
3 自动装配原理
3.1 自动装配原理
核心的依赖都在父工程中,版本管理和资源过滤
<parent>
    <groupId>org.springframework.boot</groupId>
    <artifactId>spring-boot-starter-parent</artifactId>
    <version>2.3.0.RELEASE</version>
    <relativePath/> <!-- lookup parent from repository -->
</parent>
我们在引入springboot依赖的时候不需要指定版本,因为父pom中有管理仓库
启动器:
<!--web依赖 tomcat web。xml dispatcherServlet-->
<dependency>
    <groupId>org.springframework.boot</groupId>
    <artifactId>spring-boot-starter-web</artifactId>
</dependency>
我们需要使用什么功能就引入什么启动器
可以在项目的pom中配置依赖的版本:
<properties>
        <java.version>1.8</java.version>
        <mysql.version>5.*.*</mysql.version>
    </properties>
20210419注:
3.2 主程序
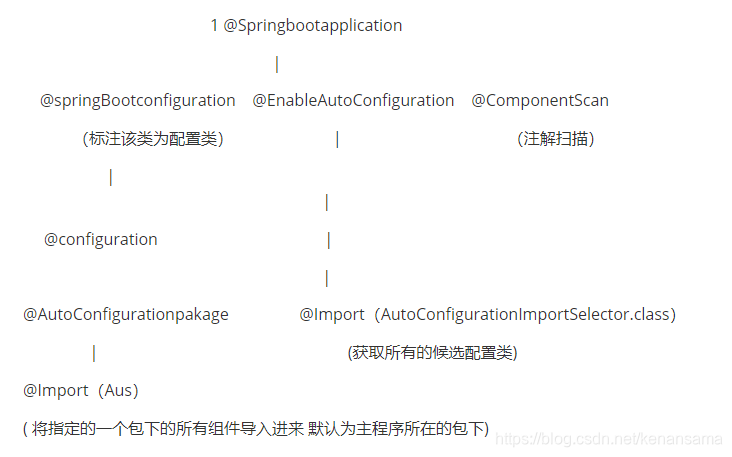
//集成封装了springconfig注解 标注这个类是一个springboot应用
@SpringBootApplication
public class BootproApplication {

    public static void main(String[] args) {
        //通过反射加载类
        SpringApplication.run(BootproApplication.class, args)   }

}
主程序注解
@SpringBootConfiguration //sprng配置文件 就是一个configuration 代表当前类为spring的配置类

@EnableAutoConfiguration //自动装配
//注解扫描
@ComponentScan(excludeFilters = { @Filter(type = FilterType.CUSTOM, classes = TypeExcludeFilter.class),
      @Filter(type = FilterType.CUSTOM, classes = AutoConfigurationExcludeFilter.class) })

//@SpringBoootConfiguration下的注解:(说明该class是一个spring配置类)
@Configuration

//EnableAutoConfigurations下的注解:
@AutoConfigurationPackage //自动配置包
@Import(AutoConfigurationImportSelector.class)//导入选择器

//@AutoConfigurationPackage下的注解
@Import(AutoConfigurationPackages.Registrar.class)//利用registar给容器中批量导入组件
/**
 * {@link ImportBeanDefinitionRegistrar} to store the base package from the importing
 * configuration.
 */
static class Registrar implements ImportBeanDefinitionRegistrar, DeterminableImports {

   @Override
   public void registerBeanDefinitions(AnnotationMetadata metadata, BeanDefinitionRegistry registry) {
       //将指定的一个包下的所有组件导入进来 默认为主程序所在的包下
      register(registry, new PackageImports(metadata).getPackageNames().toArray(new String[0]));
   }

   @Override
   public Set<Object> determineImports(AnnotationMetadata metadata) {
      return Collections.singleton(new PackageImports(metadata));
   }

}
(AutoConfigurationImportSelector.class 给容器导入组件

上图 获取所有的候选配置类
每个autoconfiguration(配置类)类 对应一个properties类 通过yaml或properties给具体属性赋值 被调用的autoconfig类会通过@Bean 注解生成程序运行所需的对象交给spring ioc容器管理(生成一个template对象)
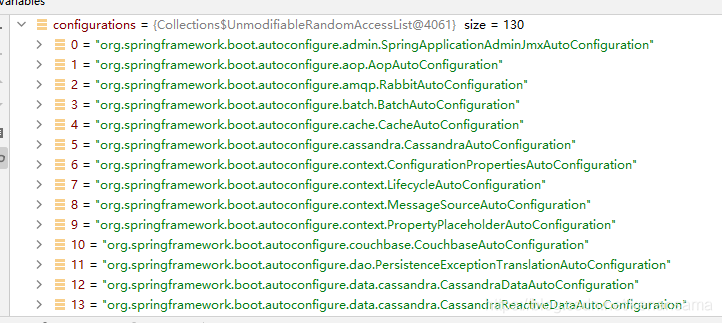
List<String> loadFactoryNames(Class<?> factoryType, @Nullable ClassLoader classLoader) //这个方法得到所有的组件 从meta-info 下加载文件
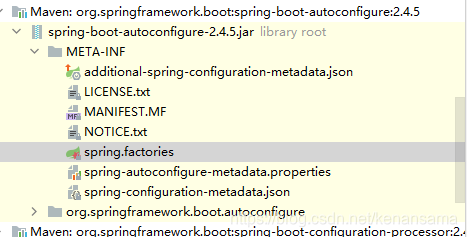
从spring.factories中读取配置(需要加载的类)
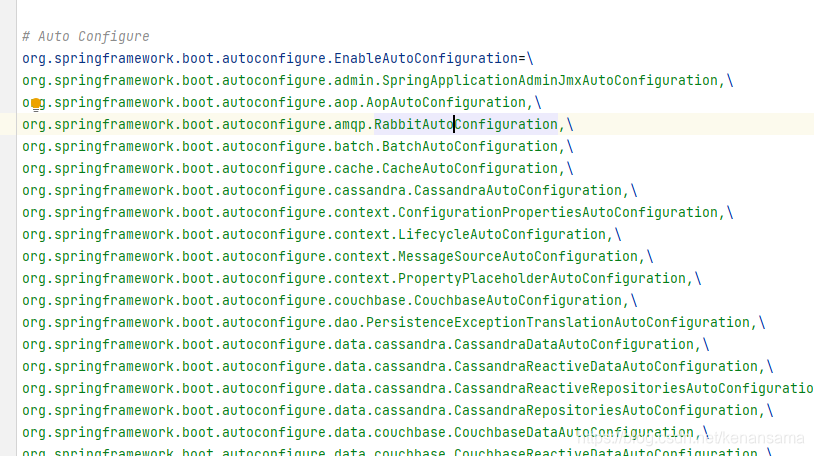
读取完全部配置 最后按照条件装备规则按需开启 例: 下图类上有注解 当容器中有advice时才加载进容器中 当添加了aop依赖后才能将其加进去

主程序运行过程
SpringApplication
1 判断应用的类是普通项目还是web项目
2 加载所有可用的初始化器 设置到initializers中
3 找出所有的应用程序监听器,设置到listener中
5 推断设置main方法的定义类 ,找到运行的主类
注:
springBoot 自动扫描主程序所在的包以及其所有子包下的组件,若想修改则可:@SpringBootApplication(scanBasePackages=“com”)
1 springboot先加载所有的自动配置类
2 每个自动备注类按照条件生效
3 生效的配置类会向容器中注册组件
注解总结:
基础注解:
@configuration:
配置类
(proxyBeanMethods=true) 全增量(full)开发模式 严格准守spring约束 bean为单例模式;
= false (lite)不为单例模式 getBean时spring运行时不会做检查 增加效率。
@Configuration
public class MyConfig {

    @Bean("kenan")
    public Student getStudent(){
        return new Student(22,"柯南",1608);
    }
    @Bean("miao")
    public Pet getPet(){
        return  new Pet();
    }
}
@import:
@Import(user.class) 在容器中创建出user类型的组件 默认组件名为全类名(包+类名)
@conditional:
条件装配,满足condition则进行组件注入
@ImportResources:
导入spring配置文件:
@ImportResources(“classpath:**”)
@ConfigurationProperties:
配置绑定
@PropertySource
加载指定的属性文件(*.properties)到 Spring 的 Environment 中。可以配合 @Value 和
@ConfigurationProperties 使用。
@PropertySource 和 @Value
组合使用,可以将自定义属性文件中的属性变量值注入到当前类的使用@Value注解的成员变量中。
@PropertySource 和 @ConfigurationProperties
组合使用,可以将属性文件与一个Java类绑定,将属性文件中的变量值注入到该Java类的成员变量中
1 导入依赖:
<dependency>
            <groupId>org.springframework.boot</groupId>
            <artifactId>spring-boot-configuration-processor</artifactId>
        </dependency>
2 类上加注解:
@ConfigurationProperties(prefix = "mypet")
public class Pet {
    private String species;
    private String name;
}
3 properties文件:
mypet.species="猫"
mypet.name="咪咪"
使用方式:
1: @Component + @ConfigurationProperties
2 @ConfigutationProperties +EnableConfigurationProperties
@EnableConfigurationProperties(HelloServiceProperties.class)
4 yaml
4.1 yaml语法
#yaml格式配置文件
server:
  port: 8081

  #对象
  student:
    name: 克南
    age: 22


    #对象行内写法
  person: {name: 克南, age: 18}


    #数组
  pets:
      - cat
      - dog
      - pig


  #行内写法
  animals: [cat, dog, pig]
4.2 yaml 属性赋值
可以将yaml中的值与bean一一对应,给bean注入值
<!--使用configProperties注解需导入这个依赖-->
<dependency>
    <groupId>org.springframework.boot</groupId>
    <artifactId>spring-boot-configuration-processor</artifactId>
    <optional>true</optional>
</dependency>
@ConfigurationProperties(prefix = "person")
public class Person {

    private String name;
    private int age;
    private Map maps;
}
person:
  name: sama
   age: ${random.int}
  maps: {hobby: girl, like: game}
4.3 指定配置文件
使用指定的properties文件
@PropertySource("classpath:kenan.properties")
name=克南
public class Dog {

    @Value("${name}")
    private String name;

    private int age;
}
4.4 yaml占位符表达式
id: ${random.int}
id2: ${random.uuid}
say: ${dog.hello:hello}aa #判断式如果冒号前的dog.hello存在 则调用hello的值 否则使用:后面的值
4.5 yaml松散绑定
驼峰和分隔符转换
private String lastName;
person:
    last-name: sama
5 JSR303校验
在后端校验数据的格式
<!--开启后台数据校验-->
<dependency>
    <groupId>org.springframework.boot</groupId>
    <artifactId>spring-boot-starter-validation</artifactId>
    </dependency>
@Validated
public class Person {

    @Email(message = "邮箱格式错误")
    private String name;
    private int age;
    private Map maps;
}
default message [邮箱格式错误]; origin class path resource [application.yaml]:3:11
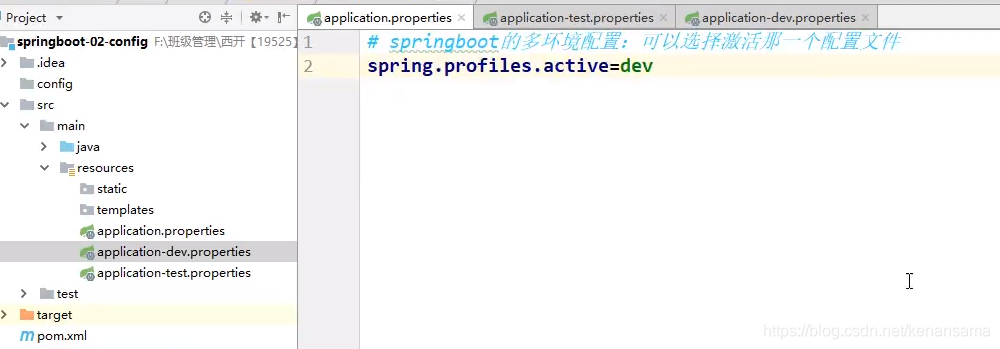
6 多环境配置
配置文件的四个位置
1 根目录下的config文件夹:
2 根目录下:
3 classpath下的config下:
4 classpath下:
优先级 1 》 2 》 3 》4
yaml多环境配置选择 (spring profiles active)
[外链图片转存失败,源站可能有防盗链机制,建议将图片保存下来直接上传(img-8yQL75kd-1627207396216)(K:\u\study\文档\image-boot原理图6)]
server:
    port: 8081
spring:
  profiles:
    active: test
---
server:
  port: 8082
spring:
  profiles: dev


---
server:
  port: 8083
spring:
  profiles: test
7 导入静态资源
WebMvcAutoConfiguration下的
EnableWebMvcConfiguration
public void addResourceHandlers(ResourceHandlerRegistry registry) {
    if (!this.resourceProperties.isAddMappings()) {
        logger.debug("Default resource handling disabled");
        return;
    }
    Duration cachePeriod = this.resourceProperties.getCache().getPeriod();
    CacheControl cacheControl = this.resourceProperties.getCache().getCachecontrol().toHttpCacheControl();
    if (!registry.hasMappingForPattern("/webjars/**")) {
        customizeResourceHandlerRegistration(registry.addResourceHandler("/webjars/**")
                                             .addResourceLocations("classpath:/META-INF/resources/webjars/")
                                              .setCachePeriod(getSeconds(cachePeriod)).setCacheControl(cacheControl));
    }
    String staticPathPattern = this.mvcProperties.getStaticPathPattern();
    if (!registry.hasMappingForPattern(staticPathPattern)) {
        customizeResourceHandlerRegistration(registry.addResourceHandler(staticPathPattern)
                                             .addResourceLocations(getResourceLocations(this.resourceProperties.getStaticLocations()))
                                             .setCachePeriod(getSeconds(cachePeriod)).setCacheControl(cacheControl));
    }
}
什么是webjars
springboot使用webjars统一管理静态资源
使用依赖的方式来引入web常用的包库 如jquery 等
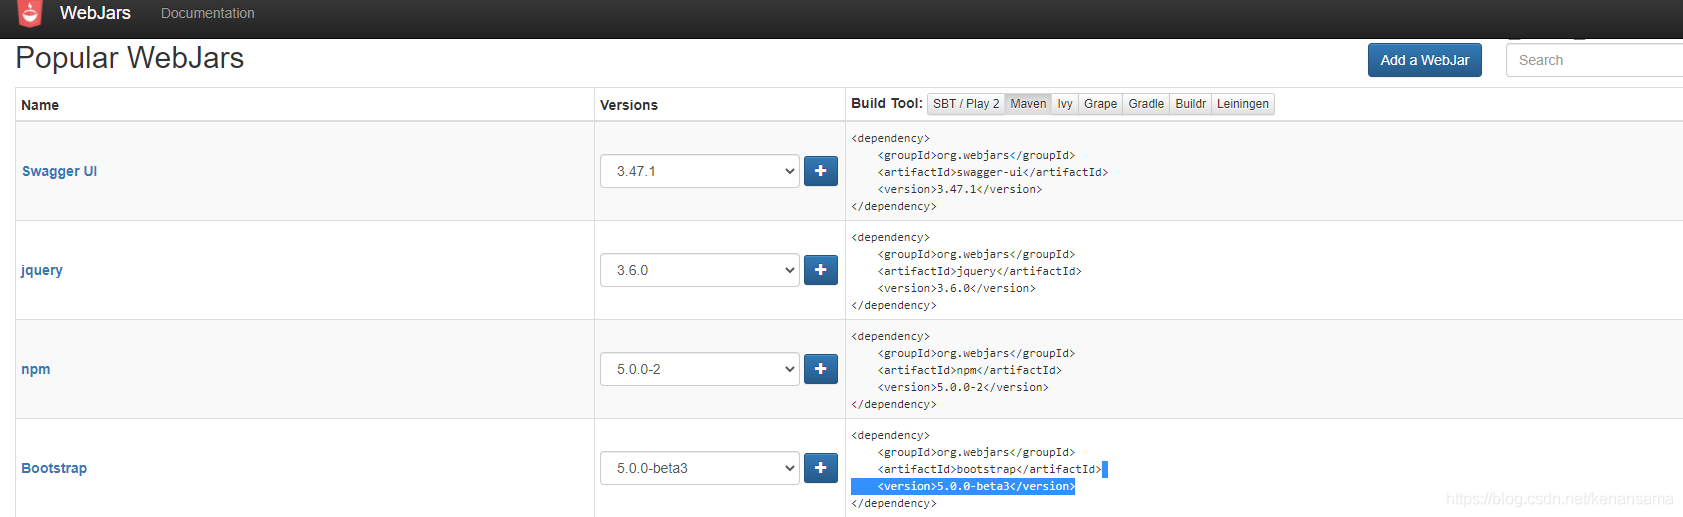
<dependency>
    <groupId>org.webjars</groupId>
    <artifactId>jquery</artifactId>
    <version>3.6.0</version>
</dependency>
1 访问静态资源的路径为 /webjars/**
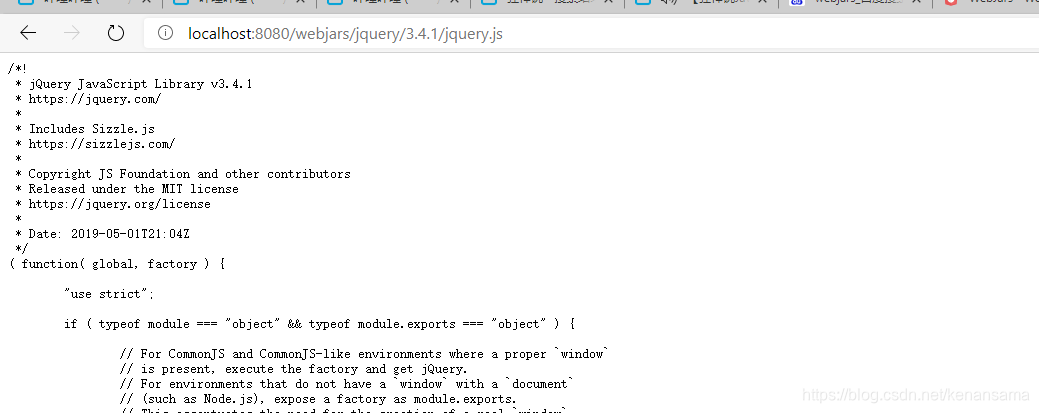
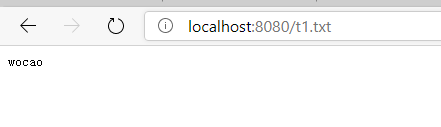
2 访问静态资源的默认路径 /** 例如:/t1.txt 那么就会到/** 所对应的映射目录去寻找t1.txt
<script src="webjars/jquery/3.4.1/jquery.js"></script>
<--用webjar引用静态资源-->
/**
 * Path pattern used for static resources.
 */
private String staticPathPattern = "/**";
private static final String[] CLASSPATH_RESOURCE_LOCATIONS = { "classpath:/META-INF/resources/",
      "classpath:/resources/", "classpath:/static/", "classpath:/public/" };

/**
 * Locations of static resources. Defaults to classpath:[/META-INF/resources/,
 * /resources/, /static/, /public/].
 */
一般 static 放图片 public放公共js resources 放上下传文件
三者优先级 r > s > p
3 在配置文件中自定义静态资源位置
spring:
  mvc:
    static-path-pattern: /mystaic/, classpath:/mystatic/
7.1 首页
private Resource getIndexHtml(String location) {
   return this.resourceLoader.getResource(location + "index.html");
}
故须在静态资源文件夹下新建index.html
8 thymeleaf
默认的配置类配置了前缀和后缀
@ConfigurationProperties(prefix = "spring.thymeleaf")
public class ThymeleafProperties {

   private static final Charset DEFAULT_ENCODING = StandardCharsets.UTF_8;

   public static final String DEFAULT_PREFIX = "classpath:/templates/";

   public static final String DEFAULT_SUFFIX = ".html";
8.1 开始
可以在yaml中关闭thymeleaf缓存
spirng.thymleaf.cache: false
1导入依赖
<!-- https://mvnrepository.com/artifact/org.springframework.boot/spring-boot-starter-thymeleaf -->
<dependency>
    <groupId>org.springframework.boot</groupId>
    <artifactId>spring-boot-starter-thymeleaf</artifactId>
</dependency>
/*在template文件下的html只能通过controller访问
* 需要模板引擎的支持*/
@Controller
public class IndexController {
    @RequestMapping("/a")
    public String index(){
        return "index";
    }

}
2 导入约束 声明thymeleaf的命名空间
<html lang="en" xmlns:th="http://www.thymeleaf.org">
3 元素中使用th标签
<!--所有的元素都可被html接管-->
<div th:text="${msg}"></div>
8.2 基本语法
<!--所有的元素都可被html接管-->
<div th:text="${msg}"></div>
<!--非转义字符串 可输出html-->
<div th:utext="${msg}"></div>
<!--遍历 users是集合 user是单个元素-->
<h2 th:each="user:${users}" th:text="${user}"></h2>
<!--两个中括号 中间加元素-->
<h2 th:each="user:${users}">
    [[${user}]]
</h2>
//工具类 可以将数组转换为集合
model.addAttribute("users", Arrays.asList("kenan","sama"));
<link th:href="@{/css/bootstrap.min.css}" rel="stylesheet">
<link  th:href="@{/css/animate.css}" rel="stylesheet">
<link  th:href="@{/css/style.css}" rel="stylesheet">
<link  th:href="@{/css/login.css}" rel="stylesheet">
<script th:src="@{/js/jquery-3.4.1.min.js}"></script>
<script th:src="@{/js/bootstrap.min.js}"></script>
9 扩展MVC
9.1 扩展MVC
自定义视图解析器
//扩展mvc
@Configuration
public class MyMVC implements WebMvcConfigurer {


    @Bean
public MyViewResolver myViewResolver(){
    return new MyViewResolver();
}


    //自己配置的viewResolver
    class MyViewResolver implements ViewResolver{

        @Override
        public View resolveViewName(String viewName, Locale locale) throws Exception {
            return null;
        }
    }
}
//添加一个视图跳转页面 相当于手动配置controller
@Override
public void addViewControllers(ViewControllerRegistry registry) {
    registry.addViewController("/user").setViewName("index");
}
9.2 拦截器
@Override
public void addInterceptors(InterceptorRegistry registry) {
    //添加拦截链接 和不拦截的拦截
    registry.addInterceptor(new LoginInterceptor()).addPathPatterns("/**").excludePathPatterns();
}
10 整合数据库
10.1 springboot JDBC
1 设置参数
spring:
  datasource:
    username: root
    password: 123456
    url: jdbc:mysql://localhost:3306/graduation_project?useUnicode=true&characterEncoding=UTF-8&serverTimezone=Hongkong
    driver-class-name: com.mysql.cj.jdbc.Driver
2 使用spring提供的jdbctemplate操作数据库
@RestController
public class MyController {
    @Autowired
    JdbcTemplate template;
    @RequestMapping("/test")
    public List<Map<String, Object>> t1(){
        String sql = "select * from patients";
        List<Map<String, Object>> maps = template.queryForList(sql);
        return maps;
    }
}
@RequestMapping("update/{name}/{id}")
public String update(@PathVariable("name") String name,  @PathVariable("id") String id){
    String sql = "update patients set p_name = ? where p_id = ?";
    Object[] objects = new Object[2];
    objects[0] = name;
    objects[1] = id;
    template.update(sql,objects);
    return "ok";

}
10.2 整合druid数据源
1 导入maven依赖
com.alibaba druid 1.1.222 指定数据库type并配置druid属性
spring:
  datasource:
    username: root
    password: 123456
    url: jdbc:mysql://localhost:3306/graduation_project?useUnicode=true&characterEncoding=UTF-8&serverTimezone=Hongkong
    driver-class-name: com.mysql.cj.jdbc.Driver
    type: com.alibaba.druid.pool.DruidDataSource
#   数据源其他配置
    initialSize: 5
    minIdle: 5
    maxActive: 20
    maxWait: 60000
    timeBetweenEvictionRunsMillis: 60000
    minEvictableIdleTimeMillis: 300000
    validationQuery: SELECT 1 FROM DUAL
    testWhileIdle: true
    testOnBorrow: false
    testOnReturn: false
    poolPreparedStatements: true
#   配置监控统计拦截的filters,stat监控界面sql统计,'wall'用于防火墙防御sql注入 log4j 日志文件
    filters: stat,wall,log4j
    maxPoolPreparedStatementPerConnectionSize: 20
    useGlobalDataSourceStat: true
    connectionProperties: druid.stat.mergeSql=true;druid.stat.slowSqlMillis=500
3 创建druid配置文件使其生效虽然我们配置了druid连接池的其它属性,但是不会生效。因为默认是使用的java.sql.Datasource的类来获取属性的,有些属性datasource没有。如果我们想让配置生效,需要手动创建Druid的配置文件。
 //绑定druiddatasource参数
    @ConfigurationProperties("spring.datasource")
    @Bean
    public DataSource dataSource(){
        return new DruidDataSource();
    }
//配置后台监控 注册一个servlet
@Bean
public ServletRegistrationBean tatViewServlet() {
    ServletRegistrationBean<StatViewServlet> bean = new ServletRegistrationBean<>(new StatViewServlet(), "/druid/*");
    //设置后台管理用户 和一些配置
    HashMap<String, String> map = new HashMap<>();
    map.put("loginUsername", "admin");
    map.put("loginPassword", "123456");

    //设置访问白名单
    map.put("allow", "localhost");


    bean.setInitParameters(map);
    return bean;

}
11 整合Mybatis
前情提要:
spring整合mybatis时可以使用MapperScannerConfigurer实现mapper的动态代理(省去了手动实现mapper类的步骤“mapperImpl”)在接口上也可以省去@Repository注解
<!--生成mapper代理类-->
<bean id="mapperScanner" class="org.mybatis.spring.mapper.MapperScannerConfigurer">
    <property name="basePackage" value="com.zzuli.mapper"/>
</bean>
public interface StuMapper {

    List<Student> getStu();
}
@mapper注解
@mapper在springboot中使用 添加在mapper接口上 在编译后悔生成对应的接口实现类
@MapperScan
在springboot的启动类上添加使用 其所指定的包中的接口在编译后都会生成对应的实现类
11.1 入门
1 引入maven依赖
org.mybatis.spring.boot mybatis-spring-boot-starter 2.1.32编写mapper
@Mapper
public interface PatientMapper {
    List<Patient> getPat();

    Patient getPatById(String id);
}
<?xml version="1.0" encoding="UTF-8" ?>
<!DOCTYPE mapper
        PUBLIC "-//mybatis.org//DTD Config 3.0//EN"
        "http://mybatis.org/dtd/mybatis-3-mapper.dtd">
<mapper namespace="zuli.kenan.boot_mybatis.mapper.PatientMapper">


    <select id="getPat" resultMap="patMap">
        select  * from patients
    </select>

    <!--结果集-->
    <resultMap id="patMap" type="zuli.kenan.boot_mybatis.pojo.Patient">
        <result property="id" column="p_id"/>
        <result property="name" column="p_name"/>
        <result property="password" column="password"/>
    </resultMap>
</mapper>
#整合mybatis
mybatis:
  type-aliases-package: zuli.kenan.boot_mybatis.pojo
  mapper-locations: classpath*:mapper/*.xml
@MapperScan("com.kenan.mybatisboot.mapper")
12 SpringSecurity
功能权限
访问权限
菜单权限
需要拦截器 过滤器 都是原生代码
12.1 框架搭建
<dependency>
    <groupId>org.springframework.boot</groupId>
    <artifactId>spring-boot-starter-security</artifactId>
</dependency>
@EnableWebSecurity
public class SecurityConfig extends WebSecurityConfigurerAdapter {

    @Override
    protected void configure(HttpSecurity http) throws Exception {
        //链式调用 建造者模式
        //指定访问策略
        //首页对应的功能页只有对应权限的人才能访问
        //url后面跟参数 * 当参数和hasrole中的规则一致时,才能访问
        http.authorizeRequests().antMatchers("/").permitAll()
                .antMatchers("/level1/**").hasRole("vip1")
                .antMatchers("/level2/**").hasRole("vip2");

        //访问被拦截后会跳到登录面(自带的)he most basic configuration defaults to automatically generating a login page at
        //  * the URL "/login", redirecting to "/login?error" for authentication failure.
        http.formLogin();
    }

    //认证用户  给指定的用户指定相应的role 要设置密码编码不使用明文密码
    // enable in memory based authentication with a user named
    //  *     // "user" and "admin"
    //  *     .inMemoryAuthentication().withUser("user").password("password").roles("USER").and()
    //  *           .withUser("admin").password("password").roles("USER", "ADMIN");
    //  * }
    @Override
    protected void configure(AuthenticationManagerBuilder auth) throws Exception {
        auth.inMemoryAuthentication().passwordEncoder(new BCryptPasswordEncoder())
                .withUser("kenan").password("1234").roles("v1","v2")
                .and()
                .withUser("kenan").password("22").roles("v3");
    }
}
13 Shiro
);
    //访问被拦截后会跳到登录面(自带的)he most basic configuration defaults to automatically generating a login page at
    //  * the URL "/login", redirecting to "/login?error" for authentication failure.
    http.formLogin();
}

//认证用户  给指定的用户指定相应的role 要设置密码编码不使用明文密码
// enable in memory based authentication with a user named
//  *     // "user" and "admin"
//  *     .inMemoryAuthentication().withUser("user").password("password").roles("USER").and()
//  *           .withUser("admin").password("password").roles("USER", "ADMIN");
//  * }
@Override
protected void configure(AuthenticationManagerBuilder auth) throws Exception {
    auth.inMemoryAuthentication().passwordEncoder(new BCryptPasswordEncoder())
            .withUser("kenan").password("1234").roles("v1","v2")
            .and()
            .withUser("kenan").password("22").roles("v3");
}
}
## 13 Shiro


 2274
2274


 被折叠的 条评论
为什么被折叠?
被折叠的 条评论
为什么被折叠?
 到【灌水乐园】发言


