


axios简介
axios的npm文档:npm-axios
当然也有axios爱好者共建的中文网:http://www.axios-js.com/zh-cn/docs/
axios本质上也是对原生XHR的封装,只不过它是Promise的实现版本,符合最新的ES规范,会用ajax很容易上手axios

vue axios入门
- npm安装,就不复述了
npm install axios --save
- 引用
因为axios是一个库,不是vue中的第三方插件,不能直接通过Vue.use()安装插件
一般写在vue项目的mian.js中:
import Vue from 'vue'
import axios from 'axios'
- 简便配置
为了更方便的使用axios,可以在main.js中配置
// 全局注册:给Vue函数添加一个原型属性$axios 指向Axios
Vue.prototype.$axios = axios
// 请求地址为baseurl+url
axios.defaults.baseURL = 'http://localhost:8080'
第一条:后续可以通过this.$axios直接使用,不用重复引用axios
第二条:请求时的url是通过baseURL+url拼接,就不需要重复写ip+port了
- 简单的demo
    getUser() {
      const _this = this
      this.$axios({
        method: 'get',
        url: '/admin/getById',
        params : {
        	"id" : this.id
        }
      }).then(function(response) {
        console.log(response.data)
        _this.tableData = response.data
      })
    },
很明显,对应请求是:http://localhost:8080/admin/getById,后端写好对应的接口并返回数据就能接收到数据了
axios相关方法
方法
上面的方法就是基本的通过向 axios 传递相关配置来创建请求
axios也为所有支持的请求方法提供了别名
delete,head, options与get类似,put, patch与post类似
axios.get(url[, config]):get请求axios.post(url[, data[, config]]):post请求axios.request(config):实际上所有aixos请求的创建都是request方法来实现的axios.delete(url[, config]):delete请求axios.head(url[, config]):类似与get,只是不会获得响应内容,用于获取报头axios.options(url[, config]):options请求axios.put(url[, data[, config]]):put请求axios.patch(url[, data[, config]]):只将更改的数据推送到后端
处理并发请求的助手函数
axios.all([getUserAccount(), getUserPermissions()])
  .then(axios.spread(function (acct, perms) {
    // 两个请求现在都执行完成
  }));
-
axios.all(iterable):Promise.all的封装,将多个请求并发执行
axios.all方法接受一个数组作为参数,数组中的每个元素都是一个请求,返回一个promise对象,当数组中所有请求均已完成时,执行then方法。 -
axios.spread(callback):接收一个函数作为参数,返回一个新的函数。接收的参数函数的参数是axios.all方法中每个请求返回的响应。
使用自定义配置新建一个 axios 实例
axios.create([config])
const instance = axios.create({
  baseURL: 'http://localhost:8080',
  timeout: 1000,
  headers: {'X-Custom-Header': 'foobar'}
});
创建了instance实例,然后使用就可以了:
instance(
	method : 'get',
	url : "/admin/getById",
    params : {
   	"id" : this.id
   }
)
请求方法写法
- 最基本写法:axios(config)
method为get时可以省略
   getUser() {
      const _this = this
      this.$axios({
        method: 'get',
        url: '/admin/getById',
        params : {
      		"id" : this.id
        }
      }).then(function(response) {
        console.log(response.data)
        _this.tableData = response.data
      })
    },
- 使用对应的请求方法
   getUser() {
      const _this = this
      this.$axios.get('/admin/getById', {
      	params : {
        	"id" : this.id
        }
      }).then(function(response) {
        console.log(response.data)
        _this.tableData = response.data
      })
    },
请求配置参数
config中不仅仅上面这些参数
{
   // `url` 是用于请求的服务器 URL
  url: '/user',

  // `method` 是创建请求时使用的方法
  method: 'get', // default

  // `baseURL` 将自动加在 `url` 前面,除非 `url` 是一个绝对 URL。
  // 它可以通过设置一个 `baseURL` 便于为 axios 实例的方法传递相对 URL
  baseURL: 'https://some-domain.com/api/',

  // `transformRequest` 允许在向服务器发送前,修改请求数据
  // 只能用在 'PUT', 'POST' 和 'PATCH' 这几个请求方法
  // 后面数组中的函数必须返回一个字符串,或 ArrayBuffer,或 Stream
  transformRequest: [function (data, headers) {
    // 对 data 进行任意转换处理
    return data;
  }],

  // `transformResponse` 在传递给 then/catch 前,允许修改响应数据
  transformResponse: [function (data) {
    // 对 data 进行任意转换处理
    return data;
  }],

  // `headers` 是即将被发送的自定义请求头
  headers: {'X-Requested-With': 'XMLHttpRequest'},

  // `params` 是即将与请求一起发送的 URL 参数
  // 必须是一个无格式对象(plain object)或 URLSearchParams 对象
  params: {
    ID: 12345
  },

   // `paramsSerializer` 是一个负责 `params` 序列化的函数
  // (e.g. https://www.npmjs.com/package/qs, http://api.jquery.com/jquery.param/)
  paramsSerializer: function(params) {
    return Qs.stringify(params, {arrayFormat: 'brackets'})
  },

  // `data` 是作为请求主体被发送的数据
  // 只适用于这些请求方法 'PUT', 'POST', 和 'PATCH'
  // 在没有设置 `transformRequest` 时,必须是以下类型之一:
  // - string, plain object, ArrayBuffer, ArrayBufferView, URLSearchParams
  // - 浏览器专属:FormData, File, Blob
  // - Node 专属: Stream
  data: {
    firstName: 'Fred'
  },

  // `timeout` 指定请求超时的毫秒数(0 表示无超时时间)
  // 如果请求话费了超过 `timeout` 的时间,请求将被中断
  timeout: 1000,

   // `withCredentials` 表示跨域请求时是否需要使用凭证
  withCredentials: false, // default

  // `adapter` 允许自定义处理请求,以使测试更轻松
  // 返回一个 promise 并应用一个有效的响应 (查阅 [response docs](#response-api)).
  adapter: function (config) {
    /* ... */
  },

 // `auth` 表示应该使用 HTTP 基础验证,并提供凭据
  // 这将设置一个 `Authorization` 头,覆写掉现有的任意使用 `headers` 设置的自定义 `Authorization`头
  auth: {
    username: 'janedoe',
    password: 's00pers3cret'
  },

   // `responseType` 表示服务器响应的数据类型,可以是 'arraybuffer', 'blob', 'document', 'json', 'text', 'stream'
  responseType: 'json', // default

  // `responseEncoding` indicates encoding to use for decoding responses
  // Note: Ignored for `responseType` of 'stream' or client-side requests
  responseEncoding: 'utf8', // default

   // `xsrfCookieName` 是用作 xsrf token 的值的cookie的名称
  xsrfCookieName: 'XSRF-TOKEN', // default

  // `xsrfHeaderName` is the name of the http header that carries the xsrf token value
  xsrfHeaderName: 'X-XSRF-TOKEN', // default

   // `onUploadProgress` 允许为上传处理进度事件
  onUploadProgress: function (progressEvent) {
    // Do whatever you want with the native progress event
  },

  // `onDownloadProgress` 允许为下载处理进度事件
  onDownloadProgress: function (progressEvent) {
    // 对原生进度事件的处理
  },

   // `maxContentLength` 定义允许的响应内容的最大尺寸
  maxContentLength: 2000,

  // `validateStatus` 定义对于给定的HTTP 响应状态码是 resolve 或 reject  promise 。如果 `validateStatus` 返回 `true` (或者设置为 `null` 或 `undefined`),promise 将被 resolve; 否则,promise 将被 rejecte
  validateStatus: function (status) {
    return status >= 200 && status < 300; // default
  },

  // `maxRedirects` 定义在 node.js 中 follow 的最大重定向数目
  // 如果设置为0,将不会 follow 任何重定向
  maxRedirects: 5, // default

  // `socketPath` defines a UNIX Socket to be used in node.js.
  // e.g. '/var/run/docker.sock' to send requests to the docker daemon.
  // Only either `socketPath` or `proxy` can be specified.
  // If both are specified, `socketPath` is used.
  socketPath: null, // default

  // `httpAgent` 和 `httpsAgent` 分别在 node.js 中用于定义在执行 http 和 https 时使用的自定义代理。允许像这样配置选项:
  // `keepAlive` 默认没有启用
  httpAgent: new http.Agent({ keepAlive: true }),
  httpsAgent: new https.Agent({ keepAlive: true }),

  // 'proxy' 定义代理服务器的主机名称和端口
  // `auth` 表示 HTTP 基础验证应当用于连接代理,并提供凭据
  // 这将会设置一个 `Proxy-Authorization` 头,覆写掉已有的通过使用 `header` 设置的自定义 `Proxy-Authorization` 头。
  proxy: {
    host: '127.0.0.1',
    port: 9000,
    auth: {
      username: 'mikeymike',
      password: 'rapunz3l'
    }
  },

  // `cancelToken` 指定用于取消请求的 cancel token
  // (查看后面的 Cancellation 这节了解更多)
  cancelToken: new CancelToken(function (cancel) {
  })

}
其中:
get/delete/head/options请求带参数时,用params:添加到url的请求字符串中的;
post/put/patch带参数时,用data:添加到请求体(body)中
配置的优先顺序
请求方法中的config > 创建axios实例中的config > 库中的默认配置
以下超时时间:
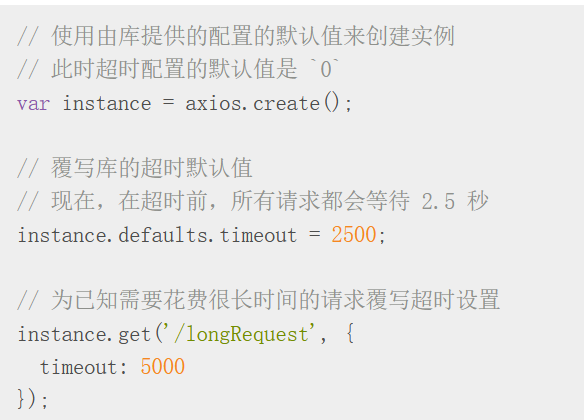
优先级最高的是5000,然后是2500,最后是库提供的0
同样,baseURL在mian.js中全局配置,如果需要请求其他baseURL,只需在请求方法中设置
   getUser() {
      const _this = this
      this.$axios.get('/admin/getById', {
      	baseURL : 'http://localhost:9090'
      	params : {
        	"id" : this.id
        }
      }).then(function(response) {
        console.log(response.data)
        _this.tableData = response.data
      })
    },
响应
response的结构:

{
  // `data` 由服务器提供的响应
  data: {},

  // `status` 来自服务器响应的 HTTP 状态码
  status: 200,

  // `statusText` 来自服务器响应的 HTTP 状态信息
  statusText: 'OK',

  // `headers` 服务器响应的头
  headers: {},

   // `config` 是为请求提供的配置信息
  config: {},
 // 'request'
  // `request` is the request that generated this response
  // It is the last ClientRequest instance in node.js (in redirects)
  // and an XMLHttpRequest instance the browser
  request: {}
}
data才是后端传来的数据,所以通常是使用response.data
拦截器
axios都封装好了,直接使用:
- 请求拦截器
// 添加请求拦截器
axios.interceptors.request.use(
  function (config) {
    // 在发送请求之前做些什么
    return config;
  },
  function (error) {
    // 对请求错误做些什么
    return Promise.reject(error);
 });
- 响应拦截器
// 添加响应拦截器
axios.interceptors.response.use(
  function (response) {
    // 对响应数据做点什么
    return response;
  },
  function (error) {
    // 对响应错误做点什么
    return Promise.reject(error);
  });
- 移除拦截器
const myInterceptor = axios.interceptors.request.use(function () {/*...*/});
axios.interceptors.request.eject(myInterceptor);
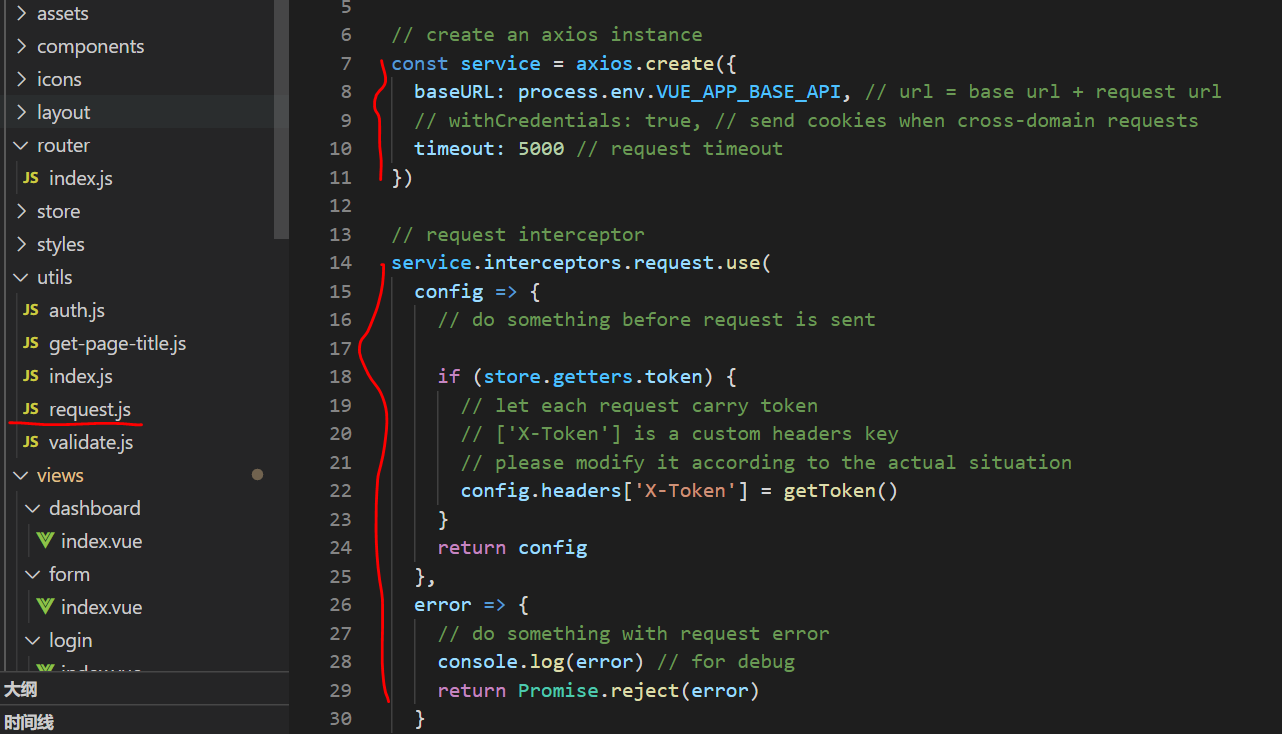
注意:如果写在.vue文件中,就需要写在create方法中
而且一个界面创建了拦截器,所有界面都有


当然,vue项目是写在utils/request.js中
错误处理
上面的方法其实不完整,还缺少错误处理this.$axios.get().then().catch()
   getUser() {
      const _this = this
      this.$axios.get('/admin/getById', {
      	params : {
        	"id" : this.id
        }
      }).then(function(response) {
        console.log(response.data)
        _this.tableData = response.data
      }).catch(function(error) {
          console.log(error)
        })
    },


 1万+
1万+


 被折叠的 条评论
为什么被折叠?
被折叠的 条评论
为什么被折叠?
 到【灌水乐园】发言


