菜鸟刚接触SQLite,敲了一个小Demo。用于测试SQLite。具体的SQLite的相关简介在此不再赘述。
业务描述:
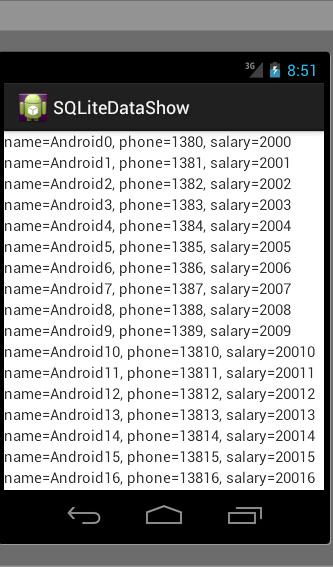
使用SQLite创建数据库,并插入相关数据。最终可以在avd用户界面读取并显示数据库内容。
实现分析及步骤。
首先创建一个数据库,通过SQLiteOpenHelper进行数据库的创建,数据库创建的具体过程见后面代码。
然后对创建的数据库,进行通过ContentValues来创建数据库并插入数据库内容。由于刚接触SQLite时在进行增删改查训练时,是在单元测试框架中进行的,所以在本次Demo中,扔选择在测试框架中进行插入。
由于本次Demo用到的变量较多,(3*50=150)。为了便于对属性的管理,考虑使用JavBean来对管理属性。
最后在MainActivity中进行对数据库的查询、读取、存储和显示。
创建数据库
package com.example.datashow;

import android.content.Context;
import android.database.sqlite.SQLiteDatabase;
import android.database.sqlite.SQLiteOpenHelper;

public class mySQLite extends SQLiteOpenHelper {

    public mySQLite(Context context) {
        /**
         * 创建一个数据库,名字为“student.db”,版本为“2”
         */
        super(context, "student.db", null,2);
        // TODO Auto-generated constructor stub
    }

    //数据库创建时,调用此方法
    public void onCreate(SQLiteDatabase db) {
        // TODO Auto-generated method stub
        /**
         * 创建数据库,一共有四列。分别为"_id", "name" , "phone" ,"salary"
         */
        db.execSQL("create table student (_id integer primary key autoincrement, name char(10) ,phone char(11) , salary double(20))");
    }

    //数据库升级时,调用此方法
    public void onUpgrade(SQLiteDatabase db, int oldVersion, int newVersion) {
        // TODO Auto-generated method stub

    }
}
为数据库添加内容
package com.example.datashow;

import android.content.ContentValues;
import android.database.sqlite.SQLiteDatabase;
import android.test.AndroidTestCase;


public class mySQLiteTest extends AndroidTestCase {


    private mySQLite ms;
    private SQLiteDatabase db;
    private ContentValues newValues;


    //在测试方法调用前调用此方法
    @Override
    protected void setUp() throws Exception {
        // TODO Auto-generated method stub
        super.setUp();
        ms = new mySQLite(getContext());
        db = ms.getWritableDatabase();
    }

    //测试方法结束后调用此方法
    @Override
    protected void tearDown() throws Exception {
        // TODO Auto-generated method stub
        super.tearDown();
        db.close();
    }
    /**
     * 通过ContentValues对数据库进行插入
     * 对数据库插入50组数据。分别为"name","phone","salary"进行赋值
     */
    public void insert()
    {
        for (int i = 0; i <50; i++) {
            ContentValues values = new ContentValues();
            //values.put("name", "A"+i);
            values.put("name", "Android" + i);
            values.put("phone", "138" + i);
            values.put("salary", "200"+i);
            db.insert("student", null, values);
        }
    }
}
设置JavaBean
package com.example.datashow;

public class Student {
    private String name;
    private String phone;
    private String salary;

    public Student(String name, String phone, String salary) {
        super();
        this.name = name;
        this.phone = phone;
        this.salary = salary;
    }
    public String getName() {
        return name;
    }
    public void setName(String name) {
        this.name = name;
    }
    public String getPhone() {
        return phone;
    }
    public void setPhone(String phone) {
        this.phone = phone;
    }
    public String getSalary() {
        return salary;
    }
    public void setSalary(String salary) {
        this.salary = salary;
    }
    @Override
    public String toString() {
        return "name=" + name + ", phone=" + phone + ", salary="
                + salary ;
    }

}
MainActivity中实现
MainActivity代码实现
package com.example.datashow;

import java.util.ArrayList;
import java.util.List;
import com.example.datashow.R;
import android.app.Activity;
import android.database.Cursor;
import android.database.sqlite.SQLiteDatabase;
import android.os.Bundle;
import android.widget.LinearLayout;
import android.widget.TextView;


public class MainActivity extends Activity {

        //创建一个集合用来存储数据库中的数据
        List<Student> studentList;

    @Override
    protected void onCreate(Bundle savedInstanceState) {
        super.onCreate(savedInstanceState);
        setContentView(R.layout.main);
        studentList = new ArrayList<Student>();

        //通过SQLiteOpenHelper的继承类mySQLite来对数据库进行管理
        mySQLite ms = new mySQLite(this);
        SQLiteDatabase db = ms.getWritableDatabase();

        //通过cursor来实现对数据库列表的遍历
        Cursor cursor = db.query("student", null, null, null, null, null,null , null);
        while (cursor.moveToNext()) {
            String name = cursor.getString(cursor.getColumnIndex("name"));
            String phone = cursor.getString(cursor.getColumnIndex("phone"));
            String salary = cursor.getString(cursor.getColumnIndex("salary"));
            //通过调用JavaBean对象,对Student属性赋值
            Student stu = new Student(name, phone, salary);
            //将stu遍历的结果存储在studentList集合
            studentList.add(stu);
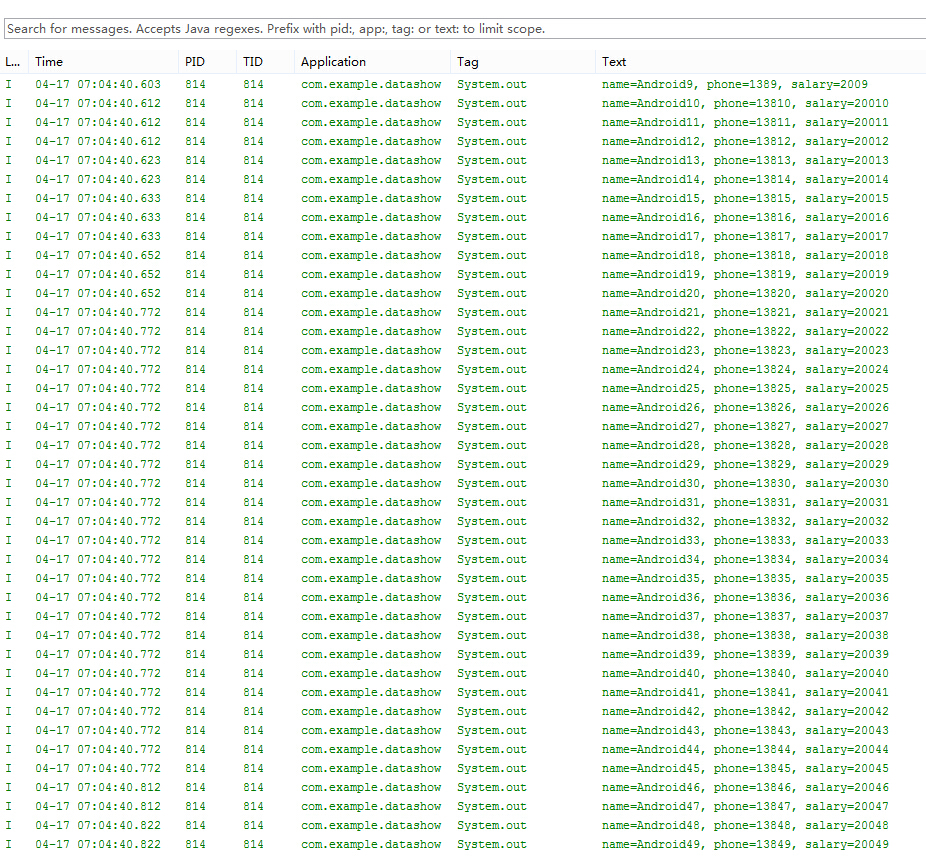
            //用于测试Demo,实验结果将会在Logcat中显示
            System.out.println(stu.toString());
        }

        //将数据显示至屏幕
        //每有一条数据,就创建一个TextView对象
        LinearLayout ll = (LinearLayout) findViewById(R.id.ll);
        for (Student s : studentList) {
            TextView tv = new TextView(this);
            tv.setText(s.toString());
            tv.setTextSize(15);
            //把TextView对象设置成线性布局的子节点
            ll.addView(tv);
        }
    }

}
布局文件main.xml代码实现
<?xml version="1.0" encoding="utf-8"?>
<ScrollView
    xmlns:android="http://schemas.android.com/apk/res/android"
    android:layout_width="match_parent"
    android:layout_height="match_parent">
<LinearLayout
    android:id="@+id/ll"
    android:layout_width="match_parent"
    android:layout_height="match_parent"
    android:orientation="vertical" >
</LinearLayout>
</ScrollView>
实现结果
Logcat结果
avd结果
至此,Demo结束。
SQLite相关内容,继续更新。


 1720
1720

 被折叠的 条评论
为什么被折叠?


