


7.5 Bean scopes
bean的范围
When you create a bean definition, you create a recipe for creating actual instances of the class defined by that bean definition. The idea that a bean definition is a recipe is important, because it means that, as with a class, you can create many object instances from a single recipe.
当你创建bean的定义时,你指定了bean定义中类创建实例的过程。将bean的定义作为一个过程来考虑是重要的,因为这就意味着,通过一个过程使得为一个类创建多个对象。
You can control not only the various dependencies and configuration values that are to be plugged into an object that is created from a particular bean definition, but also the scope of the objects created from a particular bean definition. This approach is powerful and flexible in that you can choose the scope of the objects you create through configuration instead of having to bake in the scope of an object at the Java class level. Beans can be defined to be deployed in one of a number of scopes: out of the box, the Spring Framework supports seven scopes, five of which are available only if you use a web-aware ApplicationContext.
你不只可以控制依赖和配置值用于插件式配置到一个由bean的定义构造出来的对象中,也可以通过bean的定义指定对象的范围。这种方法有力且快捷的设置了object的范围而不再需要你通过Java类的级别来处理。你可以将bean设置为其中一个范围,spring框架支持7中范围,其中的5中你只能在web应用中使用。
The following scopes are supported out of the box. You can also create a custom scope.
下面是范围的列表。你也可以自定义范围。
Table 7.3. Bean scopes
bean的范围
| Scope | Description |
| singleton | (Default) Scopes a single bean definition to a single object instance per Spring IoC container. 默认选项,在每个spring的ioc容器中只保留一个实例 |
| prototype | Scopes a single bean definition to any number of object instances. 对于一个bean有多个实例 |
| request | Scopes a single bean definition to the lifecycle of a single HTTP request; that is, each HTTP request has its own instance of a bean created off the back of a single bean definition. Only valid in the context of a web-aware Spring ApplicationContext. 对于每个bean在一个http请求的生命周期中保持一个实例。意味着每个http请求都会有他自己的实例。只在spring的web应用上下文中有效。 |
| session | Scopes a single bean definition to the lifecycle of an HTTP Session. Only valid in the context of a web-aware Spring ApplicationContext. 对于每个bean在一个http session的生命周期有效。只在spring的web应用上下文中有效。 |
| globalSession | Scopes a single bean definition to the lifecycle of a global HTTP Session. Typically only valid when used in a Portlet context. Only valid in the context of a web-aware Spring ApplicationContext. 对于每个bean在一个全局的http session的生命周期有效。通常在使用Proletcontext时有效。只在spring的web应用上下文有效。 |
| application | Scopes a single bean definition to the lifecycle of a ServletContext. Only valid in the context of a web-aware Spring ApplicationContext. |
| websocket | Scopes a single bean definition to the lifecycle of a WebSocket. Only valid in the context of a web-aware Spring ApplicationContext. 对于每个bean在一个WebSocket的生命周期有效。只在spring的web应用上下文有效。 |
[Note]
注意
As of Spring 3.0, a thread scope is available, but is not registered by default. For more information, see the documentation for SimpleThreadScope. For instructions on how to register this or any other custom scope, see the section called“Using a custom scope”.
在spring3.0中,线程范围是存在的,但是并没有默认被注册。相关信息,见SimpleThreadScope的文档。了解更多有关如何注册或其他自定义范围,见”使用自定义范围“章节。
7.5.1 The singleton scope
单例范围
Only one shared instance of a singleton bean is managed, and all requests for beans with an id or ids matching that bean definition result in that one specific bean instance being returned by the Spring container.
单例bean只有一个被共享的实例被管理,所有通过id或其他形式匹配的请求都会由同一个在spring容器中的bean实例返回。
To put it another way, when you define a bean definition and it is scoped as a singleton, the Spring IoC container creates exactly one instance of the object defined by that bean definition. This single instance is stored in a cache of such singleton beans, and all subsequent requests and references for that named bean return the cached object.
也就是说,当你定义了一个单例范围的bean,spring的IOC容器只会通过bean的定义明确创建一个实例。这个单例实例保存在这样单例bean的缓存中,并且所有的子请求和通过name的引用都会返回被缓存的实例。
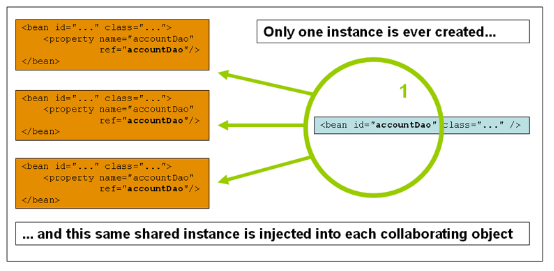
Spring’s concept of a singleton bean differs from the Singleton pattern as defined in the Gang of Four (GoF) patterns book. The GoF Singleton hard-codes the scope of an object such that one and only one instance of a particular class is created per ClassLoader. The scope of the Spring singleton is best described as per container and per bean. This means that if you define one bean for a particular class in a single Spring container, then the Spring container creates one and only one instance of the class defined by that bean definition. The singleton scope is the default scope in Spring. To define a bean as a singleton in XML, you would write, for example:
spring有关单例bean的概念来源于GoF模式那本书中有关单例模式的想法。GoF单例中硬编码了object以至于ClassLoader只能创建类的一个实例。spring的单例是对每个容器一个bean的最好诠释。这意味着如果你在单一的spring容器中定义了一个class,容器会通过bean的定义只创建一个实例。spring的默认bean的范围是单例。如果你希望在xml中配置单例,你可以这样写,例如:
<bean id="accountService" class="com.foo.DefaultAccountService"/>
<!-- the following is equivalent, though redundant (singleton scope is the default) -->
<bean id="accountService" class="com.foo.DefaultAccountService" scope="singleton"/>
7.5.2 The prototype scope
原型范围
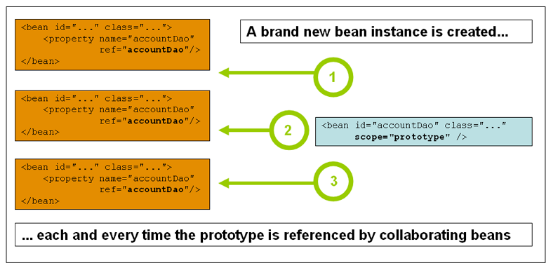
The non-singleton, prototype scope of bean deployment results in the creation of a new bean instance every time a request for that specific bean is made. That is, the bean is injected into another bean or you request it through a getBean() method call on the container. As a rule, use the prototype scope for all stateful beans and the singleton scope for stateless beans.
非单例,原型模式的bean在每次请求时会创建新的实例。这意味着bean注入到另一个bean或在容器中调用getBean方法。一般情况下,原型范围用于有状态的bean,单例范围用于无状态的bean。
The following diagram illustrates the Spring prototype scope. A data access object (DAO) is not typically configured as a prototype, because a typical DAO does not hold any conversational state; it was just easier for this author to reuse the core of the singleton diagram.
下面的图表展示了spring的原型范围。DAO并不是一个典型的原型模式,因为通常DAO中不需要任何状态变量,这只是为了重用单例的那张图而已。
The following example defines a bean as a prototype in XML:
下面的例子是原型范围在xml中的定义方式
<bean id="accountService" class="com.foo.DefaultAccountService" scope="prototype"/>
In contrast to the other scopes, Spring does not manage the complete lifecycle of a prototype bean: the container instantiates, configures, and otherwise assembles a prototype object, and hands it to the client, with no further record of that prototype instance. Thus, although initialization lifecycle callback methods are called on all objects regardless of scope, in the case of prototypes, configured destruction lifecycle callbacks are not called. The client code must clean up prototype-scoped objects and release expensive resources that the prototype bean(s) are holding. To get the Spring container to release resources held by prototype-scoped beans, try using a custom bean post-processor, which holds a reference to beans that need to be cleaned up.
和其他的范围进行对比,spring并没有完全管理一个原型bean的整个生命周期:实例化、配置另外包括组合这些object然后提供给客户端,但是不保留这些原型实例的引用。因此,尽管初始化方法在需要这个bean时被回调,但由于是原型bean,因此destroy方法不会被回调。因此客户端必须手动释放原型范围的object并且释放他们持有的宝贵的资源。为了可以让spring释放原型范围bean的资源,尝试使用自定义的bean的post-procesor,使得需要被清理时可以保留一个bean的引用。
In some respects, the Spring container’s role in regard to a prototype-scoped bean is a replacement for the Java new operator. All lifecycle management past that point must be handled by the client. (For details on the lifecycle of a bean in the Spring container, see Section 7.6.1,“Lifecycle callbacks”.)
在某种意义上,对于一个原型的bean来说,spring容器的角色就是Java新操作器的替代。所有的生命周期管理过去完全是由客户端执行的(详见spring容器对bean的生命周期管理,见章节7.6.1“生命周期的回调”)
7.5.3 Singleton beans with prototype-bean dependencies
依赖原型bean的单例bean
When you use singleton-scoped beans with dependencies on prototype beans, be aware that dependencies are resolved at instantiation time. Thus if you dependency-inject a prototype-scoped bean into a singleton-scoped bean, a new prototype bean is instantiated and then dependency-injected into the singleton bean. The prototype instance is the sole instance that is ever supplied to the singleton-scoped bean.
当你的单例bean依赖原型bean时,要意识到是在初始化的时候被依赖注入的。如果你在单例bean中注入原型bean,一个新的原型bean实例会被初始化然后注入单例bean。原型bean只会提供一次实例给单例bean。
However, suppose you want the singleton-scoped bean to acquire a new instance of the prototype-scoped bean repeatedly at runtime. You cannot dependency-inject a prototype-scoped bean into your singleton bean, because that injection occurs only once, when the Spring container is instantiating the singleton bean and resolving and injecting its dependencies. If you need a new instance of a prototype bean at runtime more than once, see Section 7.4.6,“Method injection”
然而,假设你希望单例bean在每次运行时获得一个新的原型bean。你不能直接将原型bean注入单例bean,因为只会注入一次,整个注入会在spring容器初始化单例的bean的时候完成。如果你在每次运行时需要一个新的原型bean,见章节7.4.6,“方法注入”
7.5.4 Request, session, global session, application, and WebSocket scopes
请求、session、全局session、application和WebSocket范围
The request, session, globalSession, application, and websocket scopes are only available if you use a web-aware Spring ApplicationContext implementation (such as XmlWebApplicationContext). If you use these scopes with regular Spring IoC containers such as the ClassPathXmlApplicationContext, an IllegalStateException will be thrown complaining about an unknown bean scope.
请求、session、全局session、application和WebSocket范围只有在你在web中使用spring的ApplicationContext(例如XmlWebApplicationContext)中才可以。如果你在普通的spring的IOC容器中使用这些范围例如ClassPathXmlApplicationContext,那么IllegalStateException会被抛出由于识别不了bean的范围。
Initial web configuration
初始化web的配置
To support the scoping of beans at the request, session, globalSession, application, and websocket levels (web-scoped beans), some minor initial configuration is required before you define your beans. (This initial setup is not required for the standard scopes, singleton and prototype.)
为了支持请求、session、全局session、application和WebSocket范围,一些初始化的配置需要用来定义你的bean。(这些初始化的配置不需要基本的范围支持,如单例和原型)
How you accomplish this initial setup depends on your particular Servlet environment.
如何在你的Servlet环境中完成这些初始化的设置。
If you access scoped beans within Spring Web MVC, in effect, within a request that is processed by the Spring DispatcherServlet or DispatcherPortlet, then no special setup is necessary: DispatcherServlet and DispatcherPortlet already expose all relevant state.
如果你使用spring的web mvc来方位这些范围的bean,实际上,对于spring的DispatcherServlet和DispatcherPortlet来处理一个请求,那么不需要什么特殊的配置。DispatcherServlet和DispatcherPortlet已经暴露了所有相关的状态。
If you use a Servlet 2.5 web container, with requests processed outside of Spring’s DispatcherServlet (for example, when using JSF or Struts), you need to register the org.springframework.web.context.request.RequestContextListener ServletRequestListener. For Servlet 3.0+, this can be done programmatically via the WebApplicationInitializer interface. Alternatively, or for older containers, add the following declaration to your web application’s web.xml file:
如果你使用servlet 2.5版本的web容器,请求是在spring的DispatcherServlet外部处理的(例如,你使用JSF或Struts),你需要注册org.springframework.web.context.request.RequestContextListener ServletRequestListener。对于Servlet3.0以上的版本,这个操作可以通过WebApplicationInitializer接口来实现或者兼容老的容器,在你web应用的web.xml文件中添加如下的配置:
<web-app>
...
<listener>
<listener-class>
org.springframework.web.context.request.RequestContextListener
</listener-class>
</listener>
...
</web-app>
Alternatively, if there are issues with your listener setup, consider using Spring’s RequestContextFilter. The filter mapping depends on the surrounding web application configuration, so you have to change it as appropriate.
相对的,如果你的监听器初始化有问题,考虑使用spring的RequestContextFilter。过滤器的匹配根据web应用来配置,因此你可以随时根据需要更改。
<web-app>
...
<filter>
<filter-name>requestContextFilter</filter-name>
<filter-class>org.springframework.web.filter.RequestContextFilter</filter-class>
</filter>
<filter-mapping>
<filter-name>requestContextFilter</filter-name>
<url-pattern>/*</url-pattern>
</filter-mapping>
...
</web-app>
DispatcherServlet, RequestContextListener, and RequestContextFilter all do exactly the same thing, namely bind the HTTP request object to the Thread that is servicing that request. This makes beans that are request- and session-scoped available further down the call chain.
DispatcherServlet、RequestContextListener和RequestContextFilter基本都是在做相同的事情,绑定到处理request的http请求obj线程上。这使得request和session范围的bean可以来到调用链上。
Request scope
request范围
Consider the following XML configuration for a bean definition:
考虑下面这个xml配置的bean定义
<bean id="loginAction" class="com.foo.LoginAction" scope="request"/>
The Spring container creates a new instance of the LoginAction bean by using the loginAction bean definition for each and every HTTP request. That is, the loginAction bean is scoped at the HTTP request level. You can change the internal state of the instance that is created as much as you want, because other instances created from the same loginAction bean definition will not see these changes in state; they are particular to an individual request. When the request completes processing, the bean that is scoped to the request is discarded.
spring容器在每次http请求时通过使用loginAction的定义创建一个新的LoginAction的实例。这就意味着loginAction的bean是http请求级别的。你可以根据需要创建多个bean的实例,并改变内部的状态,因为通过相同的loginAction的bean定义创建的实例看不到其他实例的状态改变,他们对一个request来说是独立的。如果一个请求处理完成,那么request范围的bean将会被销毁。
When using annotation-driven components or Java Config, the @RequestScope annotation can be used to assign a component to the request scope.
当使用注解配置或java配置时,@RequestScope注解修饰的bean将会被作为一个request范围的bean来使用
@RequestScope
@Component
public class LoginAction {
// ...
}
Session scope
session范围
Consider the following XML configuration for a bean definition:
考虑下面xml配置的bean的定义
<bean id="userPreferences" class="com.foo.UserPreferences" scope="session"/>
The Spring container creates a new instance of the UserPreferences bean by using the userPreferences bean definition for the lifetime of a single HTTP Session. In other words, the userPreferences bean is effectively scoped at the HTTP Session level. As with request-scoped beans, you can change the internal state of the instance that is created as much as you want, knowing that other HTTP Session instances that are also using instances created from the same userPreferences bean definition do not see these changes in state, because they are particular to an individual HTTP Session. When the HTTP Session is eventually discarded, the bean that is scoped to that particular HTTP Session is also discarded.
spring在单一的http会话中通过使用userPreferences的bean定义来创建UserPreferences的实例。也就是说userPreferences在http的session级别有效。类似request范围的bean可以在初始化时改变状态,session范围的bean在不同的session中是看不见的,因为他们独立于http的session中。当http的session被销毁时,session范围的bean也会被抛弃。
When using annotation-driven components or Java Config, the @SessionScope annotation can be used to assign a component to the session scope.
使用注解配置和java的配置,使用@SessionScope注解的bean会被作为session范围的bean来使用。
@SessionScope
@Component
public class UserPreferences {
// ...
}
Global session scope
全局session范围
Consider the following bean definition:
考虑下面的bean定义
<bean id="userPreferences" class="com.foo.UserPreferences" scope="globalSession"/>
The globalSession scope is similar to the standard HTTP Session scope (described above), and applies only in the context of portlet-based web applications. The portlet specification defines the notion of a global Session that is shared among all portlets that make up a single portlet web application. Beans defined at the globalSession scope are scoped (or bound) to the lifetime of the global portlet Session.
全局的session范围类似于标注的http的session范围(上面描述过),并且只在portlet-based的web应用上下文中有效。portlet规范定义全局session的用处在共享所有的portlet来创建一个单一的portlet的web应用。定义为globalSession范围的bean在global portlet Session中被绑定。
If you write a standard Servlet-based web application and you define one or more beans as having globalSession scope, the standard HTTP Session scope is used, and no error is raised.
如果你写一个标准的基于servlet的web应用,并且你定义了一个或过个bean使用了globalSession范围,那么使用标准的http的session范围也不会有问题。
Application scope
Application范围
Consider the following XML configuration for a bean definition:
考虑下面用xml配置的bean的定义
<bean id="appPreferences" class="com.foo.AppPreferences" scope="application"/>
The Spring container creates a new instance of the AppPreferences bean by using the appPreferences bean definition once for the entire web application. That is, the appPreferences bean is scoped at the ServletContext level, stored as a regular ServletContext attribute. This is somewhat similar to a Spring singleton bean but differs in two important ways: It is a singleton per ServletContext, not per Spring 'ApplicationContext' (for which there may be several in any given web application), and it is actually exposed and therefore visible as a ServletContext attribute.
定义在企业级的web应用中,spring容器通过使用AppPreferences的bean定义创建了AppPreferences的新的实例。这也就说明appPreferences的bean是ServletContext级别的,保存在常规的ServletContext属性中。这种在某些方面和spring的单例bean相同,单两者的重要区别是:在每个ServletContext中有不是每个spring的ApplicationContext(将会在web应用中给出更多),并且他实际暴露、可见了ServletContext的属性。
When using annotation-driven components or Java Config, the @ApplicationScope annotation can be used to assign a component to the application scope.
当使用注解配置或java配置时,使用@ApplicationScope注解会将组件声明为application范围。
@ApplicationScope
@Component
public class AppPreferences {
// ...
}
Scoped beans as dependencies
范围bean作为依赖
The Spring IoC container manages not only the instantiation of your objects (beans), but also the wiring up of collaborators (or dependencies). If you want to inject (for example) an HTTP request scoped bean into another bean of a longer-lived scope, you may choose to inject an AOP proxy in place of the scoped bean. That is, you need to inject a proxy object that exposes the same public interface as the scoped object but that can also retrieve the real target object from the relevant scope (such as an HTTP request) and delegate method calls onto the real object.
spring的IOC容器不只管理你bean的实例化,也包括注入依赖。如果你希望将一个request的bean注入到另一个长期存活的bean,你可以选择使用AOP代理来替代范围的bean。你需要注入一个暴露相同接口的代理object作为范围的object,但是也可以从相关范围(例如http请求中)检索实际的目标object并且对目标object调用委托方法。
[Note]
注意
You may also use <aop:scoped-proxy/> between beans that are scoped as singleton, with the reference then going through an intermediate proxy that is serializable and therefore able to re-obtain the target singleton bean on deserialization.
你也可以使用<aop:scoped-proxy/>在单例bean的定义之间,获得他的引用通过可以序列化的中间代理并且通过反序列化重新获得目标的bean实例。
When declaring <aop:scoped-proxy/> against a bean of scope prototype, every method call on the shared proxy will lead to the creation of a new target instance which the call is then being forwarded to.
当在原型bean中定义<aop:scoped-proxy/>时,每个对共享代理的方法调用将会指向新创建的目标实例然后在被转发。
Also, scoped proxies are not the only way to access beans from shorter scopes in a lifecycle-safe fashion. You may also simply declare your injection point (i.e. the constructor/setter argument or autowired field) as ObjectFactory<MyTargetBean>, allowing for a getObject() call to retrieve the current instance on demand every time it is needed - without holding on to the instance or storing it separately.
并且,范围代理并不是唯一访问在一个在lifecycle-safe时尚的shorter范围的bean的方法。你也可以简单定义你的注入点(例如构造器或set方法注入或自动注入)作为ObjectFactory<MyTargetBean>,允许调用getObject来获得当前实例在你需要的任何时间——而不再需要保持一个实例或分开存储一个实例。
The JSR-330 variant of this is called Provider, used with a Provider<MyTargetBean> declaration and a corresponding get() call for every retrieval attempt. See here for more details on JSR-330 overall.
在JSP-330中这种叫做提供者,使用Provider<MyTargetBean>定义并且和get方法调用相关联用于每次尝试的获取操作。详见JSR-330中的说明。
The configuration in the following example is only one line, but it is important to understand the "why" as well as the "how" behind it.
下面的配置虽然只有一行,但重要的是例子为什么和后面的原理。
<?xml version="1.0" encoding="UTF-8"?>
<beans xmlns="http://www.springframework.org/schema/beans"
xmlns:xsi="http://www.w3.org/2001/XMLSchema-instance"
xmlns:aop="http://www.springframework.org/schema/aop"
xsi:schemaLocation="http://www.springframework.org/schema/beans
http://www.springframework.org/schema/beans/spring-beans.xsd
http://www.springframework.org/schema/aop
http://www.springframework.org/schema/aop/spring-aop.xsd">
<!-- an HTTP Session-scoped bean exposed as a proxy -->
<!-- 一个session范围的bean暴露给了代理-->
<bean id="userPreferences" class="com.foo.UserPreferences" scope="session">
<!-- instructs the container to proxy the surrounding bean -->
<aop:scoped-proxy/>
</bean>
<!-- a singleton-scoped bean injected with a proxy to the above bean -->
<!-- 一个单例bean注入了一个上面的bean -->
<bean id="userService" class="com.foo.SimpleUserService">
<!-- a reference to the proxied userPreferences bean -->
<property name="userPreferences" ref="userPreferences"/>
</bean>
</beans>
To create such a proxy, you insert a child <aop:scoped-proxy/> element into a scoped bean definition (see the section called“Choosing the type of proxy to create”and Chapter 41, XML Schema-based configuration). Why do definitions of beans scoped at the request, session, globalSession and custom-scope levels require the <aop:scoped-proxy/> element? Let’s examine the following singleton bean definition and contrast it with what you need to define for the aforementioned scopes (note that the following userPreferences bean definition as it stands is incomplete).
创建一个这样的代理,你在范围bean之间插入了一个<aop:scoped-proxy/>子元素(详见“选择创建的代理的类型”和41章节,基于XML Schema的配置)。为什么在定义request、session、globalSession和自定义范围级别的bean时需要<aop:scoped-proxy/>元素呢?我们来检查一下下面这个单例的bean的定义对比一下你需要为上述的范围做什么(注意下面的userPreferences的bean定义是不完整的)
<bean id="userPreferences" class="com.foo.UserPreferences" scope="session"/>
<bean id="userManager" class="com.foo.UserManager">
<property name="userPreferences" ref="userPreferences"/>
</bean>
In the preceding example, the singleton bean userManager is injected with a reference to the HTTP Session-scoped bean userPreferences. The salient point here is that the userManager bean is a singleton: it will be instantiated exactly once per container, and its dependencies (in this case only one, the userPreferences bean) are also injected only once. This means that the userManager bean will only operate on the exact same userPreferences object, that is, the one that it was originally injected with.
在上面的例子中,单例bean的userManager依赖于session范围的bean是userPreferences。这里的重点是userManager的bean是单例的,这意味着这个bean在每个容器中只会初始化一次,并且它的依赖(对于userPreferences的bean来说也只有一次)也只会注入一次。这意味着userManager的bean将操作相同的userPreferences的object,就是原始被注入的那一个。
This is not the behavior you want when injecting a shorter-lived scoped bean into a longer-lived scoped bean, for example injecting an HTTP Session-scoped collaborating bean as a dependency into singleton bean. Rather, you need a single userManager object, and for the lifetime of an HTTP Session, you need a userPreferences object that is specific to said HTTP Session. Thus the container creates an object that exposes the exact same public interface as the UserPreferences class (ideally an object that is a UserPreferences instance) which can fetch the real UserPreferences object from the scoping mechanism (HTTP request, Session, etc.). The container injects this proxy object into the userManager bean, which is unaware that this UserPreferences reference is a proxy. In this example, when a UserManager instance invokes a method on the dependency-injected UserPreferences object, it actually is invoking a method on the proxy. The proxy then fetches the real UserPreferences object from (in this case) the HTTP Session, and delegates the method invocation onto the retrieved real UserPreferences object.
这并不是你想要的方式,当一个小范围的bean注入一个大范围的bean中,例如一个单例bean需要一个session范围的bean时。相比之下,你的userManager在每个特定的http的session的生命周期中需要一个userPreferences对象。容器创建一个object老宝来相同的接口作为UserPreferences类(理想上是UserPreferences实例)可以抓取UserPreferences对象在一些范围中(http请求、session等)。容器将代理对象注入到userManager的bean中,但是引用不会意识到实际引用的是一个代理。在这个例子中,当UserManager实例调用UserPreferences的方法是,他实际调用了代理的方法。代理抓取实际UserPreferences对象从session中,然后委托给实际的UserPreferences对象来实现。
Thus you need the following, correct and complete, configuration when injecting request-, session-, and globalSession-scoped beans into collaborating objects:
下面是你需要的正确完整的配置,当注入请求、session、全局session范围的bean到一个其他对象中:
<bean id="userPreferences" class="com.foo.UserPreferences" scope="session">
<aop:scoped-proxy/>
</bean>
<bean id="userManager" class="com.foo.UserManager">
<property name="userPreferences" ref="userPreferences"/>
</bean>
Choosing the type of proxy to create
选择代理的类型用于创建
By default, when the Spring container creates a proxy for a bean that is marked up with the <aop:scoped-proxy/> element, a CGLIB-based class proxy is created.
默认的,spring容器为使用<aop:scoped-proxy/>标记的bean创建代理,基于cglib来创建代理。
[Note]
注意
CGLIB proxies only intercept public method calls! Do not call non-public methods on such a proxy; they will not be delegated to the actual scoped target object.
cglib代理智能注入到公共的方法调用中!不要在这样的代理上调用非public的方法,他们不会委托给实际的范围的目标对象。
Alternatively, you can configure the Spring container to create standard JDK interface-based proxies for such scoped beans, by specifying false for the value of the proxy-target-class attribute of the <aop:scoped-proxy/> element. Using JDK interface-based proxies means that you do not need additional libraries in your application classpath to effect such proxying. However, it also means that the class of the scoped bean must implement at least one interface, and that all collaborators into which the scoped bean is injected must reference the bean through one of its interfaces.
相对的,你可以配置spring容器为这样的bean创建标准的基于接口的JDK,通过在<aop:scoped-proxy/>元素中设置proxy-target-class属性为false。使用基于接口的JDK意味着你不需要在你应用中加入额外的库来影响代理。然而,这也意味着你的范围bean必须实现至少一个接口并且所有相关的被注入的bean必须应用其中一个接口的bean。
<!-- DefaultUserPreferences implements the UserPreferences interface -->
<bean id="userPreferences" class="com.foo.DefaultUserPreferences" scope="session">
<aop:scoped-proxy proxy-target-class="false"/>
</bean>
<bean id="userManager" class="com.foo.UserManager">
<property name="userPreferences" ref="userPreferences"/>
</bean>
For more detailed information about choosing class-based or interface-based proxying, see Section 11.6,“Proxying mechanisms”.
有关基于类或基于接口的代理的更多信息,见11.6章节“代理机制”
7.5.5 Custom scopes
自定义范围
The bean scoping mechanism is extensible; You can define your own scopes, or even redefine existing scopes, although the latter is considered bad practice and you cannot override the built-in singleton and prototype scopes.
bean的范围机制是可以扩展的;你可以定义你自己的范围或重新定义已经存在的范围,尽管后面是一种糟糕的选择并且你不能覆盖内置的单例和原型范围。
Creating a custom scope
创建自定义范围
To integrate your custom scope(s) into the Spring container, you need to implement the org.springframework.beans.factory.config.Scope interface, which is described in this section. For an idea of how to implement your own scopes, see the Scope implementations that are supplied with the Spring Framework itself and the Scope javadocs, which explains the methods you need to implement in more detail.
如果需要将你的自定义范围和spring容器结合,你需要实现org.springframework.beans.factory.config.Scope接口,将会在这个章节中进行介绍。关于如何实现你自己的范围,请参考spring框架自身或scope的javadocs文件,会更加详细的介绍你需要实现的方法。
The Scope interface has four methods to get objects from the scope, remove them from the scope, and allow them to be destroyed.
scope接口有siege方法使得获得范围中的对象、删除范围中的对象和允许他们被销毁。
The following method returns the object from the underlying scope. The session scope implementation, for example, returns the session-scoped bean (and if it does not exist, the method returns a new instance of the bean, after having bound it to the session for future reference).
下面的方法从一个潜在的范围返回一个对象。session范围的实现,例如,返回session范围的bean(如果不存在,该方法返回bean的一个新实例,在后面会和session绑定由于后面的引用)。
Object get(String name, ObjectFactory objectFactory)
The following method removes the object from the underlying scope. The session scope implementation for example, removes the session-scoped bean from the underlying session. The object should be returned, but you can return null if the object with the specified name is not found.
下面的方法从一个潜在的范围删除一个对象。session范围的实现,例如,删除session范围的bean。然后被删除的bean会被返回,如果没有找到指定名的对象会返回null。
Object remove(String name)
The following method registers the callbacks the scope should execute when it is destroyed or when the specified object in the scope is destroyed. Refer to the javadocs or a Spring scope implementation for more information on destruction callbacks.
下面的方法注册回调方法当销毁或或者定义在范围的bean被销毁时执行。详见spring框架的javadoc或spring范围的实现。
void registerDestructionCallback(String name, Runnable destructionCallback)
The following method obtains the conversation identifier for the underlying scope. This identifier is different for each scope. For a session scoped implementation, this identifier can be the session identifier.
下面的方法为潜在的范围获得会话标识。这个标识与其他范围是不一样的。例如session范围的实现,这个定义可以session的标识符。
String getConversationId()
Using a custom scope
使用自定义范围
After you write and test one or more custom Scope implementations, you need to make the Spring container aware of your new scope(s). The following method is the central method to register a new Scope with the Spring container:
当你完成并测试一个或多个自定义范围的实现,你需要使得spring容器意识到你定义的范围。下面的方法就是核心方法用于将一个新的范围注册到spring容器中:
void registerScope(String scopeName, Scope scope);
This method is declared on the ConfigurableBeanFactory interface, which is available on most of the concrete ApplicationContext implementations that ship with Spring via the BeanFactory property.
这个方法定义在ConfigurableBeanFactory接口中,对于多个ApplicationContext实现可见通过BeanFactory属性。
The first argument to the registerScope(..) method is the unique name associated with a scope; examples of such names in the Spring container itself are singleton and prototype. The second argument to the registerScope(..) method is an actual instance of the custom Scope implementation that you wish to register and use.
registerScope方法的第一个参数是唯一的名字和范围绑定,例如这样的名在spirng容器中是单例和原型。registerScope方法的第二个参数是你需要注册和使用的自定义范围实现的实例,
Suppose that you write your custom Scope implementation, and then register it as below.
假设你完成你的自定义范围实现,然后就这样进行注册。
[Note]
注意
The example below uses SimpleThreadScope which is included with Spring, but not registered by default. The instructions would be the same for your own custom Scope implementations.
下面的例子使用了spring包含的SimpleThreadScope,但是并没有被注册。这个组件和你自定义的范围实现基本类似。
Scope threadScope = new SimpleThreadScope();
beanFactory.registerScope("thread", threadScope);
You then create bean definitions that adhere to the scoping rules of your custom Scope:
你可以在创建bean定义是使用你自定义的范围:
<bean id="..." class="..." scope="thread">
With a custom Scope implementation, you are not limited to programmatic registration of the scope. You can also do the Scope registration declaratively, using the CustomScopeConfigurer class:
使用自定义的范围实现,你可以编程限制范围的注册。你可以使用CustomScopeConfigurer类来登记注册范围:
<?xml version="1.0" encoding="UTF-8"?>
<beans xmlns="http://www.springframework.org/schema/beans"
xmlns:xsi="http://www.w3.org/2001/XMLSchema-instance"
xmlns:aop="http://www.springframework.org/schema/aop"
xsi:schemaLocation="http://www.springframework.org/schema/beans
http://www.springframework.org/schema/beans/spring-beans.xsd
http://www.springframework.org/schema/aop
http://www.springframework.org/schema/aop/spring-aop.xsd">
<bean class="org.springframework.beans.factory.config.CustomScopeConfigurer">
<property name="scopes">
<map>
<entry key="thread">
<bean class="org.springframework.context.support.SimpleThreadScope"/>
</entry>
</map>
</property>
</bean>
<bean id="bar" class="x.y.Bar" scope="thread">
<property name="name" value="Rick"/>
<aop:scoped-proxy/>
</bean>
<bean id="foo" class="x.y.Foo">
<property name="bar" ref="bar"/>
</bean>
</beans>
[Note]
注意
When you place <aop:scoped-proxy/> in a FactoryBean implementation, it is the factory bean itself that is scoped, not the object returned from getObject().
当你替换<aop:scoped-proxy/>在FactoryBean的实现,他是factory的bean本身的范围,不是getObject返回的对象。
7.6 Customizing the nature of a bean
自定义bean的特性
7.6.1 Lifecycle callbacks
生命周期方法回调
To interact with the container’s management of the bean lifecycle, you can implement the Spring InitializingBean and DisposableBean interfaces. The container calls afterPropertiesSet() for the former and destroy() for the latter to allow the bean to perform certain actions upon initialization and destruction of your beans.
为了印象容器管理的bean的生命周期,你可以实现spring的InitializingBean和DisposableBean接口。容器调用afterPropertiesSet方法用于former并且调用destroy方法用于后续允许bean表现特定的行为在初始化和销毁时。
[Tip]
提示
The JSR-250 @PostConstruct and @PreDestroy annotations are generally considered best practice for receiving lifecycle callbacks in a modern Spring application. Using these annotations means that your beans are not coupled to Spring specific interfaces. For details see Section 7.9.8, “@PostConstruct and @PreDestroy”.
JSP-250中的@PostConstruct和@PreDestroy注解是现代spring应用中比较好的方式用于回调生命周期方法。使用这样的注解意味着你的bean不在和spring中特定饿接口绑定。详见7.9.8章节“@PostConstruct和@PreDestroy”。
If you don’t want to use the JSR-250 annotations but you are still looking to remove coupling consider the use of init-method and destroy-method object definition metadata.
如果你不想使用JSR-250注解但是你也在需找其他的方式例如使用init-method和destroy-method对象的定义元数据。
Internally, the Spring Framework uses BeanPostProcessor implementations to process any callback interfaces it can find and call the appropriate methods. If you need custom features or other lifecycle behavior Spring does not offer out-of-the-box, you can implement a BeanPostProcessor yourself. For more information, see Section 7.8, “Container Extension Points”.
在内部,spring框架使用BeanPostProcessor的实现来处理回调的接口,她可以找到并调用合适的方法。如果你需要自定义特性或其他生命周期的行为,sping没有提供直接的方式调用,你可以实现BeanPostProcessor类。详见7.8章节,“容器的扩展点”。
In addition to the initialization and destruction callbacks, Spring-managed objects may also implement the Lifecycle interface so that those objects can participate in the startup and shutdown process as driven by the container’s own lifecycle.
除了初始化和销毁方法的回调,spring管理的对象也可以实现生命周期接口以方便这些对象可以在启动和关闭处理通过容器自身的生命周期。
The lifecycle callback interfaces are described in this section.
生命周期方法回调接口在这个章节中被描述。
Initialization callbacks
初始化方法回调
The org.springframework.beans.factory.InitializingBean interface allows a bean to perform initialization work after all necessary properties on the bean have been set by the container. The InitializingBean interface specifies a single method:
org.springframework.beans.factory.InitializingBean接口允许bean来实现初始化工作在所有必要的属性被容器设置之后。InitializingBean接口中只定义了一个方法:
void afterPropertiesSet() throws Exception;
It is recommended that you do not use the InitializingBean interface because it unnecessarily couples the code to Spring. Alternatively, use the @PostConstruct annotation or specify a POJO initialization method. In the case of XML-based configuration metadata, you use the init-method attribute to specify the name of the method that has a void no-argument signature. With Java config, you use the initMethod attribute of @Bean, see the section called“Receiving lifecycle callbacks”. For example, the following:
不建议你使用InitializingBean接口因为不必要将你的代码和spring耦合。相反的,使用@PostConstruct主机或者定义POJO的初始化方法。在基于xml的配置元数据中,你可以使用init-method属性定义无返回无参数的方法签名。在java配置中,你可以使用@Bean的initMethod属性,见“接受生命周期方法回调”。例如,下面的例子:
<bean id="exampleInitBean" class="examples.ExampleBean" init-method="init"/>
public class ExampleBean {
public void init() {
// do some initialization work
}
}
…?is exactly the same as…?
起始和下面是一样的
<bean id="exampleInitBean" class="examples.AnotherExampleBean"/>
public class AnotherExampleBean implements InitializingBean {
public void afterPropertiesSet() {
// do some initialization work
}
}
but does not couple the code to Spring.
但是没有和spring的代码耦合。
Destruction callbacks
销毁方法的回调
Implementing the org.springframework.beans.factory.DisposableBean interface allows a bean to get a callback when the container containing it is destroyed. The DisposableBean interface specifies a single method:
org.springframework.beans.factory.DisposableBean接口允许你在容器销毁前回调方法。DisposableBean接口定义了一个方法:
void destroy() throws Exception;
It is recommended that you do not use the DisposableBean callback interface because it unnecessarily couples the code to Spring. Alternatively, use the @PreDestroy annotation or specify a generic method that is supported by bean definitions. With XML-based configuration metadata, you use the destroy-method attribute on the <bean/>. With Java config, you use the destroyMethod attribute of @Bean, see the section called“Receiving lifecycle callbacks”. For example, the following definition:
不建议使用DisposableBean回调接口因为会造成和spring的耦合。相反,我们建议你使用@PreDestroy或定义一个bean的定义来支持通用的方法。使用基于xml的配置元数据,你可以在bean中使用destroy-method属性。使用java配置,你可以在@Bean中设置destroyMethod属性,见章节“接受生命周期方法回调”。例如下面的定义:
<bean id="exampleInitBean" class="examples.ExampleBean" destroy-method="cleanup"/>
public class ExampleBean {
public void cleanup() {
// do some destruction work (like releasing pooled connections)
}
}
is exactly the same as:
和下面的例子类似
<bean id="exampleInitBean" class="examples.AnotherExampleBean"/>
public class AnotherExampleBean implements DisposableBean {
public void destroy() {
// do some destruction work (like releasing pooled connections)
}
}
but does not couple the code to Spring.
但是和spring的代码没有耦合。
[Tip]
提示
The destroy-method attribute of a <bean> element can be assigned a special (inferred) value which instructs Spring to automatically detect a public close or shutdown method on the specific bean class (any class that implements java.lang.AutoCloseable or java.io.Closeable would therefore match). This special (inferred) value can also be set on the default-destroy-method attribute of a <beans> element to apply this behavior to an entire set of beans (see the section called“Default initialization and destroy methods”). Note that this is the default behavior with Java config.
bean元素的destroy-method属性可以被设置为一个特殊的值,spring会自动查询公共的close或shutdown方法在特殊的bean定义上(任何的类实现java.lang.AutoCloseable或java.io.Closeable接口的将会符合)。这个特殊的这也可以通过bean元素的default-destroy-method属性来设置用于将这个行为应用于一系列的bean(见章节“默认初始话和销毁方法”)。注意这个也可以通过java配置来指定。
Default initialization and destroy methods
默认初始化和销毁方法
When you write initialization and destroy method callbacks that do not use the Spring-specific InitializingBean and DisposableBean callback interfaces, you typically write methods with names such as init(), initialize(), dispose(), and so on. Ideally, the names of such lifecycle callback methods are standardized across a project so that all developers use the same method names and ensure consistency.
当你写初始化和销毁方法时不要使用spring定义的InitializingBean和DisposableBean回调接口,你可以直接使用这样的名字来定义方法,如init、initialize、dispose等等。理想上,最好这个工程使用标准的生命周期回调方法的名称用来保证开发者之间的一致性。
You can configure the Spring container to look for named initialization and destroy callback method names on every bean. This means that you, as an application developer, can write your application classes and use an initialization callback called init(), without having to configure an init-method="init" attribute with each bean definition. The Spring IoC container calls that method when the bean is created (and in accordance with the standard lifecycle callback contract described previously). This feature also enforces a consistent naming convention for initialization and destroy method callbacks.
你可以配置spring容器来查找每个bean配置的初始化和销毁方法。这意味着,作为应用开发者,你可以将init作为初始化回调方法的名字,而不需要在每个bean定义中指定初始化方法为init。spring的ioc容器当bean创建时会调用方法(和之前藐视的标准生命周期回调一样)。这一特性使得初始化和销毁方法有了一致性。
Suppose that your initialization callback methods are named init() and destroy callback methods are named destroy(). Your class will resemble the class in the following example.
假设你的初始化回调方法叫init,销毁回调方法叫destroy。你的类可以类似如下的形式。
public class DefaultBlogService implements BlogService {
private BlogDao blogDao;
public void setBlogDao(BlogDao blogDao) {
this.blogDao = blogDao;
}
// this is (unsurprisingly) the initialization callback method
public void init() {
if (this.blogDao == null) {
throw new IllegalStateException("The [blogDao] property must be set.");
}
}
}
<beans default-init-method="init">
<bean id="blogService" class="com.foo.DefaultBlogService">
<property name="blogDao" ref="blogDao" />
</bean>
</beans>
The presence of the default-init-method attribute on the top-level <beans/> element attribute causes the Spring IoC container to recognize a method called init on beans as the initialization method callback. When a bean is created and assembled, if the bean class has such a method, it is invoked at the appropriate time.
顶级元素beans元素default-init-method属性的存在告诉spring的ioc容器,默认的初始化方法叫init会在bean初始化时被回调。当一个bean被创建和装配时,含有这样方法的bean中的这些方法会在适当的时间被调用。
You configure destroy method callbacks similarly (in XML, that is) by using the default-destroy-method attribute on the top-level <beans/> element.
你可以同样的在顶级元素beans中定义default-destroy-method属性。
Where existing bean classes already have callback methods that are named at variance with the convention, you can override the default by specifying (in XML, that is) the method name using the init-method and destroy-method attributes of the <bean/> itself.
如果一个已经存在的bean的回调方法名和规范不一样,你也可以在bean中定义init-method属性和destroy-method属性来覆盖默认值。
The Spring container guarantees that a configured initialization callback is called immediately after a bean is supplied with all dependencies. Thus the initialization callback is called on the raw bean reference, which means that AOP interceptors and so forth are not yet applied to the bean. A target bean is fully created first, then an AOP proxy (for example) with its interceptor chain is applied. If the target bean and the proxy are defined separately, your code can even interact with the raw target bean, bypassing the proxy. Hence, it would be inconsistent to apply the interceptors to the init method, because doing so would couple the lifecycle of the target bean with its proxy/interceptors and leave strange semantics when your code interacts directly to the raw target bean.
spring容器可以保证一个配置的初始化回调方法会在所有依赖注入完成后被调用。初始化方法作为原始bean的引用被调用,也就意味着AOP拦截器不能在应用于这个bean。目标首先被创建,然后AOP代理的拦截链才会被应用。如果目标bean和代理是分开定义的,你的代码可以通过代理与原始目标bean产生联系。因此,将一个拦截器用于初始化方法是相悖的,因为这样做会导致目标bean的生命周期和他的代理或拦截器相互耦合并且会留下莫名的语义当你的代码和原始目标对象相关联时。
Combining lifecycle mechanisms
组合生命周期策略
As of Spring 2.5, you have three options for controlling bean lifecycle behavior: the InitializingBean and DisposableBean callback interfaces; custom init() and destroy() methods; and the @PostConstruct and @PreDestroy annotations. You can combine these mechanisms to control a given bean.
在spring2.5中,你有三种方法用于控制bean的生命周期的行为:InitializingBean和DisposableBean回调接口、自定义init和destroy方法和@PostConstruct、@PreDestroy注解。你可以混合使用这三种方法来控制一个给定的bean。
[Note]
注意
If multiple lifecycle mechanisms are configured for a bean, and each mechanism is configured with a different method name, then each configured method is executed in the order listed below. However, if the same method name is configured - for example, init() for an initialization method - for more than one of these lifecycle mechanisms, that method is executed once, as explained in the preceding section.
在多个选择控制bean的生命周期的方式,每个方法都被配置成不同的方法名,并且每一个方法都会按照下面的顺序来执行。然而,如果配置了同名的方法,例如init用于初始化方法,多于一个的生命周期策略,方法只会被执行一次,在上面的选择中。
Multiple lifecycle mechanisms configured for the same bean, with different initialization methods, are called as follows:
多个生命周期策略被定义给同一个bean,并使用不同的初始化方法名,会按照下面的顺序来调用:
Methods annotated with @PostConstruct
使用@PostConstruct修饰的方法
afterPropertiesSet() as defined by the InitializingBean callback interface
实现InitializingBean回调接口的方法
A custom configured init() method
自定义的init方法
Destroy methods are called in the same order:
销毁的方法是按照下面的顺序来调用的:
Methods annotated with @PreDestroy
使用@PreDestroy修饰的方法
destroy() as defined by the DisposableBean callback interface
实现DisposableBean回调接口的方法
A custom configured destroy() method
自定义的destroy方法
Startup and shutdown callbacks
开始或关闭的回调
The Lifecycle interface defines the essential methods for any object that has its own lifecycle requirements (e.g. starts and stops some background process):
Lifecycle接口定义了对于一个对象在生命周期中需要的方法(例如,启动和关闭一些后台的进程)
public interface Lifecycle {
void start();
void stop();
boolean isRunning();
}
Any Spring-managed object may implement that interface. Then, when the ApplicationContext itself receives start and stop signals, e.g. for a stop/restart scenario at runtime, it will cascade those calls to all Lifecycle implementations defined within that context. It does this by delegating to a LifecycleProcessor:
任何spring管理的object可以实现这个接口。然后,当ApplicationContext收到开始和关闭的信号时,例如,在运行时收到了stop或restart指令就会在适当的时候调用这些方法。他们定义在LifecycleProcessor接口中如下:
public interface LifecycleProcessor extends Lifecycle {
void onRefresh();
void onClose();
}
Notice that the LifecycleProcessor is itself an extension of the Lifecycle interface. It also adds two other methods for reacting to the context being refreshed and closed.
注意LifecycleProcessor是Lifecycle接口的扩展。他增加了两个方法用于refresh和close。
[Tip]
提示
Note that the regular org.springframework.context.Lifecycle interface is just a plain contract for explicit start/stop notifications and does NOT imply auto-startup at context refresh time. Consider implementing org.springframework.context.SmartLifecycle instead for fine-grained control over auto-startup of a specific bean (including startup phases). Also, please note that stop notifications are not guaranteed to come before destruction: On regular shutdown, all Lifecycle beans will first receive a stop notification before the general destruction callbacks are being propagated; however, on hot refresh during a context’s lifetime or on aborted refresh attempts, only destroy methods will be called.
注意org.springframework.context.Lifecycle接口只是定义了start和stop方法,但是没有包括在上下文刷新的auto-startup。考虑实现org.springframework.context.SmartLifecycle接口会更加细粒度地控制auto-startup对于特定的bean(包括startup部分)。而且,请注意stop声明并不保证在销毁前执行。在正常的关闭中,所有生命周期方法会首先收到一个stop的提示在通常销毁方法回调之前。然而在上下文的情况下热重启或者放弃热重启的尝试时,只有destroy方法会被调用。
The order of startup and shutdown invocations can be important. If a "depends-on" relationship exists between any two objects, the dependent side will start after its dependency, and it will stop before its dependency. However, at times the direct dependencies are unknown. You may only know that objects of a certain type should start prior to objects of another type. In those cases, the SmartLifecycle interface defines another option, namely the getPhase() method as defined on its super-interface, Phased.
开始和关闭的调用可以很重要。如果在两个object之间存在依赖的关系,依赖一方的启动将会晚于被依赖的一方,并且会比被依赖的一方优先被关闭。然而,有时直接依赖是不清楚的。你或许只能知道某些类型的obj会比另一个类型的object早。在这样的情况下,SmartLifecycle定义了另外一个选项,叫做getPhase方法,这个方法定义在他的父接口Phased中。
public interface Phased {
int getPhase();
}
public interface SmartLifecycle extends Lifecycle, Phased {
boolean isAutoStartup();
void stop(Runnable callback);
}
When starting, the objects with the lowest phase start first, and when stopping, the reverse order is followed. Therefore, an object that implements SmartLifecycle and whose getPhase() method returns Integer.MIN_VALUE would be among the first to start and the last to stop. At the other end of the spectrum, a phase value of Integer.MAX_VALUE would indicate that the object should be started last and stopped first (likely because it depends on other processes to be running). When considering the phase value, it’s also important to know that the default phase for any "normal" Lifecycle object that does not implement SmartLifecycle would be 0. Therefore, any negative phase value would indicate that an object should start before those standard components (and stop after them), and vice versa for any positive phase value.
当启动的时候,object在低等级的phase会先启动,当关闭的时候正好顺序相反。然而,实现SmartLifecycle接口getPhase方法返回Integer的最小值将会最先启动,然后最后一个结束。另一方面,phase的值如果是Integer的最大值则暗示着这个对象将会最后一个启动并且第一个停止(类似于他依赖骐达程序运行)。当考虑到phase的值,需要知道默认的值对于普通的生命周期对象并没有实现SmartLifecycle接口的对象来说是0。然而,任何负数的phase将意味着这个object将比正常的组件提前启动(并且在他们之后体质),如果是正数则反之。
As you can see the stop method defined by SmartLifecycle accepts a callback. Any implementation must invoke that callback’s run() method after that implementation’s shutdown process is complete. That enables asynchronous shutdown where necessary since the default implementation of the LifecycleProcessor interface, DefaultLifecycleProcessor, will wait up to its timeout value for the group of objects within each phase to invoke that callback. The default per-phase timeout is 30 seconds. You can override the default lifecycle processor instance by defining a bean named "lifecycleProcessor" within the context. If you only want to modify the timeout, then defining the following would be sufficient:
你知道定义了SmartLifecycle可以接受一个回调。任何实现必须先回调run方法在停止过程完成后。这可以保证异步的停止当有必要的时候由于默认实现了LifecycleProcessor接口、DefaultLifecycleProcessor接口,将会等待他的超时为了一组对象可以在自己的phase中被回调。默认每个phase的超时是30秒。你可以覆盖默认的生命周期处理器实例通过定义名字为lifecycleProcessor的bean在上下文中。如果你只想改变超时,你可以按照下面的定义就足够了。
<bean id="lifecycleProcessor" class="org.springframework.context.support.DefaultLifecycleProcessor">
<!-- timeout value in milliseconds -->
<!-- 超时的值的单位是毫秒 -->
<property name="timeoutPerShutdownPhase" value="10000"/>
</bean>
As mentioned, the LifecycleProcessor interface defines callback methods for the refreshing and closing of the context as well. The latter will simply drive the shutdown process as if stop() had been called explicitly, but it will happen when the context is closing. The 'refresh' callback on the other hand enables another feature of SmartLifecycle beans. When the context is refreshed (after all objects have been instantiated and initialized), that callback will be invoked, and at that point the default lifecycle processor will check the boolean value returned by each SmartLifecycle object’s isAutoStartup() method. If "true", then that object will be started at that point rather than waiting for an explicit invocation of the context’s or its own start() method (unlike the context refresh, the context start does not happen automatically for a standard context implementation). The "phase" value as well as any "depends-on" relationships will determine the startup order in the same way as described above.
上面提到的,LifecycleProcessor接口定义了回调方法用于刷新和关闭上下文。如果关闭程序开始执行,后者会被调用,但是会在上下文正在关闭的过程中被调用。refresh的回调在另一方面允许了SmartLifecycle的bean的另一个特性。当上下文被刷新是(所有的object被实例化和初始化),回调方法会被调用,并且指向默认的生命周期处理器将检查每个SmartLifecycle对象isAutoStartup方法的boolean返回值。如果是true,那么obje会在那个点启动而不是等到上下文调用他的start方法(不像上下文刷新,上下文启动不会自动发生对于一个标注的上下文实现来说)。phase的值和依赖关系都会影响启动的顺序。
Shutting down the Spring IoC container gracefully in non-web applications
在非web应用中优雅的关闭spring的ioc容器
[Note]
注意
This section applies only to non-web applications. Spring’s web-based ApplicationContext implementations already have code in place to shut down the Spring IoC container gracefully when the relevant web application is shut down.
这一章节只适用于非web的应用。基于spring的web应用的ApplicationContext实现在相关web应用停止时会优雅的关闭spring的ioc容器。
If you are using Spring’s IoC container in a non-web application environment; for example, in a rich client desktop environment; you register a shutdown hook with the JVM. Doing so ensures a graceful shutdown and calls the relevant destroy methods on your singleton beans so that all resources are released. Of course, you must still configure and implement these destroy callbacks correctly.
如果你在非web应用环境中使用spring的ioc容器,例如,在一个富客户端环境,你注册一个JVM钩子函数保证优雅的关闭并调用所有相关单例对象的销毁方法以便所有的资源都被释放了。当然,你必须首先正确的配置这些销毁的回调方法。
To register a shutdown hook, you call the registerShutdownHook() method that is declared on the ConfigurableApplicationContext interface:
注册一个关闭钩子,你需要调用registerShutdownHook方法定义在ConfigurableApplicationContext的接口中。
import org.springframework.context.ConfigurableApplicationContext;
import org.springframework.context.support.ClassPathXmlApplicationContext;
public final class Boot {
public static void main(final String[] args) throws Exception {
ConfigurableApplicationContext ctx = new ClassPathXmlApplicationContext(
new String []{"beans.xml"});
// add a shutdown hook for the above context...
// 为上面的上下文添加关闭钩子
ctx.registerShutdownHook();
// app runs here...
// 应用在这里运行
// main method exits, hook is called prior to the app shutting down...
// 主方法退出,钩子方法会在app被关闭前调用
}
}
7.6.2 ApplicationContextAware and BeanNameAware
ApplicationContextAware和BeanNameAware
When an ApplicationContext creates an object instance that implements the org.springframework.context.ApplicationContextAware interface, the instance is provided with a reference to that ApplicationContext.
当ApplicationContext创建了一个object实例实现了org.springframework.context.ApplicationContextAware接口,那么这个实例提供了ApplicationContext的一个引用。
public interface ApplicationContextAware {
void setApplicationContext(ApplicationContext applicationContext) throws BeansException;
}
Thus beans can manipulate programmatically the ApplicationContext that created them, through the ApplicationContext interface, or by casting the reference to a known subclass of this interface, such as ConfigurableApplicationContext, which exposes additional functionality. One use would be the programmatic retrieval of other beans. Sometimes this capability is useful; however, in general you should avoid it, because it couples the code to Spring and does not follow the Inversion of Control style, where collaborators are provided to beans as properties. Other methods of the ApplicationContext provide access to file resources, publishing application events, and accessing a MessageSource. These additional features are described in Section 7.15,“Additional Capabilities of the ApplicationContext”
这样bean可以手动手动编程控制ApplicationContext,通过ApplicationContext接口,或者将其转化为一个子类的实例,例如ConfigurableApplicationContext,将可以提供额外的功能。一个用法就是获得其他的bean。有时这个做法很有用。然而,通常你应该避免使用它,因为这会使得你的代码和spring耦合并且不符合IOC的风格,当bean作为属性提供的时候。ApplicationContext提供的其他方法访问文件资源、发布应用事件和访问消息资源。这些额外的特性会在7.15章节“ApplicationContext的其他功能”中介绍。
As of Spring 2.5, autowiring is another alternative to obtain reference to the ApplicationContext. The "traditional" constructor and byType autowiring modes (as described in Section 7.4.5,“Autowiring collaborators”) can provide a dependency of type ApplicationContext for a constructor argument or setter method parameter, respectively. For more flexibility, including the ability to autowire fields and multiple parameter methods, use the new annotation-based autowiring features. If you do, the ApplicationContext is autowired into a field, constructor argument, or method parameter that is expecting the ApplicationContext type if the field, constructor, or method in question carries the @Autowired annotation. For more information, see Section 7.9.2,“@Autowired”.
在spring2.5中,自动注入作为另一个获得ApplicationContext引用的替代。传统的构造器和通过类型注入的方式(在7.4.5章节“自动注入组件”)可以提供ApplicationContext类型的依赖作为一个构造器参数或set方法的参数。为了更加便利,包括可以注入的属性和多个参数方法,使用基于注解的自动注入特性。如果你这样做,ApplicationContext可以注入到属性、构造器参数或方法参数被期望ApplicationContext类型的参数如果属性、构造器或方法有一个@Autowired注解。更多信息见7.9.2章节“@Autowired”。
When an ApplicationContext creates a class that implements the org.springframework.beans.factory.BeanNameAware interface, the class is provided with a reference to the name defined in its associated object definition.
当ApplicationContext创建了一个类实现了org.springframework.beans.factory.BeanNameAware接口,这个类就可以根据name获得另一个bean的实例的定义。
public interface BeanNameAware {
void setBeanName(String name) throws BeansException;
}
The callback is invoked after population of normal bean properties but before an initialization callback such as InitializingBean afterPropertiesSet or a custom init-method.
这个回调方法在正常属性被注入后,但是在初始化回调方法被调用之前例如InitializingBean的afterPropertiesSet或init方法。
7.6.3 Other Aware interfaces
其他的Aware接口
Besides ApplicationContextAware and BeanNameAware discussed above, Spring offers a range of Aware interfaces that allow beans to indicate to the container that they require a certain infrastructure dependency. The most important Aware interfaces are summarized below - as a general rule, the name is a good indication of the dependency type:
除了上面讨论的ApplicationContextAware和BeanNameAware,spring提供了一系列的Aware接口运行bean来暗示容器他们需要一些特殊的组件依赖。最重要的Aware接口在下面被总结,作为通用的规则,名字暗示了注入的类型
Table 7.4. Aware interfaces
Aware接口
| Name 名字 | Injected Dependency 注入依赖 | Explained in… 说明的位置 |
| ApplicationContextAware | Declaring ApplicationContext 声明ApplicationContext | Section 7.6.2,“ApplicationContextAware and BeanNameAware” 见7.6.2章节 |
| ApplicationEventPublisherAware | Event publisher of the enclosing ApplicationContext ApplicationContext的事件发布 | Section 7.15, “Additional Capabilities of the ApplicationContext” 见7.15章节,其他ApplicationContext的应用 |
| BeanClassLoaderAware | Class loader used to load the bean classes. 类加载器用于加载bean类的 | Section 7.3.2, “Instantiating beans” 见7.3.2章节,实例化bean |
| BeanFactoryAware | Declaring BeanFactory 声明BeanFactory | Section 7.6.2, “ApplicationContextAware and BeanNameAware” 见7.6.2章节 |
| BeanNameAware | Name of the declaring bean 声明bean的名字 | Section 7.6.2, “ApplicationContextAware and BeanNameAware” 见7.6.2章节 |
| BootstrapContextAware | Resource adapter BootstrapContext the container runs in. Typically available only in JCA awareApplicationContexts 容器中运行的资源适配器。通常在JCA aware ApplicationContexts中可用 | Chapter 32, JCA CCI 32章节,JCA CCI |
| LoadTimeWeaverAware | Defined weaver for processing class definition at load time 在加载时定义weaver用于处理类的定义 | Section 11.8.4, “Load-time weaving with AspectJ in the Spring Framework” 11.8.4章节,在spring框架中使用AspectJ实现Load-time weaving |
| MessageSourceAware | Configured strategy for resolving messages (with support for parametrization and internationalization) 配置策略用于解析消息(支持参数化和国际化) | Section 7.15, “Additional Capabilities of theApplicationContext” 7.15章节,ApplicationContext的其他作用 |
| NotificationPublisherAware | Spring JMX notification publisher spring jmx通知出版者 | Section 31.7, “Notifications” 31.7章节,通知 |
| PortletConfigAware | Current PortletConfig the container runs in. Valid only in a web-aware Spring ApplicationContext 容器中运行的PortletConfig目前只在spring的web中可用 | Chapter 25, Portlet MVC Framework 25章节, |
| PortletContextAware | Current PortletContext the container runs in. Valid only in a web-aware Spring ApplicationContext 容器中运行的PortletContext目前只在spring的web中可用 | Chapter 25, Portlet MVC Framework 25章节, |
| ResourceLoaderAware | Configured loader for low-level access to resources 配置加载器用于加载资源 | Chapter 8, Resources 8章节,资源 |
| ServletConfigAware | Current ServletConfig the container runs in. Valid only in a web-aware Spring ApplicationContext | Chapter 22, Web MVC framework 22章节,Web MVC框架 |
| ServletContextAware | Current ServletContext the container runs in. Valid only in a web-aware Spring ApplicationContext 容器中运行的ServletContext目前只在spring的web中可用 | Chapter 22, Web MVC framework 22章节,Web MVC框架 |
Note again that usage of these interfaces ties your code to the Spring API and does not follow the Inversion of Control style. As such, they are recommended for infrastructure beans that require programmatic access to the container.
再次注意,使用这些接口会使得你的代码和Spring API耦合,并且不符合反向控制的方式。建议基础组件需要编程访问容器时使用。
7.7 Bean definition inheritance
bean定义的继承
A bean definition can contain a lot of configuration information, including constructor arguments, property values, and container-specific information such as initialization method, static factory method name, and so on. A child bean definition inherits configuration data from a parent definition. The child definition can override some values, or add others, as needed. Using parent and child bean definitions can save a lot of typing. Effectively, this is a form of templating.
一个bean的定义包含了很多配置信息,包括构造器参数、参数值和容器特定的信息例如初始化方法、静态工厂方法名等等。子bean定义继承来自父bean的定义。子bean定义可以根据需要覆盖一些值或添加其他的值。使用子bean和父bean的定义可以减少很多键盘输入。更加有效,可以作为一种模板。
If you work with an ApplicationContext interface programmatically, child bean definitions are represented by the ChildBeanDefinition class. Most users do not work with them on this level, instead configuring bean definitions declaratively in something like the ClassPathXmlApplicationContext. When you use XML-based configuration metadata, you indicate a child bean definition by using the parent attribute, specifying the parent bean as the value of this attribute.
如果你编程使用ApplicationContext接口,子bean定义由ChildBeanDefinition类代表。大部分用户不需要在这个级别编程来替代ClassPathXmlApplicationContext中定义的bean定义信息。当你使用基于XML的配置元数据时,你可以通过使用parent属性来定义子bean定义,尤其是父bean作为这个值的属性值。
<bean id="inheritedTestBean" abstract="true"
class="org.springframework.beans.TestBean">
<property name="name" value="parent"/>
<property name="age" value="1"/>
</bean>
<bean id="inheritsWithDifferentClass"
class="org.springframework.beans.DerivedTestBean"
parent="inheritedTestBean" init-method="initialize">
<property name="name" value="override"/>
<!-- the age property value of 1 will be inherited from parent -->
<!-- age属性的值是1,从父bean中继承得到-->
</bean>
A child bean definition uses the bean class from the parent definition if none is specified, but can also override it. In the latter case, the child bean class must be compatible with the parent, that is, it must accept the parent’s property values.
如果子bean不定义class属性,则使用其父bean的class定义,当然也可以覆盖父bean的定义。在下面的例子中,子bean的类必须和父bean相匹配,也就是必须可以接收父bean的属性值。
A child bean definition inherits scope, constructor argument values, property values, and method overrides from the parent, with the option to add new values. Any scope, initialization method, destroy method, and/or static factory method settings that you specify will override the corresponding parent settings.
子bean可以继承范围、构造器参数值、属性值和覆盖父类的方法通过添加新的属性值。任何范围、初始化方法、销毁方法和静态工厂方法设置都可以从父bean的设置中覆盖。
The remaining settings are always taken from the child definition: depends on, autowire mode, dependency check, singleton, lazy init.
剩下的设置则从子bean定义中获得:依赖、自动注入模式、依赖检查、单例、延迟加载。
The preceding example explicitly marks the parent bean definition as abstract by using the abstract attribute. If the parent definition does not specify a class, explicitly marking the parent bean definition as abstract is required, as follows:
前面的例子明确声明了父bean的定义是抽象的,因为使用了抽象的属性定义。如果父bean定义没有定义class属性,需要将bean定义为抽象,如下:
<bean id="inheritedTestBeanWithoutClass" abstract="true">
<property name="name" value="parent"/>
<property name="age" value="1"/>
</bean>
<bean id="inheritsWithClass" class="org.springframework.beans.DerivedTestBean"
parent="inheritedTestBeanWithoutClass" init-method="initialize">
<property name="name" value="override"/>
<!-- age will inherit the value of 1 from the parent bean definition-->
</bean>
The parent bean cannot be instantiated on its own because it is incomplete, and it is also explicitly marked as abstract. When a definition is abstract like this, it is usable only as a pure template bean definition that serves as a parent definition for child definitions. Trying to use such an abstract parent bean on its own, by referring to it as a ref property of another bean or doing an explicit getBean() call with the parent bean id, returns an error. Similarly, the container’s internal preInstantiateSingletons() method ignores bean definitions that are defined as abstract.
上面的父bean是不可以被实例化的因为他不完整并且也明确定义了他是抽象的。当一个像这样定义的抽象,通常作为一个纯粹的模板bean定义作为一个父bean来服务子bean。如果试图使用这样的父bean,或作为另一个bean属性的指向或者使用getBean方法使用父bean的id会返回错误。同样,容器内部的preInstantiateSingletons方法会忽略抽象bean的定义。
[Note]
注意
ApplicationContext pre-instantiates all singletons by default. Therefore, it is important (at least for singleton beans) that if you have a (parent) bean definition which you intend to use only as a template, and this definition specifies a class, you must make sure to set the abstract attribute to true, otherwise the application context will actually (attempt to) pre-instantiate the abstract bean.
ApplicationContext默认提前初始化所有单例bean。然而,这是重要的(至少对于单例bean),那就是你使用了bean的定义希望他作为一个模板,并且这个定义中含有class属性,你必须保证这是一个抽象的定义bean,否则应用上文将会尝试提前初始化抽象bean。
7.8 Container Extension Points
容器的扩展点
Typically, an application developer does not need to subclass ApplicationContext implementation classes. Instead, the Spring IoC container can be extended by plugging in implementations of special integration interfaces. The next few sections describe these integration interfaces.
通常,应用开发者不需要ApplicationContext实现类的子类。作为代替,spring的IOC容器可以通过实现特殊的接口进行扩展。下面几节将介绍这样的集成接口。
7.8.1 Customizing beans using a BeanPostProcessor
使用BeanPostProcessor来自定义bean
The BeanPostProcessor interface defines callback methods that you can implement to provide your own (or override the container’s default) instantiation logic, dependency-resolution logic, and so forth. If you want to implement some custom logic after the Spring container finishes instantiating, configuring, and initializing a bean, you can plug in one or more BeanPostProcessor implementations.
BeanPostProcessor接口定义了回调方法,你可以实现这个接口并提供自己的实现集成逻辑(或者覆盖容器中默认的实现)、依赖处理逻辑或其他的。如果你希望在spring容器完成初始化、配置和初始化bean之后做一些逻辑处理,你可以实现一个或多个BeanPostProcessor实现。
You can configure multiple BeanPostProcessor instances, and you can control the order in which these BeanPostProcessors execute by setting the order property. You can set this property only if the BeanPostProcessor implements the Ordered interface; if you write your own BeanPostProcessor you should consider implementing the Ordered interface too. For further details, consult the javadocs of the BeanPostProcessor and Ordered interfaces. See also the note below on programmatic registration of BeanPostProcessors.
你可以配置多个BeanPostProcessor实例,并且你可以可控制在这些BeanPostProcessors中执行设置属性的顺序。如果BeanPostProcessor实现了Ordered接口,你可以设置这些属性。如果你实现自己的BeanPostProcessor,你需要考虑实现Ordered接口。更多的细节,见BeanPostProcessor和Ordered的javadocs。你也可以参考下面的BeanPostProcessors的编程注册。
[Note]
注意
BeanPostProcessors operate on bean (or object) instances; that is to say, the Spring IoC container instantiates a bean instance and then BeanPostProcessors do their work.
BeanPostProcessors操作一个bean(或object)的实例,简单点说,spring的IOC容器在完成初始化之后BeanPostProcessors会完成他的工作。
BeanPostProcessors are scoped per-container. This is only relevant if you are using container hierarchies. If you define a BeanPostProcessor in one container, it will only post-process the beans in that container. In other words, beans that are defined in one container are not post-processed by a BeanPostProcessor defined in another container, even if both containers are part of the same hierarchy.
BeanPostProcessors的作用域是每个容器。这个只取决于你正在使用的容器层级。如果你在一个容器中定义了BeanPostProcessor,他将会只在那个特定的容器中起作用。换句话说,一个容器中的BeanPostProcessor不会对另一个容器起作用,即便两个容器是相同的继承关系。
To change the actual bean definition (i.e., the blueprint that defines the bean), you instead need to use a BeanFactoryPostProcessor as described in Section 7.8.2,“Customizing configuration metadata with a BeanFactoryPostProcessor”.
需要改变实际bean的定义(例如,定义bean的蓝图),你需要根据需要像章节7.8.2“使用BeanPostProcessor来自定义配置元数据”的描述一样来使用BeanPostProcessor。
The org.springframework.beans.factory.config.BeanPostProcessor interface consists of exactly two callback methods. When such a class is registered as a post-processor with the container, for each bean instance that is created by the container, the post-processor gets a callback from the container both before container initialization methods (such as InitializingBean’s afterPropertiesSet() and any declared init method) are called as well as after any bean initialization callbacks. The post-processor can take any action with the bean instance, including ignoring the callback completely. A bean post-processor typically checks for callback interfaces or may wrap a bean with a proxy. Some Spring AOP infrastructure classes are implemented as bean post-processors in order to provide proxy-wrapping logic.
org.springframework.beans.factory.config.BeanPostProcessor接口有两个回调方法。当一个类被注册为一个容器的post-processor,对于这个容器创建的所有bean,每个bean的初始化方法结束后在容器初始化方法(例如InitializingBean的afterPropertiesSet方法和任何被定义的init方法)之前post-processor会从容器中获得回调方法。post-processor可以对bean的实例做任何处理,包括忽略回调方法的完成。一个bean的post-processor通常检查回调接口或使用代理来包裹bean。一些spring的AOP基础组件类实现了bean的post-processor用于处理代理包裹逻辑。
An ApplicationContext automatically detects any beans that are defined in the configuration metadata which implement the BeanPostProcessor interface. The ApplicationContext registers these beans as post-processors so that they can be called later upon bean creation. Bean post-processors can be deployed in the container just like any other beans.
ApplicationContext自动的探测bean被配置元数据定义成实现BeanPostProcessor接口。ApplicationContext将这些bean注册成post-processor以让他们可以在bean创建之后被调用。post-processor的bean可以像其他的bean一样定义在容器中。
Note that when declaring a BeanPostProcessor using an @Bean factory method on a configuration class, the return type of the factory method should be the implementation class itself or at least the org.springframework.beans.factory.config.BeanPostProcessor interface, clearly indicating the post-processor nature of that bean. Otherwise, the ApplicationContext won’t be able to autodetect it by type before fully creating it. Since a BeanPostProcessor needs to be instantiated early in order to apply to the initialization of other beans in the context, this early type detection is critical.
注意当使用@Bean修饰的工厂方法来定义BeanPostProcessor的类时,工厂方法的返回值应该实现类本身或至少实现org.springframework.beans.factory.config.BeanPostProcessor接口,明确定义bean的post-processor特性。另外,ApplicationContext不会自动通过类型来探测在完全创建之前。BeanPostProcessor需要被提前初始化以用于其他上下文bean的初始化,类型探测是危险的。
[Note]
注意
While the recommended approach for BeanPostProcessor registration is through ApplicationContext auto-detection (as described above), it is also possible to register them programmatically against a ConfigurableBeanFactory using the addBeanPostProcessor method. This can be useful when needing to evaluate conditional logic before registration, or even for copying bean post processors across contexts in a hierarchy. Note however that BeanPostProcessors added programmatically do not respect the Ordered interface. Here it is the order of registration that dictates the order of execution. Note also that BeanPostProcessors registered programmatically are always processed before those registered through auto-detection, regardless of any explicit ordering.
建议BeanPostProcessor的注册方法是通过ApplicationContext的自动探测(同上面描述的),他也可以通过ConfigurableBeanFactory使用addBeanPostProcessor方法来编程实现。如果需要评价条件逻辑在注册之前或在继承的上下文中拷贝bean的post processor时是很有用的。注意,然而编程添加BeanPostProcessors不可以respect Ordered接口。这里注册的顺序决定了运行的顺序。注意即使明确定义了顺序,编程注册的BeanPostProcessors比自动探测注册的BeanPostProcessors要提早运行。
[Note]
注意
Classes that implement the BeanPostProcessor interface are special and are treated differently by the container. All BeanPostProcessors and beans that they reference directly are instantiated on startup, as part of the special startup phase of the ApplicationContext. Next, all BeanPostProcessors are registered in a sorted fashion and applied to all further beans in the container. Because AOP auto-proxying is implemented as a BeanPostProcessor itself, neither BeanPostProcessors nor the beans they reference directly are eligible for auto-proxying, and thus do not have aspects woven into them.
实现BeanPostProcessor接口的类在容器中是特殊对待的。所有的BeanPostProcessors和这些bean引用的会在启动时直接初始化,作为ApplicationContext的特殊启动部分。然后,所有的BeanPostProcessors被注册并且应用于容器中的其他bean。因为AOP自动代理实现了BeanPostProcessor自身,所以BeanPostProcessors和他依赖的bean不适合于自动代理,不要在切面中包含他们
For any such bean, you should see an informational log message: "Bean foo is not eligible for getting processed by all BeanPostProcessor interfaces (for example: not eligible for auto-proxying)".
对于任何一个bean,你应该查看日志会看到“Bean foo不适合被所有的BeanPostProcessor接口处理(例如,适合自动代理)”。
Note that if you have beans wired into your BeanPostProcessor using autowiring or @Resource (which may fall back to autowiring), Spring might access unexpected beans when searching for type-matching dependency candidates, and therefore make them ineligible for auto-proxying or other kinds of bean post-processing. For example, if you have a dependency annotated with @Resource where the field/setter name does not directly correspond to the declared name of a bean and no name attribute is used, then Spring will access other beans for matching them by type.
注意如果你的baen使用自动注入或@Resource(在自动注入时快速失败)来注入了你的BeanPostProcessor,spring或许访问不确定的bean在寻找类型匹配依赖是,会是的自动代理或其他类型的post-processing失效。例如,你使用@Resource注解依赖属性或set方法并没有直接和bean的名称和没有使用name属性,spirng将会通过匹配类型来访问其他的bean。
The following examples show how to write, register, and use BeanPostProcessors in an ApplicationContext.
下面的例子展示了如何书写、注册和使用ApplicationContext的BeanPostProcessors
Example: Hello World, BeanPostProcessor-style
例子:Hello World,BeanPostProcessor风格
This first example illustrates basic usage. The example shows a custom BeanPostProcessor implementation that invokes the toString() method of each bean as it is created by the container and prints the resulting string to the system console.
第一个例子展示了基本用法。这个例子展示了自定义BeanPostProcessor的实现调用toString方法当容器中每个bean创建之后打印他们的结果在系统的控制台。
Find below the custom BeanPostProcessor implementation class definition:
发现下面自定义BeanPostProcessor的实现类定义:
package scripting;
import org.springframework.beans.factory.config.BeanPostProcessor;
import org.springframework.beans.BeansException;
public class InstantiationTracingBeanPostProcessor implements BeanPostProcessor {
// simply return the instantiated bean as-is
// 简单的返回了实例化的bean
public Object postProcessBeforeInitialization(Object bean,
String beanName) throws BeansException {
return bean; // we could potentially return any object reference here...
// 我们在这里可以返回任何对象引用
}
public Object postProcessAfterInitialization(Object bean,
String beanName) throws BeansException {
System.out.println("Bean '" + beanName + "' created : " + bean.toString());
return bean;
}
}
<?xml version="1.0" encoding="UTF-8"?>
<beans xmlns="http://www.springframework.org/schema/beans"
xmlns:xsi="http://www.w3.org/2001/XMLSchema-instance"
xmlns:lang="http://www.springframework.org/schema/lang"
xsi:schemaLocation="http://www.springframework.org/schema/beans
http://www.springframework.org/schema/beans/spring-beans.xsd
http://www.springframework.org/schema/lang
http://www.springframework.org/schema/lang/spring-lang.xsd">
<lang:groovy id="messenger"
script-source="classpath:org/springframework/scripting/groovy/Messenger.groovy">
<lang:property name="message" value="Fiona Apple Is Just So Dreamy."/>
</lang:groovy>
<!--
when the above bean (messenger) is instantiated, this custom
BeanPostProcessor implementation will output the fact to the system console
-->
<!-- 当上面的bean(messenger)被初始化,自定义的BeanPostProcessor实现将会在系统控制台输出内容-->
<bean class="scripting.InstantiationTracingBeanPostProcessor"/>
</beans>
Notice how the InstantiationTracingBeanPostProcessor is simply defined. It does not even have a name, and because it is a bean it can be dependency-injected just like any other bean. (The preceding configuration also defines a bean that is backed by a Groovy script. The Spring dynamic language support is detailed in the chapter entitled Chapter 35, Dynamic language support.)
注意InstantiationTracingBeanPostProcessor的定义是简单的。他甚至没有名字,并且这是一个bean可以被依赖注入像其他的bean一样。(前面的配置中定义了一个bean,后台是Groovy脚本。spring的动态语言支持在35章节描述,“动态语言支持”)
The following simple Java application executes the preceding code and configuration:
下面的简单的java应用执行了上面的代码和配置
import org.springframework.context.ApplicationContext;
import org.springframework.context.support.ClassPathXmlApplicationContext;
import org.springframework.scripting.Messenger;
public final class Boot {
public static void main(final String[] args) throws Exception {
ApplicationContext ctx = new ClassPathXmlApplicationContext("scripting/beans.xml");
Messenger messenger = (Messenger) ctx.getBean("messenger");
System.out.println(messenger);
}
}
The output of the preceding application resembles the following:
上面的应用的输出是下面这样的:
Bean 'messenger' created : org.springframework.scripting.groovy.GroovyMessenger@272961
org.springframework.scripting.groovy.GroovyMessenger@272961
Example: The RequiredAnnotationBeanPostProcessor
例子:RequiredAnnotationBeanPostProcessor
Using callback interfaces or annotations in conjunction with a custom BeanPostProcessor implementation is a common means of extending the Spring IoC container. An example is Spring’s RequiredAnnotationBeanPostProcessor - a BeanPostProcessor implementation that ships with the Spring distribution which ensures that JavaBean properties on beans that are marked with an (arbitrary) annotation are actually (configured to be) dependency-injected with a value.
使用回调接口或注解连接自定义的BeanPostProcessor实现是一种扩展spring的IOC容器的通常做法。一个例子就是spring的RequiredAnnotationBeanPostProcessor,BeanPostProcessor的实现是spring发行版允许javabean属性可以通过注解来标记并实际依赖于一个值。
7.8.2 Customizing configuration metadata with a BeanFactoryPostProcessor
使用BeanFactoryPostProcessor自定义配置元数据
The next extension point that we will look at is the org.springframework.beans.factory.config.BeanFactoryPostProcessor. The semantics of this interface are similar to those of the BeanPostProcessor, with one major difference: BeanFactoryPostProcessor operates on the bean configuration metadata; that is, the Spring IoC container allows a BeanFactoryPostProcessor to read the configuration metadata and potentially change it before the container instantiates any beans other than BeanFactoryPostProcessors.
下一个扩展点是org.springframework.beans.factory.config.BeanFactoryPostProcessor。这个接口的语义和BeanPostProcessor类似,但是有一点不同:BeanFactoryPostProcessor操作的是bean的配置元数据,也就是说,spring的IOC容器语序一个BeanFactoryPostProcessor来读取配置元数据并且潜在的改变他在容器初始化任何bean之前,和BeanFactoryPostProcessors不同。
You can configure multiple BeanFactoryPostProcessors, and you can control the order in which these BeanFactoryPostProcessors execute by setting the order property. However, you can only set this property if the BeanFactoryPostProcessor implements the Ordered interface. If you write your own BeanFactoryPostProcessor, you should consider implementing the Ordered interface too. Consult the javadocs of the BeanFactoryPostProcessor and Ordered interfaces for more details.
你可以配置多个BeanFactoryPostProcessors,并且你可以控制这些BeanFactoryPostProcessors在执行设置的顺序。然而,只有在实现了Ordered接口后才可以改变顺序。如果你实现自己的BeanFactoryPostProcessors,你也应该考虑实现Ordered接口。参见BeanFactoryPostProcessors和Ordered接口的javadocs来了解详情。
[Note]
注意
If you want to change the actual bean instances (i.e., the objects that are created from the configuration metadata), then you instead need to use a BeanPostProcessor (described above in Section 7.8.1,“Customizing beans using a BeanPostProcessor”). While it is technically possible to work with bean instances within a BeanFactoryPostProcessor (e.g., using BeanFactory.getBean()), doing so causes premature bean instantiation, violating the standard container lifecycle. This may cause negative side effects such as bypassing bean post processing.
如果你想要改变实际bean的实例(例如,从配置元数据中创建的object),那你需要使用BeanPostProcessor(在上面7.8.1章节中描述“使用BeanPostProcessor”自定义bean”)。用BeanFactoryPostProcessor和bean的实例一起在技术上是可行的(例如,使用BeanFactory.getBean),这样做会导致bean的提前初始化,违反标准容器的生命周期。这也会导致低效率例如绕过bean的后续处理。
Also, BeanFactoryPostProcessors are scoped per-container. This is only relevant if you are using container hierarchies. If you define a BeanFactoryPostProcessor in one container, it will only be applied to the bean definitions in that container. Bean definitions in one container will not be post-processed by BeanFactoryPostProcessors in another container, even if both containers are part of the same hierarchy.
BeanFactoryPostProcessors的作用范围是每个容器。只和你使用的容器的继承关系有关。如果你在一个容器中定义了BeanFactoryPostProcessor,他将会只在那个特定的容器中起作用。一个容器中的BeanFactoryPostProcessor不会对另一个容器起作用,即便两个容器是相同的继承关系。
A bean factory post-processor is executed automatically when it is declared inside an ApplicationContext, in order to apply changes to the configuration metadata that define the container. Spring includes a number of predefined bean factory post-processors, such as PropertyOverrideConfigurer and PropertyPlaceholderConfigurer. A custom BeanFactoryPostProcessor can also be used, for example, to register custom property editors.
定义在ApplicationContext的一个post-processor的bean会自动执行,以便于改变容器中的配置元数据。spring包括一系列已经定义好的bean工厂post-processors,例如PropertyOverrideConfigurer和PropertyPlaceholderConfigurer。一个自定义BeanFactoryPostProcessor也可以被使用,例如注册自定义属性编辑器。
An ApplicationContext automatically detects any beans that are deployed into it that implement the BeanFactoryPostProcessor interface. It uses these beans as bean factory post-processors, at the appropriate time. You can deploy these post-processor beans as you would any other bean.
ApplicationContext自动探测部署的并且实现BeanFactoryPostProcessor接口的bean。他会在恰当的时候使用这些bean。你可以部署这些post-processor的bean作为你需要的其他bean。
[Note]
注意
As with BeanPostProcessors , you typically do not want to configure BeanFactoryPostProcessors for lazy initialization. If no other bean references a Bean(Factory)PostProcessor, that post-processor will not get instantiated at all. Thus, marking it for lazy initialization will be ignored, and the Bean(Factory)PostProcessor will be instantiated eagerly even if you set the default-lazy-init attribute to true on the declaration of your <beans /> element.
使用BeanPostProcessors,你不需要将BeanFactoryPostProcessors配置成延迟启动。如果没有bean引用Bean(Factory)PostProcessor,post-processor将不会获得初始化。因此设置他为延迟初始化会被忽略并且Bean(Factory)PostProcessor将会被实例化如果你设置了default-lazy-init属性为true在你定义beans时。
Example: the Class name substitution PropertyPlaceholderConfigurer
例子:类名替换PropertyPlaceholderConfigurer
You use the PropertyPlaceholderConfigurer to externalize property values from a bean definition in a separate file using the standard Java Properties format. Doing so enables the person deploying an application to customize environment-specific properties such as database URLs and passwords, without the complexity or risk of modifying the main XML definition file or files for the container.
你使用PropertyPlaceholderConfigurer来外部属性值从一个bean定义中在其他的文件使用标准的java属性形式。这样做可以在部署应用是自定义特定环境的属性,例如数据库地址和密码,而不再需要修改复杂的xml定义文件或容器的文件。
Consider the following XML-based configuration metadata fragment, where a DataSource with placeholder values is defined. The example shows properties configured from an external Properties file. At runtime, a PropertyPlaceholderConfigurer is applied to the metadata that will replace some properties of the DataSource. The values to replace are specified as placeholders of the form ${property-name} which follows the Ant / log4j / JSP EL style.
考虑下面基于xml配置元数据的片段,定义了一个使用占位符的DataSource。这个例子中属性配置是在一个外置的properties文件中的。在运行时,PropertyPlaceholderConfigurer将会替换DataSource的部分属性。需要被替换的属性都类似于${属性名}这样的形式,仿照了Ant、log4j和JSP EL的风格。
<bean class="org.springframework.beans.factory.config.PropertyPlaceholderConfigurer">
<property name="locations" value="classpath:com/foo/jdbc.properties"/>
</bean>
<bean id="dataSource" destroy-method="close"
class="org.apache.commons.dbcp.BasicDataSource">
<property name="driverClassName" value="${jdbc.driverClassName}"/>
<property name="url" value="${jdbc.url}"/>
<property name="username" value="${jdbc.username}"/>
<property name="password" value="${jdbc.password}"/>
</bean>
The actual values come from another file in the standard Java Properties format:
实际的值来源于另外一个标准的Java的属性文件格式:
jdbc.driverClassName=org.hsqldb.jdbcDriver
jdbc.url=jdbc:hsqldb:hsql://production:9002
jdbc.username=sa
jdbc.password=root
Therefore, the string ${jdbc.username} is replaced at runtime with the value 'sa', and the same applies for other placeholder values that match keys in the properties file. The PropertyPlaceholderConfigurer checks for placeholders in most properties and attributes of a bean definition. Furthermore, the placeholder prefix and suffix can be customized.
在运行时,${jdbc.username}将会由sa来替换,其他的也会根据key的匹配来进行替换。PropertyPlaceholderConfigurer会检查bean定义中属性的定义。另外,占位符的前缀和后缀是可以自定义的。
With the context namespace introduced in Spring 2.5, it is possible to configure property placeholders with a dedicated configuration element. One or more locations can be provided as a comma-separated list in the location attribute.
在spring2.5的context的命名空间中,允许使用一个专有的配置属性来设置占位符属性。一个或多个属性值可以通过逗号来分割,提供给location的属性值。
<context:property-placeholder location="classpath:com/foo/jdbc.properties"/>
The PropertyPlaceholderConfigurer not only looks for properties in the Properties file you specify. By default it also checks against the Java System properties if it cannot find a property in the specified properties files. You can customize this behavior by setting the systemPropertiesMode property of the configurer with one of the following three supported integer values:
PropertyPlaceholderConfigurer的功能并不只限于加载你定义的属性文件。默认情况下,他会检测java系统属性如果配置的属性在properties中无法找到时。你可以自定义查找的属性通过设置systemPropertiesMode属性并指定以下某个值。
never (0): Never check system properties
never:不检测系统属性
fallback (1): Check system properties if not resolvable in the specified properties files. This is the default.
fallback:如果配置文件中不存在则检查系统属性,这是默认值
override (2): Check system properties first, before trying the specified properties files. This allows system properties to override any other property source.
override:先检查系统属性,然后检查自定义配置文件。并且允许系统属性可以覆盖其他属性。
Consult the PropertyPlaceholderConfigurer javadocs for more information.
参考PropertyPlaceholderConfigurer的javadocs来获取更多信息。
[Tip]
提示
You can use the PropertyPlaceholderConfigurer to substitute class names, which is sometimes useful when you have to pick a particular implementation class at runtime. For example:
你可以使用PropertyPlaceholderConfigurer来替代类名,当你在运行时需要获得一个特殊的实现时这个功能很有用。例如:
<bean class="org.springframework.beans.factory.config.PropertyPlaceholderConfigurer">
<property name="locations">
<value>classpath:com/foo/strategy.properties</value>
</property>
<property name="properties">
<value>custom.strategy.class=com.foo.DefaultStrategy</value>
</property>
</bean>
<bean id="serviceStrategy" class="${custom.strategy.class}"/>
If the class cannot be resolved at runtime to a valid class, resolution of the bean fails when it is about to be created, which is during the preInstantiateSingletons() phase of an ApplicationContext for a non-lazy-init bean.
如果在运行时不能指定一个有效的类,对于一个非延迟加载的bean,解决方法是在preInstantiateSingletons的期间进行创建。
Example: the PropertyOverrideConfigurer
例子:PropertyOverrideConfigurer
The PropertyOverrideConfigurer, another bean factory post-processor, resembles the PropertyPlaceholderConfigurer, but unlike the latter, the original definitions can have default values or no values at all for bean properties. If an overriding Properties file does not have an entry for a certain bean property, the default context definition is used.
PropertyOverrideConfigurer,另外一个bean工厂的后处理器,和PropertyPlaceholderConfigurer相似,但是有以下不同,原始的定义可以有默认值或没有bean的属性值。如果一个bean的定义属性没有找到匹配的属性文件,则使用默认值。
Note that the bean definition is not aware of being overridden, so it is not immediately obvious from the XML definition file that the override configurer is being used. In case of multiple PropertyOverrideConfigurer instances that define different values for the same bean property, the last one wins, due to the overriding mechanism.
注意bean的定义是不知道被覆盖的,所以从xml的配置信息中是无法看出属性覆盖被使用了。如果多个PropertyOverrideConfigurer实例对同一个bean属性定义了不同的值,由于覆盖机制,最后声明的被采用。
Properties file configuration lines take this format:
属性配置文件如下:
beanName.property=value
For example:
例如:
dataSource.driverClassName=com.mysql.jdbc.Driver
dataSource.url=jdbc:mysql:mydb
This example file can be used with a container definition that contains a bean called dataSource, which has driver and url properties.
这个例子文件中的定义可以叫dataSource,包含driver和url属性。
Compound property names are also supported, as long as every component of the path except the final property being overridden is already non-null (presumably initialized by the constructors). In this example…?
组合属性名也是支持的,每一个部分是final的且非空(推测已经被构造器初始化)在这个例子中???
foo.fred.bob.sammy=123
the sammy property of the bob property of the fred property of the foo bean is set to the scalar value 123.
foo的fred属性的bob属性的sammy属性被设置成为123
[Note]
注意
Specified override values are always literal values; they are not translated into bean references. This convention also applies when the original value in the XML bean definition specifies a bean reference.
定义的值通常是字面值,他们不能转化为bean的引用。这个规定也适用于在xml中bean定义的原始值的引用。
With the context namespace introduced in Spring 2.5, it is possible to configure property overriding with a dedicated configuration element:
使用spring2.5的context命名空间,你一个可以这样配置属性的覆盖。
<context:property-override location="classpath:override.properties"/>
7.8.3 Customizing instantiation logic with a FactoryBean
使用FactoryBean自定义初始化逻辑
Implement the org.springframework.beans.factory.FactoryBean interface for objects that are themselves factories.
为object实现org.springframework.beans.factory.FactoryBean接口是他们的工厂。
The FactoryBean interface is a point of pluggability into the Spring IoC container’s instantiation logic. If you have complex initialization code that is better expressed in Java as opposed to a (potentially) verbose amount of XML, you can create your own FactoryBean, write the complex initialization inside that class, and then plug your custom FactoryBean into the container.
FactoryBean接口是spring的ioc容器的初始化逻辑中一个可插拔的部分。如果你用java实现了更好的的初始化逻辑代码,来代替冗长的xml配置,你可以创建你自己的FactoryBean,在类中实现复杂的初始化逻辑,然后将你的FactoryBean通过插件加载到容器中。
The FactoryBean interface provides three methods:
FactoryBean接口提供了三个方法:
Object getObject(): returns an instance of the object this factory creates. The instance can possibly be shared, depending on whether this factory returns singletons or prototypes.
Object getObject():返回公共创建的object的实例。这个实例可以被共享,取决于工厂返回的是一个单例还是原型。
boolean isSingleton(): returns true if this FactoryBean returns singletons, false otherwise.
boolean isSingleton():返回true如果这个FactoryBean实例是单例,不是返回false。
Class getObjectType(): returns the object type returned by the getObject() method or null if the type is not known in advance.
Class getObjectType():返回getObject方法返回的实例的类型,如果类型是未知的则返回空。
The FactoryBean concept and interface is used in a number of places within the Spring Framework; more than 50 implementations of the FactoryBean interface ship with Spring itself.
FactoryBean概念和接口在spring框架的很多地方被使用。在spring中就有多于50个的实现。
When you need to ask a container for an actual FactoryBean instance itself instead of the bean it produces, preface the bean’s id with the ampersand symbol ( &) when calling the getBean() method of the ApplicationContext. So for a given FactoryBean with an id of myBean, invoking getBean("myBean") on the container returns the product of the FactoryBean; whereas, invoking getBean("&myBean") returns the FactoryBean instance itself.
当你需要从容器中获得一个实际的FactoryBean实例而不是bean产生的,在bean的id前使用&符号,然后调用ApplicationContext的genBean方法就可以。例如一个给定的bean的名字为myBean,调用容器的getBean("myBean")来返回创建的他的FactoryBean,调用getBean("&myBean")可以获得FactoryBean实例本身。


 3万+
3万+

 被折叠的 条评论
为什么被折叠?
被折叠的 条评论
为什么被折叠?
 到【灌水乐园】发言


