


Elasticsearch Reference文档的中文翻译,非外文系,希望可以给初学Elasticsearch的人带去帮助
版本5.5
开始翻译时间2017年8月14日
文档参考地址:https://www.elastic.co/guide/en/elasticsearch/reference/5.5/index.html
采用中英文混合的方式展现
Getting Started
入门
Elasticsearch is a highly scalable open-source full-text search and analytics engine. It allows you to store, search, and analyze big volumes of data quickly and in near real time. It is generally used as the underlying engine/technology that powers applications that have complex search features and requirements.
Elasticsearch是一个可扩展开源的全文本搜索和分析引擎。他可以在很短的时间内存储、查询和分析大规模的数据。他通常作为一个底层的引擎或技术用于大型应用完成复杂的搜索特性和相关的需求。
Here are a few sample use-cases that Elasticsearch could be used for:
这里是一些可以使用Elasticsearch的样例:
You run an online web store where you allow your customers to search for products that you sell. In this case, you can use Elasticsearch to store your entire product catalog and inventory and provide search and autocomplete suggestions for them.
你可以运行一个在线的web程序存储你希望你的客户来查找并购买的商品。在这个例子中,你可以使用Elasticsearch来存储你的所有产品目录和提供搜索和自动完成建议的功能。
You want to collect log or transaction data and you want to analyze and mine this data to look for trends, statistics, summarizations, or anomalies. In this case, you can use Logstash (part of the Elasticsearch/Logstash/Kibana stack) to collect, aggregate, and parse your data, and then have Logstash feed this data into Elasticsearch. Once the data is in Elasticsearch, you can run searches and aggregations to mine any information that is of interest to you.
你希望手机日志或事务数据并且你希望分析和挖掘这写数据用于统计趋势、数据、总结或异常的情况。在这种情况下,你可以使用Logstash(ELK栈的一部分)来收集、汇总和解析你的数据并且使用Logstash将数据导入Elasticsearch。一旦数据进入Elasticsearch,你可以使用搜索和聚集来挖掘任何你需要的信息。
You run a price alerting platform which allows price-savvy customers to specify a rule like "I am interested in buying a specific electronic gadget and I want to be notified if the price of gadget falls below $X from any vendor within the next month". In this case you can scrape vendor prices, push them into Elasticsearch and use its reverse-search (Percolator) capability to match price movements against customer queries and eventually push the alerts out to the customer once matches are found.
你会运行一个价格平台用于允许精打细算的客户指定一个规则例如“我希望购买一个电动的小玩意和我希望在他在下个月中的某一天降价到$X的时候通知我”。在这种情况下你可以处理买家的价格,将他们放入Elasticsearch中并且使用反向(过滤器)的能力来匹配价格的波动对于客户的查询并且最终推送提醒给客户一旦要求被满足的话。
You have analytics/business-intelligence needs and want to quickly investigate, analyze, visualize, and ask ad-hoc questions on a lot of data (think millions or billions of records). In this case, you can use Elasticsearch to store your data and then use Kibana (part of the Elasticsearch/Logstash/Kibana stack) to build custom dashboards that can visualize aspects of your data that are important to you. Additionally, you can use the Elasticsearch aggregations functionality to perform complex business intelligence queries against your data.
你分析商业智能的需求并且希望快速调查、分析、视觉化和需找专门的问题对于大量的数据(想象一下大概有数百万或上亿的记录)。在这种情况下,你可以使用Elasticsearch来存储你的数据并且使用Kibana(ELK栈的一部分)来构建自定义的操作面板来可视化你数据。此外你可以使用Elasticsearch的聚集功能处理复杂的商业智能查询对于你的数据。
For the rest of this tutorial, I will guide you through the process of getting Elasticsearch up and running, taking a peek inside it, and performing basic operations like indexing, searching, and modifying your data. At the end of this tutorial, you should have a good idea of what Elasticsearch is, how it works, and hopefully be inspired to see how you can use it to either build sophisticated search applications or to mine intelligence from your data.
对于这个指南后续的部分,我们将贵通过一些过程来使得你的Elasticsearch可以运行和使用,以及了解内部构造并且对于索引、搜索和修改你的数据提供基础的建议。在这个章节的最后,你应该了解Elasticsearch是怎样工作以及帮助你了解如何构建复杂的搜索应用或挖掘你数据中有用的部分。
Basic Concepts
基本概念
There are a few concepts that are core to Elasticsearch. Understanding these concepts from the outset will tremendously help ease the learning process.
这里有一些基本的核心概念对于Elasticsearch。最初理解这些概念将帮助你更好的学习Elasticsearch。
Near Realtime (NRT)
Elasticsearch is a near real time search platform. What this means is there is a slight latency (normally one second) from the time you index a document until the time it becomes searchable.
Elasticsearch是一个接近实时的搜索凭他。这意味着延迟是很短的(正常情况下是一秒)就是你添加文档到可以搜索这个文档之间的间隔时间。
Cluster
集群
A cluster is a collection of one or more nodes (servers) that together holds your entire data and provides federated indexing and search capabilities across all nodes. A cluster is identified by a unique name which by default is "elasticsearch". This name is important because a node can only be part of a cluster if the node is set up to join the cluster by its name.
集群就是一个或多个节点(服务器)一起保存你的整个数据并且提供共同的索引和搜索能力跨越多个节点。一个集群被定义为一个统一的名字使用默认的"elasticsearch"。这个名字是很重要的因为一个节点只能是集群的一部分如果节点通过这个名字加入这个集群之后。
Make sure that you don’t reuse the same cluster names in different environments, otherwise you might end up with nodes joining the wrong cluster. For instance you could use logging-dev, logging-stage, and logging-prod for the development, staging, and production clusters.
保证你不会重复使用相同的集群名字在不同的环境中,除非你能保证节点不会错误的加入集群。例如你可以使用logging-dev、logging-stage和logging-prod作为你开发、stage、和生产的集群名字。
Note that it is valid and perfectly fine to have a cluster with only a single node in it. Furthermore, you may also have multiple independent clusters each with its own unique cluster name.
注意集群可以只有一个节点,这是合法的。此外你也可以有多个独立的集群并且每一个都有他们独立的名字。
Node
节点
A node is a single server that is part of your cluster, stores your data, and participates in the cluster’s indexing and search capabilities. Just like a cluster, a node is identified by a name which by default is a random Universally Unique IDentifier (UUID) that is assigned to the node at startup. You can define any node name you want if you do not want the default. This name is important for administration purposes where you want to identify which servers in your network correspond to which nodes in your Elasticsearch cluster.
一个节点是单个服务器作为你集群的一部分用于存储你的数据和参与集群的索引和搜索供呢个。就像一个集群中一个节点使用一个名字来标识默认是一个随机的UUID在开始时被分配。你可以定义任何一个节点的名字根据你的需要如果你不希望使用默认值。这个名字是很重要的处于管理的目的所以你可以定义相应节点的名字在你的网络中并且在你的Elasticsearch集群中。
A node can be configured to join a specific cluster by the cluster name. By default, each node is set up to join a cluster named elasticsearch which means that if you start up a number of nodes on your network and—assuming they can discover each other—they will all automatically form and join a single cluster named elasticsearch.
一个节点可以被配置来参与一个指定的集群使用集群的名字。默认的每个节点被设置为elasticsearch意味着如果你同时启动一些节点在你的网络中并且假设你法相了不同他们将会自动加入名字为elasticsearch的集群。
In a single cluster, you can have as many nodes as you want. Furthermore, if there are no other Elasticsearch nodes currently running on your network, starting a single node will by default form a new single-node cluster named elasticsearch.
在单一的集群中,你可以使用任意数量的节点。此外没有如果没有Elasticsearch的节点正在运行中,开始单一的节点将默认形成一个单一节点的集群名字为elasticsearch。
Index
索引
An index is a collection of documents that have somewhat similar characteristics. For example, you can have an index for customer data, another index for a product catalog, and yet another index for order data. An index is identified by a name (that must be all lowercase) and this name is used to refer to the index when performing indexing, search, update, and delete operations against the documents in it.
一个索引是一个文档的集合类似于特征。例如你可以对于用户的数据进行索引,另一个用于索引产品目录并且也可以索引订单数据。一个索引被定义通过一个名字(必须全部是小写的)并且这个名字通常引用一个索引在执行索引、搜索、更新和删除的操作来控制文档的时候。
In a single cluster, you can define as many indexes as you want.
在一个单一的集群中,你可以根据需要随意的定义许多索引。
Type
类型
Within an index, you can define one or more types. A type is a logical category/partition of your index whose semantics is completely up to you. In general, a type is defined for documents that have a set of common fields. For example, let’s assume you run a blogging platform and store all your data in a single index. In this index, you may define a type for user data, another type for blog data, and yet another type for comments data.
在索引中,你可以定义一个或多个类型。一个类型是一个逻辑的索引分类其中的语义取决于你。通常,一个类型被定义用于文档可以设置一些通用的域。例如,让我们假设你运行了一个博客平台并且存储所有的的数据在单一的索引中。在这个索引,你可以定义用户数据的类型、并且定义另一个类型用于博客数据、另一个类型用于评论数据。
Document
文档
A document is a basic unit of information that can be indexed. For example, you can have a document for a single customer, another document for a single product, and yet another for a single order. This document is expressed in JSON (JavaScript Object Notation) which is an ubiquitous internet data interchange format.
一个文档是信息可以被索引的基本单元。例如,你可以对于单一的集群有一个文档、另一个文档用于单个产品,另一个文档用于单个顺序。这个文档被表示为JSON类型(JavaScript的Object Notation)是一个被广泛使用的用于交换数据在Internet中。
Within an index/type, you can store as many documents as you want. Note that although a document physically resides in an index, a document actually must be indexed/assigned to a type inside an index.
在一个索引或类型中,你可以根据需要存储多个文档。注意尽管一个文档物理上存储于一个索引中,一个文档实际必须被索引或分配给索引中的类型。
Shards & Replicas
分片和复制
An index can potentially store a large amount of data that can exceed the hardware limits of a single node. For example, a single index of a billion documents taking up 1TB of disk space may not fit on the disk of a single node or may be too slow to serve search requests from a single node alone.
一个索引可以存储大量的数据但是限制于单个节点的硬件。例如,一个十亿文档数目的单一索引可以花费1TB的磁盘空间甚至更多或者在单个节点下会运行十分缓慢。
To solve this problem, Elasticsearch provides the ability to subdivide your index into multiple pieces called shards. When you create an index, you can simply define the number of shards that you want. Each shard is in itself a fully-functional and independent "index" that can be hosted on any node in the cluster.
为了解决问题,Elasticsearch提供了将索引分散给多个部分的功能叫做分片。当你创建索引时你可以简单的定义你希望的分片数目。每个分片会有全功能相当于独立的索引可以在集群中被处理。
Sharding is important for two primary reasons:
使用分片的两个重要原因:
It allows you to horizontally split/scale your content volume
他允许你水平分割你的内容卷
It allows you to distribute and parallelize operations across shards (potentially on multiple nodes) thus increasing performance/throughput
他允许你分布式和并行操作在多个分片中(就是多个节点)来提供性能
The mechanics of how a shard is distributed and also how its documents are aggregated back into search requests are completely managed by Elasticsearch and is transparent to you as the user.
如何分片的策略是分布式的并且文档如何被存储用于搜索请求都是由Elasticsearch来管理并且对于用户是透明的。
In a network/cloud environment where failures can be expected anytime, it is very useful and highly recommended to have a failover mechanism in case a shard/node somehow goes offline or disappears for whatever reason. To this end, Elasticsearch allows you to make one or more copies of your index’s shards into what are called replica shards, or replicas for short.
在网络或云环境中失败是随时可能发生的,非常建议你使用副本策略来解决节点有时断线和失效由于某些原因的问题。在最后,Elasticsearch允许你使用一个或多个备份对于你的索引分片的功能叫做复制分片或复制。
Replication is important for two primary reasons:
使用备份的两个重要原因:
It provides high availability in case a shard/node fails. For this reason, it is important to note that a replica shard is never allocated on the same node as the original/primary shard that it was copied from.
他提供了高可用对于节点的失败。出于这个原因,注意复制的内容不会落在同一个节点上而是复制一份到另一个位置
It allows you to scale out your search volume/throughput since searches can be executed on all replicas in parallel.
允许你扩展你的搜索卷因此搜索可以被并行执行
To summarize, each index can be split into multiple shards. An index can also be replicated zero (meaning no replicas) or more times. Once replicated, each index will have primary shards (the original shards that were replicated from) and replica shards (the copies of the primary shards). The number of shards and replicas can be defined per index at the time the index is created. After the index is created, you may change the number of replicas dynamically anytime but you cannot change the number of shards after-the-fact.
最后总结,每个索引可以分配给多个分片。一个索引可以被复制零次或多次(零次意味着没有备份)。一旦使用备份,每个索引将有一个主分片(原始分片复制的来源)和复制分片(主分片的备份)。分片的数量和复制的数量可以根据每个索引来定义在索引被创建的时候。在索引创建之后,你可以动态改变复制的数目在任何时候但是你不能改变既有的分片数目。
By default, each index in Elasticsearch is allocated 5 primary shards and 1 replica which means that if you have at least two nodes in your cluster, your index will have 5 primary shards and another 5 replica shards (1 complete replica) for a total of 10 shards per index.
默认的每个索引在Elasticsearch中被分为五个主要分片和一个复制意味着如果你有两个节点在集群中,你的索引将有五个主要分片和另外五个复制分片(一个完整备份)总共是个用于每个索引。
Note
注意
Each Elasticsearch shard is a Lucene index. There is a maximum number of documents you can have in a single Lucene index. As of LUCENE-5843, the limit is 2,147,483,519 (= Integer.MAX_VALUE - 128) documents. You can monitor shard sizes using the _cat/shards API.
每个Elasticsearch分片是一个Lucene索引。就是你在单一Lucene索引中最大的文档数目。基于LUCENE-5843,限制是2147183519(=Integer的最大值-128)个文档。你可以监控分片的数目使用_cat/shards的API。
With that out of the way, let’s get started with the fun part…
现在让我们进入正题吧。
Installation
安装
Elasticsearch requires at least Java 8. Specifically as of this writing, it is recommended that you use the Oracle JDK version 1.8.0_131. Java installation varies from platform to platform so we won’t go into those details here. Oracle’s recommended installation documentation can be found on Oracle’s website. Suffice to say, before you install Elasticsearch, please check your Java version first by running (and then install/upgrade accordingly if needed):
Elasticsearch至少要求Java8的环境。在这个文档完成的时候,建议使用Oracle的JDK版本1.8.0_131。Java的安装不同于平台因此我们不会介绍其中的细节。Oracle的建议安装文档可以在Oracle的官网找到。在安装Elasticsearch之前,请首先检查Java的环境(是否已经正确的安装或升级):
java -version

echo $JAVA_HOME
Once we have Java set up, we can then download and run Elasticsearch. The binaries are available from www.elastic.co/downloads along with all the releases that have been made in the past. For each release, you have a choice among a zip or tar archive, a DEB or RPM package, or a Windows MSI installation package.
一旦Java已经设置好,我们可以开始下载和运行Elasticsearch。二进制文件可以来自www.elastic.co/downloads有所有的发布版本。对于每个发布版本,你可以选择使用zip或tar的压缩包,或DEB或RPM的包或一个Windows的MSI安装包。
Installation example with tar
使用tar来安装
For simplicity, let’s use the tar file.
为了简单起见,我们先使用tar文件。
Let’s download the Elasticsearch 5.5.1 tar as follows:
下载Elasticsearch5.5.1的tar文件如下
curl -L -O https://artifacts.elastic.co/downloads/elasticsearch/elasticsearch-5.5.1.tar.gz
Then extract it as follows:
然后按照下面的命令解压缩:
tar -xvf elasticsearch-5.5.1.tar.gz
It will then create a bunch of files and folders in your current directory. We then go into the bin directory as follows:
将会创建一系列文件和文件夹在你当前的目录中。我们进入这个bin目录如下:
cd elasticsearch-5.5.1/bin
And now we are ready to start our node and single cluster:
并且我们可以准备启动我们的节点和单一的集群:
./elasticsearch
使用Windows的MSI安装包
For Windows users, we recommend using the MSI Installer package. The package contains a graphical user interface (GUI) that guides you through the installation process.
对于Windows的用户,我们建议使用MSI的安装包。安装包提供了图形界面来引导你完成安装过程。
First, download the Elasticsearch 5.5.1 MSI from https://artifacts.elastic.co/downloads/elasticsearch/elasticsearch-5.5.1.msi.
首先下载Elasticsearch5.5.1的MSI来自https://artifacts.elastic.co/downloads/elasticsearch/elasticsearch-5.5.1.msi
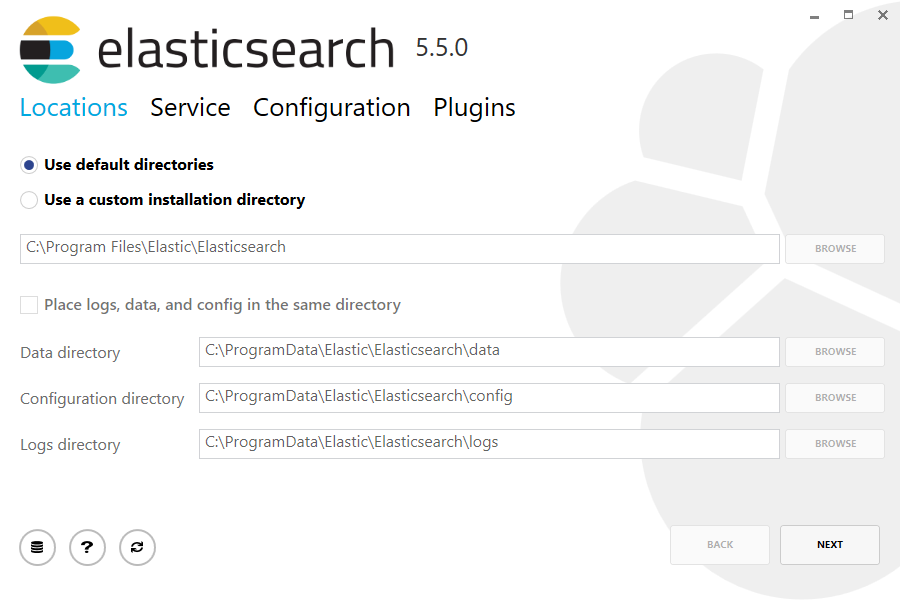
Then double-click the downloaded file to launch the GUI. Within the first screen, select the deployment directories:
然后双击下载的文件来启动图形安装界面。在第一个页面中,选择需要部署的目录:
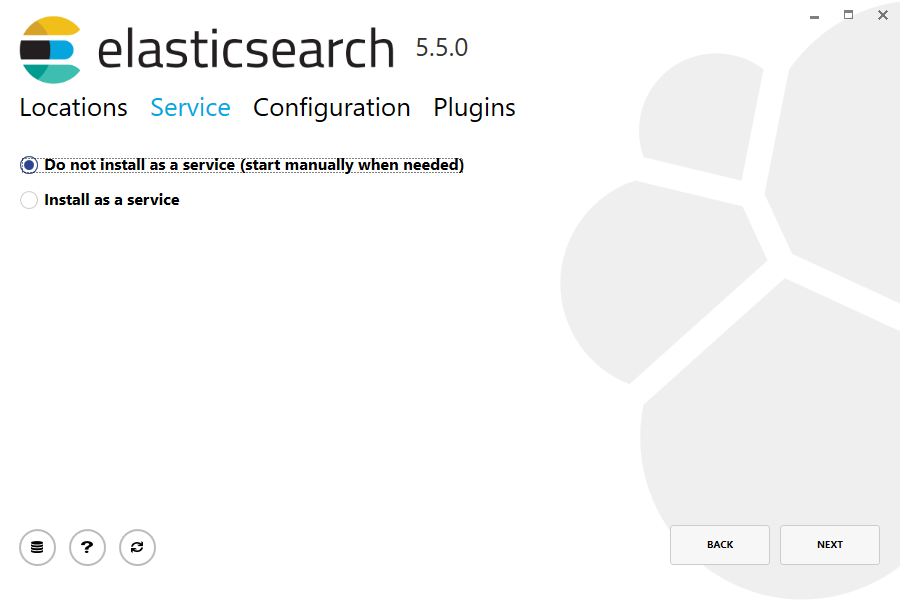
Then select whether to install as a service or start Elasticsearch manually as needed. To align with the tar example, choose not to install as a service:
然后选择是否作为服务来启动Elasticsearch根据需要。为了使用和tar一样的效果,选择不安装作为服务。
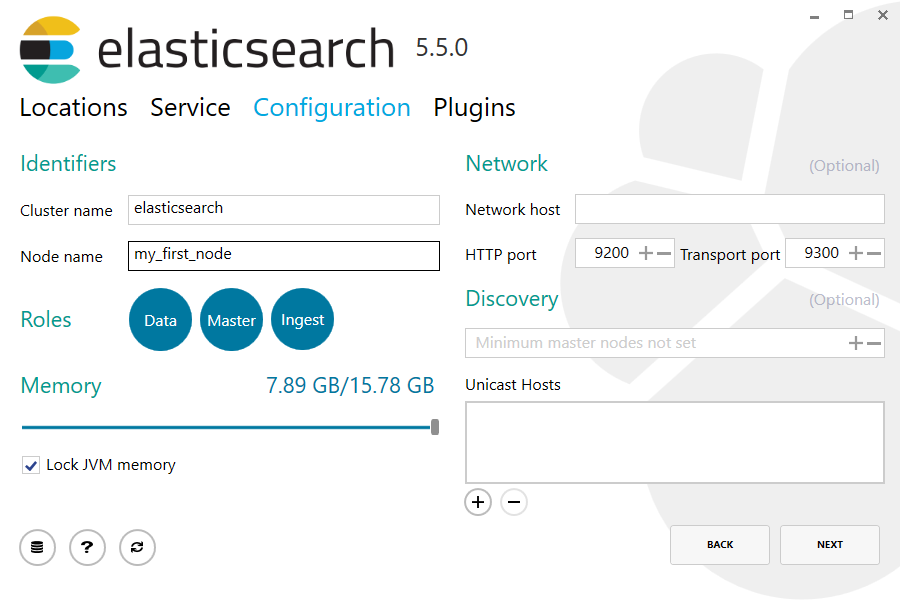
For configuration, simply leave the default values:
为了配置,简单的保留默认值:
Again, to align with the tar example, uncheck all plugins to not install any plugins:
再次为了和tar的效果一样,不检查所有的插件也不安装任何插件:

After clicking the install button, Elasticsearch will be installed:
在点击安装按钮之后,Elasticsearch将会被安装:

By default, Elasticsearch will be installed at %PROGRAMFILES%\Elastic\Elasticsearch. Navigate here and go into the bin directory as follows:
默认的Elasticsearch将被安装到%PROGRAMFILES%\Elastic\Elasticsearch目录下。进入这个目录的bin目录如下:
with Command Prompt:
使用命令:
cd %PROGRAMFILES%\Elastic\Elasticsearch\bin
with PowerShell:
或者使用PowerShell:
cd $env:PROGRAMFILES\Elastic\Elasticsearch\bin
And now we are ready to start our node and single cluster:
现在我们已经准备好启动我们的节点和单一的集群:
.\elasticsearch.exeSuccessfully running node
成功运行节点
If everything goes well with installation, you should see a bunch of messages that look like below:
如果安装过程顺利的话,你可能会看到如下的信息:
[2016-09-16T14:17:51,251][INFO ][o.e.n.Node               ] [] initializing ...
[2016-09-16T14:17:51,329][INFO ][o.e.e.NodeEnvironment    ] [6-bjhwl] using [1] data paths, mounts [[/ (/dev/sda1)]], net usable_space [317.7gb], net total_space [453.6gb], spins? [no], types [ext4]
[2016-09-16T14:17:51,330][INFO ][o.e.e.NodeEnvironment    ] [6-bjhwl] heap size [1.9gb], compressed ordinary object pointers [true]
[2016-09-16T14:17:51,333][INFO ][o.e.n.Node               ] [6-bjhwl] node name [6-bjhwl] derived from node ID; set [node.name] to override
[2016-09-16T14:17:51,334][INFO ][o.e.n.Node               ] [6-bjhwl] version[5.5.1], pid[21261], build[f5daa16/2016-09-16T09:12:24.346Z], OS[Linux/4.4.0-36-generic/amd64], JVM[Oracle Corporation/Java HotSpot(TM) 64-Bit Server VM/1.8.0_60/25.60-b23]
[2016-09-16T14:17:51,967][INFO ][o.e.p.PluginsService     ] [6-bjhwl] loaded module [aggs-matrix-stats]
[2016-09-16T14:17:51,967][INFO ][o.e.p.PluginsService     ] [6-bjhwl] loaded module [ingest-common]
[2016-09-16T14:17:51,967][INFO ][o.e.p.PluginsService     ] [6-bjhwl] loaded module [lang-expression]
[2016-09-16T14:17:51,967][INFO ][o.e.p.PluginsService     ] [6-bjhwl] loaded module [lang-groovy]
[2016-09-16T14:17:51,967][INFO ][o.e.p.PluginsService     ] [6-bjhwl] loaded module [lang-mustache]
[2016-09-16T14:17:51,967][INFO ][o.e.p.PluginsService     ] [6-bjhwl] loaded module [lang-painless]
[2016-09-16T14:17:51,967][INFO ][o.e.p.PluginsService     ] [6-bjhwl] loaded module [percolator]
[2016-09-16T14:17:51,968][INFO ][o.e.p.PluginsService     ] [6-bjhwl] loaded module [reindex]
[2016-09-16T14:17:51,968][INFO ][o.e.p.PluginsService     ] [6-bjhwl] loaded module [transport-netty3]
[2016-09-16T14:17:51,968][INFO ][o.e.p.PluginsService     ] [6-bjhwl] loaded module [transport-netty4]
[2016-09-16T14:17:51,968][INFO ][o.e.p.PluginsService     ] [6-bjhwl] loaded plugin [mapper-murmur3]
[2016-09-16T14:17:53,521][INFO ][o.e.n.Node               ] [6-bjhwl] initialized
[2016-09-16T14:17:53,521][INFO ][o.e.n.Node               ] [6-bjhwl] starting ...
[2016-09-16T14:17:53,671][INFO ][o.e.t.TransportService   ] [6-bjhwl] publish_address {192.168.8.112:9300}, bound_addresses {{192.168.8.112:9300}
[2016-09-16T14:17:53,676][WARN ][o.e.b.BootstrapCheck     ] [6-bjhwl] max virtual memory areas vm.max_map_count [65530] likely too low, increase to at least [262144]
[2016-09-16T14:17:56,731][INFO ][o.e.h.HttpServer         ] [6-bjhwl] publish_address {192.168.8.112:9200}, bound_addresses {[::1]:9200}, {192.168.8.112:9200}
[2016-09-16T14:17:56,732][INFO ][o.e.g.GatewayService     ] [6-bjhwl] recovered [0] indices into cluster_state
[2016-09-16T14:17:56,748][INFO ][o.e.n.Node               ] [6-bjhwl] started
Without going too much into detail, we can see that our node named "6-bjhwl" (which will be a different set of characters in your case) has started and elected itself as a master in a single cluster. Don’t worry yet at the moment what master means. The main thing that is important here is that we have started one node within one cluster.
除了很多细节之外,我们可以看到节点名字为"6-bjhwl"(可能会在你的环境中是不同的)已经启动并且选举自己为master在单一的集群中。不要管master是什么意思。在这里的重点是我们已经启动了一个集群中的节点。
As mentioned previously, we can override either the cluster or node name. This can be done from the command line when starting Elasticsearch as follows:
根据之前提到的,我们可以覆盖集群或节点的名字。这可以通过命令行来完成如下:
./elasticsearch -Ecluster.name=my_cluster_name -Enode.name=my_node_name
Also note the line marked http with information about the HTTP address (192.168.8.112) and port (9200) that our node is reachable from. By default, Elasticsearch uses port 9200 to provide access to its REST API. This port is configurable if necessary.
同时要注意上面信息中有关的HTTP地址(192.168.8.112)和端口(9200)就是我们节点接收的端口。默认的Elasticsearch使用9200端口来提供REST的API支持。这个端口可以被配置修改。
Exploring Your Cluster
探索你的集群
The REST API
REST风格的API
Now that we have our node (and cluster) up and running, the next step is to understand how to communicate with it. Fortunately, Elasticsearch provides a very comprehensive and powerful REST API that you can use to interact with your cluster. Among the few things that can be done with the API are as follows:
下载我们有了一个节点(和一个集群)正在启动和运行,下一步就是理解如何使用他们。幸运的是Elasticsearch提供了非常复杂和功能强大的REST的API供你来使用来和你的集群进行通讯。下面就是这些API可以提供的功能概述:
Check your cluster, node, and index health, status, and statistics
检查你的集群、节点和索引的健康、状态和统计
Administer your cluster, node, and index data and metadata
管理你的集群和索引数据和元数据
Perform CRUD (Create, Read, Update, and Delete) and search operations against your indexes
执行CRUD(创建、更新和删除)并且执行搜索索引的操作
Execute advanced search operations such as paging, sorting, filtering, scripting, aggregations, and many others
执行高级的查询操作例如分页、排序、过滤、脚本、聚合和其他的操作。
Cluster Health
集群的健康度
Let’s start with a basic health check, which we can use to see how our cluster is doing. We’ll be using curl to do this but you can use any tool that allows you to make HTTP/REST calls. Let’s assume that we are still on the same node where we started Elasticsearch on and open another command shell window.
让我们开始基础的可用性检查,我们可以使用它来观察我们的集群是如何工作的。我们将使用curl来完成这个功能但是你可以使用任何攻击来允许你实现HTTP或REST的调用。让我们假设我们已经在一个节点上启动的Elasticsearch并且打开了一个命令行窗口。
To check the cluster health, we will be using the _cat API. You can run the command below in Kibana’s Console by clicking "VIEW IN CONSOLE" or with curl by clicking the "COPY AS CURL" link below and pasting it into a terminal.
为了检查集群的健康度,我们可以使用_cat的API。你可以运行如下的命令在Kibana的控制台上通过单击"VIEW IN CONSOLE"或使用curl通过单击"COPY AS CURL"的链接和输入下面的内容在终端中。
GET /_cat/health?v
And the response:
并且我们将收到返回:
epoch      timestamp cluster       status node.total node.data shards pri relo init unassign pending_tasks max_task_wait_time active_shards_percent
1475247709 17:01:49  elasticsearch green           1         1      0   0    0    0        0             0                  -                100.0%
We can see that our cluster named "elasticsearch" is up with a green status.
我们可以看到我们的集群名字为"elasticsearch"已经启动并且是green的状态。
Whenever we ask for the cluster health, we either get green, yellow, or red. Green means everything is good (cluster is fully functional), yellow means all data is available but some replicas are not yet allocated (cluster is fully functional), and red means some data is not available for whatever reason. Note that even if a cluster is red, it still is partially functional (i.e. it will continue to serve search requests from the available shards) but you will likely need to fix it ASAP since you have missing data.
我们获取状态的时候,可能会获得green、yellow或red。Green意味着一切正常(集群是全功能运行的),yellow意味着所有的数据是可用的但是一些复制不能被使用(集群是全功能的),并且red意味着出于一些原因一部分数据是不可用的。注意如果一个集群是red的,他依然可以提供部分功能(例如,他将继续服务于搜索的请求对于可用的分片)但是你需要尽快修复以防止丢失数据。
Also from the above response, we can see a total of 1 node and that we have 0 shards since we have no data in it yet. Note that since we are using the default cluster name (elasticsearch) and since Elasticsearch uses unicast network discovery by default to find other nodes on the same machine, it is possible that you could accidentally start up more than one node on your computer and have them all join a single cluster. In this scenario, you may see more than 1 node in the above response.
同样来自响应,我们可以看到一共有一个节点并且我们有零个分片因为里面还没有存储任何数据。注意因为我们使用了默认的集群名(elasticsearch)因此Elasticsearch的默认使用单一的网络发现的功能来查找其他的节点在同一台机器上,他可能会加入一个你启动的另一个节点并且加入了集群。在这种情况下,你肯能看到一个或多个节点数目在响应中。
We can also get a list of nodes in our cluster as follows:
我们可以获得集群中节点的列表如下:
GET /_cat/nodes?v
And the response:
并且会返回:
ip        heap.percent ram.percent cpu load_1m load_5m load_15m node.role master       name
127.0.0.1           10           5   5    4.46                        mdi      *      PB2SGZY
Here, we can see our one node named "PB2SGZY", which is the single node that is currently in our cluster.
这里我们可以看到我们的节点名字为"PB2SGZY",并且是在我们集群中的单一节点、
List All Indices
列出所有的索引
Now let’s take a peek at our indices:
现在让我们看一下我们的索引:
GET /_cat/indices?v
And the response:
并且收到响应:
health status index uuid pri rep docs.count docs.deleted store.size pri.store.size Which simply means we have no indices yet in the cluster.
意味着我们在这个集群中没有任何的索引。
Create an Index
创建一个索引
Now let’s create an index named "customer" and then list all the indexes again:
现在让我们创建一个索引名字为"customer"然后再次列出所有的索引:
PUT /customer?pretty
GET /_cat/indices?v
The first command creates the index named "customer" using the PUT verb. We simply append pretty to the end of the call to tell it to pretty-print the JSON response (if any).
第一个名字创建了索引名字为"customer"使用了PUT的语义。我们简单的追加了pretty在调用的最后并且告诉他使用pretty-print的JSON返回(如果可以的话)
And the response:
然后响应是:
health status index    uuid                   pri rep docs.count docs.deleted store.size pri.store.size
yellow open   customer 95SQ4TSUT7mWBT7VNHH67A   5   1          0            0       260b           260b
The results of the second command tells us that we now have 1 index named customer and it has 5 primary shards and 1 replica (the defaults) and it contains 0 documents in it.
第二个命令的结果告诉我们现在有一个索引名字为customer并且他有五个主要的分片和一个备份(默认的情况下)并且他其中没有包含文档。
You might also notice that the customer index has a yellow health tagged to it. Recall from our previous discussion that yellow means that some replicas are not (yet) allocated. The reason this happens for this index is because Elasticsearch by default created one replica for this index. Since we only have one node running at the moment, that one replica cannot yet be allocated (for high availability) until a later point in time when another node joins the cluster. Once that replica gets allocated onto a second node, the health status for this index will turn to green.
你可能注意到customer的索引有一个yellow的健康状态。我们之前讨论过yellow意味着一些复制可能没有被分配。这个现象发生的原因是因为Elasticsearch默认为这个索引创建了一个备份。因此我们在同一个节点上运行着备份,有一个备份没有被分配(为了高可靠性)直到另一个节点加入我们的集群中。一旦备份分配到了第二个节点,这个索引的健康状态将会成为green。
Index and Query a Document
索引并查询一个文档
Let’s now put something into our customer index. Remember previously that in order to index a document, we must tell Elasticsearch which type in the index it should go to.
现在让我们想我们的customer索引中存储一些数据。记住之前提到的为了索引一个文档,我们必须告诉Elasticsearch我们需要使用什么类型的索引。
Let’s index a simple customer document into the customer index, "external" type, with an ID of 1 as follows:
让我们索引一个简单的文档到customer的索引中,"external"类型,使用ID为1如下:
PUT /customer/external/1?pretty

{
  "name": "John Doe"
}
And the response:
然后收到返回:
{
  "_index" : "customer",
  "_type" : "external",
  "_id" : "1",
  "_version" : 1,
  "result" : "created",
  "_shards" : {
    "total" : 2,
    "successful" : 1,
    "failed" : 0
  },
  "created" : true
}
From the above, we can see that a new customer document was successfully created inside the customer index and the external type. The document also has an internal id of 1 which we specified at index time.
从上面的内容,我们可以看到一个新的customer文档被成功创建在customer索引中并且类型是external。文档中也有一个内部的编号为1的id在创建的时候被指定的。
It is important to note that Elasticsearch does not require you to explicitly create an index first before you can index documents into it. In the previous example, Elasticsearch will automatically create the customer index if it didn’t already exist beforehand.
注意Elasticsearch不会要求你明确创建一个索引在你可以索引文档之前。在之前的例子中,Elasticsearch将自动创建customer索引如果之前没有存在的话。
Let’s now retrieve that document that we just indexed:
现在让我们获取我们刚才索引的文档:
GET /customer/external/1?pretty
And the response:
并且获得响应:
{
  "_index" : "customer",
  "_type" : "external",
  "_id" : "1",
  "_version" : 1,
  "found" : true,
  "_source" : { "name": "John Doe" }
}
Nothing out of the ordinary here other than a field, found, stating that we found a document with the requested ID 1 and another field, _source, which returns the full JSON document that we indexed from the previous step.
注意这里我们找到的不只是一个域,我们使用ID为1来查找文档得到了一些其他的域,_source,返回了整个我们之前索引的JSON文档。
Delete an Index
删除索引
Now let’s delete the index that we just created and then list all the indexes again:
现在让我们删除刚才创建的索引然后再次列出索引:
DELETE /customer?pretty
GET /_cat/indices?v
And the response:
然后返回
health status index uuid pri rep docs.count docs.deleted store.size pri.store.size
Which means that the index was deleted successfully and we are now back to where we started with nothing in our cluster.
意味着索引已经成功被删除并且现在我们回到了一个空的集群的状态。
Before we move on, let’s take a closer look again at some of the API commands that we have learned so far:
在我们进行下一步之前,我们先查看一些我们已经学会的API命令:
PUT /customer
PUT /customer/external/1

{
  "name": "John Doe"
}

GET /customer/external/1
DELETE /customer
If we study the above commands carefully, we can actually see a pattern of how we access data in Elasticsearch. That pattern can be summarized as follows:
如果我们认真学习的上面的命令,我们可以发现我们访问Elasticsearch的模式。这个模式可以归纳如下:
<REST Verb> /<Index>/<Type>/<ID>
This REST access pattern is so pervasive throughout all the API commands that if you can simply remember it, you will have a good head start at mastering Elasticsearch.
REST的访问风格是在所有的API文档中被体现如果你可以记住他们的话,你将有了一个更好的学习和掌握Elasticsearch的开始。
Modifying Your Data
修改你的数据
Elasticsearch provides data manipulation and search capabilities in near real time. By default, you can expect a one second delay (refresh interval) from the time you index/update/delete your data until the time that it appears in your search results. This is an important distinction from other platforms like SQL wherein data is immediately available after a transaction is completed.
Elasticsearch提供了接近实时的数据操作和查询功能。默认的,你可能会有一秒的延迟(刷新间隔)来自你索引/更新/删除你的数据直到他们出现在你的搜索结果中。这是一个和SQL相比重要的差别其中SQL的数据只能在事务完成后才会返回。
Indexing/Replacing Documents
索引/复制文档
We’ve previously seen how we can index a single document. Let’s recall that command again:
我们之前看到了如何索引单个文档。让我们重新执行那个命令:
PUT /customer/external/1?pretty

{
  "name": "John Doe"
}
Again, the above will index the specified document into the customer index, external type, with the ID of 1. If we then executed the above command again with a different (or same) document, Elasticsearch will replace (i.e. reindex) a new document on top of the existing one with the ID of 1:
再一次上面索引的一个指定的文档到customer索引中,类型为external,使用的ID是1。如果我们再次执行上面的命令在不同的文档(或同一个),Elasticsearch将替换(也就是重新索引)一个新的文档在我们已有的ID为1的文档之上:
PUT /customer/external/1?pretty

{
  "name": "Jane Doe"
}
The above changes the name of the document with the ID of 1 from "John Doe" to "Jane Doe". If, on the other hand, we use a different ID, a new document will be indexed and the existing document(s) already in the index remains untouched.
上面的对于ID为1的文档的改变是从"John Doe"到"Jane Doe"。在另一方面,我们使用了不同的ID,一个新的文档将被索引并且已有的文档将保留在索引中不会被改变。
PUT /customer/external/2?pretty

{
  "name": "Jane Doe"
}
The above indexes a new document with an ID of 2.
上面索引一个新的文档使用的ID为2。
When indexing, the ID part is optional. If not specified, Elasticsearch will generate a random ID and then use it to index the document. The actual ID Elasticsearch generates (or whatever we specified explicitly in the previous examples) is returned as part of the index API call.
在索引过程中,ID的部分是可选的。如果没有被指定,Elasticsearch将会生成一个随机的ID并且使用他索引一个文档。实际的Elasticsearch生成的ID(或在前面的例子中我们明确指定的ID)是所谓API的一部分被调用的。
This example shows how to index a document without an explicit ID:
下面的例子展示了如何在不指定ID的情况下索引一个文档:
POST /customer/external?pretty

{
  "name": "Jane Doe"
}
Note that in the above case, we are using the POST verb instead of PUT since we didn’t specify an ID.
注意上面的例子中,我们使用了POST方法而不是GET方法因此我们不需要指定ID。
Updating Documents
更新文档
In addition to being able to index and replace documents, we can also update documents. Note though that Elasticsearch does not actually do in-place updates under the hood. Whenever we do an update, Elasticsearch deletes the old document and then indexes a new document with the update applied to it in one shot.
此外可以索引和替换文档,我们也可以更新文档。注意Elasticsearch没有明确实现更新的方式。如果我们使用了更新操作,Elasticsearch会删除旧的文档并且索引一个新的文档以实现更新的操作。
This example shows how to update our previous document (ID of 1) by changing the name field to "Jane Doe":
下面的例子展示了如何更新我们之前的文档(ID为1)通过改变name域为"Jane Doe":
POST /customer/external/1/_update?pretty

{
  "doc": { "name": "Jane Doe" }
}
This example shows how to update our previous document (ID of 1) by changing the name field to "Jane Doe" and at the same time add an age field to it:
下面的例子中更新了我们之前的文档(ID为1)通过改变name域为"Jane Doe"并且同时添加了一个age域:
POST /customer/external/1/_update?pretty

{
  "doc": { "name": "Jane Doe", "age": 20 }
}
Updates can also be performed by using simple scripts. This example uses a script to increment the age by 5:
更新操作也可以通过使用简单的脚本来完成。下面的例子使用脚本将文档中的age增加了五:
POST /customer/external/1/_update?pretty

{
  "script" : "ctx._source.age += 5"
}
In the above example, ctx._source refers to the current source document that is about to be updated.
在上面的例子中,ctx._source之前当前source的文档也就是将要被更新的文档。
Note that as of this writing, updates can only be performed on a single document at a time. In the future, Elasticsearch might provide the ability to update multiple documents given a query condition (like an SQL UPDATE-WHERE statement).
注意这个写法,更新在同一时间只能针对于一个文档。在未来,Elasticsearch可能会提供通过更新多个文档的功能通过给定一个查询条件(类似于SQL中UPDATE-WHERE的语句)。
Deleting Documents
删除文档
Deleting a document is fairly straightforward. This example shows how to delete our previous customer with the ID of 2:
删除一个文档是相当简单的。下面的例子展示了如何删除我们之前的文档ID为2。
DELETE /customer/external/2?pretty
See the _delete_by_query API to delete all documents matching a specific query. It is worth noting that it is much more efficient to delete a whole index instead of deleting all documents with the Delete By Query API.
参考_delete_by_query的API可以删除所有的文档通过匹配一个指定的查询。这个API在删除所有的文档时是非常有效的。
Batch Processing
批量处理
In addition to being able to index, update, and delete individual documents, Elasticsearch also provides the ability to perform any of the above operations in batches using the _bulk API. This functionality is important in that it provides a very efficient mechanism to do multiple operations as fast as possible with as few network roundtrips as possible.
此外为了可以索引、更新和删除独立的文档,Elasticsearch也提供了将上面的操作组合为一个批量来使用_bulk的API来批量处理。这个功能是很重要的并且提供了一个有效的策略来最快的完成多个操作并且花费较少的网络往返次数。
As a quick example, the following call indexes two documents (ID 1 - John Doe and ID 2 - Jane Doe) in one bulk operation:
作为一个快速入门的例子,下面的调用索引了两个文档(ID为1,John Doe和ID为i2 Jane Doe)在一个批量的操作中:
POST /customer/external/_bulk?pretty

{"index":{"_id":"1"}}
{"name": "John Doe" }
{"index":{"_id":"2"}}
{"name": "Jane Doe" }
This example updates the first document (ID of 1) and then deletes the second document (ID of 2) in one bulk operation:
下面的例子更新了第一个文档(ID为1)然后删除了第二个文档(ID为2)在一个批量操作中:
POST /customer/external/_bulk?pretty
{"update":{"_id":"1"}}
{"doc": { "name": "John Doe becomes Jane Doe" } }
{"delete":{"_id":"2"}}
Note above that for the delete action, there is no corresponding source document after it since deletes only require the ID of the document to be deleted.
注意上面的删除操作,他们是不依赖原始文档的因为删除之要求文档的ID。
The Bulk API does not fail due to failures in one of the actions. If a single action fails for whatever reason, it will continue to process the remainder of the actions after it. When the bulk API returns, it will provide a status for each action (in the same order it was sent in) so that you can check if a specific action failed or not.
Bulk的API不会因为其中一个操作失败而失败。如果单一的操作由于某些原因失败了,他将继续处理剩余的操作。当bulk的API返回的时候,他会提供每个操作的执行状态(以发送的相同顺序)因此你可以检查某个操作是否是失败了。
Exploring Your Data
探索你的数据
Sample Dataset
简单的数据集
Now that we’ve gotten a glimpse of the basics, let’s try to work on a more realistic dataset. I’ve prepared a sample of fictitious JSON documents of customer bank account information. Each document has the following schema:
下面让我们看一下基本的状态,我们可以使用多个realistic的数据集。我们准备了一个功能的JSON文档样例对于customern的银行账户的信息作为样例。每个文档有如下的schema:
{
    "account_number": 0,
    "balance": 16623,
    "firstname": "Bradshaw",
    "lastname": "Mckenzie",
    "age": 29,
    "gender": "F",
    "address": "244 Columbus Place",
    "employer": "Euron",
    "email": "bradshawmckenzie@euron.com",
    "city": "Hobucken",
    "state": "CO"
}
For the curious, I generated this data from www.json-generator.com/ so please ignore the actual values and semantics of the data as these are all randomly generated.
为了方便,我生成这些数据来自www.json-generator.com因此请忽略数据中实际的内容因为他们都是随机生成的。
Loading the Sample Dataset
加载样例数据集
You can download the sample dataset (accounts.json) from here. Extract it to our current directory and let’s load it into our cluster as follows:
你可以从这里下载样例的数据集(accouts.json)。解压缩到我们的当前目录并且加载到我们的集群中以如下的方式:
curl -H "Content-Type: application/json" -XPOST 'localhost:9200/bank/account/_bulk?pretty&refresh' --data-binary "@accounts.json"
curl 'localhost:9200/_cat/indices?v'
And the response:
然后我们会看到结果:
health status index uuid                   pri rep docs.count docs.deleted store.size pri.store.size
yellow open   bank  l7sSYV2cQXmu6_4rJWVIww   5   1       1000            0    128.6kb        128.6kb
Which means that we just successfully bulk indexed 1000 documents into the bank index (under the account type).
意味着我们已经成功的批量索引了1000个文档到bank的索引中(使用accout类型)。
The Search API
搜索使用的API
Now let’s start with some simple searches. There are two basic ways to run searches: one is by sending search parameters through the REST request URI and the other by sending them through the REST request body. The request body method allows you to be more expressive and also to define your searches in a more readable JSON format. We’ll try one example of the request URI method but for the remainder of this tutorial, we will exclusively be using the request body method.
现在让我们开始学习简单的搜索功能。这里有两种基本的方式来实现搜索:一个是发送搜索的参数通过REST的请求URI而另一个是使用REST的请求体来发送。请求方法来发送的花费是很大的尤其定义你的搜索使用一个可读方式的JSON格式。我们将使用使用一个作为URI方法的例子但是后续文档中其他的搜索部分,我们将只会使用请求体的方式。
The REST API for search is accessible from the _search endpoint. This example returns all documents in the bank index:
用于搜索的REST的API是可以访问_search节点的。这个例子返回所有在bank索引中的文档:
GET /bank/_search?q=*&sort=account_number:asc&prettyLet’s first dissect the search call. We are searching (_search endpoint) in the bank index, and the q=* parameter instructs Elasticsearch to match all documents in the index. The sort=account_number:asc parameter indicates to sort the results using the account_number field of each document in an ascending order. The pretty parameter, again, just tells Elasticsearch to return pretty-printed JSON results.
让我们首先发送请求的调用。我们将搜索(_search端点)在bank索引中并且q=*参数告诉Elasticsearch匹配所有在索引中的文档。sort=account_number:asc参数指定使用account_number域来排序索引以升序的方式。pretty参数只是指定Elasticsearch的返回输出使用格式化的JSON结果。
And the response (partially shown):
响应看起来是这样的(部分的展示):
{
  "took" : 63,
  "timed_out" : false,
  "_shards" : {
    "total" : 5,
    "successful" : 5,
    "failed" : 0
  },
  "hits" : {
    "total" : 1000,
    "max_score" : null,
    "hits" : [ {
      "_index" : "bank",
      "_type" : "account",
      "_id" : "0",
      "sort": [0],
      "_score" : null,
      "_source" : {"account_number":0,"balance":16623,"firstname":"Bradshaw","lastname":"Mckenzie","age":29,"gender":"F","address":"244 Columbus Place","employer":"Euron","email":"bradshawmckenzie@euron.com","city":"Hobucken","state":"CO"}
    }, {
      "_index" : "bank",
      "_type" : "account",
      "_id" : "1",
      "sort": [1],
      "_score" : null,
      "_source" : {"account_number":1,"balance":39225,"firstname":"Amber","lastname":"Duke","age":32,"gender":"M","address":"880 Holmes Lane","employer":"Pyrami","email":"amberduke@pyrami.com","city":"Brogan","state":"IL"}
    }, ...

    ]
  }
}
As for the response, we see the following parts:
从响应中,我们可以看到如下的部分
took – time in milliseconds for Elasticsearch to execute the search
took,单位是微妙,返回Elasticsearch执行查询花费的时间
timed_out – tells us if the search timed out or not
timed_out,返回搜索是否超时
_shards – tells us how many shards were searched, as well as a count of the successful/failed searched shards
_shards,返回有多少shard被查找过,也就是成功或失败的搜索shard的计数
hits – search results
hits,搜索结果
hits.total – total number of documents matching our search criteria
hits.total,查询匹配的文档的数目
hits.hits – actual array of search results (defaults to first 10 documents)
hits.hits,实际搜索结果的数组(默认显示前十个结果)
hits.sort - sort key for results (missing if sorting by score)
hits.sort,结果的排序键(如果不指定将使用score来排序)
hits._score and max_score - ignore these fields for now
hits_score和max_score,现在忽略这些域
Here is the same exact search above using the alternative request body method:
这里是一个相同的查询使用了另一种请求体的方式:
(译者注:目前认为原始文档中存在错误,从这里开始后续有关查询bank索引中的文档时,要发送POST请求,后续翻译时保持原文的内容但是不在做特殊说明。)
GET /bank/_search

{
  "query": { "match_all": {} },
  "sort": [
    { "account_number": "asc" }
  ]
}
The difference here is that instead of passing q=* in the URI, we POST a JSON-style query request body to the _search API. We’ll discuss this JSON query in the next section.
这里和传递q=*不同是我们发送了一个JSON风格的请求体通过_search的API。我们在以后会讨论这些JSON的查询方式。
It is important to understand that once you get your search results back, Elasticsearch is completely done with the request and does not maintain any kind of server-side resources or open cursors into your results. This is in stark contrast to many other platforms such as SQL wherein you may initially get a partial subset of your query results up-front and then you have to continuously go back to the server if you want to fetch (or page through) the rest of the results using some kind of stateful server-side cursor.
在这里重点是理解一旦你获得结果的返回,Elasticsearch就完成了对请求的处理并且不会保留任何服务器端的资源或对于你的结果打开游标。这和许多其他的平台例如SQL是完全不同的,你可以预先获得你查询的部分结果并且你必须连续不断的访问服务器如果你希望获取剩余的结果(或者分页)使用一些有状态的服务端游标。
Introducing the Query Language
介绍查询语法
Elasticsearch provides a JSON-style domain-specific language that you can use to execute queries. This is referred to as the Query DSL. The query language is quite comprehensive and can be intimidating at first glance but the best way to actually learn it is to start with a few basic examples.
Elasticsearch提供了JSON风格的指定域名的语法可以供你来执行查询。这被称为Query DSL。查询语法是比较复杂的并且可能在最初是比较难以理解的但是最好的学习方式依然是从一个简单的例子开始。
Going back to our last example, we executed this query:
回到上一个例子,我们执行了这样一个查询:
GET /bank/_search

{
  "query": { "match_all": {} }
}
Dissecting the above, the query part tells us what our query definition is and the match_all part is simply the type of query that we want to run. The match_all query is simply a search for all documents in the specified index.
分析上面的查询,query告诉我们这是查询,match_all告诉我们希望执行的查询类型。match_all查询时简单的在指定索引中查询所有的文档。
In addition to the query parameter, we also can pass other parameters to influence the search results. In the example in the section above we passed in sort, here we pass in size:
此外对于查询参数,我们也可以传递其他参数来改变查询结果。在以前的例子中我们传递了排序的命令,这次我们查询需要查询的size:
GET /bank/_search

{
  "query": { "match_all": {} },
  "size": 1
}
Note that if size is not specified, it defaults to 10.
这里如果没有指定size,默认是10。
This example does a match_all and returns documents 11 through 20:
下面的例子中将返回文档11到20:
GET /bank/_search

{
  "query": { "match_all": {} },
  "from": 10,
  "size": 10
}
The from parameter (0-based) specifies which document index to start from and the size parameter specifies how many documents to return starting at the from parameter. This feature is useful when implementing paging of search results. Note that if from is not specified, it defaults to 0.
from参数(默认是0)指定了文档的索引开始的位置并且size参数指定了返回开始于from的文档的数目。这个特性是十分有用的当实现分页查询的时候。注意如果没有指定,默认是零。
This example does a match_all and sorts the results by account balance in descending order and returns the top 10 (default size) documents.
下面的例子是match_all并且排序结果使用account的balance以降序的方式并且返回前十个(默认值)文档。
GET /bank/_search

{
  "query": { "match_all": {} },
  "sort": { "balance": { "order": "desc" } }
}
Executing Searches
执行查询
Now that we have seen a few of the basic search parameters, let’s dig in some more into the Query DSL. Let’s first take a look at the returned document fields. By default, the full JSON document is returned as part of all searches. This is referred to as the source (_source field in the search hits). If we don’t want the entire source document returned, we have the ability to request only a few fields from within source to be returned.
现在让我们看一些基本查询的参数,让我们一起深入Query DSI中更多的内容吧。首先我们看一下返回文档的域。默认的这个JSON文档会被返回作为所有查询的一部分。这是取决于source的(_source域在search hits中)。如果我们不希望返回整个源文档,我们可以请求一部分的域。
This example shows how to return two fields, account_number and balance (inside of _source), from the search:
下面的例子展示了如何返回两个域,account_number和balance(而不是_source),下面是查询:
GET /bank/_search

{
  "query": { "match_all": {} },
  "_source": ["account_number", "balance"]
}
Note that the above example simply reduces the _source field. It will still only return one field named _source but within it, only the fields account_number and balance are included.
注意上面的例子中减少了_source的域内容。他依然会返回一个域名字为_source并且数据在这个域中,但是只包含account_number和balance。
If you come from a SQL background, the above is somewhat similar in concept to the SQL SELECT FROM field list.
如果使用后台的SQL,上面的内容类似于SQL中的SELECT FROM域列表。
Now let’s move on to the query part. Previously, we’ve seen how the match_all query is used to match all documents. Let’s now introduce a new query called the match query, which can be thought of as a basic fielded search query (i.e. a search done against a specific field or set of fields).
现在让我们注意查询的部分。之前我们知道如何使用match_all来匹配所有的文档。现在我们介绍一个新的查询名字叫做匹配查询,可以认为对于基本域的搜索查询(例如指定域或域的集合)。
This example returns the account numbered 20:
下面的例子返回account的number为20的文档:
GET /bank/_search

{
  "query": { "match": { "account_number": 20 } }
}
This example returns all accounts containing the term "mill" in the address:
下面的例子返回所有的文档,但是要求address中包含mill。
GET /bank/_search

{
  "query": { "match": { "address": "mill" } }
}
This example returns all accounts containing the term "mill" or "lane" in the address:
下面的例子返回所有的文档但是要求address中包含mill或lane。
GET /bank/_search

{
  "query": { "match": { "address": "mill lane" } }
}
This example is a variant of match (match_phrase) that returns all accounts containing the phrase "mill lane" in the address:
下面的例子是匹配(match_phrase)返回的文档包含phrases“mill land”在address域中
GET /bank/_search

{
  "query": { "match_phrase": { "address": "mill lane" } }
}
Let’s now introduce the bool query. The bool query allows us to compose smaller queries into bigger queries using boolean logic.
现在我们引入布尔查询。布尔查询允许我们组合一些查询条件在一个查询中通过使用布尔形式的逻辑。
This example composes two match queries and returns all accounts containing "mill" and "lane" in the address:
下面的例子组合了两种匹配查询并且返回所有的文档要求address中既保护mill也要保护lane。
GET /bank/_search

{
  "query": {
    "bool": {
      "must": [
        { "match": { "address": "mill" } },
        { "match": { "address": "lane" } }
      ]
    }
  }
}
In the above example, the bool must clause specifies all the queries that must be true for a document to be considered a match.
在上面的例子中,布尔must指定所有的查询子句返回true对于一个文档才能算是匹配一个文档。
In contrast, this example composes two match queries and returns all accounts containing "mill" or "lane" in the address:
作为对比,下面的例子组合两个查询并且返回所有的账户,要求address中包含mill或lane。
GET /bank/_search

{
  "query": {
    "bool": {
      "should": [
        { "match": { "address": "mill" } },
        { "match": { "address": "lane" } }
      ]
    }
  }
}
In the above example, the bool should clause specifies a list of queries either of which must be true for a document to be considered a match.
在上面的例子中,布尔should子句指定了查询的列表必须是true对于每个文档要匹配其中一个条件。
This example composes two match queries and returns all accounts that contain neither "mill" nor "lane" in the address:
下面的例子组合了两个查询条件并且返回所有的账户要求address不包含mill也不包含lane。
GET /bank/_search

{
  "query": {
    "bool": {
      "must_not": [
        { "match": { "address": "mill" } },
        { "match": { "address": "lane" } }
      ]
    }
  }
}
In the above example, the bool must_not clause specifies a list of queries none of which must be true for a document to be considered a match.
在上面的例子中,布尔must_not子句指定了一个查询的列表必须是true对于每个文档的匹配。
We can combine must, should, and must_not clauses simultaneously inside a bool query. Furthermore, we can compose bool queries inside any of these bool clauses to mimic any complex multi-level boolean logic.
我们可以组合must、should和must_not子句在一个布尔查询中。此外,我们可以组合布尔查询在这些布尔查询子句中来实现任何复杂的多层次布尔查询。
This example returns all accounts of anybody who is 40 years old but doesn’t live in ID(aho):
下面的例子将返回所有的账户,要求年龄为40但是没有居住在ID(aho):
GET /bank/_search

{
  "query": {
    "bool": {
      "must": [
        { "match": { "age": "40" } }
      ],
      "must_not": [
        { "match": { "state": "ID" } }
      ]
    }
  }
}
Executing Filters
执行过滤器
In the previous section, we skipped over a little detail called the document score (_score field in the search results). The score is a numeric value that is a relative measure of how well the document matches the search query that we specified. The higher the score, the more relevant the document is, the lower the score, the less relevant the document is.
在之前的章节中,我们跳过了一些细节名字为doucument score(就是查询结果中的_score域)。score是数值类型的值相对屁股了文档的匹配度对于我们指定查询。分值越高就代表文档越相关,分数越低则文档就越不相关。
But queries do not always need to produce scores, in particular when they are only used for "filtering" the document set. Elasticsearch detects these situations and automatically optimizes query execution in order not to compute useless scores.
但是查询不会总是需要score,在特定情况下他们只是用于过滤我们的文档集合。Elasticsearch处理这些情况并且自动优化查询的执行避免计算不必要的score。
The bool query that we introduced in the previous section also supports filter clauses which allow to use a query to restrict the documents that will be matched by other clauses, without changing how scores are computed. As an example, let’s introduce the range query, which allows us to filter documents by a range of values. This is generally used for numeric or date filtering.
我们介绍的布尔查询在之前的章节中也支持过滤条件允许我们使用查询来限制我们匹配的文档对于其他的子句而不是改变score的计算。作为一个例子,我们引入了范围查询,允许我们过来文档使用一定范围的值。这通常用于数值或日期的过滤。
This example uses a bool query to return all accounts with balances between 20000 and 30000, inclusive. In other words, we want to find accounts with a balance that is greater than or equal to 20000 and less than or equal to 30000.
下面的例子使用了一个布尔查询来返回所有的账户要求balances在20000到30000之前。换句话说,我们希望账户的balance要高于20000并且小于等于30000。
GET /bank/_search

{
  "query": {
    "bool": {
      "must": { "match_all": {} },
      "filter": {
        "range": {
          "balance": {
            "gte": 20000,
            "lte": 30000
          }
        }
      }
    }
  }
}
Dissecting the above, the bool query contains a match_all query (the query part) and a range query (the filter part). We can substitute any other queries into the query and the filter parts. In the above case, the range query makes perfect sense since documents falling into the range all match "equally", i.e., no document is more relevant than another.
根据上面的讨论,布尔查询包含match_all查询(query部分)和范围查询(filter部分)。我们可以替代任何的查询到query和filter布尔诺。在上面的例子中,范围查询使得适合的文档进入范围匹配“equally”,也就是没有文档和其他是有关的。
In addition to the match_all, match, bool, and range queries, there are a lot of other query types that are available and we won’t go into them here. Since we already have a basic understanding of how they work, it shouldn’t be too difficult to apply this knowledge in learning and experimenting with the other query types.
此外对于match_all、match、bool和范围查询,有一些其他的查询类型是可用的并且我们在这里先不会进行讨论。我们已经了解了基本查询的使用,他不是很难对于基于这些知识来学习和使用其他的查询类型。
Executing Aggregations
执行聚集操作
Aggregations provide the ability to group and extract statistics from your data. The easiest way to think about aggregations is by roughly equating it to the SQL GROUP BY and the SQL aggregate functions. In Elasticsearch, you have the ability to execute searches returning hits and at the same time return aggregated results separate from the hits all in one response. This is very powerful and efficient in the sense that you can run queries and multiple aggregations and get the results back of both (or either) operations in one shot avoiding network roundtrips using a concise and simplified API.
聚集提供了可以分组和提取你数据的状态。最简单的方式来理解聚集就是相当于SQL中GROUP BY和SQL的聚集韩式。在Elasticsearch中,你可以执行查询返回结果和返回聚集结果对于响应中的数据。这是十分有用并且有效的在一些场景中你可以执行查询和多个聚集操作并且获取结果对于他们的操作而避免花费大量的网络消费使用一个简明的API来实现。
To start with, this example groups all the accounts by state, and then returns the top 10 (default) states sorted by count descending (also default):
首先,下面的例子通过state来分组所有的文档,并且返回前十个(默认)state使用count的降序来排序(默认):
GET /bank/_search

{
  "size": 0,
  "aggs": {
    "group_by_state": {
      "terms": {
        "field": "state.keyword"
      }
    }
  }
}
In SQL, the above aggregation is similar in concept to:
在SQL中,上面的聚集操作相当于下面的内容:
SELECT state, COUNT(*) FROM bank GROUP BY state ORDER BY COUNT(*) DESC
And the response (partially shown):
并且响应是(部分展示内容):
{
  "took": 29,
  "timed_out": false,
  "_shards": {
    "total": 5,
    "successful": 5,
    "failed": 0
  },
  "hits" : {
    "total" : 1000,
    "max_score" : 0.0,
    "hits" : [ ]
  },
  "aggregations" : {
    "group_by_state" : {
      "doc_count_error_upper_bound": 20,
      "sum_other_doc_count": 770,
      "buckets" : [ {
        "key" : "ID",
        "doc_count" : 27
      }, {
        "key" : "TX",
        "doc_count" : 27
      }, {
        "key" : "AL",
        "doc_count" : 25
      }, {
        "key" : "MD",
        "doc_count" : 25
      }, {
        "key" : "TN",
        "doc_count" : 23
      }, {
        "key" : "MA",
        "doc_count" : 21
      }, {
        "key" : "NC",
        "doc_count" : 21
      }, {
        "key" : "ND",
        "doc_count" : 21
      }, {
        "key" : "ME",
        "doc_count" : 20
      }, {
        "key" : "MO",
        "doc_count" : 20
      } ]
    }
  }
}
We can see that there are 27 accounts in ID (Idaho), followed by 27 accounts in TX (Texas), followed by 25 accounts in AL (Alabama), and so forth.
我们可以看到有27个账户是ID,下面有27个账户是TX,然后是25个账户是AL等等。
Note that we set size=0 to not show search hits because we only want to see the aggregation results in the response.
注意我们设置了size=0来避免展示搜索内容因为我们只希望看到聚集的结果。
Building on the previous aggregation, this example calculates the average account balance by state (again only for the top 10 states sorted by count in descending order):
基于前面的聚集,下面的例子计算了平均账户的balance对于state分组(并且展示了降序的结果对于前十个state):
GET /bank/_search

{
  "size": 0,
  "aggs": {
    "group_by_state": {
      "terms": {
        "field": "state.keyword"
      },
      "aggs": {
        "average_balance": {
          "avg": {
            "field": "balance"
          }
        }
      }
    }
  }
}
Notice how we nested the average_balance aggregation inside the group_by_state aggregation. This is a common pattern for all the aggregations. You can nest aggregations inside aggregations arbitrarily to extract pivoted summarizations that you require from your data.
注意我们内置的average_balanc聚集在group_by_state聚集中。这是一个通用的表达对于所有的聚集。你可以聚集中内嵌聚集来提供总结的功能对于你的数据处理。
Building on the previous aggregation, let’s now sort on the average balance in descending order:
基于前面的聚集,让我们排序平均的balance以降序的方式:
GET /bank/_search

{
  "size": 0,
  "aggs": {
    "group_by_state": {
      "terms": {
        "field": "state.keyword",
        "order": {
          "average_balance": "desc"
        }
      },
      "aggs": {
        "average_balance": {
          "avg": {
            "field": "balance"
          }
        }
      }
    }
  }
}
This example demonstrates how we can group by age brackets (ages 20-29, 30-39, and 40-49), then by gender, and then finally get the average account balance, per age bracket, per gender:
下面的例子展示了如何使用age来分组(范围是20-29,30-39,40-49),然后是gender,然后最终是平均的账户balance,对于每个年龄段和性别:
GET /bank/_search

{
  "size": 0,
  "aggs": {
    "group_by_age": {
      "range": {
        "field": "age",
        "ranges": [
          {
            "from": 20,
            "to": 30
          },
          {
            "from": 30,
            "to": 40
          },
          {
            "from": 40,
            "to": 50
          }
        ]
      },
      "aggs": {
        "group_by_gender": {
          "terms": {
            "field": "gender.keyword"
          },
          "aggs": {
            "average_balance": {
              "avg": {
                "field": "balance"
              }
            }
          }
        }
      }
    }
  }
}
There are many other aggregations capabilities that we won’t go into detail here. The aggregations reference guide is a great starting point if you want to do further experimentation.
还有许多其他的聚集操作我们没有去描述里面的细节。聚集参考指南是一个不错的文档如果你希望研究更加深入的内容。
Conclusion
总结
Elasticsearch is both a simple and complex product. We’ve so far learned the basics of what it is, how to look inside of it, and how to work with it using some of the REST APIs. I hope that this tutorial has given you a better understanding of what Elasticsearch is and more importantly, inspired you to further experiment with the rest of its great features!
Elasticsearch是一个既简单又复杂的产品。我们到此只是学习了一部分的基础内容,如内部的部分,如何使用一些REST风格的API。我们希望这份指南可以给你一个较好的方式来理解Elasticsearch的重要性,鼓励你探索其他更加棒的特性!


 2066
2066


 被折叠的 条评论
为什么被折叠?
被折叠的 条评论
为什么被折叠?
 到【灌水乐园】发言


