Redis Cluster集群
一、redis-cluster设计
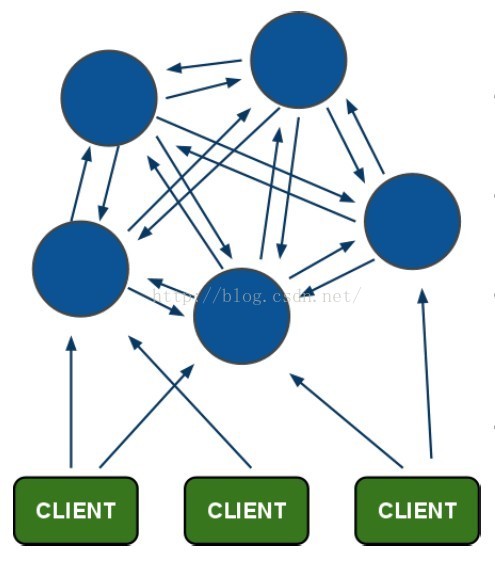
Redis集群搭建的方式有多种,例如使用zookeeper等,但从redis 3.0之后版本支持redis-cluster集群,Redis-Cluster采用无中心结构,每个节点保存数据和整个集群状态,每个节点都和其他所有节点连接。其redis-cluster架构图如下:
其结构特点:
1、所有的redis节点彼此互联(PING-PONG机制),内部使用二进制协议优化传输速度和带宽。
2、节点的fail是通过集群中超过半数的节点检测失效时才生效。
3、客户端与redis节点直连,不需要中间proxy层.客户端不需要连接集群所有节点,连接集群中任何一个可用节点即可。
4、redis-cluster把所有的物理节点映射到[0-16383]slot上(不一定是平均分配),cluster 负责维护node<->slot<->value。
5、Redis集群预分好16384个桶,当需要在 Redis 集群中放置一个 key-value 时,根据 CRC16(key) mod 16384的值,决定将一个key放到哪个桶中。
1、redis cluster节点分配
现在我们是三个主节点分别是:A, B, C 三个节点,它们可以是一台机器上的三个端口,也可以是三台不同的服务器。那么,采用哈希槽 (hash slot)的方式来分配16384个slot 的话,它们三个节点分别承担的slot 区间是:
节点A覆盖0-5460;
节点B覆盖5461-10922;
节点C覆盖10923-16383.
获取数据:
如果存入一个值,按照redis cluster哈希槽的算法: CRC16('key')%16384 = 6782。 那么就会把这个key 的存储分配到 B 上了。同样,当我连接(A,B,C)任何一个节点想获取'key'这个key时,也会这样的算法,然后内部跳转到B节点上获取数据
新增一个主节点:
新增一个节点D,redis cluster的这种做法是从各个节点的前面各拿取一部分slot到D上,我会在接下来的实践中实验。大致就会变成这样:
节点A覆盖1365-5460
节点B覆盖6827-10922
节点C覆盖12288-16383
节点D覆盖0-1364,5461-6826,10923-12287
同样删除一个节点也是类似,移动完成后就可以删除这个节点了。
2、Redis Cluster主从模式
redis cluster 为了保证数据的高可用性,加入了主从模式,一个主节点对应一个或多个从节点,主节点提供数据存取,从节点则是从主节点拉取数据备份,当这个主节点挂掉后,就会有这个从节点选取一个来充当主节点,从而保证集群不会挂掉。
上面那个例子里, 集群有ABC三个主节点, 如果这3个节点都没有加入从节点,如果B挂掉了,我们就无法访问整个集群了。A和C的slot也无法访问。
所以我们在集群建立的时候,一定要为每个主节点都添加了从节点, 比如像这样, 集群包含主节点A、B、C, 以及从节点A1、B1、C1, 那么即使B挂掉系统也可以继续正确工作。
B1节点替代了B节点,所以Redis集群将会选择B1节点作为新的主节点,集群将会继续正确地提供服务。 当B重新开启后,它就会变成B1的从节点。
不过需要注意,如果节点B和B1同时挂了,Redis集群就无法继续正确地提供服务了。
二、redis集群的搭建
集群中至少应该有奇数个节点,所以至少有三个节点,每个节点至少有一个备份节点,所以下面使用6节点(主节点、备份节点由redis-cluster集群确定)。
下面使用redis-3.2.0安装,下载地址
1、安装redis节点指定端口
解压redis压缩包,编译安装
- [root@localhost redis-3.2.0]# tar xzf redis-3.2.0.tar.gz
- [root@localhost redis-3.2.0]# cd redis-3.2.0
- [root@localhost redis-3.2.0]# make
- [root@localhost redis01]# make install PREFIX=/usr/andy/redis-cluster
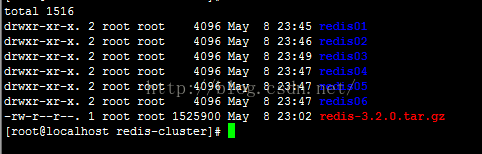
在redis-cluster下 修改bin文件夹为redis01,复制redis.conf配置文件
配置redis的配置文件redis.conf
daemonize yes #后台启动
port 7001 #修改端口号,从7001到7006
cluster-enabled yes #开启cluster,去掉注释
cluster-config-file nodes.conf
cluster-node-timeout 15000
appendonly yes
复制六份,修改对应的端口号
2、安装redis-trib所需的 ruby脚本
复制redis解压文件src下的redis-trib.rb文件到redis-cluster目录
- [root@localhost redis-cluster]# cp /usr/andy/redis/redis-3.2.0/src/redis-trib.rb ./
安装ruby环境:
- [root@localhost redis-cluster]# yum install ruby
- [root@localhost redis-cluster]# yum install rubygems
安装redis-trib.rb运行依赖的ruby的包redis-3.2.2.gem,下载
- [root@localhost redis-cluster]# gem install redis-3.2.2.gem
3、启动所有的redis节点
可以写一个命令脚本start-all.sh
- cd redis01
- ./redis-server redis.conf
- cd ..
- cd redis02
- ./redis-server redis.conf
- cd ..
- cd redis03
- ./redis-server redis.conf
- cd ..
- cd redis04
- ./redis-server redis.conf
- cd ..
- cd redis05
- ./redis-server redis.conf
- cd ..
- cd redis06
- ./redis-server redis.conf
- cd ..
设置权限启动
- [root@localhost redis-cluster]# chmod 777 start-all.sh
- [root@localhost redis-cluster]# ./start-all.sh
查看redis进程启动状态
- [root@localhost redis-cluster]# ps -ef | grep redis
-
- root 4547 1 0 23:12 ? 00:00:00 ./redis-server 127.0.0.1:7001 [cluster]
- root 4551 1 0 23:12 ? 00:00:00 ./redis-server 127.0.0.1:7002 [cluster]
- root 4555 1 0 23:12 ? 00:00:00 ./redis-server 127.0.0.1:7003 [cluster]
- root 4559 1 0 23:12 ? 00:00:00 ./redis-server 127.0.0.1:7004 [cluster]
- root 4563 1 0 23:12 ? 00:00:00 ./redis-server 127.0.0.1:7005 [cluster]
- root 4567 1 0 23:12 ? 00:00:00 ./redis-server 127.0.0.1:7006 [cluster]
- root 4840 4421 0 23:26 pts/1 00:00:00 grep --color=auto redis
可以看到redis的6个节点已经启动成功
杀死全部的几点:
- [root@localhost redis-cluster]# pkill -9 redis
4、使用redis-trib.rb创建集群
- ./redis-trib.rb create --replicas 1 127.0.0.1:7001 127.0.0.1:7002 127.0.0.1:7003 127.0.0.1:7004 127.0.0.1:7005 127.0.0.1:7006
使用create命令 --replicas 1 参数表示为每个主节点创建一个从节点,其他参数是实例的地址集合。
- [root@localhost redis-cluster]# ./redis-trib.rb create --replicas 1 127.0.0.1:7001 127.0.0.1:7002 127.0.0.1:7003 127.0.0.1:7004 127.0.0.1:7005 127.0.0.1:7006
- >>> Creating cluster
- >>> Performing hash slots allocation on 6 nodes...
- Using 3 masters:
- 127.0.0.1:7001
- 127.0.0.1:7002
- 127.0.0.1:7003
- Adding replica 127.0.0.1:7004 to 127.0.0.1:7001
- Adding replica 127.0.0.1:7005 to 127.0.0.1:7002
- Adding replica 127.0.0.1:7006 to 127.0.0.1:7003
- M: dfd510594da614469a93a0a70767ec9145aefb1a 127.0.0.1:7001
- slots:0-5460 (5461 slots) master
- M: e02eac35110bbf44c61ff90175e04d55cca097ff 127.0.0.1:7002
- slots:5461-10922 (5462 slots) master
- M: 4385809e6f4952ecb122dbfedbee29109d6bb234 127.0.0.1:7003
- slots:10923-16383 (5461 slots) master
- S: ec02c9ef3acee069e8849f143a492db18d4bb06c 127.0.0.1:7004
- replicates dfd510594da614469a93a0a70767ec9145aefb1a
- S: 83e5a8bb94fb5aaa892cd2f6216604e03e4a6c75 127.0.0.1:7005
- replicates e02eac35110bbf44c61ff90175e04d55cca097ff
- S: 10c097c429ca24f8720986c6b66f0688bfb901ee 127.0.0.1:7006
- replicates 4385809e6f4952ecb122dbfedbee29109d6bb234
- Can I set the above configuration? (type 'yes' to accept): yes
- >>> Nodes configuration updated
- >>> Assign a different config epoch to each node
- >>> Sending CLUSTER MEET messages to join the cluster
- Waiting for the cluster to join......
- >>> Performing Cluster Check (using node 127.0.0.1:7001)
- M: dfd510594da614469a93a0a70767ec9145aefb1a 127.0.0.1:7001
- slots:0-5460 (5461 slots) master
- M: e02eac35110bbf44c61ff90175e04d55cca097ff 127.0.0.1:7002
- slots:5461-10922 (5462 slots) master
- M: 4385809e6f4952ecb122dbfedbee29109d6bb234 127.0.0.1:7003
- slots:10923-16383 (5461 slots) master
- M: ec02c9ef3acee069e8849f143a492db18d4bb06c 127.0.0.1:7004
- slots: (0 slots) master
- replicates dfd510594da614469a93a0a70767ec9145aefb1a
- M: 83e5a8bb94fb5aaa892cd2f6216604e03e4a6c75 127.0.0.1:7005
- slots: (0 slots) master
- replicates e02eac35110bbf44c61ff90175e04d55cca097ff
- M: 10c097c429ca24f8720986c6b66f0688bfb901ee 127.0.0.1:7006
- slots: (0 slots) master
- replicates 4385809e6f4952ecb122dbfedbee29109d6bb234
- [OK] All nodes agree about slots configuration.
- >>> Check for open slots...
- >>> Check slots coverage...
- [OK] All 16384 slots covered.
上面显示创建成功,有3个主节点,3个从节点,每个节点都是成功连接状态。
3个主节点[M]以及分配的哈希卡槽如下:
M: dfd510594da614469a93a0a70767ec9145aefb1a 127.0.0.1:7001
slots:0-5460 (5461 slots) master
M: e02eac35110bbf44c61ff90175e04d55cca097ff 127.0.0.1:7002
slots:5461-10922 (5462 slots) master
M: 4385809e6f4952ecb122dbfedbee29109d6bb234 127.0.0.1:7003
slots:10923-16383 (5461 slots) master
3个从节点[S]以及附属的主节点如下:
S: ec02c9ef3acee069e8849f143a492db18d4bb06c 127.0.0.1:7004
replicates dfd510594da614469a93a0a70767ec9145aefb1a
S: 83e5a8bb94fb5aaa892cd2f6216604e03e4a6c75 127.0.0.1:7005
replicates e02eac35110bbf44c61ff90175e04d55cca097ff
S: 10c097c429ca24f8720986c6b66f0688bfb901ee 127.0.0.1:7006
replicates 4385809e6f4952ecb122dbfedbee29109d6bb234
以上集群安装成功了,如果安装未成功报如下错误
>>> Creating cluster
[ERR] Sorry, can't connect to node ....
需要安装最新的ruby源码,下载
- [root@localhost redis-cluster]# tar -zxvf ruby-2.3.1.tar.gz
- [root@localhost redis-cluster]# cd
- [root@localhost redis-cluster]# ./configure --prefix=/usr/local/ruby-2.3.1
- [root@localhost redis-cluster]# make && make install
- [root@localhost redis-cluster]#gem install redis
还有一种情况是,在VMware做


 最低0.47元/天 解锁文章


 3万+
3万+

 被折叠的 条评论
为什么被折叠?
被折叠的 条评论
为什么被折叠?
 到【灌水乐园】发言


