


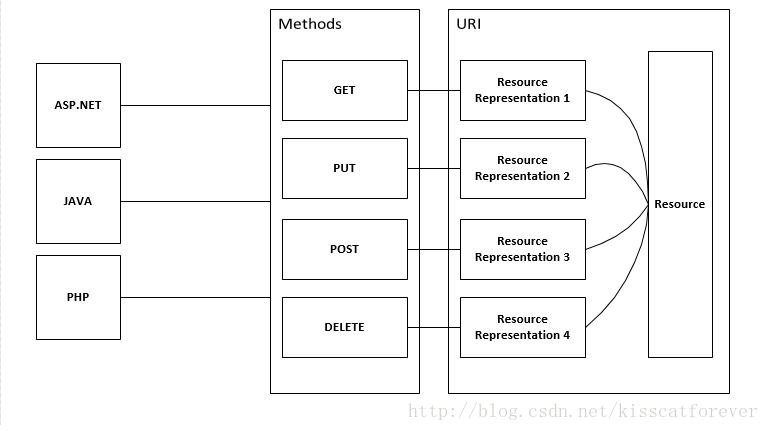
一、前言
前一篇中简单的介绍了一下WCF 的REST服务,下面就带大家搭建一个RESTful的服务。
二、搭建RESTful服务
搭建REST服务只需要5个简单步骤:
创建WCF服务项目。
准备数据(例如产品)返回
创建服务合同
实施服务
配置服务和行为
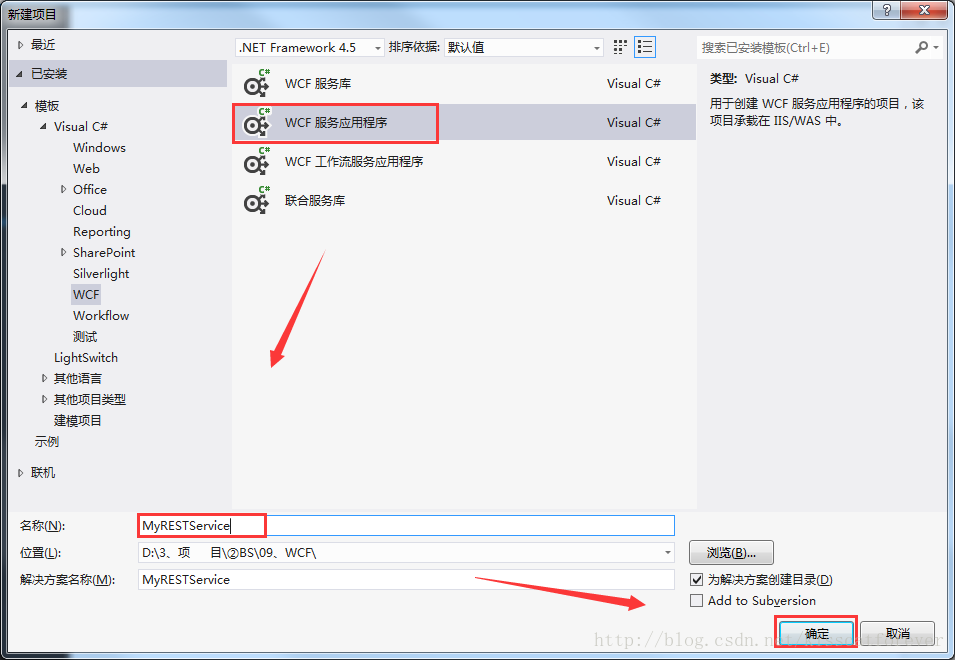
2.1 创建WCF服务项目。
打开Visual Studio。
从文件 - >新建项目。从左边选择WCF并创建一个新的WCF服务应用程序。
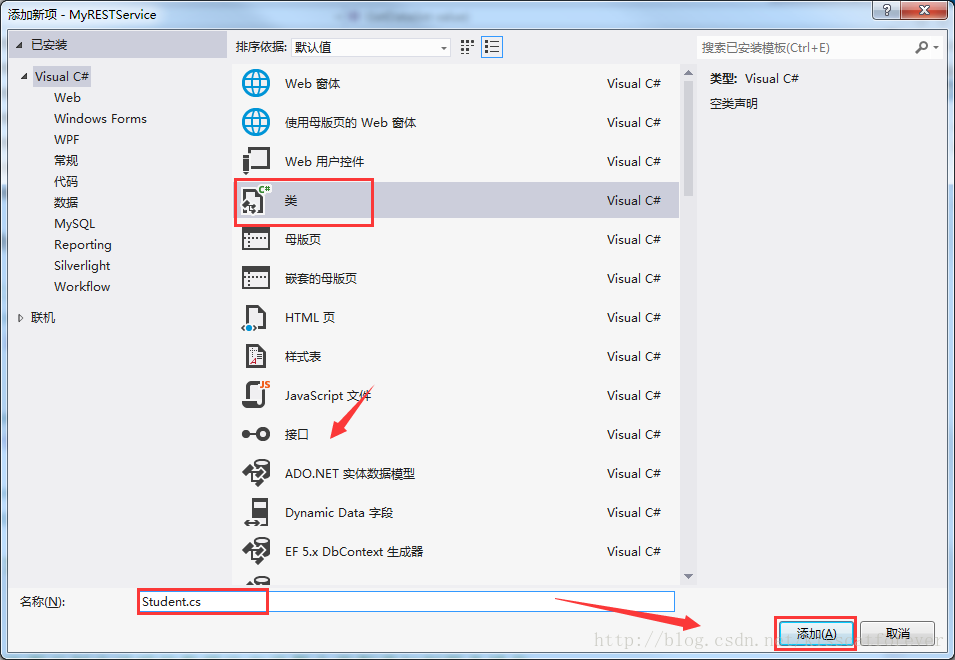
2.2 准备数据(例如产品)返回
- 现在为新创建的项目添加一个类。将其命名为Student.cs。
编辑内容,这里我们用到了WCF的数据契约:
using System;
using System.Collections.Generic;
using System.Linq;
using System.Web;
using System.Runtime.Serialization;

namespace WCFRestService
{
    /// <summary>
    /// DataContract 数据契约:服务端和客户端之间要传送的自定义数据类型
    /// </summary>
    [DataContract]
    public class Student
    {
        /// <summary>
        /// 在数据传送的过程中,只有成员变量可以被传送而成员方法不可以。
        /// 并且只有当成员变量加上DataMember时才可以被序列进行数据传输。
        /// 如果不加DataMember,客户端将无法获得该属性的任何信息。
        /// </summary>
        [DataMember]
        public int Id { get; set; }
        [DataMember]
        public string Name { get; set; }
    }
}- 建立一个单例实现类UserList,从数据库获取数据并返回产品列表。为了使它简单,在这个类中准备数据,代替数据库。
using System;
using System.Collections.Generic;
using System.Linq;
using System.Web;

namespace WCFRestService
{
    public class UserList
    {
        #region 饿汉式单例,实例化UserList类
        /// <summary>
        /// 饿汉式单例,实例化UserList类
        /// </summary>
        private static readonly UserList _Instance = new UserList();
        private UserList() { }
        public static UserList Instance
        {
            get { return _Instance; }
        }
        #endregion

        public IList<Student> Users
        {
            get { return _Users; }
        }

        private IList<Student> _Users = new List<Student>{
            new Student {Id = 1, Name = "张三" },
            new Student {Id = 2, Name = "李四" },
            new Student {Id = 3, Name = "王五" }
        };
    }
}
2.3 创建服务合同
现在添加一个新的WCF服务到这个项目,如下:

首先修改IStudnetService接口,配置Rest的URL路径
using System;
using System.Collections.Generic;
using System.Linq;
using System.Runtime.Serialization;
using System.ServiceModel;
using System.ServiceModel.Web;
using System.Text;

namespace WCFRestService
{
    /// <summary>
    /// 定义服务契约
    /// </summary>
    [ServiceContract]
    public interface IService1
    {
        //定义操作契约
        [OperationContract]
        [WebInvoke(
            Method = "GET",
            RequestFormat = WebMessageFormat.Json,
            ResponseFormat = WebMessageFormat.Json,
            UriTemplate = "GetStudentById/Id={Id}"
            )]
        Student GetStudentById(string Id);

        [OperationContract]
        [WebInvoke(
            Method = "GET",
            RequestFormat = WebMessageFormat.Json,
            ResponseFormat = WebMessageFormat.Json,
            UriTemplate = "GetStudentList"
            )]
        IList<Student> GetStudentList();

        [OperationContract]
        [WebInvoke(
            Method = "GET",
            RequestFormat = WebMessageFormat.Xml,
            BodyStyle = WebMessageBodyStyle.Bare,
            UriTemplate = "GetStudent"
            )]
        IList<Student> GetStudent();
    }
}
有关此方法的重要的一点是WebInvoke属性参数。
Method =“GET”,表示HTTP GET请求。
ResponseFormat = WebMessageFormat.Xml,响应格式将是XML在这里,但我们可以返回JSON以及通过将其值更改为WebMessageFormat.json。
BodyStyle = WebMessageBodyStyle.Bare,表示请求和响应都不包装。BodyStyle的其他可能值为Wrapped,WrappedRequest,WrappedResponse。
UriTemplate =“GetStudent”,它有两部分,URL路径和查询。
2.4 实施服务
修改StudentService类,实现Rest方法
using System;
using System.Collections.Generic;
using System.Linq;
using System.Runtime.Serialization;
using System.ServiceModel;
using System.ServiceModel.Web;
using System.Text;

namespace WCFRestService
{
    // 注意: 使用“重构”菜单上的“重命名”命令,可以同时更改代码、svc 和配置文件中的类名“Service1”。
    // 注意: 为了启动 WCF 测试客户端以测试此服务,请在解决方案资源管理器中选择 Service1.svc 或 Service1.svc.cs,然后开始调试。
    public class Service1 : IService1
    {

        public Student GetStudentById(string Id)
        {
            return UserList.Instance.Users[int.Parse(Id)];
        }

        public IList<Student> GetStudentList()
        {
            return UserList.Instance.Users;
        }


        public IList<Student> GetStudent()
        {
            return UserList.Instance.Users;
        }
    }
}
2.5 配置服务和行为
在Web.Config中配置我们的Rest服务
<system.serviceModel>
    <!--定义服务-->
    <services>
      <service name="WCFRestService.Service1" behaviorConfiguration="serviceBehavior">
        <!--定义终结点,定义ABC,B中必须使用webHttpBinding-->
        <endpoint address="" binding="webHttpBinding" contract="WCFRestService.IService1" behaviorConfiguration="web"></endpoint>
      </service>
    </services>

    <behaviors>
      <serviceBehaviors>
        <!--行为的名字要和服务的behaviorConfiguration相同-->
        <behavior name="serviceBehavior">
          <!-- 为避免泄漏元数据信息,请在部署前将以下值设置为 false -->
          <serviceMetadata httpGetEnabled="true" />
          <!-- 要接收故障异常详细信息以进行调试,请将以下值设置为 true。在部署前设置为 false 以避免泄漏异常信息 -->
          <serviceDebug includeExceptionDetailInFaults="false"/>
        </behavior>

        <behavior>
          <serviceMetadata httpGetEnabled="true" httpsGetEnabled="true"/>
          <serviceDebug includeExceptionDetailInFaults="false"/>
        </behavior>
      </serviceBehaviors>

      <!--定义终结点行为-->
      <endpointBehaviors>
        <!--终结点的行为的名字要和定义服务中的终结点的behaviorConfiguration相同-->
        <behavior name="web">
          <webHttp/>
        </behavior>
      </endpointBehaviors>

    </behaviors>

    <protocolMapping>
        <add binding="basicHttpsBinding" scheme="https" />
    </protocolMapping>
    <serviceHostingEnvironment aspNetCompatibilityEnabled="true" multipleSiteBindingsEnabled="true" />
  </system.serviceModel>
webHTTPBinding是用于RESTful服务的绑定。
现在,关于创建RESTful服务的一切都已经完成。你可以很容易地运行和测试它。
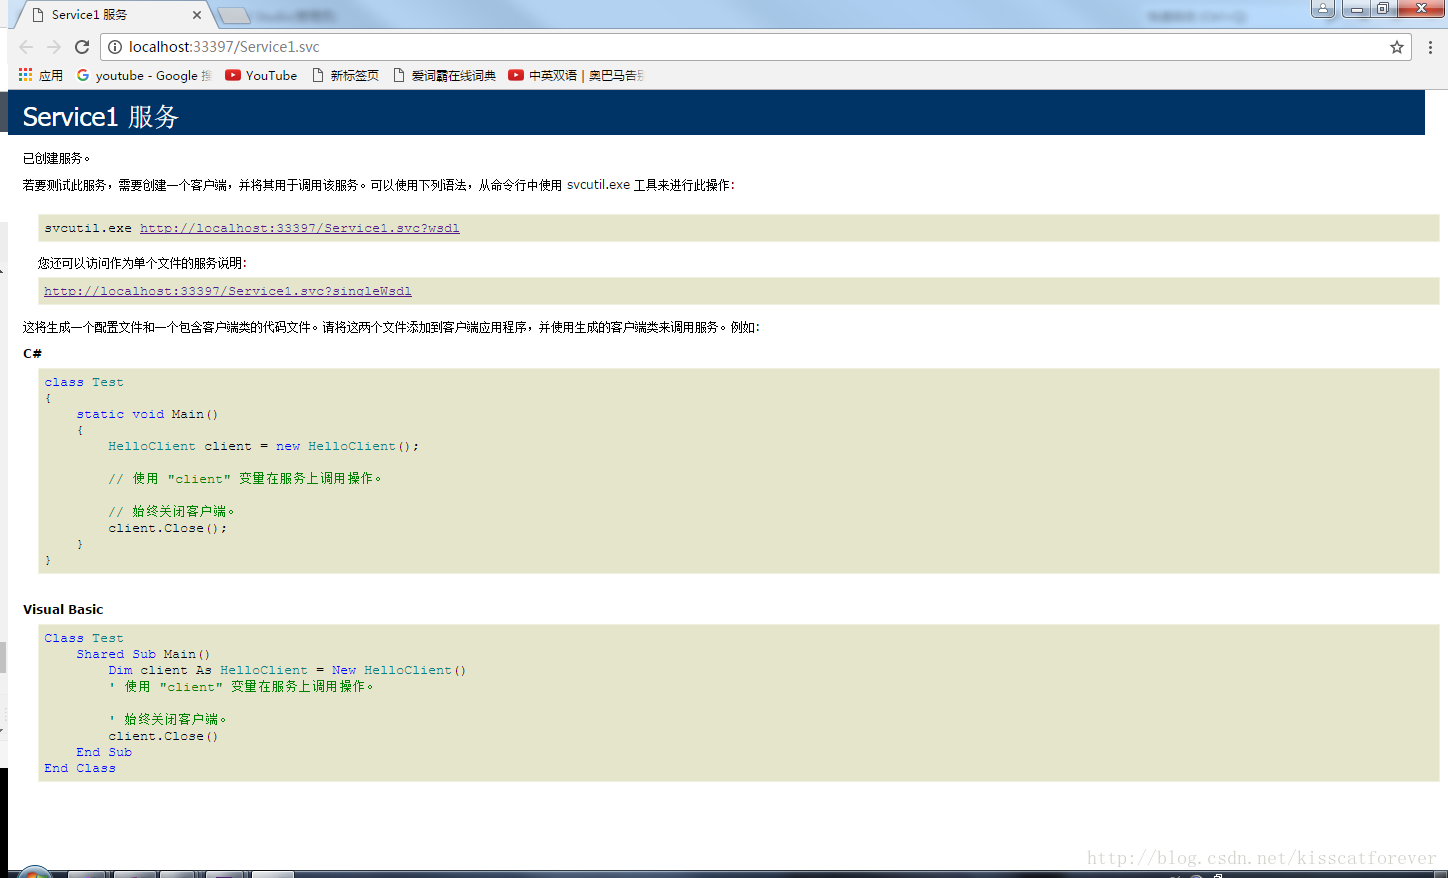
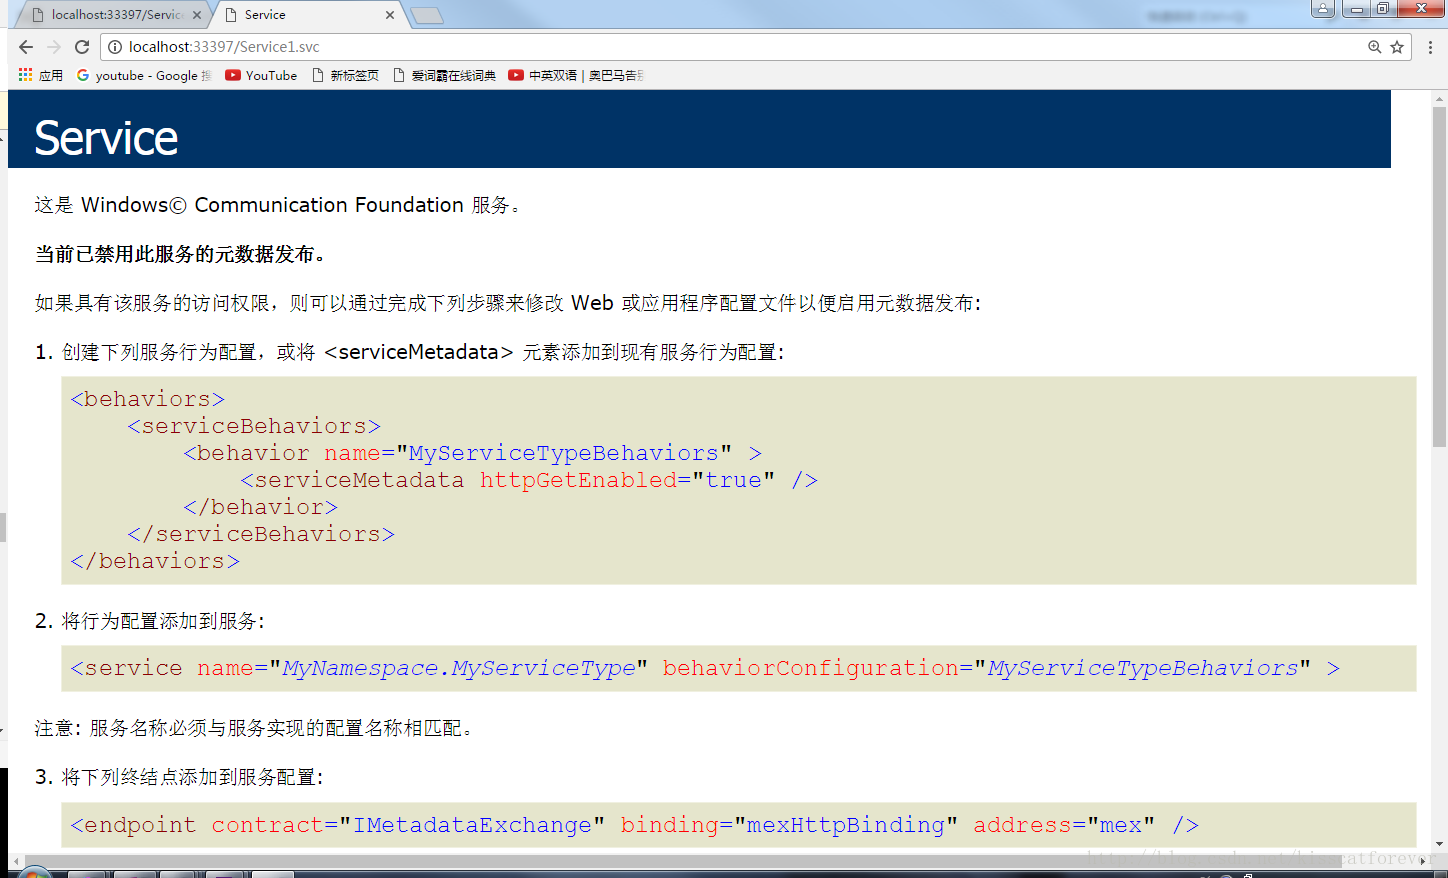
2.6 运行效果
右键单击ProductRESTService.svc文件,然后单击“ 在浏览器中查看 ”。你会看到以下屏幕,这意味着服务是好的。
这是我们通常对于基于SOAP的服务。基于REST的服务仅使用资源上的HTTP动词,因此我们可以通过简单地设置httpGetEnabled =“false”来禁用WSDL 。现在,如果我们再次运行服务,我们将得到以下屏幕。
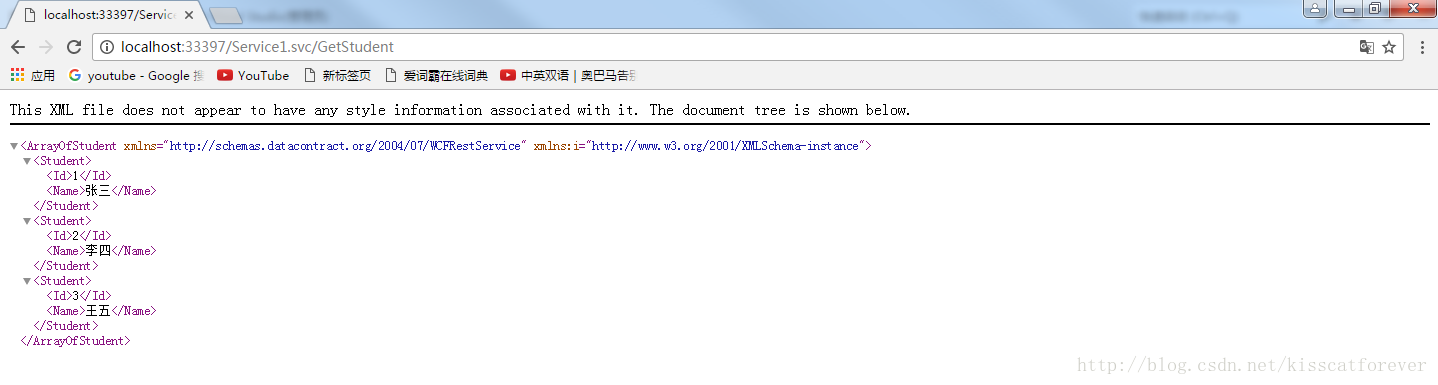
只需在浏览器中修改URL并添加“ GetStudentList ”即可。所以,这是UriTemplete我们定义为服务契约的方法。


三、小结
不怕不知道,就怕不知道。
刚开始的时候只接处了WCF,通过更多的了解这个会让自己有更多的理解,跟多的收获,接下来的研究阶段才会更加的有意思。
下一篇博客将向大家介绍使用WCF RESTful服务的增删改查操作,敬请期待。


 1871
1871


 被折叠的 条评论
为什么被折叠?
被折叠的 条评论
为什么被折叠?
 到【灌水乐园】发言


