


1. 前言
LeakCanary 是由 Square 开发的一款内存泄露检测工具。相比与用 IDE dump memory 的繁琐,它以轻便的日志被广大开发者所喜爱。让我们看看它是如何实现的吧。
ps: Square 以著名框架 Okhttp 被广大开发者所熟知。
2. 源码分析
2.1 设计架构
分析一个框架,我们可以尝试先分层。好的框架层次清晰,像TCP/IP那样,一层一层的封装起来。这里,我按照主流程大致分了一下。
一图流,大家可以参考这个图,来跟源码。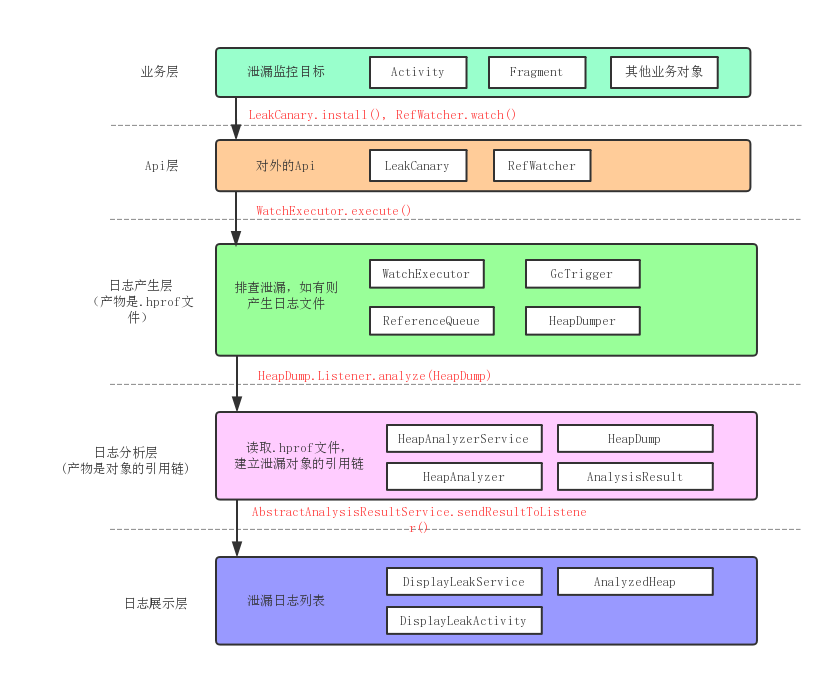
2.2 业务层
按照教程,我们通常会有如下初始化代码:
- Applicaion 中:
mRefWatcher = LeakCanary.install(this); - 基类 Activity/Fragment onDestory() 中:
mRefWatcher.watch(this);
虽然是用户端的代码,不过作为分析框架的入口,不妨称为业务层。
这一层我们考虑的是检测我们的业务对象 Activity。当然你也可以用来检测 Service。
2.3 Api层
从业务层切入,我们引出了两个类LeakCanary、RefWatcher,组成了我们的 api 层。
这一层我们要考虑如何对外提供接口,并隐藏内部实现。通常会使用
Builder、单例、适当的包私有权限。
2.3.1 主线1 install()
1 2 3 4 5 6 7 8 9 10 11 12 13 | public final class LeakCanary {
public static @NonNull RefWatcher install(@NonNull Application application) {
return refWatcher(application)
.listenerServiceClass(DisplayLeakService.class)
.excludedRefs(AndroidExcludedRefs.createAppDefaults().build())
.buildAndInstall();
}
public static @NonNull AndroidRefWatcherBuilder refWatcher(@NonNull Context context) {
return new AndroidRefWatcherBuilder(context);
}
}
|
我们先看install(),先拿到一个RefWatcherBuilder,转而使用Builder模式构造一个RefWatcher作为返回值。
大概可以知道是框架的一些初始配置。忽略其他,直接看buildAndInstall()。
1 2 3 4 5 6 7 8 9 10 11 12 13 14 15 16 17 18 19 | public final class AndroidRefWatcherBuilder extends RefWatcherBuilder<AndroidRefWatcherBuilder> {
...
private boolean watchActivities = true;
private boolean watchFragments = true;
public @NonNull RefWatcher buildAndInstall() {
RefWatcher refWatcher = build();
if (refWatcher != DISABLED) {
...
if (watchActivities) { // 1
ActivityRefWatcher.install(context, refWatcher);
}
if (watchFragments) { // 2
FragmentRefWatcher.Helper.install(context, refWatcher);
}
}
return refWatcher;
}
}
|
可以看到 1, 2 两处,默认行为是,监控 Activity 和 Fragment。
以 Activity为例:
1 2 3 4 5 6 7 8 9 10 11 12 13 14 | public final class ActivityRefWatcher {
public static void install(@NonNull Context context, @NonNull RefWatcher refWatcher) {
...
application.registerActivityLifecycleCallbacks(activityRefWatcher.lifecycleCallbacks);
}
private final Application.ActivityLifecycleCallbacks lifecycleCallbacks =
new ActivityLifecycleCallbacksAdapter() {
@Override public void onActivityDestroyed(Activity activity) {
refWatcher.watch(activity);
}
};
}
|
使用了Application.ActivityLifecycleCallbacks,看来我们基类里的watch()是多余的。Fragment 也是类似的,就不分析了,使用了FragmentManager.FragmentLifecycleCallbacks。
PS: 老版本默认只监控 Activity,watchFragments 这个字段是 2018/6 新增的。
2.3.2 主线2 watch()
之前的分析,引出了RefWatcher.watch(),它可以检测任意对象是否正常销毁,不单单是 Activity。我们来分析看看:
1 2 3 4 5 6 7 8 9 10 11 12 13 14 15 16 17 18 19 20 21 | public final class RefWatcher {
private final WatchExecutor watchExecutor;
public void watch(Object watchedReference, String referenceName) {
...
String key = UUID.randomUUID().toString();
retainedKeys.add(key);
final KeyedWeakReference reference = new KeyedWeakReference(watchedReference, key, referenceName, queue);
ensureGoneAsync(watchStartNanoTime, reference);
}
private void ensureGoneAsync(final long watchStartNanoTime, final KeyedWeakReference reference) {
watchExecutor.execute(new Retryable() {
@Override public Retryable.Result run() {
return ensureGone(reference, watchStartNanoTime);
}
});
}
}
|
通过这个 watch(),我们可以注意到这几点:
- 为了不阻塞我们的
onDestory(),特意设计成异步调用——WatchExecutor。 - 有一个弱引用
KeyedWeakReference,干嘛用的呢?
我们该怎么设计 WatchExecutor 呢?AsyncTask?线程池?我们接着往下看
2.4 日志产生层
现在我们来到了非常关键的一层,这一层主要是分析是否泄露,产物是.hprof文件。
我们平常用 IDE dump memory 的时候,生成的也是这种格式的文件。
2.4.1 WatchExecutor 异步任务
接之前的分析,WatchExecutor主要是用于异步任务,同时提供了失败重试的机制。
1 2 3 4 5 6 7 8 9 10 11 12 13 14 15 16 17 18 19 20 21 | public final class AndroidWatchExecutor implements WatchExecutor {
private final Handler mainHandler;
private final Handler backgroundHandler;
public AndroidWatchExecutor(long initialDelayMillis) {
mainHandler = new Handler(Looper.getMainLooper());
HandlerThread handlerThread = new HandlerThread(LEAK_CANARY_THREAD_NAME);
handlerThread.start();
backgroundHandler = new Handler(handlerThread.getLooper());
...
}
@Override public void execute(@NonNull Retryable retryable) {
if (Looper.getMainLooper().getThread() == Thread.currentThread()) {
waitForIdle(retryable, 0);
} else {
postWaitForIdle(retryable, 0);
}
}
...
}
|
看来是使用了HandlerThread。没啥说的,要注意一下子线程Handler的使用方式。之后便会回调ensureGone(),注意此时执行环境已经切到子线程了。
2.4.2 ReferenceQueue 检测泄露
分析下一步之前,我们先介绍一下 ReferenceQueue。
- 引用队列 ReferenceQueue 作为参数传入 WeakReference.
- WeakReference 中的 value 变得不可达,被 JVM 回收之前,WeakReference 会被加到该队列中,等待回收。
说白了,ReferenceQueue 提供了一种通知机制,以便在 GC 发生前,我们能做一些处理。
好了,让我们回到 RefWatcher。
1 2 3 4 5 6 7 8 9 10 11 12 13 14 15 16 17 18 19 20 21 22 23 24 25 26 27 28 29 30 31 32 33 34 35 36 37 38 39 40 41 42 43 44 45 46 47 48 49 50 51 52 53 | final class KeyedWeakReference extends WeakReference<Object> {
public final String key; // 由于真正的 value 正等待回收,我们追加一个 key 来识别目标。
public final String name;
KeyedWeakReference(Object referent, String key, String name,
ReferenceQueue<Object> referenceQueue) {
super(checkNotNull(referent, "referent"), checkNotNull(referenceQueue, "referenceQueue"));
this.key = checkNotNull(key, "key");
this.name = checkNotNull(name, "name");
}
}
public final class RefWatcher {
private final Set<String> retainedKeys; // 保存未回收的引用的 key。 watch()时 add, 在 queue 中找到则 remove。
private final ReferenceQueue<Object> queue; // 收集所有变得不可达的对象。
public void watch(Object watchedReference, String referenceName) {
...
String key = UUID.randomUUID().toString();
retainedKeys.add(key); // 1
final KeyedWeakReference reference = new KeyedWeakReference(watchedReference, key, referenceName, queue);
ensureGoneAsync(watchStartNanoTime, reference);
}
Retryable.Result ensureGone(final KeyedWeakReference reference, final long watchStartNanoTime) {
removeWeaklyReachableReferences(); // 2
...
if (gone(reference)) { // 3
return DONE;
}
gcTrigger.runGc(); // 4
removeWeaklyReachableReferences(); // 5
if (!gone(reference)) { // 6
// 发现泄漏
...
}
return DONE;
}
private boolean gone(KeyedWeakReference reference) {
return !retainedKeys.contains(reference.key);
}
private void removeWeaklyReachableReferences() {
// WeakReferences are enqueued as soon as the object to which they point to becomes weakly
// reachable. This is before finalization or garbage collection has actually happened.
KeyedWeakReference ref;
while ((ref = (KeyedWeakReference) queue.poll()) != null) {
retainedKeys.remove(ref.key);
}
}
}
|
我们有这样的策略:用retainedKeys保存未回收的引用的 key。
- 主线程 onDestroy() -> watch() -> retainedKeys.add(ref.key)。WatchExecutor 启动,主线程 Activity 销毁。
- WatchExecutor.execute() -> ensureGone() -> removeWeaklyReachableReferences() -> 遍历 ReferenceQueue,从 retainedKeys.remove(ref.key)
- 判断 gone(ref), 如果 Activity 已经不可达,那么直接返回,否则可能有内存泄漏。
4-6. 引用还在,然而这里没有立即判定为泄漏,而是很谨慎的手动触发 gc,再次校验。
2.4.3 GcTrigger 手动触发 Gc
这里注意一点 Android 下边的 jdk 和 oracle 公司的 jdk 在一些方法的实现上有区别。比如这个 System.gc()就被改了,不再保证必定触发 gc。作者使用Runtime.getRuntime().gc()作为代替。
了解更多:System.gc() 源码解读
2.4.4 HeapDumper 生成堆快照 .hprof
1 2 3 4 5 6 7 8 9 10 11 12 13 14 15 16 17 18 19 20 21 | public final class RefWatcher {
private final HeapDumper heapDumper;
private final HeapDump.Listener heapdumpListener;
Retryable.Result ensureGone(final KeyedWeakReference reference, final long watchStartNanoTime) {
...
gcTrigger.runGc();
removeWeaklyReachableReferences();
if (!gone(reference)) {
// 发现泄漏
File heapDumpFile = heapDumper.dumpHeap();
HeapDump heapDump = heapDumpBuilder.heapDumpFile(heapDumpFile)
...
.build();
heapdumpListener.analyze(heapDump);
}
return DONE;
}
}
|
我们跟进 heapDumper.dumpHeap(),略去一些 UI 相关代码:
1 2 3 4 5 6 7 8 9 10 11 12 13 | public final class AndroidHeapDumper implements HeapDumper {
@Override @Nullable
public File dumpHeap() {
File heapDumpFile = leakDirectoryProvider.newHeapDumpFile();
...
try {
Debug.dumpHprofData(heapDumpFile.getAbsolutePath());
...
return heapDumpFile;
} catch (Exception e) { ... }
}
}
|
最后用了 Android 原生的 api —— Debug.dumpHprofData(),生成了堆快照。
2.5 日志分析层 && 日志展示层
生成 .hprof 之后,之后由 heapdumpListener.analyze(heapDump) 把数据转到下一层。其实这两层没啥好分析的,.hprof 已经是标准的堆快照格式,平时用 AS 分析内存生成的也是这个格式。
所以,LeakCanary 在这一层只是帮我们读取了堆中的引用链。然后,日志展示层也没啥说的,就一个 ListView。
3. 总结
最后,我们可以看到一个优秀的框架需要那些东西:
分层
- 分层的意义在于逻辑清晰,每一层的任务都很明确,尽量避免跨层的依赖,这符合单一职责的设计原则。
- 对于使用者来说,只用关心
api层有哪些接口以及业务层怎么使用;而对于维护者来说,很多时候只需要关心核心逻辑日志产生层,UI层不怎么改动丑一点也没关系。方便使用也方便维护。
ReferenceQueue 的使用
- 学到了如何检测内存回收情况,并且做一些处理。以前只会傻傻的
new WeakReference()。
手动触发 gc
Runtime.getRuntime().gc()是否能立即触发 gc,这点感觉也比较含糊。这是一个 native 方法,依赖于 JVM 的实现,深究起来需要去看 Dalvik 的源码,先打一个问号。- 框架中 gc 的这段代码是从
AOSP里拷贝出来的。。。所以说,多看源码是个好习惯。
leakcanary-no-op
- release 版提供一个空实现,可以学习一下。


 1083
1083

 被折叠的 条评论
为什么被折叠?
被折叠的 条评论
为什么被折叠?
 到【灌水乐园】发言


