


前言
本文是Spring整合Shiro进行细粒度权限控制的综合实训,主要内容包括:
一、Spring中引入Shiro框架
二、Shiro登录控制
三、权限表设计
四、服务权限控制
五、自定义标签控制页面(HTML)按钮权限
开始正文之前,先介绍一下我的工程环境:Spring+Spring MVC+Mybatis+MySql+Maven,下面从Spring引入Shiro框架开始本文的介绍,文章有点长,很详细,请耐心阅读
一、Spring中引入Shiro框架
1.首先在pom.xml文件中引入Shiro相关依赖
    <!-- shiro 包-->
	<dependency>
        <groupId>org.apache.shiro</groupId>
        <artifactId>shiro-core</artifactId>
        <version>1.2.2</version>
    </dependency>

    <dependency>
        <groupId>org.apache.shiro</groupId>
        <artifactId>shiro-web</artifactId>
        <version>1.2.2</version>
    </dependency>

    <dependency>
        <groupId>org.apache.shiro</groupId>
        <artifactId>shiro-ehcache</artifactId>
        <version>1.2.2</version>
    </dependency>

    <dependency>
        <groupId>org.apache.shiro</groupId>
        <artifactId>shiro-quartz</artifactId>
        <version>1.2.2</version>
    </dependency>

    <dependency>
        <groupId>org.apache.shiro</groupId>
        <artifactId>shiro-spring</artifactId>
        <version>1.2.2</version>
    </dependency>
2.创建spring-shiro-web.xml配置文件
在工程的config目录下创建Shiro的配置文件spring-shiro-web.xml,Shiro相关的配置,就放到这个文件中,例如自定义的Realm,登录拦截的Filter,服务权限控制等,我们先放一个空文件
<?xml version="1.0" encoding="UTF-8"?>
<beans xmlns="http://www.springframework.org/schema/beans"
	xmlns:xsi="http://www.w3.org/2001/XMLSchema-instance"
	xmlns:context="http://www.springframework.org/schema/context"
	xmlns:mvc="http://www.springframework.org/schema/mvc"
	xmlns:aop="http://www.springframework.org/schema/aop"
	xmlns:tx="http://www.springframework.org/schema/tx"
	xmlns:p="http://www.springframework.org/schema/p"
	xsi:schemaLocation="http://www.springframework.org/schema/beans
			http://www.springframework.org/schema/beans/spring-beans-4.0.xsd
			http://www.springframework.org/schema/mvc
    		http://www.springframework.org/schema/mvc/spring-mvc-4.0.xsd
           http://www.springframework.org/schema/context
           http://www.springframework.org/schema/context/spring-context-4.0.xsd
           http://www.springframework.org/schema/aop
           http://www.springframework.org/schema/aop/spring-aop-4.0.xsd
           http://www.springframework.org/schema/tx
           http://www.springframework.org/schema/tx/spring-tx-4.0.xsd">


</beans>
web.xml文件中引入spring-shiro-web.xml
项目启动时要加载Shiro相关配置,因此需要在web.xml文件中引入spring-shiro-web.xml
<!-- Spring配置 -->
<context-param>
	<param-name>contextConfigLocation</param-name>
	<param-value>
		classpath:config/applicationContext.xml,
		classpath:config/spring-shiro-web.xml
	</param-value>
</context-param>
4.web.xml中配置Shiro过滤器
Shiro是基于过滤器来进行权限控制的,因此需要在web.xml中配置Shiro的过滤器
    <!-- shiro filter start -->
	<filter>
	  <filter-name>shiroFilter</filter-name>
	  <filter-class>
	      org.springframework.web.filter.DelegatingFilterProxy
	   </filter-class>
	  <init-param>
	    <param-name>targetFilterLifecycle</param-name>
	    <param-value>true</param-value>
	  </init-param>
	</filter>
	<filter-mapping>
	  <filter-name>shiroFilter</filter-name>
	  <url-pattern>/*</url-pattern>
	</filter-mapping>
	<!-- shiro filter end -->
需要注意的是,这里的过滤器名称shiroFilter需要在spring-shiro-web.xml中存在,因此在spring-shiro-web.xml中增加shiroFilter的配置
    <!-- Shiro的web过滤器 -->
    <bean id="shiroFilter" class="org.apache.shiro.spring.web.ShiroFilterFactoryBean">
    	<property name="securityManager" ref="securityManager"></property>
    	<property name="filterChainDefinitions">
    		<value>
    			/index.jsp = anon
                /unauthorized.jsp = anon
                /user/checkLogin = anon
                /user/queryUserInfo = authc
                /user/deleteUser/** = authc,perms[CUSTOMER_USER:DELETE]
    		</value>
    	</property>
    </bean>
补充说明:
- 在securityManager属性标签中,需要引用到SecurityManager
- 在filterChainDefinitions属性标签可以配置服务的访问权限,value值说明如下:
/user/checkLogin = anon表示不需要Shiro权限控制就可以访问
/user/queryUserInfo = authc表示需要登录认证才可以访问
/user/deleteUser/** = authc,perms[CUSTOMER_USER:DELETE]表示需要登录后,并拥有角色CUSTOMER_USER的DELETE权限才可访问 - 在本文中,我们的服务权限是配置在数据库中,后文会有详细的讲解
因此在spring-shiro-web.xml文件中,还需要定义SecurityManager,loginCheckPermissionFilter,及permissionsAuthorizationFilter
     <!-- 安全管理器 -->
    <bean id="securityManager" class="org.apache.shiro.web.mgt.DefaultWebSecurityManager">
    	<property name="realm" ref="userShiroRealm"/>
    </bean>
    <!-- 自定义域 -->
    <bean id="userShiroRealm" class="com.bug.realm.UserShiroRealm">
    	<property name="credentialsMatcher" ref="credentialsMatcher"/>
    	<property name="cachingEnabled" value="true"/>
    </bean>
    <!-- 自定义登录验证过滤器 -->
    <bean id="loginCheckPermissionFilter" class="com.bug.filter.LoginCheckPermissionFilter"></bean>
    <!-- 自定义权限认证器 -->
    <!--
    <bean id="permissionsAuthorizationFilter" class="com.bug.filter.PermissionsAuthorizationFilter"></bean>
    -->
         <!-- 自定义凭证(密码)匹配器 -->
    <bean id="credentialsMatcher" class="com.bug.credentials.BugCredentialsMatcher"></bean>
补充说明:
- 在Shiro权限控制中,securityManager是负责权限的管理,但是真正的权限的校验是交给Realm去处理,用户可以自定义Realm
- 在自定义的userShiroRealm中,引用了自定义的身份匹配器credentialsMatcher,用户是否登录认证通过,通过credentialsMatcher实现
到此,整个spring-shiro-web.xml文件配置完成,完整文件内容如下
<?xml version="1.0" encoding="UTF-8"?>
<beans xmlns="http://www.springframework.org/schema/beans"
	xmlns:xsi="http://www.w3.org/2001/XMLSchema-instance"
	xmlns:context="http://www.springframework.org/schema/context"
	xmlns:mvc="http://www.springframework.org/schema/mvc"
	xmlns:aop="http://www.springframework.org/schema/aop"
	xmlns:tx="http://www.springframework.org/schema/tx"
	xmlns:p="http://www.springframework.org/schema/p"
	xsi:schemaLocation="http://www.springframework.org/schema/beans
			http://www.springframework.org/schema/beans/spring-beans-4.0.xsd
			http://www.springframework.org/schema/mvc
    		http://www.springframework.org/schema/mvc/spring-mvc-4.0.xsd
           http://www.springframework.org/schema/context
           http://www.springframework.org/schema/context/spring-context-4.0.xsd
           http://www.springframework.org/schema/aop
           http://www.springframework.org/schema/aop/spring-aop-4.0.xsd
           http://www.springframework.org/schema/tx
           http://www.springframework.org/schema/tx/spring-tx-4.0.xsd">

    <!-- 安全管理器 -->
    <bean id="securityManager" class="org.apache.shiro.web.mgt.DefaultWebSecurityManager">
    	<property name="realm" ref="userShiroRealm"/>
    </bean>

    <!-- 自定义域 -->
    <bean id="userShiroRealm" class="com.bug.realm.UserShiroRealm">
    	<property name="userService" ref="userService"/>
    	<property name="credentialsMatcher" ref="credentialsMatcher"/>
    	<property name="cachingEnabled" value="true"/>
    </bean>

     <!-- 自定义凭证(密码)匹配器 -->
    <bean id="credentialsMatcher" class="com.bug.credentials.BugCredentialsMatcher"></bean>

    <!-- Shiro的web过滤器 -->
    <bean id="shiroFilter" class="org.apache.shiro.spring.web.ShiroFilterFactoryBean">
    	<property name="securityManager" ref="securityManager"></property>
    	<property name="filterChainDefinitions">
    		<value>
                /user/checkLogin = anon
                /user/queryUserInfo = authc
                /user/deleteUser/** = authc,perms[CUSTOMER_USER:DELETE]
    		</value>
    	</property>
    </bean>

    <!-- 启用Shiro注解,如果不用注解,使用shiroFilter中设置的规则也可以权限控制 -->
    <bean id="lifecycleBeanPostProcessor" class="org.apache.shiro.spring.LifecycleBeanPostProcessor"></bean>

</beans>
5.自定义Realm
Realm主要用于登录前的身份校验,如果登录成功,再进行权限的校验,在上面的配置中,我们注入了自定义的UserShiroRealm,此Realm需要继承AuthorizingRealm,并实现doGetAuthorizationInfo权限验证方法和doGetAuthenticationInfo身份验证方法,,代码实现如下
package com.bug.realm;

import java.util.HashSet;
import java.util.List;
import java.util.Set;

import org.apache.shiro.SecurityUtils;
import org.apache.shiro.authc.AuthenticationException;
import org.apache.shiro.authc.AuthenticationInfo;
import org.apache.shiro.authc.AuthenticationToken;
import org.apache.shiro.authc.SimpleAuthenticationInfo;
import org.apache.shiro.authc.UsernamePasswordToken;
import org.apache.shiro.authz.AuthorizationInfo;
import org.apache.shiro.authz.SimpleAuthorizationInfo;
import org.apache.shiro.realm.AuthorizingRealm;
import org.apache.shiro.session.Session;
import org.apache.shiro.subject.PrincipalCollection;
import org.apache.shiro.subject.Subject;

import com.bug.excption.BugException;
import com.bug.model.user.UserPermissionVO;
import com.bug.model.user.UserVO;
import com.bug.service.user.IUserService;

public class UserShiroRealm extends AuthorizingRealm{

	private IUserService userService;

	public void setUserService(IUserService userService) {
		this.userService = userService;
	}

	@Override
	protected AuthorizationInfo doGetAuthorizationInfo(PrincipalCollection principals) {
		String userName = (String)principals.getPrimaryPrincipal();
		if(userName == null) {
			throw new BugException("未登录");
		}
		SimpleAuthorizationInfo info = new SimpleAuthorizationInfo();
		return info;
	}

	@Override
	protected AuthenticationInfo doGetAuthenticationInfo(AuthenticationToken autToken) throws AuthenticationException {

		UsernamePasswordToken userPwdToken = (UsernamePasswordToken) autToken;
		String userName = userPwdToken.getUsername();
        // 根据用户名查询数据库中用户的账号密码
		UserVO user = userService.selectUserByUserName(userName);
		if (null == user) {
			throw new BugException("未知账号");
		}

		SimpleAuthenticationInfo authenticationInfo = new SimpleAuthenticationInfo(user.getUserName(),
				user.getPassword().toCharArray(), getName());

		return authenticationInfo;
	}
}
补充说明:
- doGetAuthenticationInfo方法:Shiro进行身份验证时,会调用到doGetAuthenticationInfo方法,在方法内部,我们通过UsernamePasswordToken 获得用户传过来的用户名,再通过userService.selectUserByUserName方法从数据库中查询用户信息,如果用户为空,说账号不存在,否则将查询出来的用户名及密码,封装到SimpleAuthenticationInfo 对象中,并返回,用于接下来的密码验证
- doGetAuthorizationInfo方法:Shiro角色权限验证,会调用doGetAuthorizationInfo方法,后面进行服务权限控制时会用到此方法,这里先不做任何处理
6.自定义CredentialsMatcher凭证(密码)匹配器*
此过滤器主要用于凭证(密码)匹配,即校验用户输入的密码和从数据库中查询的密码是否相同,相同则返回true,否则返回false,此匹配器继承了SimpleCredentialsMatcher,并重写doCredentialsMatch方法,代码如下
package com.bug.credentials;

import org.apache.shiro.authc.AuthenticationInfo;
import org.apache.shiro.authc.AuthenticationToken;
import org.apache.shiro.authc.credential.SimpleCredentialsMatcher;
import org.apache.shiro.util.SimpleByteSource;

/**
 * 自定义凭证(密码)匹配器
 * @author longwentao
 *
 */
public class BugCredentialsMatcher extends SimpleCredentialsMatcher {

	@Override
	public boolean doCredentialsMatch(AuthenticationToken token, AuthenticationInfo info) {
		// 对前台传入的明文数据加密,根据自定义加密规则加密
		Object tokencredential = new SimpleByteSource((char[]) token.getCredentials());
		// 从数据库获取的加密数据
		Object accunt = new SimpleByteSource((char[]) info.getCredentials());
		// 返回对比结果
		return equals(accunt, tokencredential);
	}
}
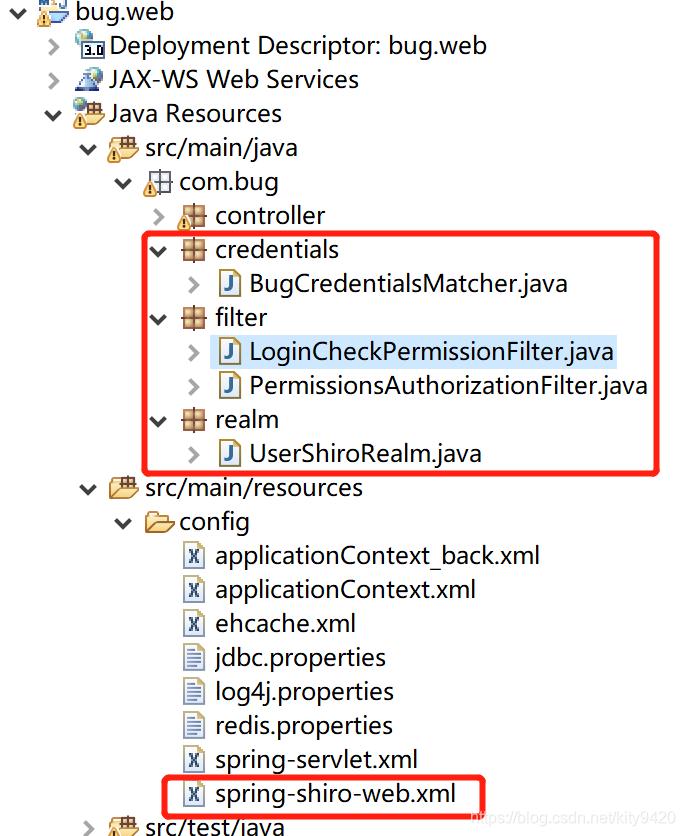
7.工程结构
到此Shiro配置相关的初始化工作已经完成,工程结构如下
二、Shiro登录控制
在上面的基础配置中,已经把登录校验用到的自定义UserShiroRealm及BugCredentialsMatcher都介绍完成了,这里只需要写一个登录的服务,并在服务中使用Shiro即可
1.增加登录服务
新增UserController,在controller中增加登录服务checkLogin
@Controller
@RequestMapping("/user")
public class UserController extends BaseController{
	private final static Logger logger = LoggerFactory.getLogger(UserController.class);

	@Autowired
	private IUserService userService;

	@RequestMapping(value = "/checkLogin", method = RequestMethod.POST)
	@ResponseBody
	public ResponseVO<UserVO> checkLogin(@RequestBody UserVO user) {
		ResponseVO<UserVO> response = new ResponseVO<UserVO>();
		try {
			UsernamePasswordToken token = new UsernamePasswordToken(user.getUserName(), user.getPassword());
			Subject subject = SecurityUtils.getSubject();
			subject.login(token);

			UserVO u = new UserVO();
			response.setData(u);
		}catch (Exception e) {
			logger.error("Login Error:",e);
			response.setStatus(ResponseVO.failCode);
			Throwable ex = e.getCause();
			if(ex instanceof BugException) {
				if(ex.getMessage() != null) {
					response.setMessage(ex.getMessage());
				}
			}else if(e instanceof IncorrectCredentialsException) {
				response.setMessage("密码错误");
			}else {
				response.setMessage("登录失败");
			}
		}

		return response;
	}
}
补充说明:
1.在UserController中继承了BaseController,主要是为了处理异常,没有权限时Shiro框架抛出的未登录异常和没有权限异常通过BaseController中定义的方法捕获,代码如下
package com.bug.controller;

import java.io.IOException;
import java.io.PrintWriter;
import java.util.HashMap;
import java.util.Map;

import javax.servlet.http.HttpServletRequest;
import javax.servlet.http.HttpServletResponse;

import org.apache.shiro.authc.AuthenticationException;
import org.apache.shiro.authz.AuthorizationException;
import org.apache.shiro.authz.UnauthenticatedException;
import org.apache.shiro.authz.UnauthorizedException;
import org.springframework.web.bind.annotation.ExceptionHandler;

import com.bug.common.JSONParseUtils;

public abstract class BaseController {
	/**
	 * 登录认证异常
	 *
	 * @param request
	 * @param response
	 * @return
	 */
	@ExceptionHandler({ UnauthenticatedException.class, AuthenticationException.class })
	public String authenticationException(HttpServletRequest request, HttpServletResponse response) {
		Map<String, Object> map = new HashMap<>();
		map.put("status", "-1000");
		map.put("message", "未登录");
		writeJson(map, response);
		return null;
	}

	/**
	 * 权限异常
	 *
	 * @param request
	 * @param response
	 * @return
	 */
	@ExceptionHandler({ UnauthorizedException.class, AuthorizationException.class })
	public String authorizationException(HttpServletRequest request, HttpServletResponse response) {
		Map<String, Object> map = new HashMap<>();
		map.put("status", "-1001");
		map.put("message", "无权限");
		writeJson(map, response);
		return null;
	}

	private void writeJson(Map<String, Object> map, HttpServletResponse response) {
		PrintWriter out = null;
		try {
			response.setCharacterEncoding("UTF-8");
			response.setContentType("application/json; charset=utf-8");
			out = response.getWriter();

			out.write(JSONParseUtils.readJsonString(map));
		} catch (IOException e) {
		} finally {
			if (out != null) {
				out.close();
			}
		}
	}
}
2.登录HTML页面及JS
增加登录页面login.html对应用的login.js
<!DOCTYPE html>
<html>
<head>
<meta charset="UTF-8">
<title>Insert title here</title>
<script type="text/javascript" src="js/jquery/jquery-3.4.1.js"></script>
<script type="text/javascript" src="js/jquery/jquery-migrate-1.4.1.js"></script>
<script type="text/javascript" src="js/jquery/jquery-session.js"></script>
<script type="text/javascript" src="login.js"></script>
</head>
<body>
	用户名:<input id="userName" type="text" name="userName"><br/>
	    密码:<input id="password" type="password" name="password"><br/>
	    <input id="login" type="submit" value="登录">
</body>
</html>
$(function() {
	$(document).ready(function(){
		bindEvent();
	});

	function bindEvent(){
		$("#login").bind("click",login);
	}
	function login(){
		var data = {
			userName:$("#userName").val(),
			password:$("#password").val()
		}
		var request = $.ajax({
			cache : false,
			async : false,
			url : "/bug.web/user/checkLogin",
			contentType : "application/json; charset=utf-8",
			method : "post",
			data : JSON.stringify(data, null, ""),
			dataType : 'json'
		});

		request.done(function(data) {
			if(data.status == "0"){
				window.location.href = "/bug.web/html/user/userManager.html";
			}else{
				alert(data.message);
			}
		});
	}
});
3.验证
访问http://localhost:8080/bug.web/html/login.html,输入账号密码,成功则重定向到userManager.html页面,失败则提示错误信息
三、权限表设计
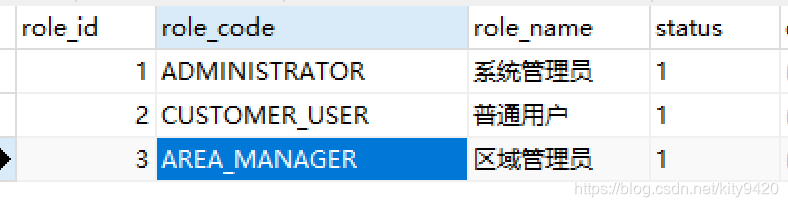
- sys_role_t:角色表,例如系统管理员,区域管理员
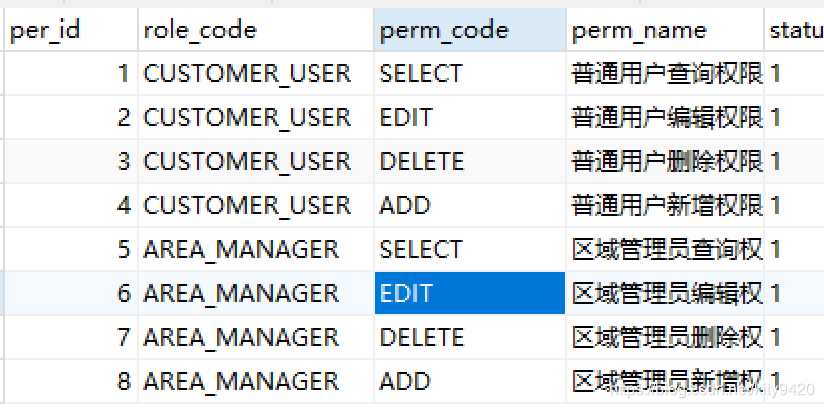
- sys_role_perm_t:角色权限表,表示该角色拥有什么样的权限,如增、删、改、查权限
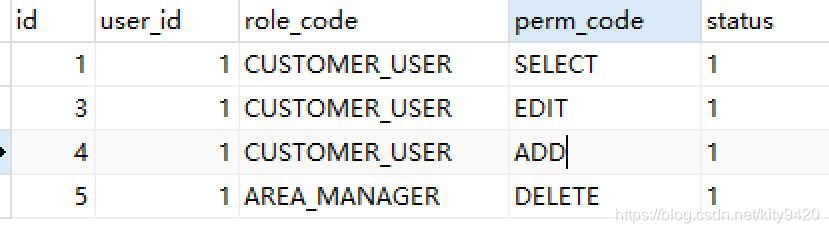
- user_role_perm_t:用户角色权限关系表,表示用户拥有什么角色的什么权限,如张三拥有区域管理员的查询权限
- 在角色表sys_role_t中初始化三个角色,分别为系统管理员,普通用户,区域管理员
- 在角色权限表sys_role_perm_t中初始化普通用户,区域管理员具有增、删、改、查权限
- 在用户角色权限关系表user_role_perm_t中配置user_id=1的用户,有普通用户角色的查询、编辑、新增权限;有区域管理员角色的删除权限
四、服务权限控制
在配置服务权限之前,需要先增加一个登录验证器LoginCheckPermissionFilter和权限访问器PermissionsAuthorizationFilter,登录验证器用于校验用户是否登录,如果未登录,则拒绝访问;权限访问器用于校验用户是否既有访问此URL的权限
1.LoginCheckPermissionFilter
此过滤器继承了AuthorizationFilter,并重写了isAccessAllowed方法和onAccessDenied方法,代码如下
package com.bug.filter;

import java.io.IOException;

import javax.servlet.ServletRequest;
import javax.servlet.ServletResponse;
import javax.servlet.http.HttpServletRequest;

import org.apache.shiro.SecurityUtils;
import org.apache.shiro.subject.Subject;
import org.apache.shiro.web.filter.authz.AuthorizationFilter;
import org.slf4j.Logger;
import org.slf4j.LoggerFactory;

/**
 * 自定义登录验证过滤器
 * @author longwentao
 *
 */
public class LoginCheckPermissionFilter extends AuthorizationFilter {
	private final static Logger logger = LoggerFactory.getLogger(LoginCheckPermissionFilter.class);

	@Override
	protected boolean isAccessAllowed(ServletRequest request, ServletResponse response, Object arg2) throws Exception {
		HttpServletRequest req = (HttpServletRequest) request;
		String url = req.getRequestURI();
		try {
			Subject subject = SecurityUtils.getSubject();

			return subject.isPermitted(url);
		} catch (Exception e) {
			logger.error("Check perssion error", e);
		}
		return false;
	}

	@Override
	protected boolean onAccessDenied(ServletRequest request, ServletResponse response) throws IOException {
		Subject subject = getSubject(request, response);
		if (subject.getPrincipal() == null) {
			saveRequestAndRedirectToLogin(request, response);
		} else {
			return true;
		}
		return false;
	}
}
2.PermissionsAuthorizationFilter
此过滤器继承了AuthorizationFilter,重写了isAccessAllowed方法和onAccessDenied方法,代码如下
package com.bug.filter;

import java.io.IOException;

import javax.servlet.ServletRequest;
import javax.servlet.ServletResponse;
import javax.servlet.http.HttpServletResponse;

import org.apache.shiro.subject.Subject;
import org.apache.shiro.web.filter.authz.AuthorizationFilter;

import com.bug.common.JSONParseUtils;
import com.bug.model.common.ResponseVO;

/**
 * 权限校验过滤器
 * @author longwentao
 *
 */
public class PermissionsAuthorizationFilter extends AuthorizationFilter {

	@Override
	protected boolean isAccessAllowed(ServletRequest request, ServletResponse response, Object mappedValue)
			throws Exception {
		Subject subject = getSubject(request, response);
		String[] perms = (String[]) mappedValue;

		boolean isPermitted = true;
		if (perms != null && perms.length > 0) {
			if (perms.length == 1) {
				if (!subject.isPermitted(perms[0])) {
					isPermitted = false;
				}
			} else {
				if (!subject.isPermittedAll(perms)) {
					isPermitted = false;
				}
			}
		}

		return isPermitted;
	}
	@Override
	protected boolean onAccessDenied(ServletRequest request, ServletResponse response) throws IOException {
		HttpServletResponse httpServletResponse = (HttpServletResponse) response;
		httpServletResponse.setHeader("Content-Type", "application/json;charset=UTF-8");
		ResponseVO<String> responseVO = new ResponseVO<String>();
		responseVO.setStatus(ResponseVO.failCode);
		responseVO.setMessage("没有权限,请联系管理员");

		byte[] bytes = JSONParseUtils.readJson2Byte(responseVO);
		httpServletResponse.getOutputStream().write(bytes);
		return false;
	}
}
3.在spring-shiro-web.xml中引入上面定义的登录验证器LoginCheckPermissionFilter和权限访问器PermissionsAuthorizationFilter
<!-- 自定义登录验证过滤器 -->
<bean id="loginCheckPermissionFilter" class="com.bug.filter.LoginCheckPermissionFilter"></bean>

 <!-- 自定义权限认证器 -->
 <bean id="permissionsAuthorizationFilter" class="com.bug.filter.PermissionsAuthorizationFilter"></bean>

 <!-- Shiro的web过滤器 -->
 <bean id="shiroFilter" class="org.apache.shiro.spring.web.ShiroFilterFactoryBean">
 	<property name="securityManager" ref="securityManager"></property>
 	<property name="filters">
 		<map>
 			<entry key="authc" value-ref="loginCheckPermissionFilter"></entry>
 			<entry key="perms" value-ref="permissionsAuthorizationFilter"></entry>
 		</map>
 	</property>
 	<property name="filterChainDefinitions">
 		<value>
             /user/checkLogin = anon
             /user/queryUserInfo = authc
             /user/deleteUser/** = authc,perms[CUSTOMER_USER:DELETE]
 		</value>
 	</property>
 </bean>
4.修改UserShiroRealm中的doGetAuthorizationInfo方法,从数据库中查询用户权限,并交给Shiro
@Override
protected AuthorizationInfo doGetAuthorizationInfo(PrincipalCollection principals) {
	String userName = (String)principals.getPrimaryPrincipal();
	if(userName == null) {
		throw new BugException("未登录");
	}
	SimpleAuthorizationInfo info = new SimpleAuthorizationInfo();
	Set<String> roles = new HashSet<String>();
	Set<String> stringPermissions = new HashSet<String>();
	List<UserPermissionVO> list = userService.queryUserPermission(userName);
	for (UserPermissionVO userPermissionVO : list) {
		roles.add(userPermissionVO.getRoleCode());
		stringPermissions.add(userPermissionVO.getPermCodes());
	}

	//roles.add("USER");
	//stringPermissions.add("USER:DELETE");//角色:删除权限
	info.setRoles(roles);
	info.setStringPermissions(stringPermissions);

	return info;
}
5.修改UserController中的登录方法,登录校验成功后,查询用户的角色权限,并返回给前台
@RequestMapping(value = "/checkLogin", method = RequestMethod.POST)
@ResponseBody
public ResponseVO<UserVO> checkLogin(@RequestBody UserVO user) {
	ResponseVO<UserVO> response = new ResponseVO<UserVO>();
	try {
		UsernamePasswordToken token = new UsernamePasswordToken(user.getUserName(), user.getPassword());

		Subject subject = SecurityUtils.getSubject();

		subject.login(token);
		// 成功则查询用户权限保存到前台
		List<UserPermissionVO> list = userService.queryUserPermission(user.getUserName());
		UserVO u = new UserVO();
		u.setPermessionList(list);
		response.setData(u);
	}catch (Exception e) {
		logger.error("Login Error:",e);
		response.setStatus(ResponseVO.failCode);
		Throwable ex = e.getCause();
		if(ex instanceof BugException) {
			if(ex.getMessage() != null) {
				response.setMessage(ex.getMessage());
			}
		}else if(e instanceof IncorrectCredentialsException) {
			response.setMessage("密码错误");
		}else {
			response.setMessage("登录失败");
		}
	}

	return response;
}
6.在UserController中增加addUser服务,并指定拥有CUSTOMER_USER角色的增加权限或AREA_MANAGER角色的增加权限才可访问
@ResponseBody
@RequiresPermissions(value = { "CUSTOMER_USER:ADD","AREA_MANAGER:ADD" },logical=Logical.OR) // 加上注解,默认需要登录
@RequestMapping(value = "/addUser", method = RequestMethod.GET)
public ResponseVO<String> addUser() {
	ResponseVO<String> response = new ResponseVO<String>();
	try {
		response.setMessage("add user success");
	} catch (Exception e) {
		logger.error("add user error:", e);
		response.setStatus(ResponseVO.failCode);
	}

	return response;
}
7.验证
未登录,直接访问http://localhost:8080/bug.web/user/addUser,报未登录错误

删除用户的CUSTOMER_USER角色的增加权限和AREA_MANAGER角色的增加权限,登录成功后再访问http://localhost:8080/bug.web/user/addUser,报没有权限错误

增加用户的CUSTOMER_USER角色的增加权限或AREA_MANAGER角色的增加权限,登录成功后再访问http://localhost:8080/bug.web/user/addUser,请求成功

五、自定义标签控制页面(HTML)按钮权限
服务端的权限上面已经介绍完成,有时候我们需要控制页面上的按钮权限,有权限则显示,无权限则不显示,则于我用的是HTML,Shiro权限标签不生效,但是我又想用标签方式根据权限控制按钮的显示与隐藏,因此我自定义了一套HTML的权限标签
1.自定义权限标签
user:hasPermission:权限标签,满足所有权限才能访问
例:<button user:hasPermission="USER:DELETE" type="button">删除用户</button>
表示有角色名称为USER的DELETE权限才能访问
user:hasRole:角色标签,满足所有角色才能访问
例:<button user:hasRole="USER"> 有 USER 角色权限</button>
表示有角色名称为USER的权限才能访问
user:hasAnyRoles:角色标签,只需要有指定角色中的任何一个就可以访问
例:<button user:hasAnyRoles="SALES,ADMINISTRATOR" type="button">超级管理员</button>
表示只需要有SALES或ADMINISTRATOR任何一个就可以访问
任何HTML标签,只要加了上面的自定义标签,就可以根据权限控制按钮是否显示
2.权限标签控制组件
自定义一个解析权限标签的公共组件user.permession.plugin.js,解析标签中指定的权限值,和后端返回的用户权限做对比,如果有权限,按钮显示,没有权限,删除按钮
$(function() {
	$(document).ready(function(){
		// 取用后端返回的用户权限数据
		var userStr = window.sessionStorage.getItem("User");
		var userData = JSON.parse(userStr);

		// 权限数组,如 USER:DELETE,CUSTOMER_USER:ADD
		var perArray = [];

		// 角色数组,如 USER,ADMINISTRATOR
		var roleArray = [];
		for(var i = 0;i < userData.permessionList.length;i++){
			perArray.push(userData.permessionList[i].permCodes);
			roleArray.push(userData.permessionList[i].roleCode)
		}
		// 解析页面上所有的user:hasPermission 标签,如果没有权限,则删除页面元素
		$('[user\\:hasPermission]').each(function(){
			var permission = $(this).attr("user:hasPermission");
			// 如果没有权限,则删除页面元素
			if(-1 == $.inArray(permission,perArray)){
				$(this).remove();
			}
		});

		// 解析页面上所有的user:hasRole 标签,如果没有权限,则删除页面元素
		$('[user\\:hasRole]').each(function(){
			var role = $(this).attr("user:hasRole");
			// 如果没有权限,则删除页面元素
			if(-1 == $.inArray(role,roleArray)){
				$(this).remove();
			}
		});

		// 解析页面上所有的user:hasAnyRoles 标签,如果没有权限,则删除页面元素
		$('[user\\:hasAnyRoles]').each(function(){
			var hasRole = false;
			var roles = $(this).attr("user:hasAnyRoles").split(",");
			for(var i = 0;i < roles.length;i ++){
				if(0 <= $.inArray(roles[i],roleArray)){
					hasRole = true;
					break;
				}
			}
			// 如果没有权限,则删除页面元素
			if(!hasRole){
				$(this).remove();
			}
		});
	});
});
3.验证
创建userManager.html页面,引入user.permession.plugin.js组件,在按钮中通过权限标签指定相应的权限码,用户登录成功后,自动跳转到此页面,有权限的按钮显示,没有权限的按钮不显示
<!DOCTYPE html>
<html xmlns:th="http://www.thymeleaf.org"
      xmlns:shiro="http://www.pollix.at/thymeleaf/shiro">
<head>
<meta charset="UTF-8">
<title>Insert title here</title>
<script type="text/javascript" src="../js/jquery/jquery-3.4.1.js"></script>
<script type="text/javascript" src="../js/jquery/jquery-migrate-1.4.1.js"></script>
<script type="text/javascript" src="../js/jquery/jquery-session.js"></script>
<script type="text/javascript" src="../js/user.permession.plugin.js"></script>
</head>
<body>
	<button user:hasPermission="USER:DELETE"  type="button">删除用户</button>

	<button user:hasPermission="CUSTOMER_USER:ADD"  type="button">新增用户</button>

	<p user:hasRole="USER"> 有  USER 角色权限</p>

	<button user:hasAnyRoles="SALES,CUSTOMER_USER"  type="button">用户管理</button>

	<button user:hasAnyRoles="SALES,ADMINISTRATOR"  type="button">超级管理员</button>
</body>
</html>
修改前台介绍过的login.js,成功成功后,将后台返回的用户权限保存到sessionStorage中
request.done(function(data) {
	if(data.status == "0"){
		// 将用户信息保存到全局变量中
		window.sessionStorage.setItem("User",JSON.stringify(data.data, null, ""));
		window.location.href = "/bug.web/html/user/userManager.html";
	}else{
		alert(data.message);
	}
});
登录成功后,跳转到userManager.html页面,没有权限的按钮不显示

到此,基于Spring整合Shiro的细粒度的权限控制就完成了,以上代码,均来至于项目实践,本人亲自操刀,如有问题,欢迎留言交流,多谢


 645
645

 被折叠的 条评论
为什么被折叠?
被折叠的 条评论
为什么被折叠?
 到【灌水乐园】发言


